Studio Tutorial: Filtering the EEG - ucdavis/erplab GitHub Wiki
Now let’s take a look at a basic EEG processing step, namely filtering. Go back to the EEG tab, and make sure that 6_N400 is still loaded and selected in the EEGsets panel.
It’s very useful to look at the EEG over the entire session, which lasted about 400 seconds in this experiment. In the Plot Settings panel, change the Time Range to 400 seconds and the Vertical Scale to 200 microvolts, as shown in the screenshot below. If you look in the plotting region, you’ll see that the EEG drifts a tremendous amount over the 400-second recording session in this subject.
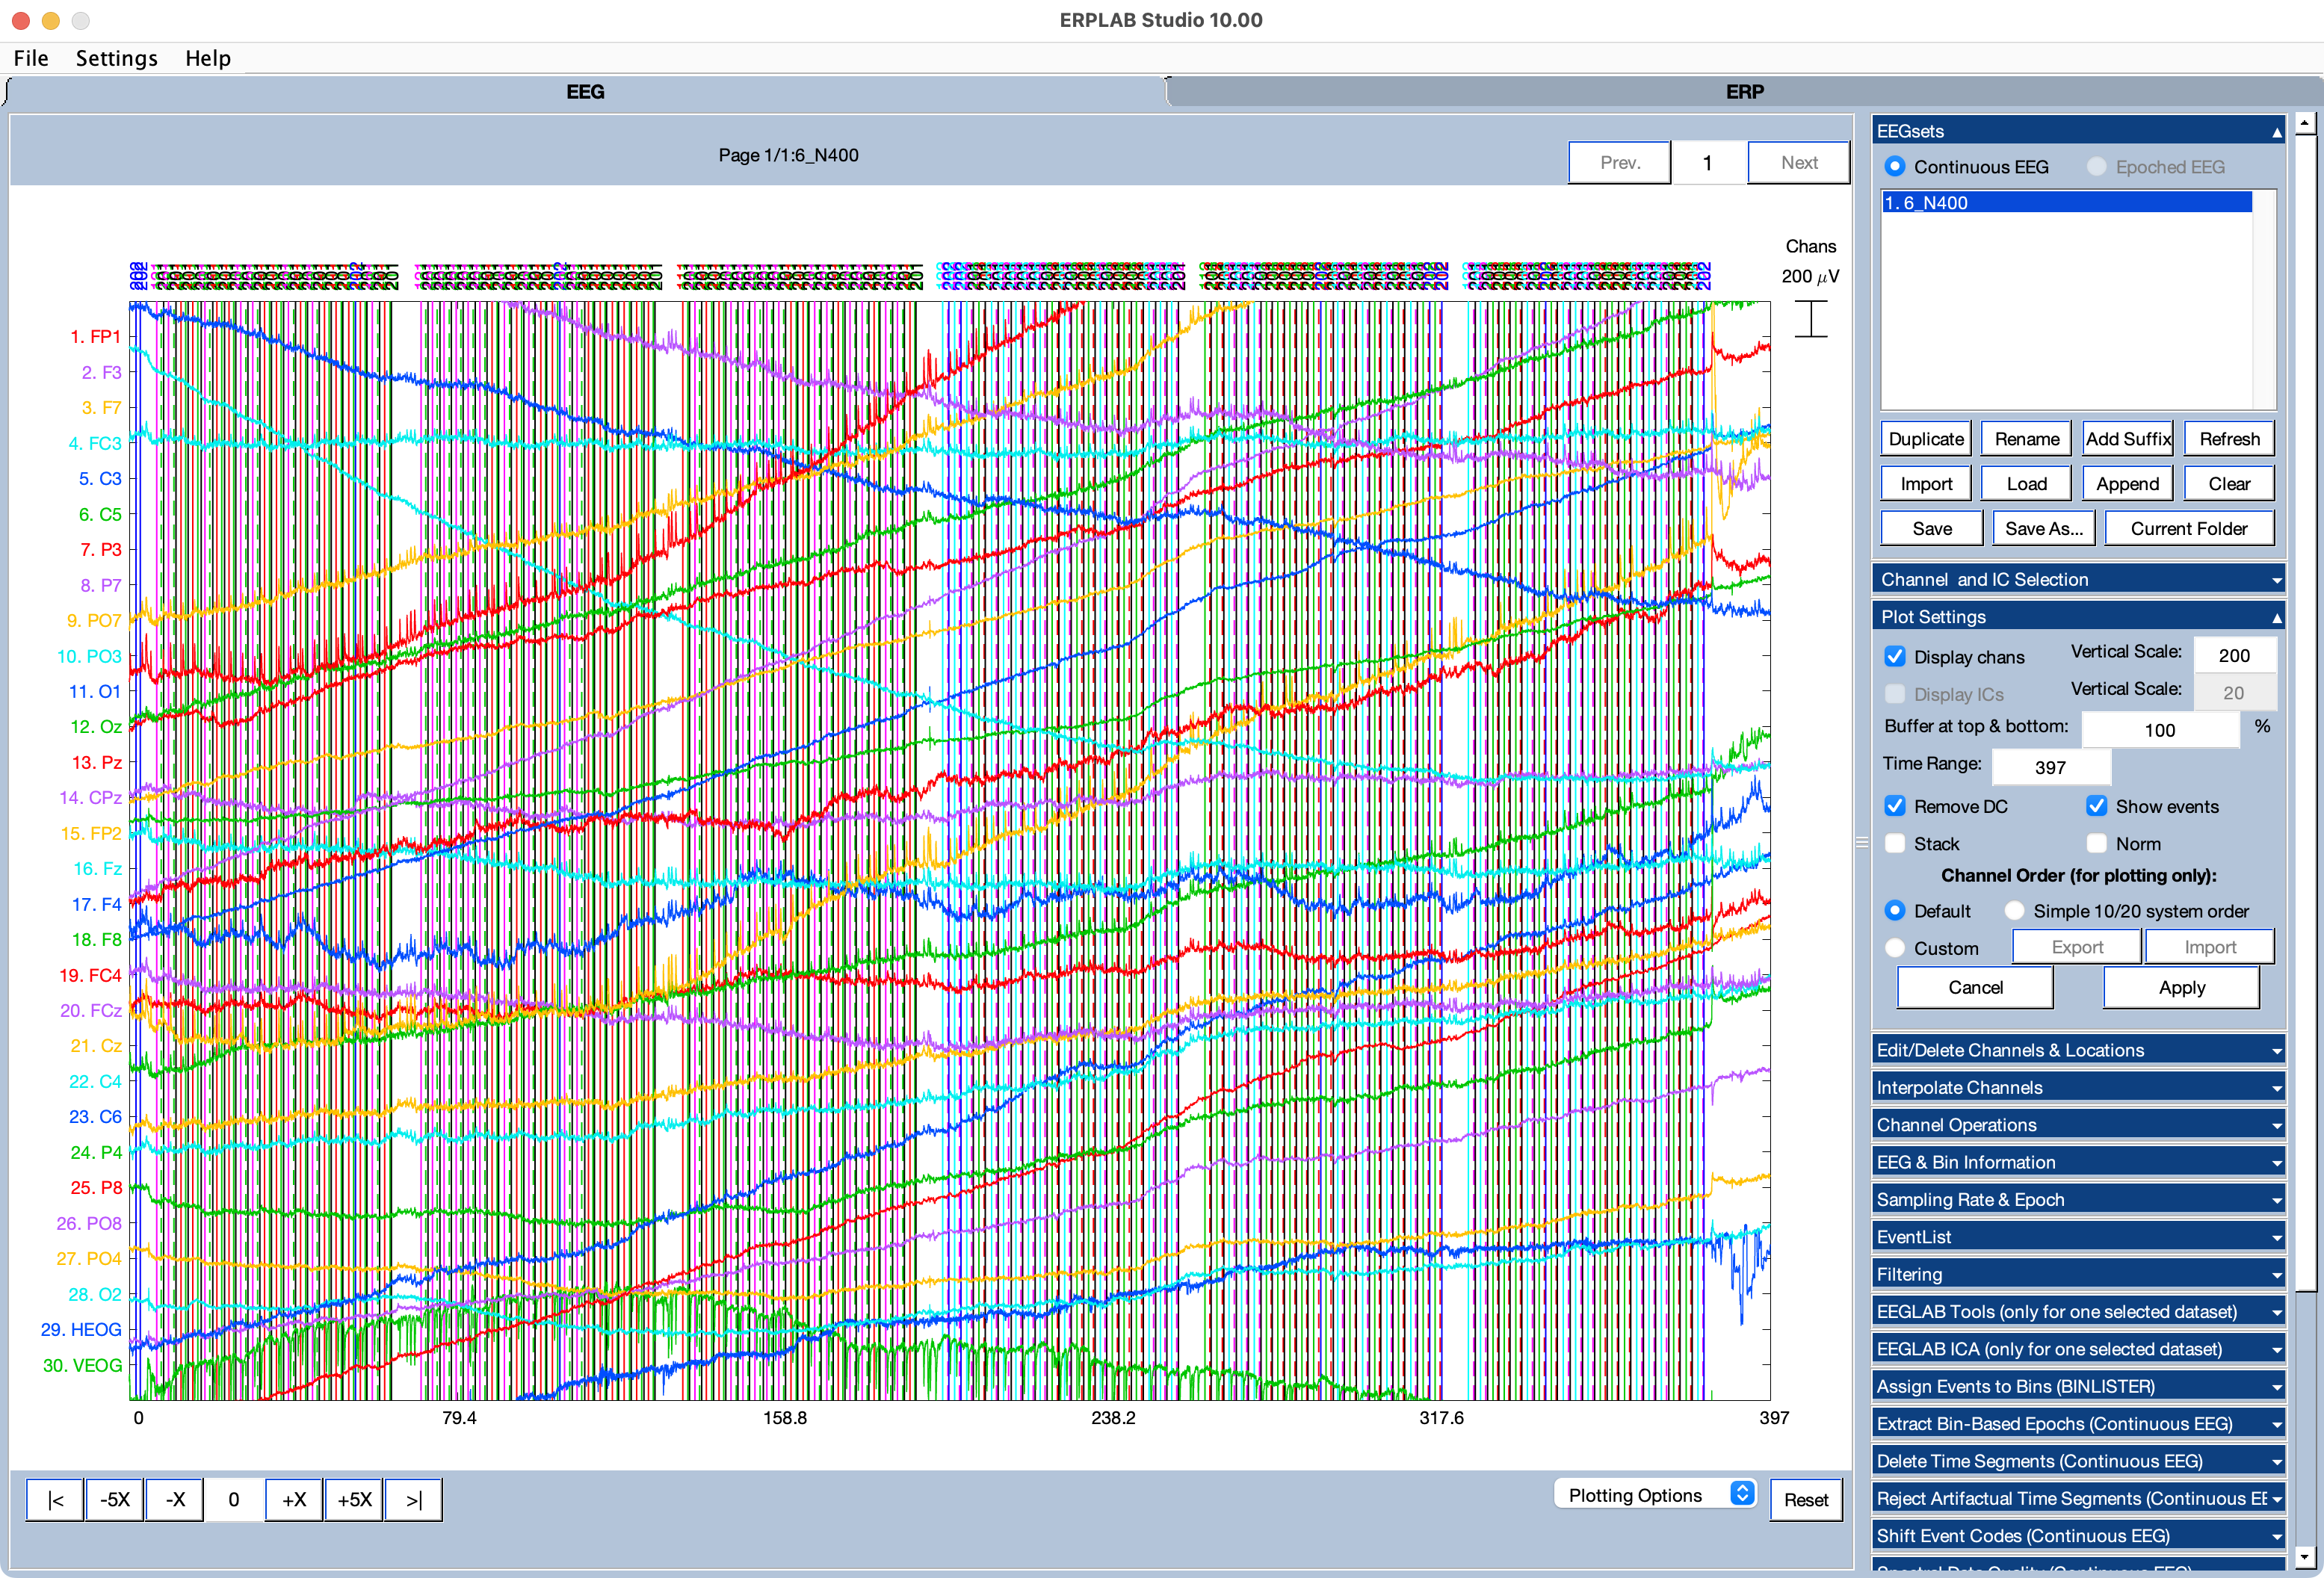
Notice that there are 6 dense clusters of event codes (marked by vertical lines), separated by brief periods without event codes. That’s because the experiment was run as a set of 6 trial blocks (the periods with many event codes), with a short break after each block of trials (the periods without event codes).
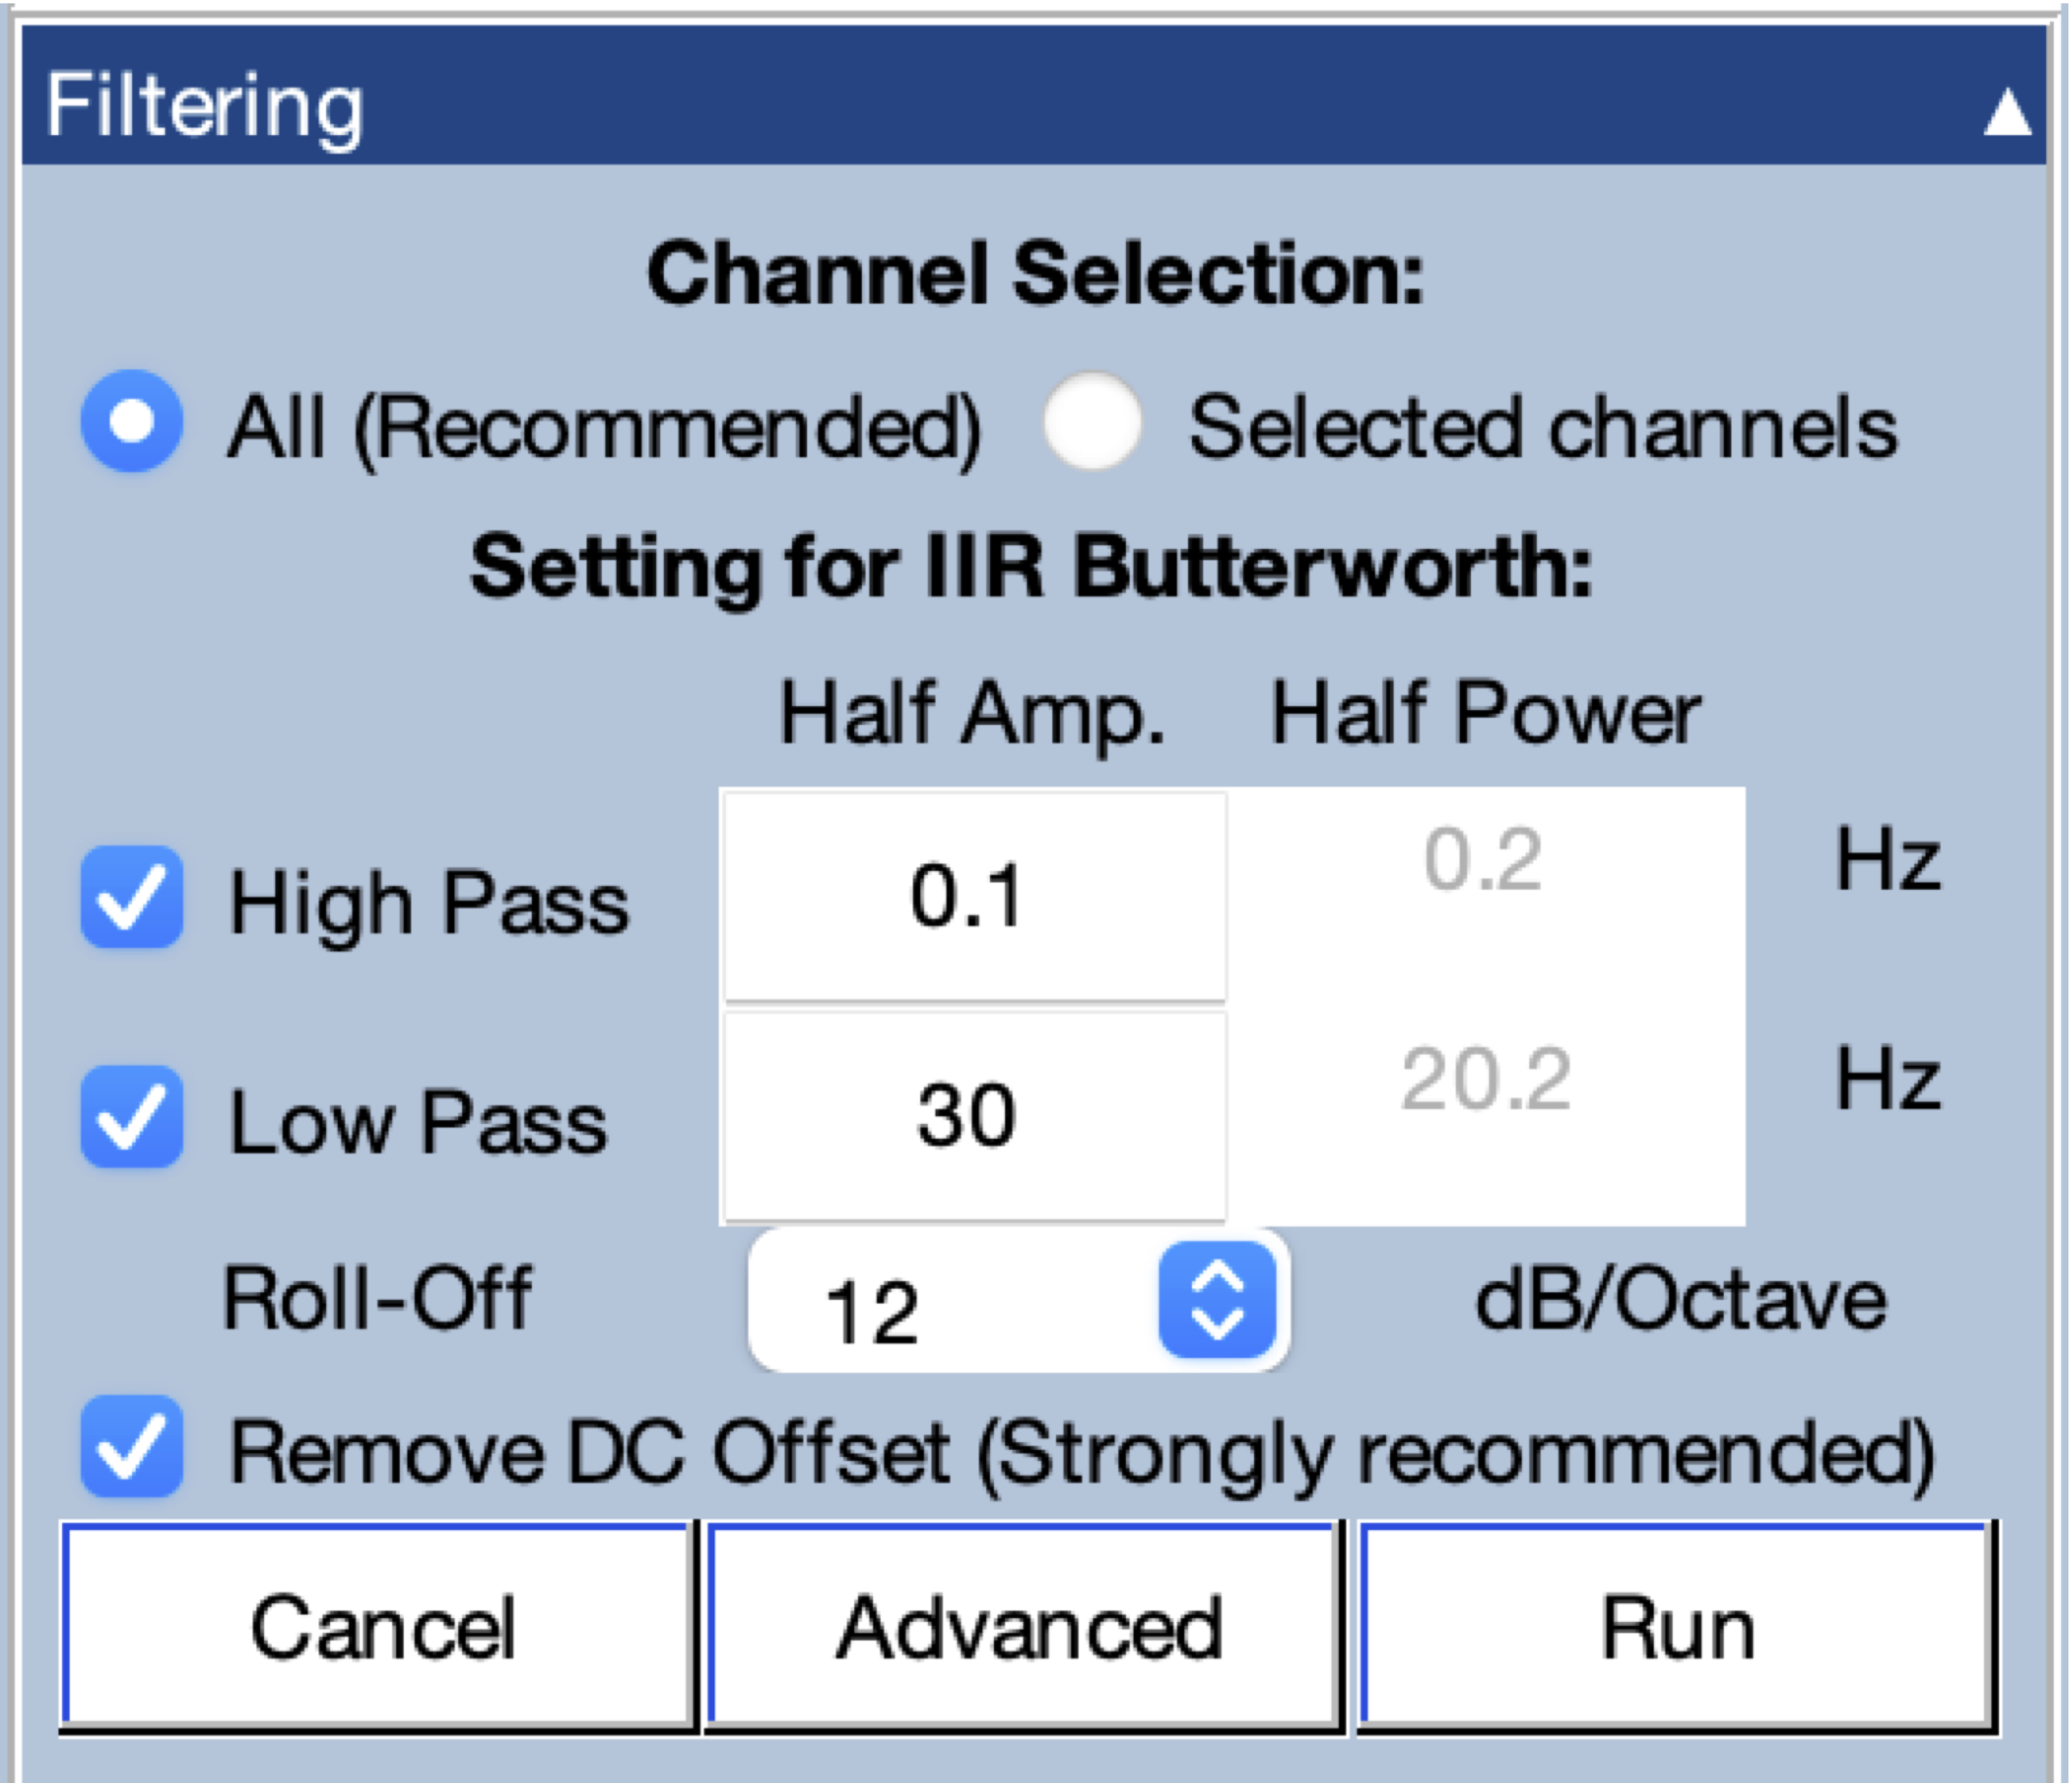
Now we’re going to apply a bandpass filter to the data. Go to the Filtering panel (in the EEG tab) and set it up as shown in the screenshot with a high-pass cutoff at 0.1 Hz, a low-pass cutoff at 30 Hz, and a roll-off of 12 dB/octave. Also make sure that Remove DC Offset is checked. Note that a bandpass of 0.1–30 Hz works reasonably well for most cognitive and affective ERP studies. If you want to determine the optimal filter settings for your own data, see the papers by Zhang et al. (2024a) and Zhang et al. (2024b), along with the instructions we provide in the ERPLAB Manual.
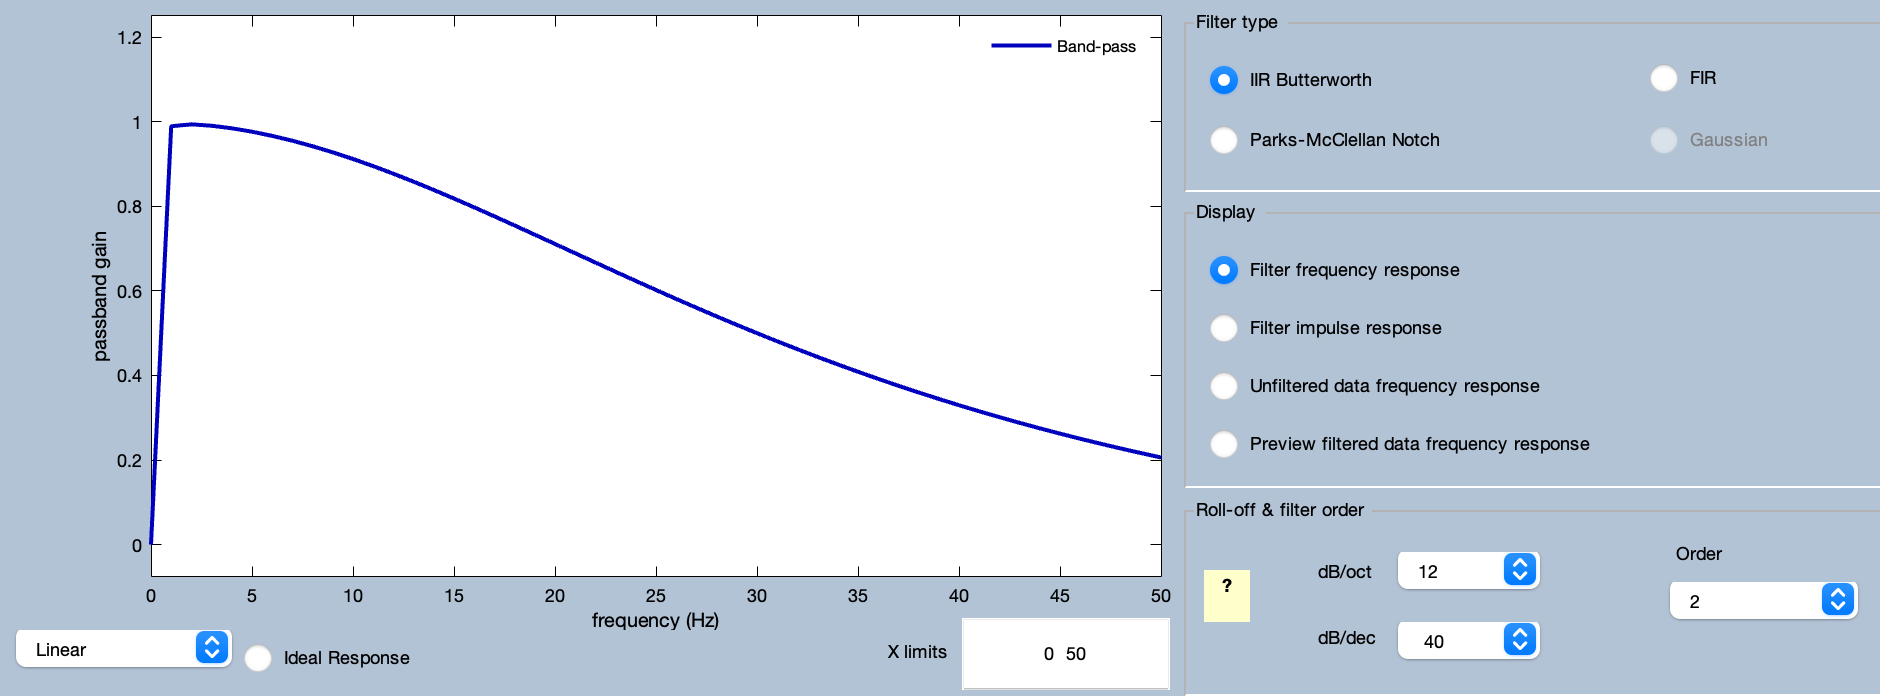
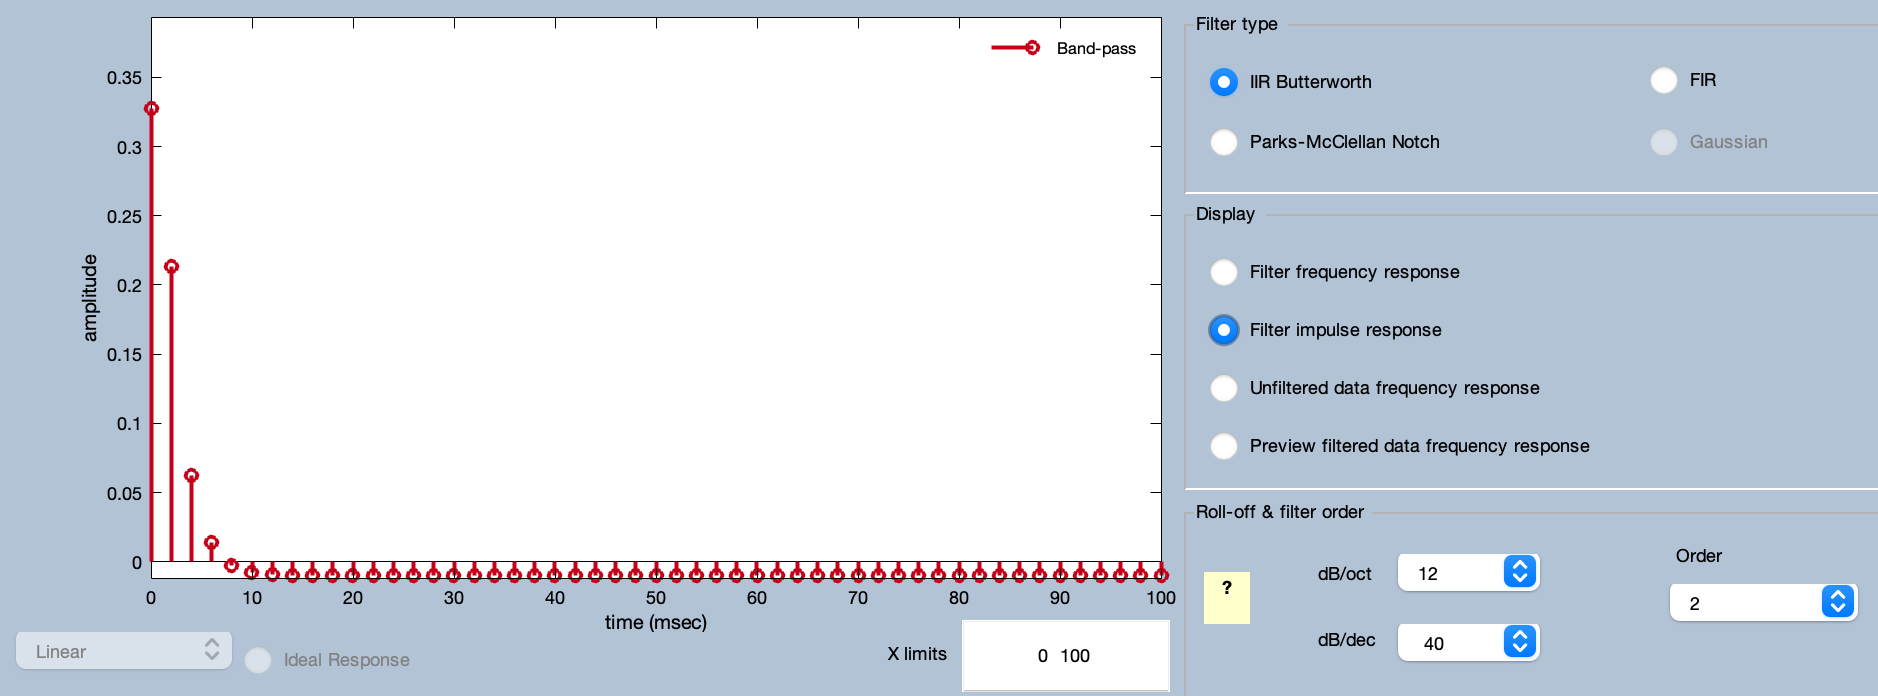
You can see the frequency response function and impulse response function of the resulting filter by clicking the Advanced button.
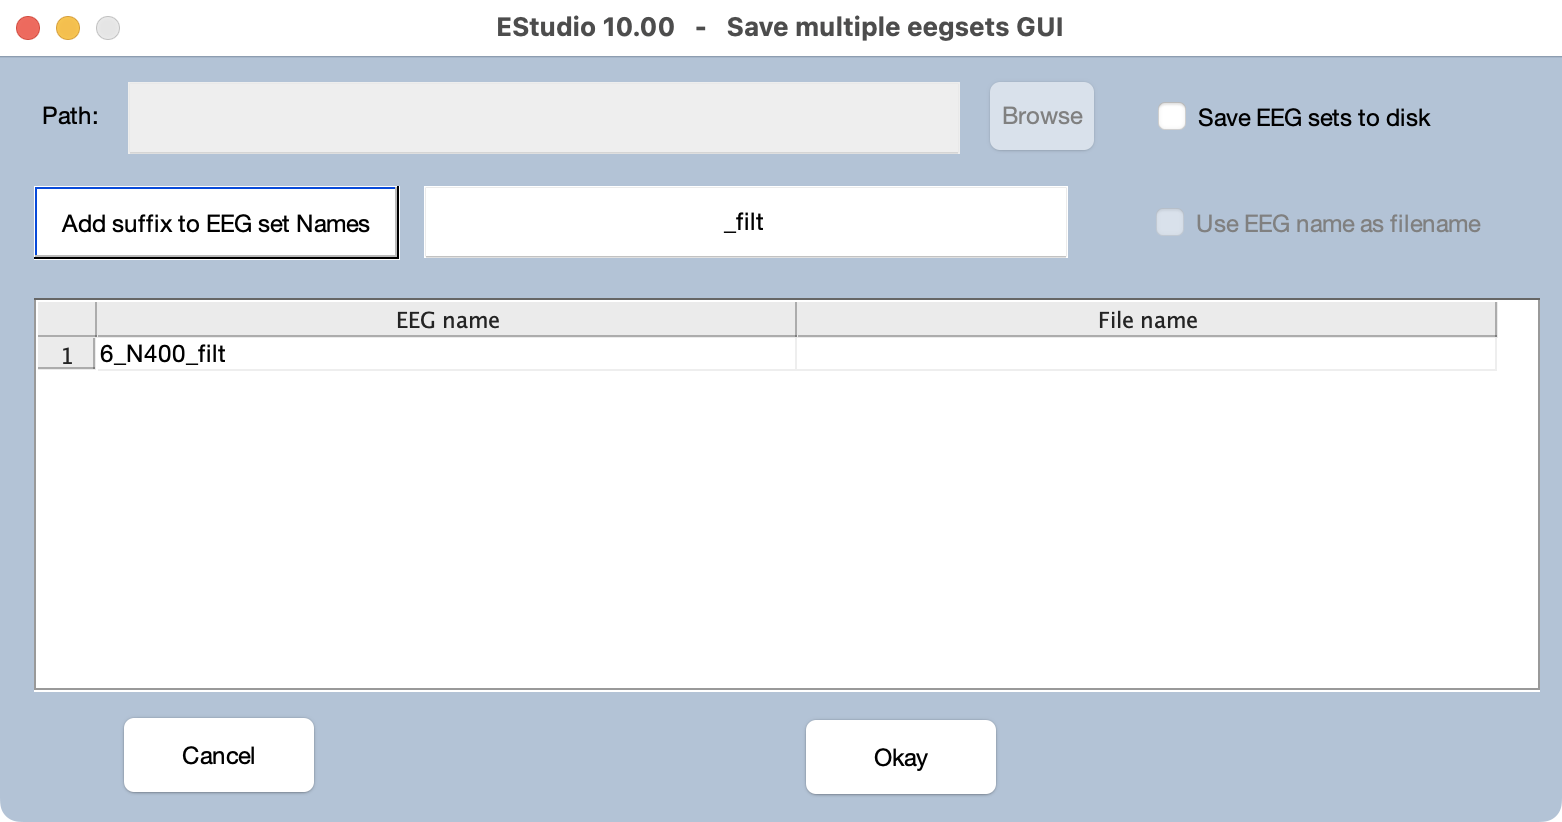
You can run the filtering from the Advanced window, but instead click Cancel to go back to the Filtering panel. Now you can click Run from the Filtering panel. It will pop up ERPLAB Studio’s standard window for naming and saving EEGsets (see screenshot below).
An important feature of ERPLAB Studio (which was inherited from EEGLAB) is that each EEG processing step typically creates a new EEGset. This EEGset is stored in memory and is available from the GUI, which makes it easy to go back a step or two and change how you’re processing the data. You can also save a given EEGset to your computer’s hard drive, but this is optional (so your hard drive doesn’t get filled up with hundreds of files).
Every EEGset has a name (which you will use to identify it in the EEGsets panel). As you can see in the screenshot above, ERPLAB Studio suggest a name for the new EEGset which consists of the original EEGset name (6_N400) plus a suffix that indicates the process being applied (_filt). You can use any name you’d like, but it’s often convenient to use the suggested name.
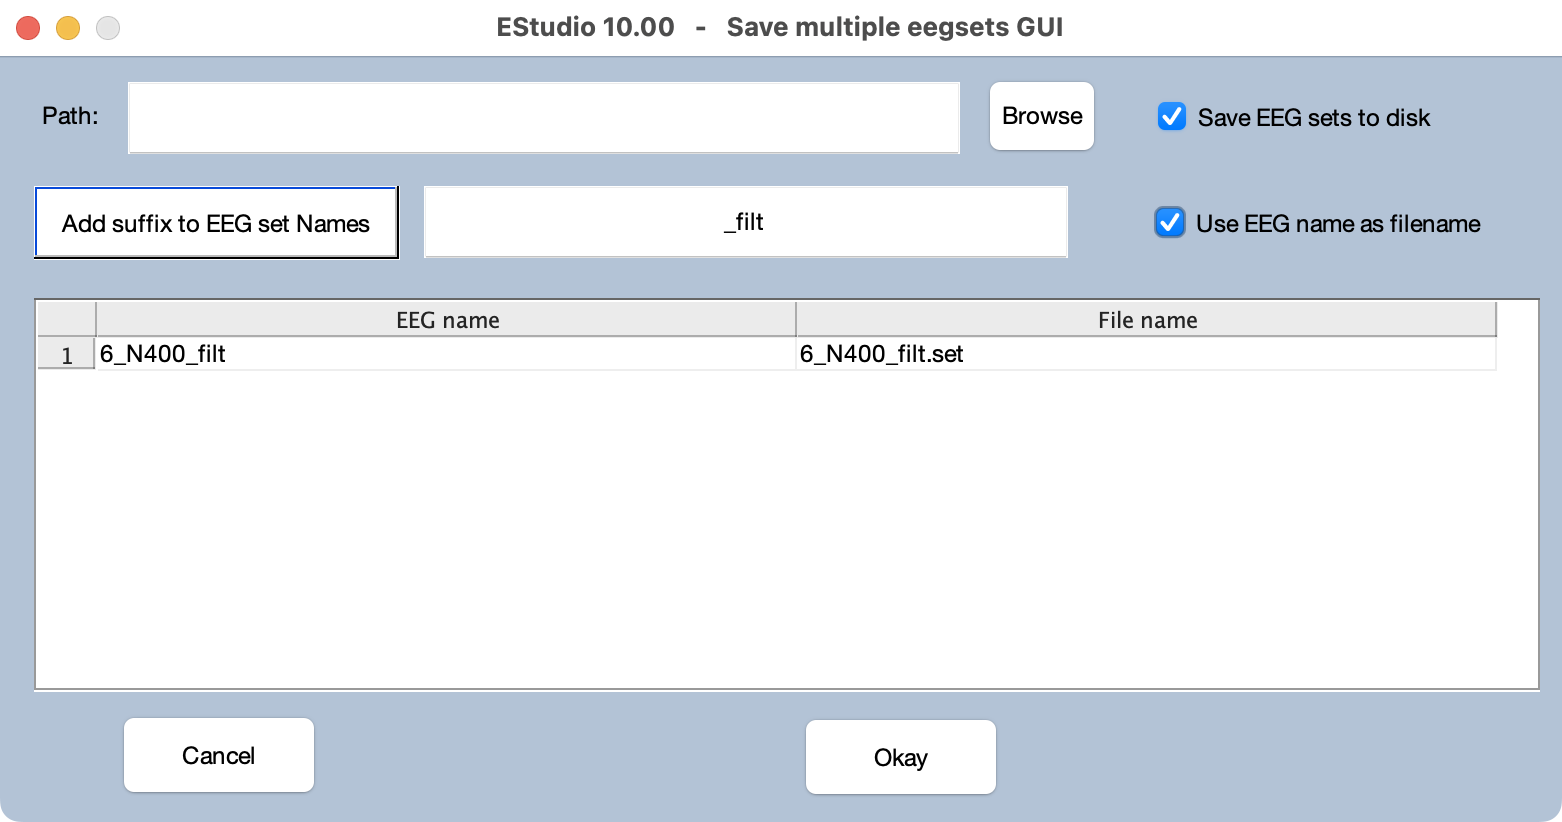
Check the Save EEGsets to disk option so that the EEGset will be saved as a file. This gives you the ability to name the file. It can be very confusing if the filename differs from the EEGset name, so you should ordinarily check Use EEG name as filename to use the same name for both.
Click the Okay button name the EEGset and save it to disk. The EEGsets panel should now have the filtered data as the second EEGset, and the filtered data are now shown in the plot region.
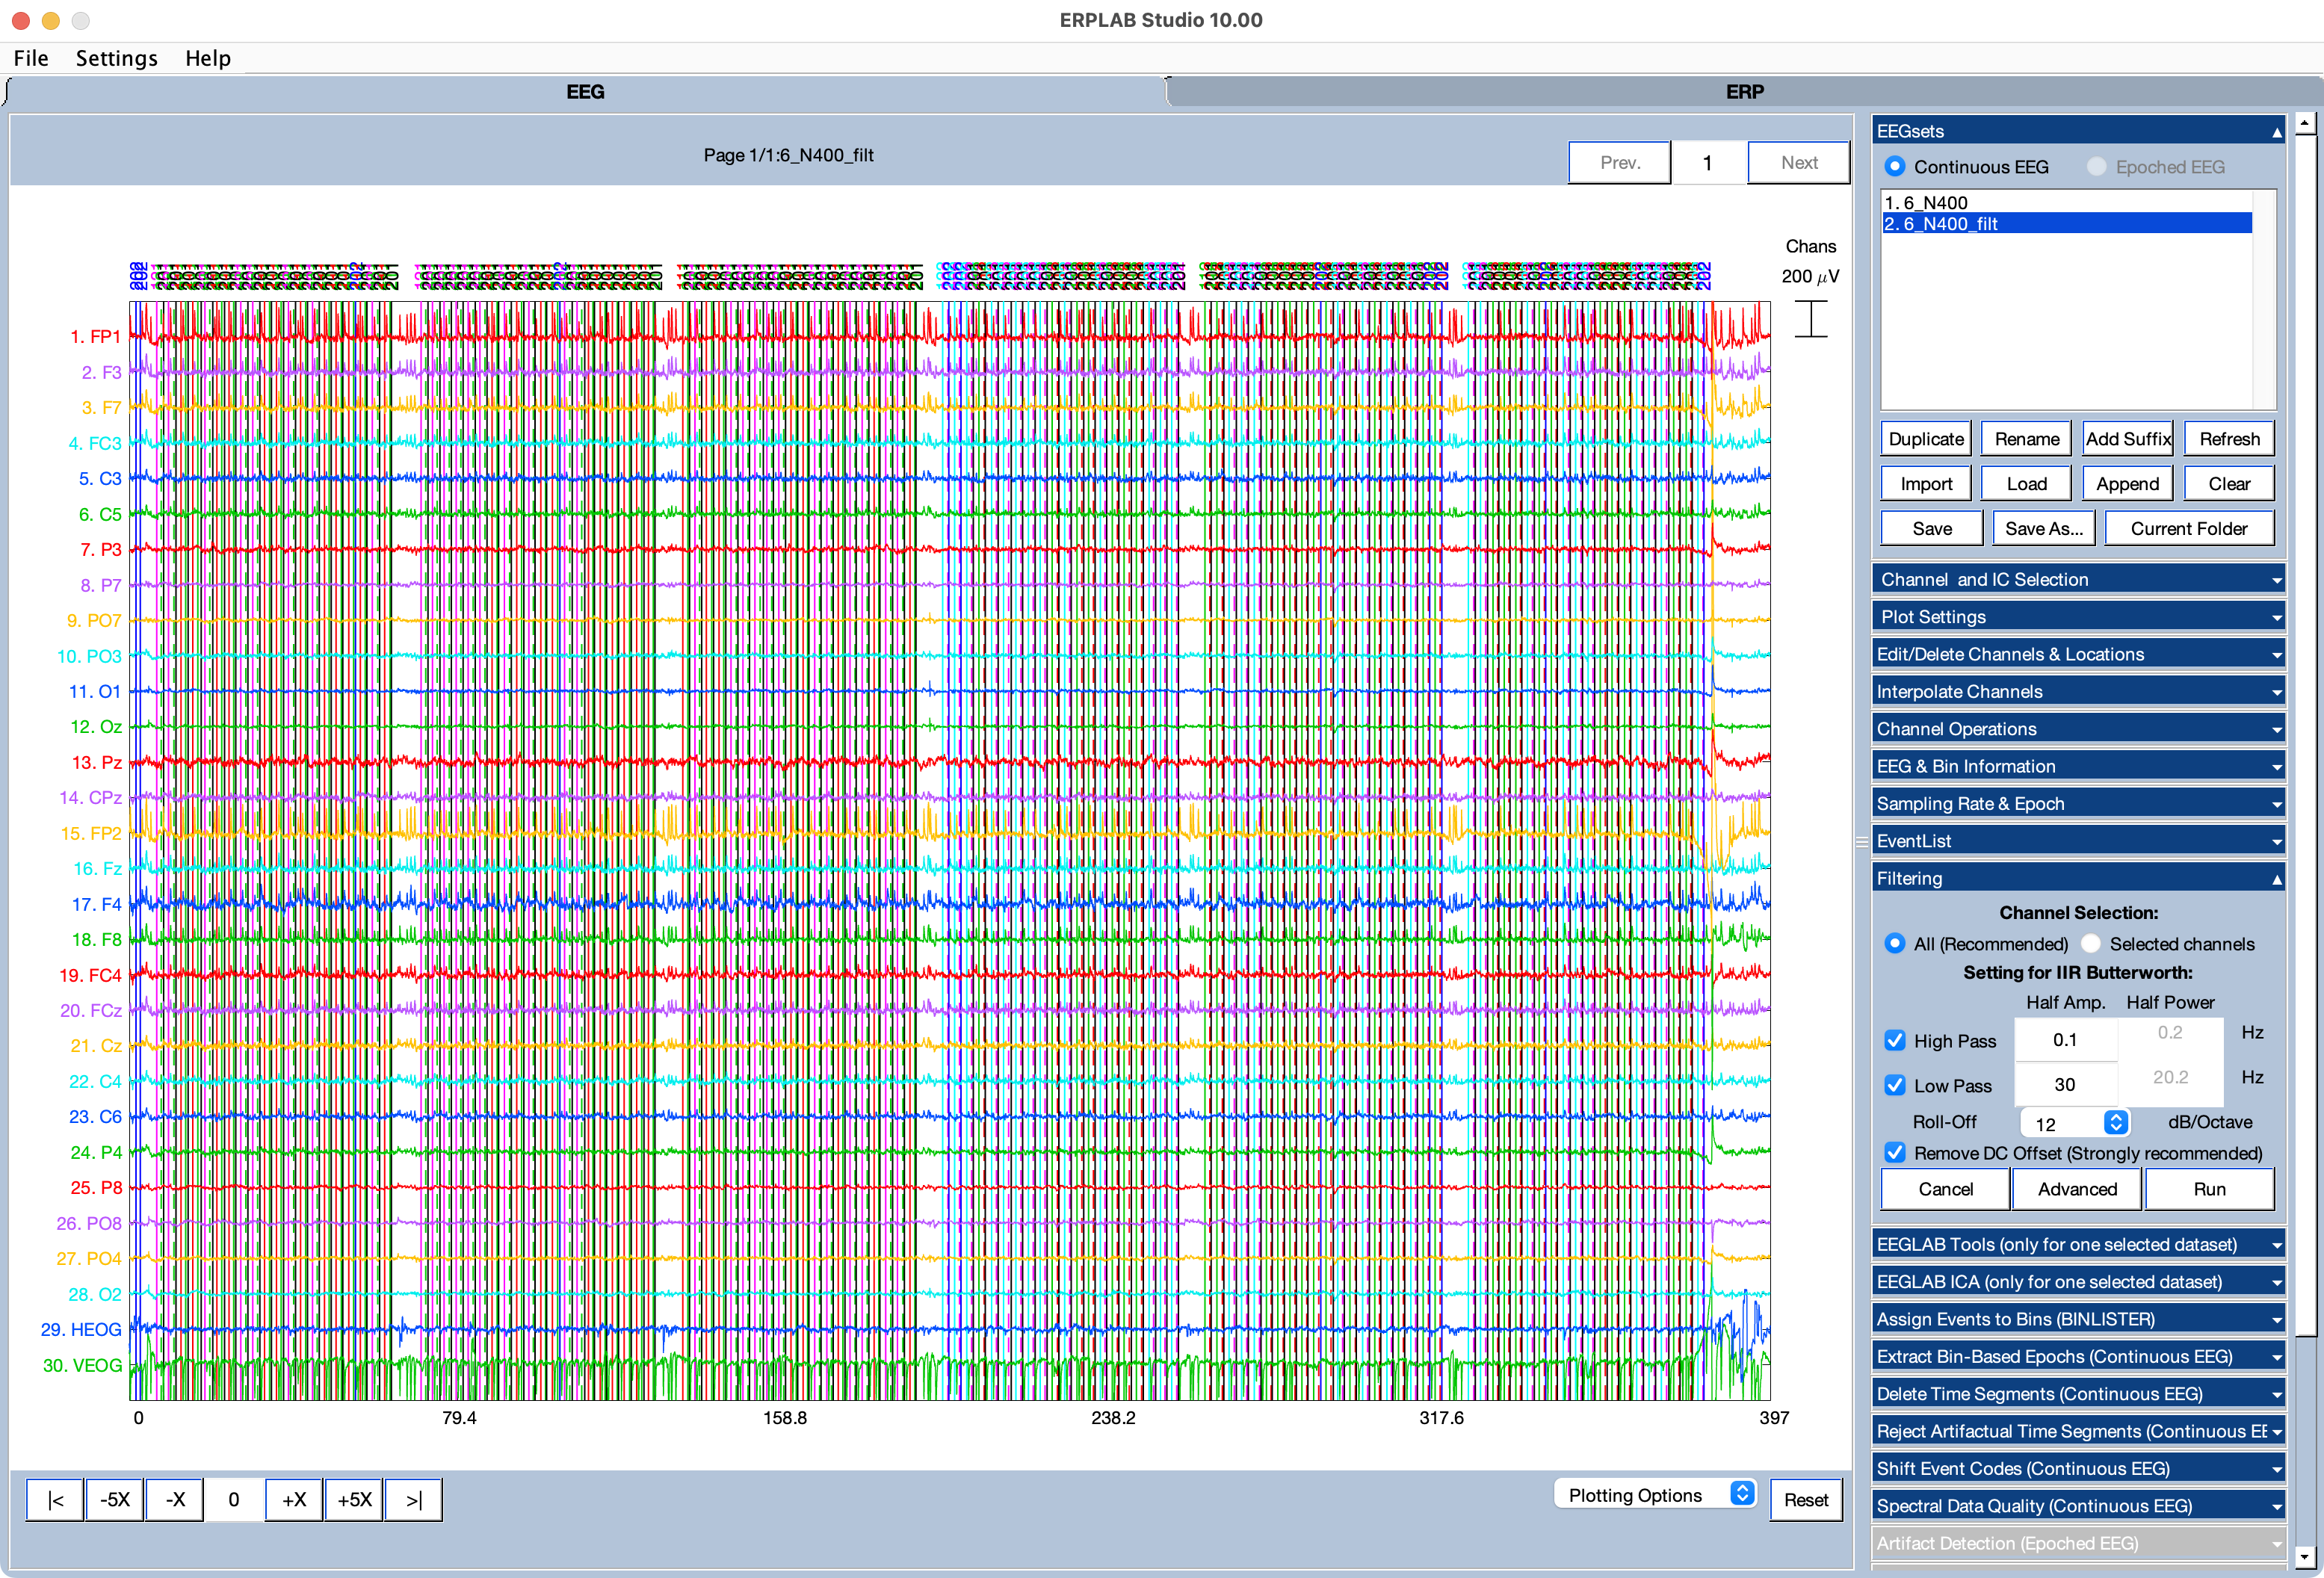
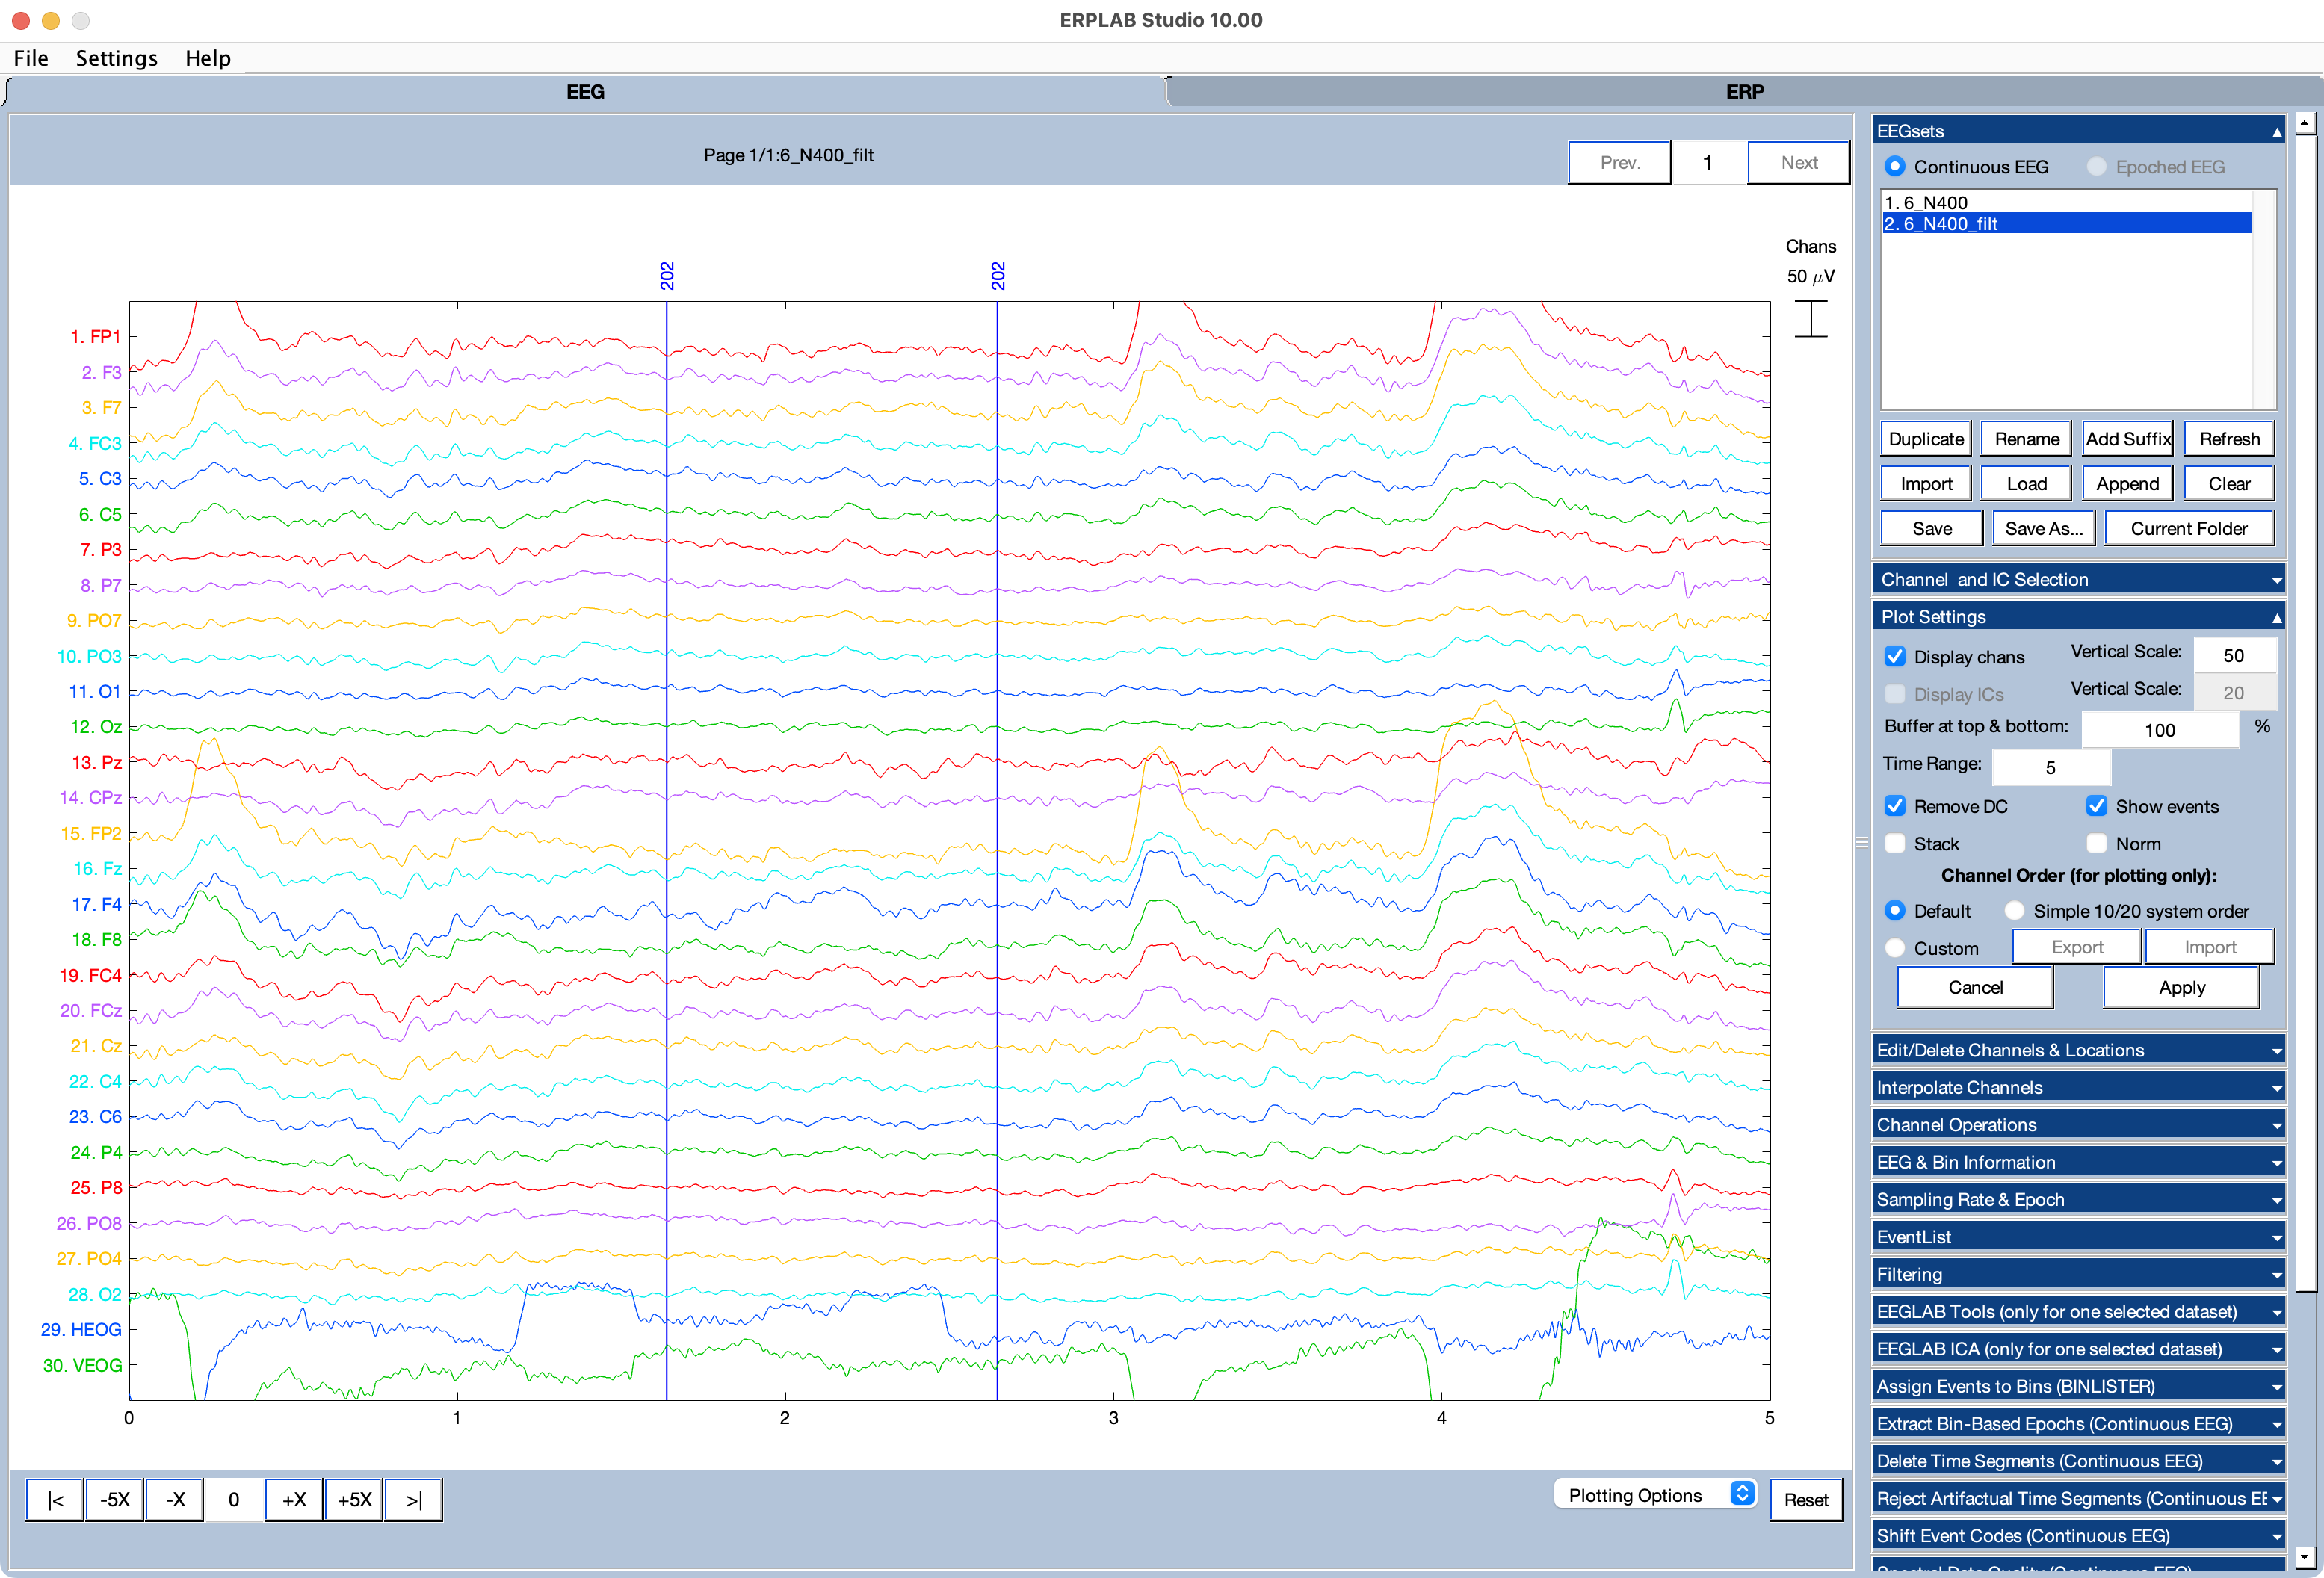
As you can see, the wild EEG drifts have been eliminated. The EEG now looks a little odd because it is largely flat except for little spikes in some channels. That’s because we are viewing a very long time period with a compressed voltage scale. With these plotting parameters, blinks look like little spikes. If you set the Time Range back to 5 and the Vertical Scale back to 50 in the Plot Settings panel, you’ll see that the EEG looks perfectly normal (see screenshot below).
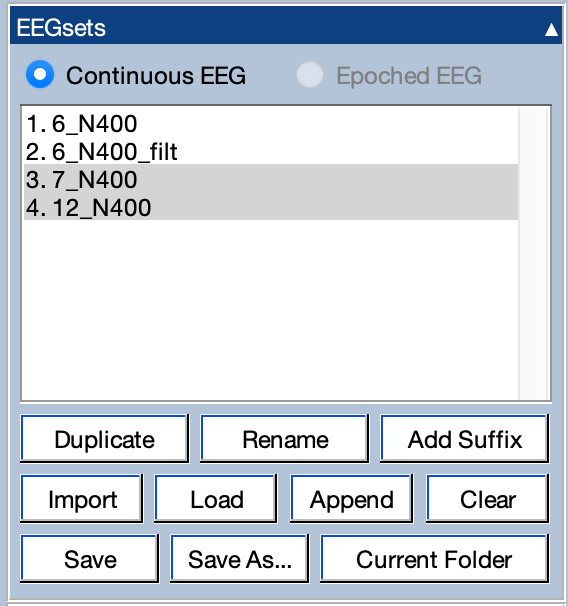
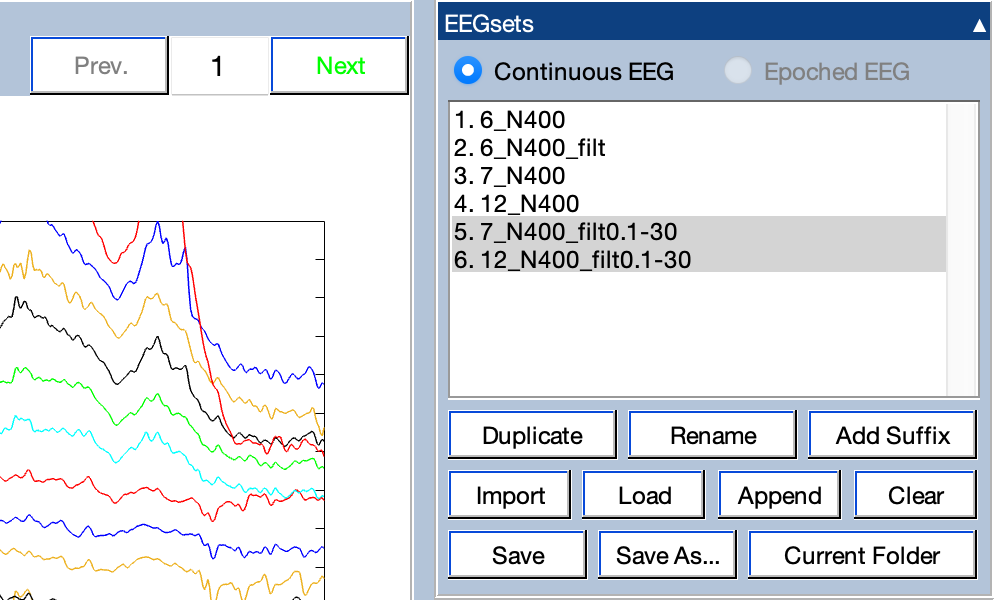
Most ERPLAB Studio functions can simultaneously operate on multiple EEGsets (or multiple ERPsets). To see how this works, go to the EEGsets tab and use the Load button to load the EEGsets for Subject #7 and Subject #12 (7_N400.set and 12_N400.set). Then, select both 7_N400 and 12_N400_preprocessed in the EEGsets menu (by shift-clicking, command-clicking, or however you like to select multiple items). It should look like the screenshot below.
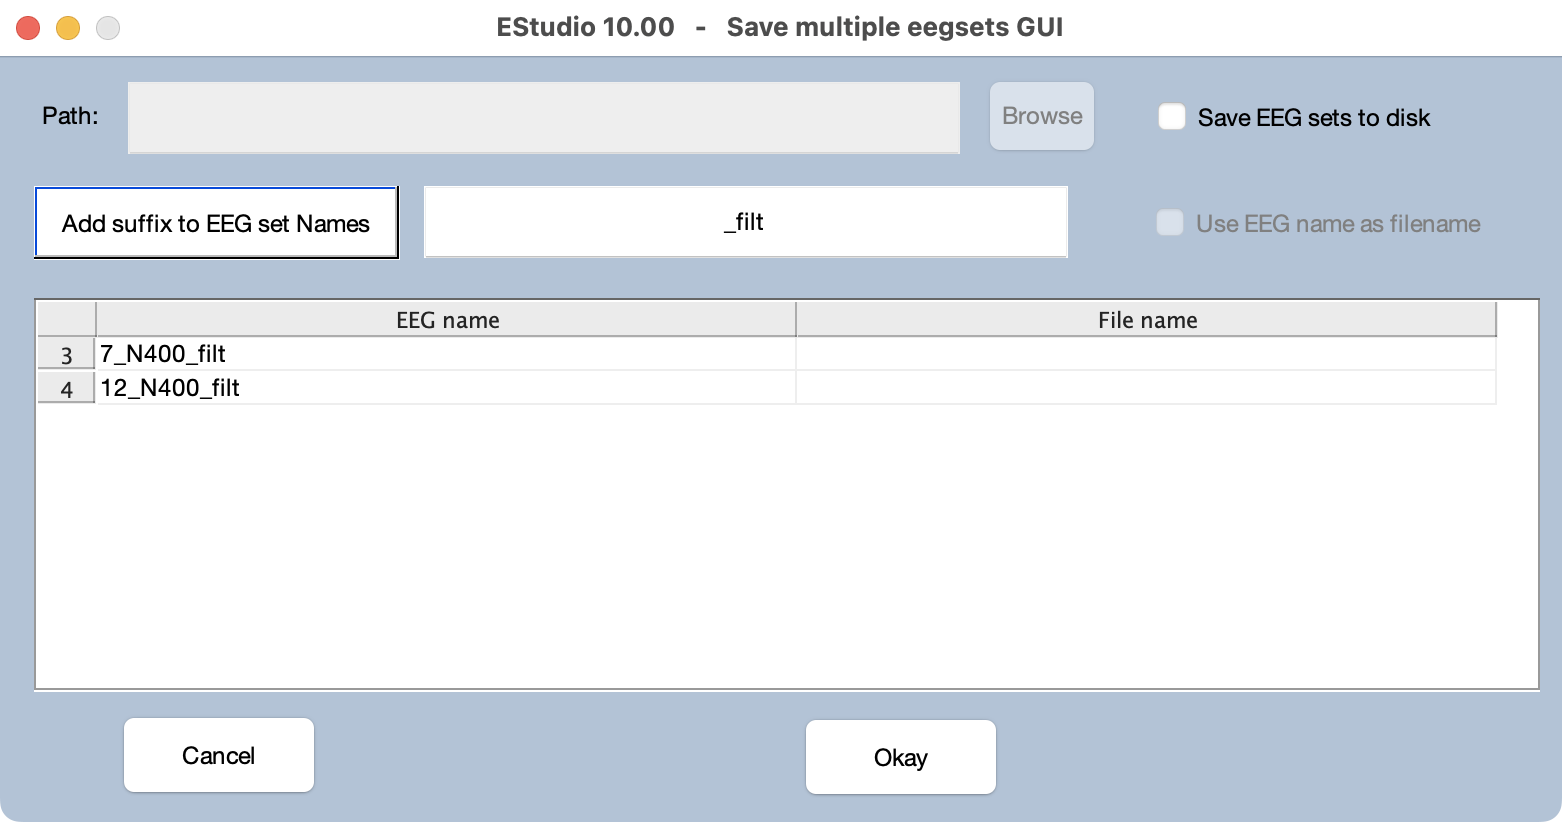
Now go to the Filtering panel, make sure it is still set to a high-pass cutoff of 0.1 Hz and a low-pass cutoff of 30 Hz, and click Run. Our standard window for naming and saving EEGsets will then appear, as shown in the screenshot. You’ll see that it has generated default names for both of the filtered EEGsets, using a suffix of _filt, which leads to names of 7_N400 _filt and 12_N400_filt.
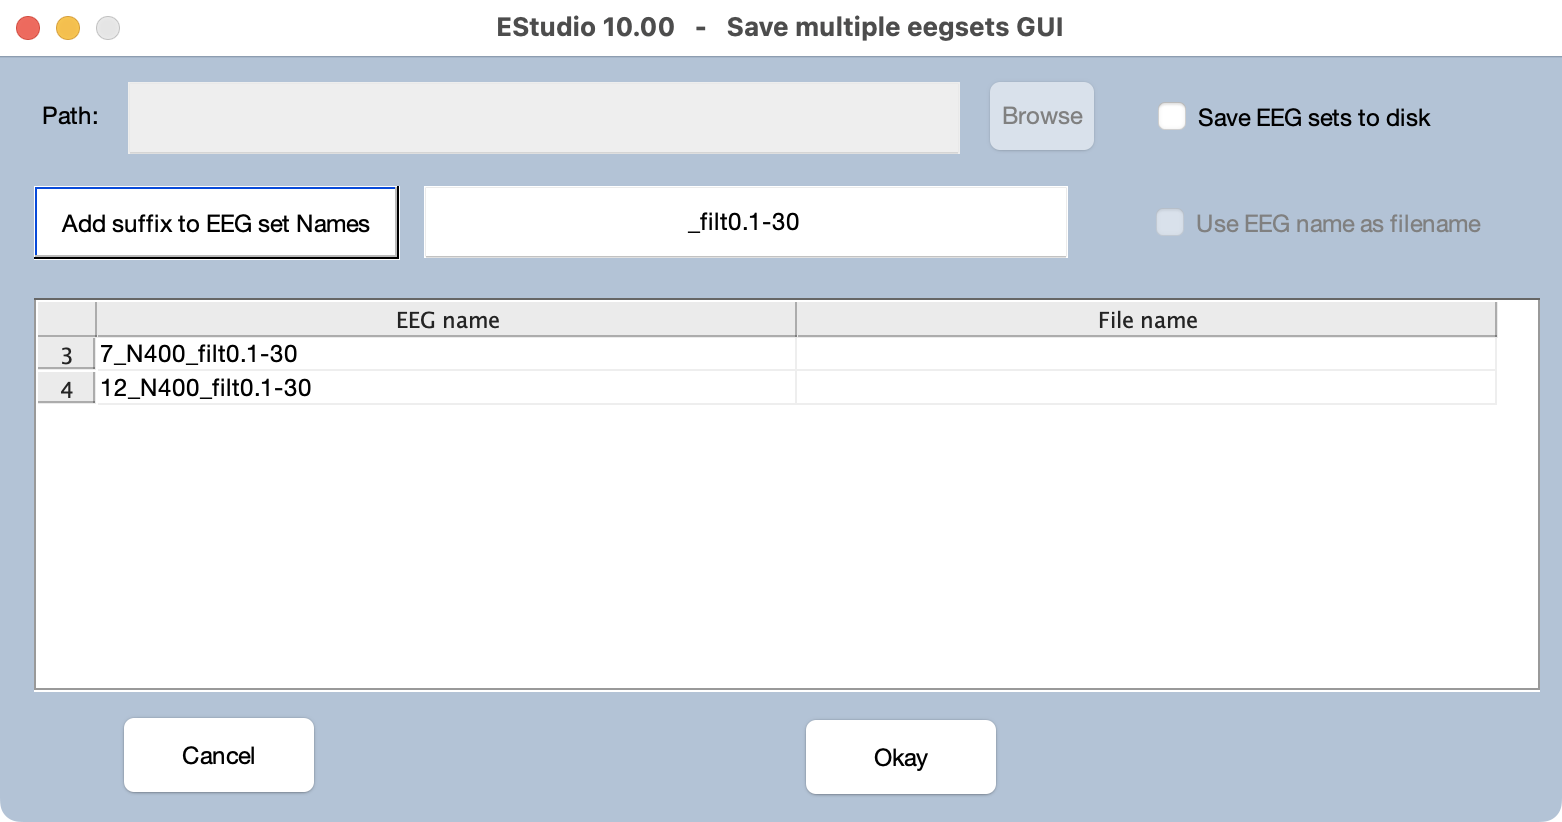
Trying to change the suffix field to _filt0.1-30 and clicking the Add suffix to EEGset names button. You’ll see that the names will be changed to 7_N400_filt0.1-30 and 12_N400 _filt0.1-30. If you click Okay, the filtering operation will run and the new EEGsets will be created with these names. You’ll then be able to see them in the EEGsets panel.
You can see that both of the filtered EEGsets are selected in the EEGsets panel. The one that is higher up on the list is shown in the plot region. But you can switch to the other one by clicking the Next button in the controls just to the left of the EEGsets panel (see screenshot).
EEGsets can be stored solely in RAM, or they can also be saved to your hard drive. The advantage of saving them on your hard drive is that they will still be available after you quit from ERPLAB Studio. The disadvantage is that your hard drive can get cluttered if you save every single EEGset you create to the hard drive. In general, we recommend saving to your hard drive after particularly time-consuming steps (such as ICA-based artifact correction), if you’re about to stop processing a set of data, or if you’ve reached a major step (e.g., you are about to create averaged ERPs from an epoched EEGset).
You can save to your hard drive when an operation runs by means of the standard window for naming EEGsets. You can also simply select one or more EEGsets from the EEGsets panel and click the Save or Save As button.
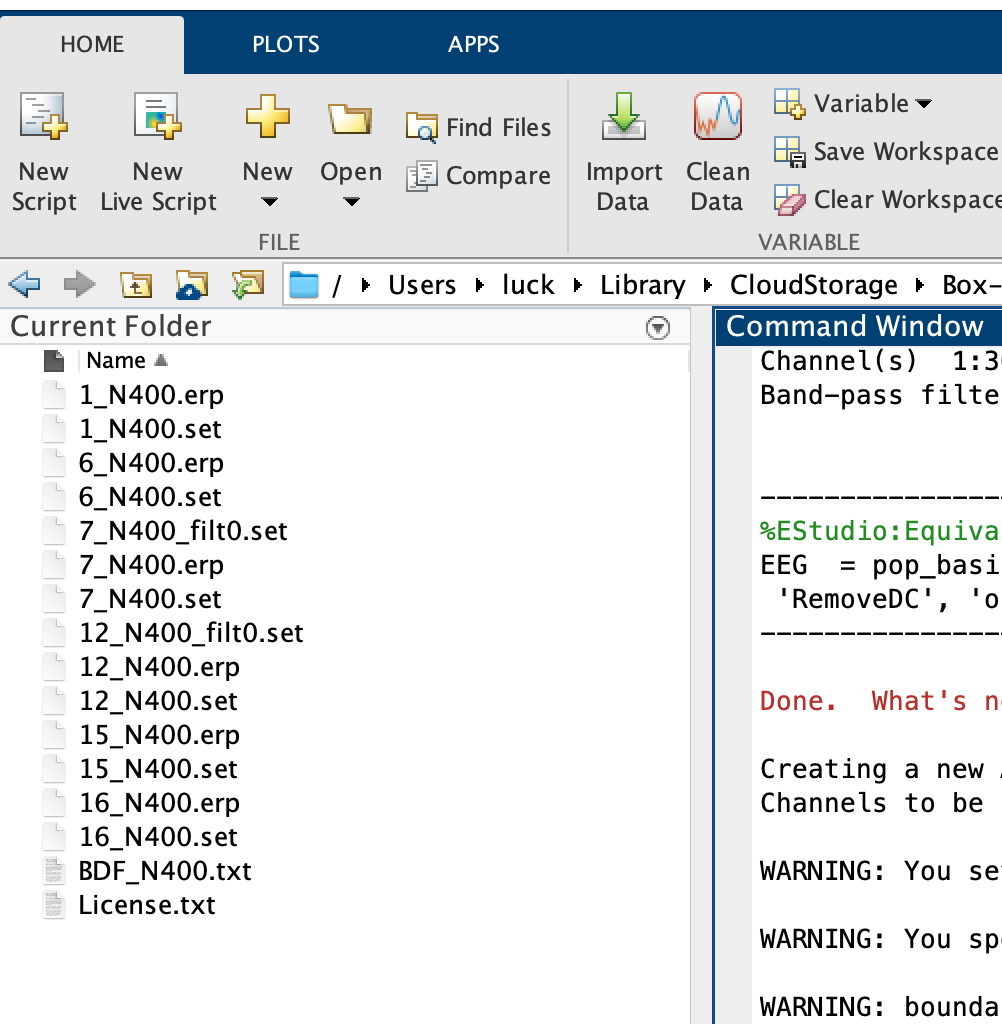
To try this, make sure that 7_N400_filt0.1-30 and 12_N400 _filt0.1-30 are still selected in the EEGsets panel, and then click the Save button. It will save them in the current folder, using the EEGset name as the file name. You can see that it worked by going to the main Matlab window and looking in the Current Folder section. You’ll see the new files (with a .set file extension).
If you had clicked Save As instead of Save, you would have been able to choose the file names.
| Previous Page | Next Page | 🏠 |
|---|---|---|
|
The EventList |
Home |