DocGisItems - Maproom/qmapshack GitHub Wiki
Prev (Geosearch) | Home | Manual | Index | (Create and edit multi-point data)) Next
Table of contents
Data in QMapShack
Introduction
QMapShack (called QMS for short) deals with
- waypoints (including some features of geocaches),
- tracks,
- routes, and
- areas.
Together these data are called GIS data (GIS: __G__eographic __I__nformation __S__ystem).
A waypoint is defined by a single geographical position/location. Similar to waypoints are POI (points of interest). The main difference is that POIs can not belong to a workspace and that they can not be edited or saved.
Tracks, routes and areas consist of several positions/locations joined in different ways by line (road) segments. Such data items are called multi-point items.
This page gives an overview of the common features of these data types in QMS.
Details about each data type can be found in the following pages:
Sources of data
QMS supports a variety of sources for GIS data:
- Files with GIS data in various formats.
- SQLite and MySQL databases.
- Data downloaded from GPS devices.
GIS data can also be created directly in QMS.
File sources
QMS can load data from files with the following formats:
GPXfiles (common and widely used GIS data format),QMSfiles (proprietary efficient binary data format in QMS),FITfiles (used by Garmin fitness devices - limited support in QMS),TCXfiles (Garmin Training Center XML - limited support in QMS),SLFfiles (Sigma Log Format),SMLfiles (Suunto XML format),LOGfiles (Openambi XML format),QLBfiles (QLandkarteGT proprietary format).
Load data either by using the main menu File - Load GIS data or drag-and-drop a file to the workspace window in QMS.
Remarks:
-
Despite all deficiencies, GPS manufacturers support the
GPXformat. A common format is a good approach in general, but TopoGrafix, the company behind GPX, fails miserably to evolve their format to the needs of today's GPS systems. Anyway, GPX is it to be. QMapShack does support the GPX definition version 1.1 and some of the proprietary extensions to GPX. And it adds a few more extensions. But due to the sheer rank growth of extensions, caused by a lack of guidance, it can't support everything. Keep this in mind when you load data from and save it to GPX files that do not origin from QMapShack. You will loose information. -
QMSis QMapShack's own binary file format. You will never loose information using it, but of course it is not compatible with any other application. -
Not all features of the other file formats can be read by QMS and not all file types support all data types.
GPS devices
QMapShack supports data exchange with several GPS outdoor units. All newer Garmin devices accessible in mass storage mode will work as well as all devices based on the CompeGPS software TwoNav, that are accessible as mass storage.
The internal memory of legacy Garmin devices (e.g. the well-known Garmin GPS 60Csx) can't be connected as an USB drive to the computer even if they are connected via USB to the computer. Thus, data in the internal memory (e.g. the so-called ActiveLogs or waypoints saved in the device) can't be accessed directly from QMS.
GPSBabel (available for Windows, MacOS and Linux) can be used with these devices to download tracks and waypoints stored in the internal device memory and to save this data into a GPX file which then can be used with QMS. GPSBabel can also be used for the data transfer in the opposite direction.
More details can be found here
Databases
QMS SQLite or MySQL databases are used to save GIS data permanently and in a well-structured way. Details about using databases can be found here
Save data
GIS data can be saved
- without any restrictions to
- QMS files
- SQLite or MySQL databases,
- with some restrictions to
- GPX files,
- TCX files (limited support).
When saving data to a GPX file the user has the choice to save the complete data information by using QMS-specific GPX extensions or to stick to the GPX 1.1 format without extensions.
Attention: When saving routes to a GPX file the complete route data consists of the user-defined routing points (the turn points of the route) only. The paths/roads between routing points and route instructions are not saved. If the paths between routing points should be saved, too, then convert the route to a track and save this track together with the route from which it was created.
The QMS-specific extensions to GPX won't be understood by other GIS applications (this is typical of GPX extensions!) and even if such a file can be read by some other software, some information kept in the extensions can be lost.
When using the GPX 1.1 format without extensions only position, timestamp and elevation for waypoints, tracks and routes are saved. GPX files with this restricted standard format can be read by other applications, too. Note: This format can't handle areas.
Save data (more precisely a project with data) to a file by using the main menu File - Save GIS data or by using one of the context menu entries Save, Save as ..., Save as GPX 1.1 w/o ext. of the considered project.
Data actions
General actions
QMS provides many ways to work with or to manipulate GIS data. It tries, if any possible, to offer equal or at least similar actions for handling the various object types. Actions available for all object types are (with a few type-specific differences):
- create, edit, copy, delete data items,
- view details of data items,
- toggle the no-go feature of data items,
- set tags and keywords in data items.
These actions are either started from the context menu of a data object in the workspace or from the toolbar of the object in a map window (left click on (border of) object to open the toolbar). As an example, here is the action toolbar of a route:

The general actions can be carried out with the following icons in the toolbar:
| Default icon | Tooltip |
|---|---|
| View details and edit. | |
| Set tags and rating. | |
| Copy route into another project. | |
| Delete route from project. | |
| Toggle no-go area or line |
The section "Create and edit multi-point data" describes common features for editing multi-point data (tracks, routes, areas).
More type-specific actions are added to these general actions for each object type.
Recommendation: Many actions start with a click in a map window. To avoid incomplete display of data items or their information try to center the point or region of interest in the map and choose a proper zoom level before carrying out an action.
Create data
There are several ways to create new data directly in QMS.
An easy and general way is to left-click at the location of a new waypoint or at the start location of a track, route or area in a map window and use the context menu entry Add waypoint/track/route/area in this window.
Then
- for a waypoint use the edit window that appears to add necessary detailed information to the waypoint and close the edit window,
- for multi-point items
- if a routing engine should be used: choose one and set it up in the
Routingwindow, - in the toolbar that appears after the first click in the map window press
O, if no routing engine is used for object creation or pressA, if the selected routing engine is to be used, - left-click at the other locations that have to be added to the data item,
- at the end stop adding locations with a right-click,
- click the
Save as newbutton in the toolbar to save the new data object to a workspace project.
- if a routing engine should be used: choose one and set it up in the
All data items have data fields Description, Comment, and Links which can be filled with detailed information when creating or editing it. A click on the highlighted items opens an editor window where the necessary text can be filled in. Default or user-defined templates allow to structure this information and to use it when searching for data with certain properties. To open a template, click on the template icon ![]() in the upper left corner of the edit window and select a template from the combobox on top of the template window.
in the upper left corner of the edit window and select a template from the combobox on top of the template window.

Editing the locations and other forms of editing of data objects are described in detail in the following pages:
Undo & redo
QMapShack maintains a record of all changes made while editing a data item. To see the list of all changes made to an object select Edit from the
context menu to open the edit window of the object. Click the History tab in this window. Each entry in the list has a short description of the
change made to the given object.
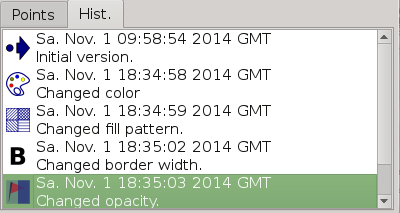
A left-click on a row in the history list reverts the object to the selected state.
A right-click on an entry in the history list opens a context menu which allows to drop all revisions of the object before or after the given one.
When saving an object (i.e. the project to which it belongs) into a database or a QMS file, then the object is saved together with its complete history. Thus, having a long history list for an object may result in a large data volume to be stored. To avoid this, consider dropping obsolete revisions of the object as described above.
When saving an object (i.e. the project to which it belongs) into a GPX or TCX file only the currently selected revision of the track/project and not the complete history is saved.
Other actions
Remarks on other general toolbar actions:
- To copy a data item to a new or existing project in the workspace use its context menu or the copy icon
 in the toolbar.
 - To delete a data item from a project in the workspace use its context menu or the delete icon
 in the toolbar. Attention: The object under consideration can belong to a database. This delete operation removes the object from a project in the workspace, but not from the database!
 - A rating and keywords can be added to each data item using its context menu entry
Set tagsor the set tags icon . This information can be used for searching data.
 - For details about the
Toggle no-go areaicon see here.
Prev (Geosearch) | Home | Manual | Index | Top | (Create and edit multi-point data)) Next