DocGisItemsWpt - Maproom/qmapshack GitHub Wiki
Prev (Routing in QMapShack) | Home | Manual | Index | (Points of interest (POI)) Next
Table of contents
Waypoints
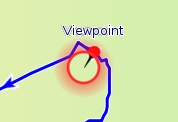
A waypoint is a coordinate with data attached. This can be a point of interest, a geocache or a georeferenced image. If you move the mouse close enough to a waypoint in a map window it gets highlighted by a red circle:
Geocaches are handled in QMS as waypoints with special features.
Create waypoint
The creation of a new waypoint is similar to the creation of a track or a route.
To create a new waypoint proceed as follows:
-
Go to a map window and zoom it to the region in which the new waypoint should be located.
-
Right-click in the map window to open its context menu.
-
Click the menu entry
Add waypoint. -
Select
- a new or existing project for the waypoint,
- in case of a new project its type (QMS, GPX file or database).

-
Click
Okto go to the next window.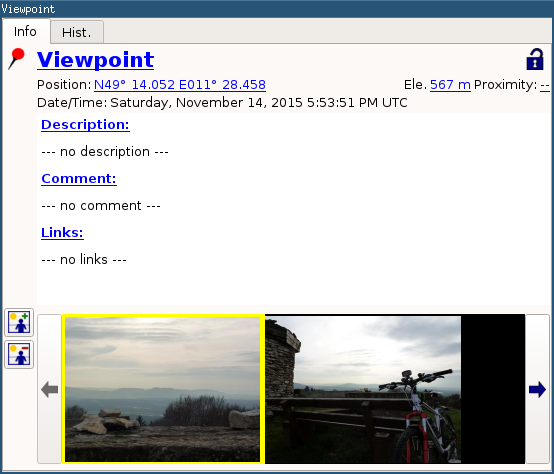
-
Insert by clicking on the blue underlined labels proper information for
- waypoint name, description, comment and links relevant for the waypoint,
- elevation (if not automatically filled-in),
- a proximity distance (used by a GPS device to warn when approaching the waypoint or used as radius of a waypoint-based no-go area),
- the position shown is the one clicked when opening the map window context menu. If necessary, click to edit it.
-
Choose waypoint icon by a click on the icon symbol at the upper left corner of the window. Choose one from the icon history list which pops up:

or select
More...to choose one from all available icons:
Waypoint icons are structured into categories and tags. Table of visible icons can be limited by choosing one of the available categories:

Waypoint icon names and tags can be searched. Searching is case-insensitive. To search,
start typing... -
Insert images linked to the waypoint by clicking the
Add imageicon near the bottom of the left window border.
If a vector map is used, then a waypoint can be created from a point of interest (POI) in the map:
- move the mouse pointer on a POI in a vector map, a small red square around this POI pops-up,
- right-click to open the context menu and select the menu entry
Add POI poi_name as waypoint(poi_name is the POI name!). The POI name and its coordinates are used in the new waypoint.

One more way to create waypoints is the use of POI files. Each POI loaded from such a file can be converted into a waypoint.
View & edit details
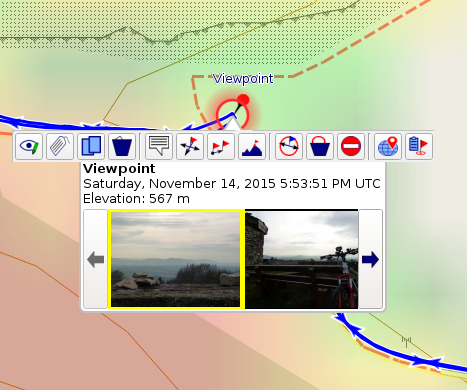
If you click on the highlighted waypoint you get a short on-screen summary of the waypoint information and a toolbar with a few handling options:
The meaning of the toolbar options is shown in the following table:
| Default icon | Tooltip |
|---|---|
| View details and edit. | |
| Set tags and rating. | |
| Copy waypoint into another project. | |
| Delete waypoint from project. | |
| Show content as static bubble. | |
| Move waypoint to a new location. | |
| Clone waypoint and move clone a given distance and angle. | |
| Replace elevation by the view's DEM data. | |
| Edit radius of circular area | |
| Delete circle defined by waypoint | |
| Switch between proximity and nogo-area | |
| Search for information about the waypoint's position on selected websites. | |
| Copy position of waypoint to Clipboard. |
When clicking the View details ... icon the window which has been already used when creating a waypoint pops-up again giving more detailed information about the waypoint. This window allows to edit some of the waypoint details.
In the upper right part of the windows 2 icons are shown with the following meaning:
| When shown, the waypoint was imported from a file and modified. | |
| When shown, the waypoint is locked - that is, it can't be modified until unlocked. Click to unlock for editing |
Custom icons
QMapShack ships with a bunch of default icons, which are likely to be displayed correctly on most GPS devices.
If you want to use your own icons, then there are 2 ways to do this:
- Use default icon directory:
- Add icon files to
~/.config/QLandkarte/WaypointIcons(*nix-type systems)C:\Users\my_user_name\.config\QLandkarte\WaypointIcons(Windows)~/Library/Application Support/QLandkarte/QMapShack/WaypointIcons(OS X/macOS)
- Add icon files to
- Use custom icon directory:
- Put your icons in some directory.
- Start QMapShack.
- Create a new waypoint or edit an existing one.
- Click waypoint's icon.
- Hit
More...in window popping up. - In the icon selection window click the
Open foldericon and define your directory path where QMapShack can find the additional user-defined waypoint icons. - Remark: As soon as a path is defined in this way, the default directory mentioned in the previous point isn't used anymore for loading icons.
While built-in icons already have categories and tags assigned, custom icons can also be assigned categories and tags. All custom icons by default belong to category external. Custom directory tree is recursively searched for custom icon files. Categories are assigned from custom directory's 1st level subfolder names, tags are assigned from 2nd level subfolder names. Subfolder name is split into keys by separator comma. Each key becomes a category or tag.
Example: 2nd level subfolder name accomodation,building assigns tags accomodation and building to all icons in that folder.
Icon files must be in PNG or BMP format. When creating a waypoint from icon, icon's longer side by default is scaled to a size of 22 pixels while maintaining the aspect ratio. Dialog Setup Map Icon Sizes allows to globally increase or reduce size of icons on map.
By default, the center of an icon is mapped to the waypoint. With QMapShack versions after version 1.17.1, icons in PNG format can be mapped with a user defined offset. This is especially useful for pin or needle style icons. To use this feature, the offset must be defined as PNG file's Image Offset (oFFs) extension. GUI tool TweakPNG allows adding or editing oFFs extension with arbitrary offset values, python script pngoffset allows setting or modifying an offset from command line. Offset is measured from icon's upper left corner. To preserve compatibility, an icon's offset value (0,0) is ignored.
When adding an icon Photo.png, the icon will be listed as Photo in QMapShack.
The photo album
In addition to general information, such as position, name and a description, QMapShack allows attaching photos to a waypoint. This functionality comes with several limitations, as it is primarily meant to provide a quick overview over the specific location - it is not intended to organize your collection of photos.
| Add (a) new image(s) | Imports one or more new images. Photos are scaled down on import | |
| Delete selected image | Remove selected image (i.e. the image with the yellow frame) |
Photos are not exported to GPX. Use either a database or the QMS format for saving photos along with waypoints.
Other actions
Move waypoint
To move a waypoint to a new location
- left-click the waypoint on the map.
- Select the
Move waypoint to new locationicon from the info window that pops-up.
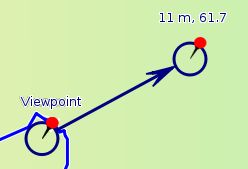
 - The mouse cursor changes to the
Moveicon. - Move the mouse pointer to the new location (don't click).
- The distance of the new to the old waypoint and the direction of change are shown.
- If the new location is not in the map view: left-click on the map and don't release the mouse button.
- The map is attached to the mouse.
- Move the map to the wanted location and release the mouse button.
- The map is fixed again.
- Move the mouse to the wanted new location of the waypoint.
- Left-click to fix the new position of the waypoint.
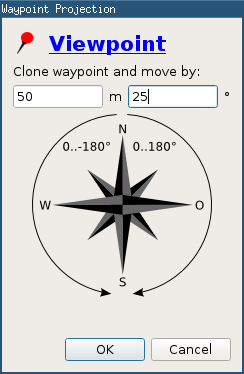
Project waypoint
This action is triggered by click on the Clone waypoint ... icon ![]() . It will create a clone of the waypoint. You have to give an explicit distance and a bearing to define the location of the cloned waypoint. You might want to change the icon and the name of the cloned waypoint.
. It will create a clone of the waypoint. You have to give an explicit distance and a bearing to define the location of the cloned waypoint. You might want to change the icon and the name of the cloned waypoint.
Set waypoints icon size
To change default icon size 22 pixels, select View -> Setup Map Icon Sizes or click icon ![]() . It allows increasing or decreasing size of waypoint and/or POI icons on map.
. It allows increasing or decreasing size of waypoint and/or POI icons on map.

Remarks on other actions
- Show content as static bubble: Replace the default waypoint layout in a map window

with a more informative layout in form of a bubble box

- Edit radius of circular area: Change the proximity radius of the waypoint in a map view: click icon, move mouse to new size of proximity area, old radius size is still shown, left-click to confirm new size.
- Switch between proximity and no-go area: If the waypoint has a proximity radius > 0, then the proximity range can be converted to a no-go area and vice versa.
- Search for information about the waypoint position on selected websites: When choosing this action a web service from the list of configured web services can be selected which displays information about the waypoint location in a web browser.
Geocaches
Geocaches are waypoints with special additional information and features. If this additional information is saved in a typical <groundspeak:cache> extension block of a waypoint in a GPX file, it can be displayed by QMS.
The waypoint icon shows the type of the geocache (traditional cache, multi-cache, virtual cache, webcam cache, ...).
The edit window differs from the one of a normal waypoint. It displays additional geocache information in read-only mode using several tabs:

Remarks:
- There are no fixed rules for defining attributes of geocaches. QMS supports only the handling of attributes defined in conformity with the rules used in https://www.geocaching.com.
- The status of a geocache (available, not available, archived) is appended to the name field of the geocache in the geocache edit window. If the status is
available, then then geocache icon shown in the edit and in the map window are colored ones. Otherwise they are gray:

Prev (Routing in QMapShack) | Home | Manual | Index | Top | (Points of interest (POI)) Next