DocGisDevices - Maproom/qmapshack GitHub Wiki
Prev ('Lost & Found' Folder) | Home | Manual | Index | (Text Editor Templates) Next
Table of contents
- Working with GPS Devices
QMapsShack supports GPS devices connected via USB:
- USB mass storage mode
- Media Transfer Protocol (MTP) mode (Linux GNOME and KDE only)
Before using your GPS device in QMapShack check the workspace setup for device support:
- select the main menu entry
Workspace - Setup workspace - select the
Enable device supportoption.
If you want to see the SD memory card of a Garmin device you have to copy the file GarminDevice.xml from the internal Garmin folder to the Garmin folder on your SD memory card.
QMapShack supports data exchange with several GPS outdoor devices based on mass storage mode. All "classic" Garmin devices will do. And all devices based on the CompeGPS software TwoNav, that are accessible by mass storage. Newer Garmin devices are supported by the USB MTP protocol.
Linux: Make sure you have installed the UDisks2 package.
Windows: Supported from version 1.0.0 on.
MacOS: Make sure that QMapShack has access to removable volumes. To check it, take the following steps:
- Go to "System Preferences" -> "Security & Privacy".
- Select tab "Privacy". Select "Files and Folders" (on the left side).
- Look for QMapShack.app (on the right side).
- Tick the checkbox "Removable Volumes".
If the following GarminDevice.xml file is copied to the Garmin folder of the SD memory card QMapShack store projects on the memory card of the device.
<?xml version="1.0" encoding="UTF-8"?>
<Device xmlns="http://www.garmin.com/xmlschemas/GarminDevice/v2"
xmlns:xsi="http://www.w3.org/2001/XMLSchema-instance"
xsi:schemaLocation="http://www.garmin.com/xmlschemas/GarminDevice/v2 http://www.garmin.com/xmlschemas/GarminDevicev2.xsd">
  <Model>
    <PartNumber>000-BBBB-00</PartNumber>
    <Description>GPSmap 60CSx</Description>
  </Model>
  <Id>12345678</Id>
  <MassStorageMode>
    <DataType>
      <Name>GPSData</Name>
      <File>
        <Specification>
          <Identifier>http://www.topografix.com/GPX/1/1</Identifier>
          <Documentation>http://www.topografix.com/GPX/1/1/gpx.xsd</Documentation>
        </Specification>
        <Location>
          <Path>.</Path>
        </Location>
      </File>
    </DataType>
  </MassStorageMode>
</Device>
With versions larger than 1.17.1 QMapShack supports MTP devices for Linux GNOME (gvfs) and Linux KDE (kio).
Garmin's built-in specification file GarminDevice.xml will be read when the device is connected via USB MTP and the device will by listed in the QMapshack workspace tree.
For non-Garmin devices such as the Wahoo or Hammerhead, or even mobile phones, a JSON file named QmsMtpDevice.json has to be placed in the file system of the device to be listed in QMapShack. The JSON file has to be stored in the top level storage path of the device and it defines information about the internal path structure. QMapShack will read the JSON file and list it in the workspace.
Definition of the JSON file QmsMtpDevice.json:
-
Description: The label of the device in the QMapshack workspace tree -
rootPath: The common root path of all import and export paths -
exportsPaths: One or more paths to define the directories where QMapShack will store projects as GPX files to the device. The paths must be defined as JSON array of comma separated strings[... , ...]. All paths must be relative to therootPath -
importPaths: One or more paths to define the directories where QMapShack will read the files from the device. The paths must be defined as JSON array of comma separated strings[... , ...]. All paths must be relative to therootPath -
icon: The path and filename to an optional icon. The icon is displayed next to the label in the QMapShack workspace. The path must be relative to therootPath
QmsMtpDevice.json
{
  "description": "Pixel 6a"
  , "rootPath": "My QMS Data Folder/"
  , "exportPaths": ["Directory to the Data/My planned Tours"]
  , "importPaths": ["Directory to the Data/My Activities"
                    , "An old Activity Directory"]
  , "icon": "../Pixel6a.png"
}
Directory structure of the mobile phone

Workspace tree in QMapShack

The Wahoo Element ACE has the following setup of the directory structure:
- In the toplevel directory
routesthe planned activities has be stored in GPX file format - In the toplevel directory
exportsthe Wahoo Element ACE stores the realized activities files in FIT file format
QmsMtpDevice.json
{
  "description": "Wahoo Element ACE"
  , "rootPath": ""
  , "exportPaths": ["routes"]
  , "importPaths": ["exports"]
  , "icon": "Wahoo.png"
}
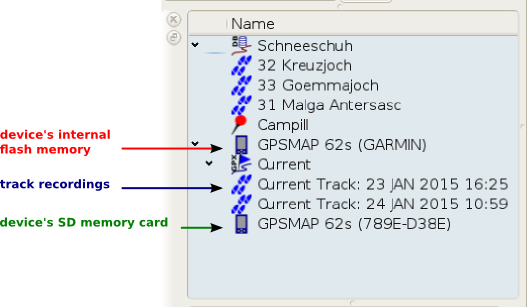
After you plugged your device into the PC you should see something link this:

Each memory of the device is listed in the workspace. If data is found on the device it will be attached as project to its device entry.
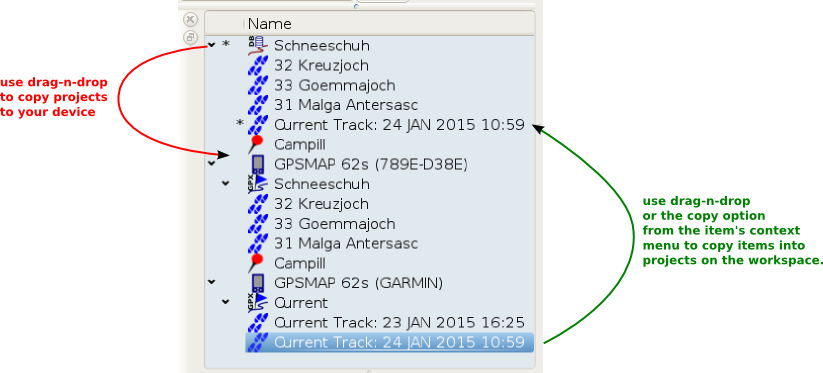
The important part to understand is that a project on the device is stored differently than on the workspace. For example, devices won't be able to deal with the idea of hidden trackpoints. Or it simply has no way to store all the information QMapShack can store. That is why projects have to be copied via the device entry to the device. And consequently, projects on the device can't be copied to the workspace. This would lead to a project clash that is hard to resolve and very likely to lose data.

That understood you copy projects by drag-n-drop to the device entry you want to store them. And after the tour, you copy items like track recordings by drag-n-drop to whatever project on the workspace you want them.

A workspace project can be automatically synchronized with the device. To do so, open the context menu of the workspace project and select the menu entry Autom. sync. w. device. An uppercase letter S in front of the project name is an indicator that autosynchronization is active. Click again the same menu entry to switch it off (Feature available starting with commit c022f38233 - 2021-01-27).
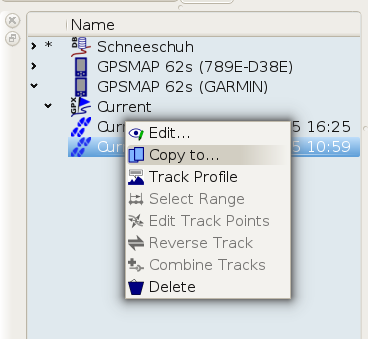
The context menu for items on devices is working, too. However with a limited range of options, as the items on the device are read-only. Copy them to the workspace to change them or to derive other items from them. Next to drag-n-drop you can use the copy option from the menu.

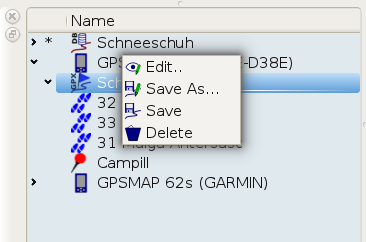
The context menu for the projects is working, too. Note that Close is replaced with Delete. This will delete the project from your device's memory.
Prev ('Lost & Found' Folder) | Home | Manual | Index | Top | (Text Editor Templates) Next