Add a new tileset - pret/pokecrystal GitHub Wiki
This tutorial is for how to add a new tileset. As an example, we'll add Pewter Museum's tileset from pokered (since its unused palette data already exists in pokecrystal).
Contents
- Define a tileset constant
- Point to the tileset's associated data
- Design its graphics
- Design its palette map
- Design its blocks (aka metatiles)
- Include the new files in the ROM
- Define its animated tiles
- Design a custom palette for it
1. Define a tileset constant
Edit constants/tileset_constants.asm:
 ; Tilesets indexes (see data/tilesets.asm)
 	const_def 1
 	const TILESET_JOHTO                ; 01
 	...
 	const TILESET_AERODACTYL_WORD_ROOM ; 24
+	const TILESET_MUSEUM
 DEF NUM_TILESETS EQU const_value - 1
2. Point to the tileset's associated data
Edit data/tilesets.asm:
 ; Associated data:
 ; - The *GFX, *Meta, and *Coll are defined in gfx/tilesets.asm
 ; - The *PalMap are defined in gfx/tileset_palette_maps.asm
 ; - The *Anim are defined in engine/tilesets/tileset_anims.asm

 Tilesets::
 ; entries correspond to TILESET_* constants (see constants/tileset_constants.asm)
 	table_width TILESET_LENGTH, Tilesets
 	tileset Tileset0
 	tileset TilesetJohto
 	...
 	tileset TilesetAerodactylWordRoom
+	tileset TilesetMuseum
 	assert_table_length NUM_TILESETS + 1
The tileset macro simultaneously declares pointers to Tileset*GFX, Tileset*Meta, Tileset*Coll, Tileset*PalMap, and Tileset*Anim. Those five labels all need to be defined, and their respective data needs to be created.
TilesetMuseumGFXwill be the label for gfx/tilesets/museum.pngTilesetMuseumMetawill be the label for data/tilesets/museum_metatiles.binTilesetMuseumCollwill be the label for data/tilesets/museum_collision.asmTilesetMuseumPalMapwill be the label for gfx/tilesets/museum_palette_map.asmTilesetMuseumAnimwill be a label in engine/tilesets/tileset_anims.asm
3. Design its graphics
Download gfx/tilesets/gate.png from pokered and save it as gfx/tilesets/museum.png:

(Of course, if this were an original tileset, you would have to create the file. You do not have to design all the tiles at this stage, though; you can just create a blank image and design them later with Polished Map, a map and tileset editor program.)
Tileset graphics can contain up to 192 tiles, each tile being 8x8 pixels. (Although this limit can be expanded to 255 tiles.) The graphics are four-color grayscale; we'll assign color palettes to the tiles next.
4. Design its palette map
The way the GameBoy hardware works, tileset graphics aren't stored as a colored image. Instead the game has a set of grayscale tile graphics, a set of eight tile color palettes, and a way to assign the palettes to the tiles. In pokecrystal, each tile always has the same palette. (Although this tutorial explains how to give the same tile different colors in different places.)
Rename gfx/tilesets/unused_museum_palette_map.asm to gfx/tilesets/museum_palette_map.asm. (Again, create the file if you need to, and leave it empty if you want to assign the colors later in Polished Map.)
These are its contents:
 	tilepal 0, WATER, RED, YELLOW, YELLOW, RED, GREEN, GREEN, BROWN
 	tilepal 0, BROWN, BROWN, GRAY, GRAY, GRAY, GRAY, GRAY, GRAY
 	tilepal 0, GRAY, GRAY, YELLOW, YELLOW, RED, GREEN, GREEN, BROWN
 	tilepal 0, BROWN, ROOF, GRAY, GRAY, GRAY, GRAY, GRAY, GRAY
 	tilepal 0, GRAY, GRAY, BROWN, BROWN, GRAY, BROWN, BROWN, ROOF
 	tilepal 0, ROOF, BROWN, BROWN, BROWN, ROOF, ROOF, ROOF, ROOF
 	tilepal 0, ROOF, ROOF, BROWN, BROWN, GRAY, BROWN, BROWN, ROOF
 	tilepal 0, ROOF, GRAY, ROOF, BROWN, ROOF, ROOF, GRAY, GRAY
 	tilepal 0, GRAY, GRAY, GRAY, GRAY, GRAY, GRAY, ROOF, ROOF
 	tilepal 0, GRAY, GRAY, GRAY, GRAY, GRAY, GRAY, RED, RED
 	tilepal 0, GRAY, GRAY, GRAY, GRAY, GRAY, GRAY, GRAY, GRAY
 	tilepal 0, GRAY, GRAY, GRAY, GRAY, GRAY, GRAY, GRAY, GRAY

 rept 16
 	db $ff
 endr

 	tilepal 1, WATER, RED, YELLOW, YELLOW, RED, GREEN, GREEN, BROWN
 	tilepal 1, BROWN, BROWN, GRAY, GRAY, GRAY, GRAY, GRAY, GRAY
 	tilepal 1, GRAY, GRAY, YELLOW, YELLOW, RED, GREEN, GREEN, BROWN
 	tilepal 1, BROWN, ROOF, GRAY, GRAY, GRAY, GRAY, GRAY, GRAY
 	tilepal 1, GRAY, GRAY, BROWN, BROWN, GRAY, BROWN, BROWN, ROOF
 	tilepal 1, ROOF, BROWN, BROWN, BROWN, ROOF, ROOF, ROOF, ROOF
 	tilepal 1, ROOF, ROOF, BROWN, BROWN, GRAY, BROWN, BROWN, ROOF
 	tilepal 1, ROOF, GRAY, ROOF, BROWN, ROOF, ROOF, GRAY, GRAY
 	tilepal 1, GRAY, GRAY, GRAY, GRAY, GRAY, GRAY, ROOF, ROOF
 	tilepal 1, GRAY, GRAY, GRAY, GRAY, GRAY, GRAY, RED, RED
 	tilepal 1, GRAY, GRAY, GRAY, GRAY, GRAY, GRAY, GRAY, GRAY
 	tilepal 1, GRAY, GRAY, GRAY, GRAY, GRAY, GRAY, GRAY, GRAY
There are eight valid tile colors: GRAY, RED, GREEN, WATER, YELLOW, BROWN, ROOF, and TEXT. Some are special:
- The lightest hue of
WATERcycles between white, light blue, and dark blue in outdoor maps. This helps make the various water-related tiles look more animated, but it prevents you from usingWATERfor plain blue tiles. YELLOWappears to glow at night in outdoor maps. This is useful for windows, but it prevents you from usingYELLOWfor plain yellow tiles.ROOFis a light blue for indoor maps, but varies for outdoor maps depending on which map group they're in. For more information onROOFcolors, see the tutorial on how to add a new map and landmark.TEXTis reserved for textboxes and Crystal's popup map name signs.
(This tutorial explains how to add PRIORITY colors for tiles that appear above sprites.)
Anyway, you can see how the colors pair up with the tile graphics, at least at first. Whenever a tile is drawn, the map engine refers to this list to get its color. There are actually more colors than there are tiles. This is harmless, but not necessary; if you're making a new tileset, you only need enough colors for each tile. (All the pokecrystal tilesets have palette data for every tile ID, even though few of them have that many tiles.)
The rept 16 \ db $ff \ endr in the middle is skipping over tile IDs $60 to $7F, which are used for text characters instead of map tiles. (This tutorial explains how to reorganize things so you can use all 255 tile IDs for maps.)
5. Design its blocks (aka metatiles)
Maps in pokecrystal are designed with blocks, not tiles, where each block (aka "metatile") is a 4x4 square of tiles. Each block also has 2x2 "collision" data describing how NPCs can interact with each quadrant.
Download gfx/blocksets/gate.bst from pokered and save it as data/tilesets/museum_metatiles.bin. (Yes, the formats are identical from Gen 1 to Gen 2.)
If this were an original tileset, you would have to create the file. You can create an empty file with the extension .bin instead of .txt, or run the command touch data/tilesets/museum_metatiles.bin the same way you run make.
Then create data/tilesets/museum_collision.asm. This should also be an empty file. (The collision system in pokered was very different from pokecrystal, based on tiles instead of blocks, so we can't copy it this time.)
At this point, you could design the blocks one by one, using a text editor for museum_collision.asm and a hex editor for museum_metatiles.bin. Just like you could have designed the tiles in a graphics editor, and the palette map in a text editor. But that's tedious and error-prone.
Instead, you can use Polished Map. It's a program for editing maps and tilesets. Just open any of the maps/*.blk files and pick "museum" as its tileset. As long as the graphics, palette map, metatiles, and collision files exist, this will work. Then click Tools→Resize Blockset… (or the blue ± button) to add some blocks to the sidebar, and right-click one of them to open the block editor:
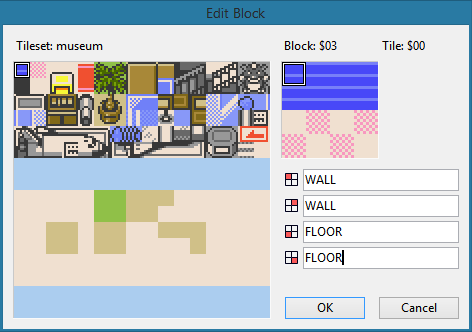
Just place the tiles and type the collision values for each block. Tiles are selected from the tileset, and valid collision values are in constants/collision_constants.asm.
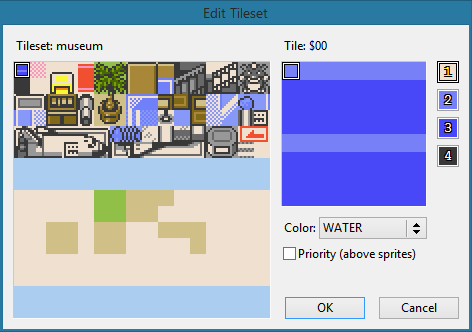
You can also edit the tileset graphics and palette map from within Polished Map. Just click Tools→Edit Tileset… (or the green puzzle piece button):
Note that the first block, with ID 0, is special. Whatever a map's border block is, block #0 will appear as that block. It will also be impassable, no matter what its collision data is, so you can't walk on it. If you know that every map will have the same border block (like the solid blackness surrounding indoor room maps), you can save space by designing that block as #0. But if, for example, some maps are surrounded by trees and others by water, you're better off just not using block #0.
Anyway, once you've designed the blocks (and maybe edited the tiles), save your changes and close Polished Map. If you accidentally changed the map too, just revert the changes to the .blk file. (You are using Git to track your changes and frequently committing them, right?)
Here, I downloaded maps/museum1f.blk from pokered, saved it as maps/PewterMuseum1F.blk, and opened it in Polished Map as a 10x4 map with the museum tileset:
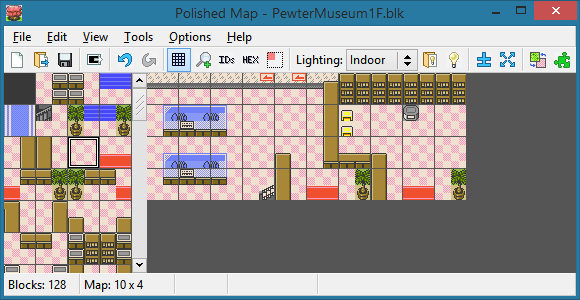
Then I swapped block #0 (floor) and block #10 (solid black) and saved that change, so the border block would be #0 and the floor would be walkable.
6. Include the new files in the ROM
Edit gfx/tilesets.asm:
 SECTION "Tileset Data 8", ROMX

 TilesetHoOhWordRoomMeta::
 INCBIN "data/tilesets/ho_oh_word_room_metatiles.bin"

 TilesetKabutoWordRoomMeta::
 INCBIN "data/tilesets/kabuto_word_room_metatiles.bin"

 TilesetOmanyteWordRoomMeta::
 INCBIN "data/tilesets/omanyte_word_room_metatiles.bin"

 TilesetAerodactylWordRoomMeta::
 INCBIN "data/tilesets/aerodactyl_word_room_metatiles.bin"
+
+TilesetMuseumGFX::
+INCBIN "gfx/tilesets/museum.2bpp.lz"
+
+TilesetMuseumMeta::
+INCBIN "data/tilesets/museum_metatiles.bin"
+
+TilesetMuseumColl::
+INCLUDE "data/tilesets/museum_collision.asm"
It doesn't matter which SECTION these files go in. You can make new ones to keep them organized, or just keep filling the existing sections until they run out of space. (If make gives you a "Section is too big" or "Unable to place section in bank" error, you've overfilled a bank.)
Now edit gfx/tileset_palette_maps.asm:
-UnusedMuseumPalMap:
-INCLUDE "gfx/tilesets/unused_museum_palette_map.asm"
+TilesetMuseumPalMap:
+INCLUDE "gfx/tilesets/museum_palette_map.asm"
These files all go in the same section, so you can't have too many tilesets or the bank will overflow. That's unlikely to happen, but if it does, remember that most of the tilesets have excess palette data that can be removed.
7. Define its animated tiles
Edit engine/tilesets/tileset_anims.asm:
 TilesetBattleTowerOutsideAnim:
 ...
 TilesetAerodactylWordRoomAnim:
+TilesetMuseumAnim:
 	dw NULL,  WaitTileAnimation
 	dw NULL,  WaitTileAnimation
 	dw NULL,  WaitTileAnimation
 	dw NULL,  WaitTileAnimation
 	dw NULL,  DoneTileAnimation
This tileset doesn't actually have any animated tiles, so it can share the same data as many other no-animation tilesets. If your tileset does have animated tiles—water, flowers, waterfalls, whirlpools, bubbling lava, etc—then look at how other tilesets do theirs. Each one basically has a list of commands that get run in sequence, until DoneTileAnimation, but the individual commands are all unique.
Note that you can't animate tiles $80 and above. That's because they exist in VRAM bank 1, and the tile animation engine runs while in bank 0.
Anyway, that's it. Now maps can use TILESET_MUSEUM like any other tileset.
8. Design a custom palette for it
A few tilesets in pokecrystal have custom palettes. For example, Ice Path uses an entirely different palette from most caves; and Radio Tower uses a subtly different palette that makes YELLOW look green and GREEN look green-on-blue, so the tops of potted plants look natural against the blue walls.
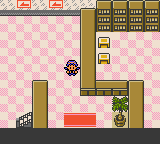
Here the yellow seats look kind of bright. We could use a different color like GRAY or BROWN, but let's instead make a custom palette that changes YELLOW.
Create gfx/tilesets/museum.pal:
+; gray
+	RGB 30, 28, 26
+	RGB 19, 19, 19
+	RGB 13, 13, 13
+	RGB 07, 07, 07
+; red
+	RGB 30, 28, 26
+	RGB 31, 19, 24
+	RGB 30, 10, 06
+	RGB 07, 07, 07
+; green
+	RGB 30, 28, 26
+	RGB 15, 20, 01
+	RGB 09, 13, 00
+	RGB 07, 07, 07
+; water (blue)
+	RGB 30, 28, 26
+	RGB 15, 16, 31
+	RGB 09, 09, 31
+	RGB 07, 07, 07
+; yellow
+	RGB 30, 28, 26
+	RGB 28, 22, 03
+	RGB 21, 14, 02
+	RGB 07, 07, 07
+; brown
+	RGB 26, 24, 17
+	RGB 21, 17, 07
+	RGB 16, 13, 03
+	RGB 07, 07, 07
+; roof (glass)
+	RGB 30, 28, 26
+	RGB 17, 19, 31
+	RGB 14, 16, 31
+	RGB 07, 07, 07
+; text
+	RGB 31, 31, 16
+	RGB 31, 31, 16
+	RGB 14, 09, 00
+	RGB 00, 00, 00
This is based on gfx/tilesets/house.pal, but with the glass-blue indoor ROOF colors from gfx/tilesets/bg_tiles.pal, and custom YELLOW colors that don't look glowing bright.
Now edit engine/tilesets/tileset_palettes.asm:
 LoadSpecialMapPalette:
 	ld a, [wMapTileset]
 	cp TILESET_POKECOM_CENTER
 	jr z, .pokecom_2f
 	cp TILESET_BATTLE_TOWER
 	jr z, .battle_tower
 	cp TILESET_ICE_PATH
 	jr z, .ice_path
 	cp TILESET_HOUSE
 	jr z, .house
 	cp TILESET_RADIO_TOWER
 	jr z, .radio_tower
 	cp TILESET_MANSION
 	jr z, .mansion_mobile
+	cp TILESET_MUSEUM
+	jr z, .museum
 	jr .do_nothing

 ...

 .mansion_mobile
 	call LoadMansionPalette
 	scf
 	ret
+
+.museum
+	call LoadMuseumPalette
+	scf
+	ret

 .do_nothing
 	and a
 	ret

 ...

+LoadMuseumPalette:
+	ld a, BANK(wBGPals1)
+	ld de, wBGPals1
+	ld hl, MuseumPalette
+	ld bc, 8 palettes
+	jp FarCopyWRAM
+
+MuseumPalette:
+INCLUDE "gfx/tilesets/museum.pal"
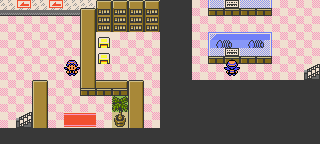
This calls LoadMuseumPalette to, er, load MuseumPalette, if [wMapTileset] is TILESET_MUSEUM.
Now the museum will appear differently:
Note that you can do any sort of condition check in LoadSpecialMapPalette, not just for the value of [wMapTileset]. You can check for a particular map in [wMapGroup] and [wMapNumber]; or for the time of day in [wTimeOfDayPal]; or so on.