Add a new map and landmark - pret/pokecrystal GitHub Wiki
This tutorial is for how to add a new map and a new landmark. As an example, we'll add two maps: the outdoor and indoor maps of the Global Terminal. The indoor map will have its own landmark.
Contents
- Plan the map's role in the game
- Design the map with Polished Map
- Define a map constant
- Define its group data
- Define its properties
- Define its attributes
- Define its SGB roof palettes
- Define any new landmarks
- Write its event scripts
- Include the block and script data
- Common mistakes
1. Plan the map's role in the game
The Global Terminal in HGSS was a tall building west of Goldenrod City, made for interaction with other players via DS Wi-Fi. That's not possible with the GameBoy Color, but a "global terminal" would also make sense as an inter-regional rest stop for travelers and tourists in a port city. Here's a mockup of what it will look like:
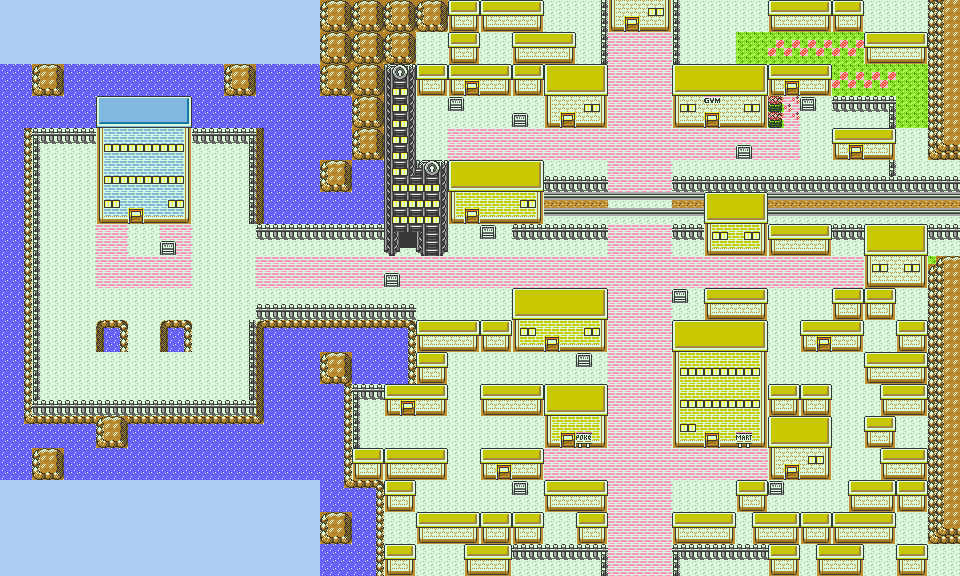
Microsoft Paint is fine for making mockups and plans; paint.net is also a good choice, with more features like layers and an undo/redo history.
2. Design the map with Polished Map
The maps/*.blk files that define map layouts can't be edited as text, and hex editing them is inconvenient. So we'll use Polished Map, a program for Windows or Linux that can edit map layouts as well as tilesets. (Editing tilesets is beyond the scope of this tutorial.)
To install Polished Map, just follow the instructions in its INSTALL.md: download install.bat and polishedmap.exe from the latest release; run install.bat with admin privileges; and delete the downloaded files, since a shortcut to the installed copy of Polished Map should now exist on your Desktop. If you need help using it, read the documentation in the Help menu.
Anyway, create a new map, choosing pokecrystal as the project directory (or whatever your pokecrystal-based project happens to be named). Make the new map 10 blocks wide and 13 blocks high, using the johto_modern tileset and goldenrod roofs. Then draw its blocks like this:
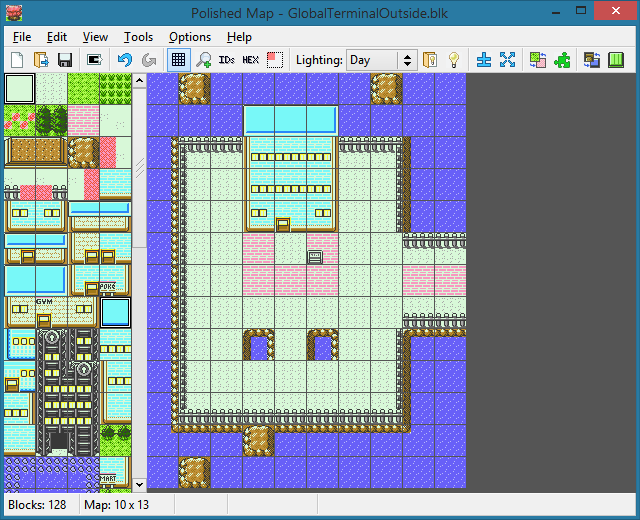
Save that as maps/GlobalTerminalOutside.blk.
(Notice that the roof and walls appear cyan. That's because the ROOF color depends on which group a map is in, and we haven't defined a group for this map yet. We'll see how roofs work later.)
Next, open maps/GoldenrodCity.blk; its 20x18 size and johto_modern tileset should be filled in automatically, but you'll need to manually pick the goldenrod roof pattern. Edit its west side to neatly connect with the Global Terminal:
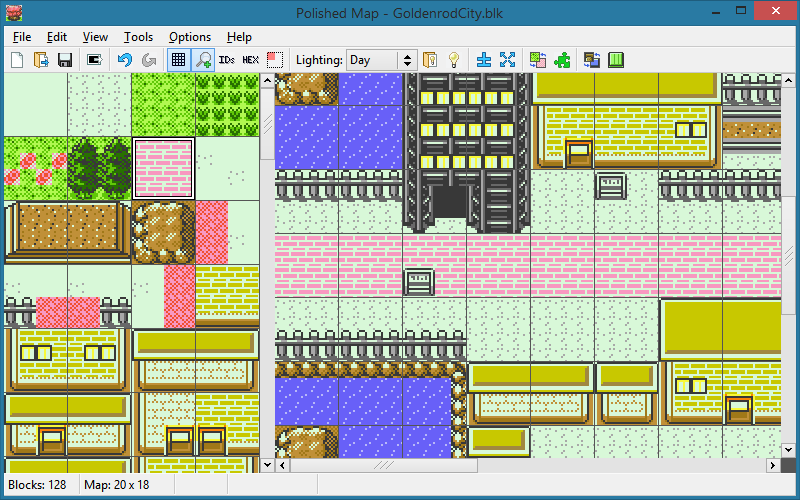
Be sure to save your changes.
Now create another new map, 9 blocks wide and 6 blocks high, using the radio_tower tileset. Then draw its blocks like this:
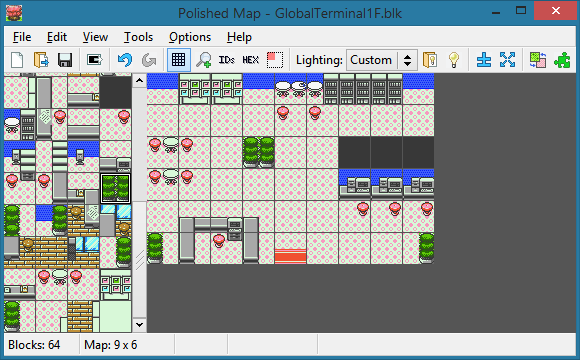
Save that as maps/GlobalTerminal1F.blk.
When you're designing maps, keep their size below this limit:
(width + 6) × (height + 6) ≤ 1300
The current map's block data gets loaded into WRAM at the address wOverworldMapBlocks, which is declared to have 1300 bytes in wram.asm. This buffer gets padded on all sides with an extra 3 blocks to load the edges of any connected maps.
It so happens that a 30x30 map will neatly fit into this limit, since (30+6)×(30+6)=1296. However, keep in mind that the official maps are usually designed with the width as a multiple of 10 and the height as a multiple of 9. For example, small towns are often 10x9; large cities are 20x18; routes may be 20x9, or 10x18, or 10x45, or so on; National Park is 20x27; et cetera.
3. Define a map constant
Edit constants/map_constants.asm:
 ; map group ids
 ; `newgroup` indexes are for:
 ; - MapGroupPointers (see data/maps/maps.asm)
 ; - MapGroupRoofs (see data/maps/roofs.asm)
 ; - OutdoorSprites (see data/maps/outdoor_sprites.asm)
 ; - RoofPals (see gfx/tilesets/roofs.pal)
 ; `map_const` indexes are for the sub-tables of MapGroupPointers (see data/maps/maps.asm)
 ; Each map also has associated data:
 ; - attributes (see data/maps/attributes.asm)
 ; - blocks (see data/maps/blocks.asm)
 ; - scripts and events (see data/maps/scripts.asm)
 	const_def

	newgroup OLIVINE                                              ;  1
 	map_const OLIVINE_POKECENTER_1F,                        5,  4 ;  1
 	...
	endgroup

 	...

	newgroup CHERRYGROVE                                          ; 26
 	map_const ROUTE_30,                                    10, 27 ;  1
 	...
	endgroup

+	newgroup GLOBAL_TERMINAL                                      ; 27
+	map_const GLOBAL_TERMINAL_OUTSIDE,                     10, 13 ;  1
+	map_const GLOBAL_TERMINAL_1F,                           9,  6 ;  2
+	endgroup

-DEF NUM_MAP_GROUPS EQU const_value ; 26
+DEF NUM_MAP_GROUPS EQU const_value ; 27
Map constants have two parts: the group ID and the map ID. Groups are significant for outdoor maps because they share a roof palette and an outdoor sprite set (more on those later). For indoor maps, groups don't really matter, but they're usually grouped with their corresponding outdoor maps for the sake of organization.
The line map_const GLOBAL_TERMINAL_OUTSIDE, 10, 13 defines four constants at once:
GROUP_GLOBAL_TERMINAL_OUTSIDEis 27, since that's the current group IDMAP_GLOBAL_TERMINAL_OUTSIDEis 1, since that's the current map IDGLOBAL_TERMINAL_OUTSIDE_WIDTHis 10GLOBAL_TERMINAL_OUTSIDE_HEIGHTis 13
The width and height are the size of the map we designed earlier. Now if you open maps/GlobalTerminalOutside.blk in Polished Map, the TitleCase filename "GlobalTerminalOutside" will get matched with the UPPER_CASE constant prefix "GLOBAL_TERMINAL_OUTSIDE", and the 10x13 size will be automatically filled in.
Note that there is no constant named just GLOBAL_TERMINAL_OUTSIDE! This can confuse people because there are constants simply named GOLDENROD_CITY, NEW_BARK_TOWN, etc. Those are landmark constants, unrelated to map constants. We'll see what those are used for later.
4. Define its group data
Every map in a group shares three things: a roof type, roof palette, and outdoor sprite set. We made a new group for the Global Terminal, so we have to define all of those.
If you're adding a map to an existing group, you can skip this step! Just be aware of what those values already are for that group, since they limit your options for designing outdoor maps.
Roof type
The roof type controls which nine roof tiles get used. This only applies to maps with the TILESET_JOHTO, TILESET_JOHTO_MODERN, or TILESET_BATTLE_TOWER_OUTSIDE tileset, since they have placeholder roof tiles in the right spot. (Those particular tilesets are hard-coded by LoadTilesetGFX in home/map.asm.)
Edit data/maps/roofs.asm:
 MapGroupRoofs:
 ; entries correspond to map groups
 ; values are indexes for Roofs (see below)
 	table_width 1, MapGroupRoofs
 	db -1             ;  0
 	db ROOF_OLIVINE   ;  1 (Olivine)
 	...
 	db ROOF_NEW_BARK  ; 26 (Cherrygrove)
+	db ROOF_GOLDENROD ; 27 (Global Terminal)
	assert_table_length NUM_MAP_GROUPS + 1
Roof tiles, like all graphics, are only loaded when you warp to a map. Walking across map connections, like from Route 34 to Goldenrod City, will not reload graphics. So if two maps are connected, even if they're in different groups, their roof types have to match. We're going to connect the Global Terminal to Goldenrod City's west edge later, so it has to use the same roof type.
Roof palette
The roof palette affects tiles that use the ROOF palette. It only applies to "outdoor" maps: those with the TOWN or ROUTE environment. (We'll go over environments later.)
Edit gfx/tilesets/roofs.pal:
 ; group 0 (unused)
 	RGB 21,21,21, 11,11,11 ; morn/day
 	RGB 21,21,21, 11,11,11 ; nite

 ...

 ; group 26 (Cherrygrove)
 	RGB 31,14,28, 31,05,21 ; morn/day
 	RGB 14,07,17, 13,00,08 ; nite

+; group 27 (Global Terminal)
+	RGB 16,23,28, 03,15,21 ; morn/day
+	RGB 08,11,21, 02,08,16 ; nite
Maps get most of their palettes from gfx/tilesets/bg_tiles.pal, but outdoor maps load their ROOF palettes from roofs.pal. Only the middle two colors are specified; the lightest and darkest, usually off-white and gray/black, are unchanged from their bg_tiles.pal values.
Unlike tiles, palettes are reloaded when you cross a map connection, so the Global Terminal can have a unique roof color.
If you're using a desktop graphics program like Paint, it will show red, green, and blue color channel values from 0 to 255. Color channels on the GameBoy Color range from 0 to 31, so just divide the Paint values by 8 to get the right ones.
To derive "nite" colors from "morn/day" colors, you can take 50% of the red and green values and 75% of the blue value.
Outdoor sprite set
The outdoor sprite set is the set of sprites it's possible to use in outdoor maps. Indoor maps are all independent, so they load graphics for whichever sprites happen to be used on each map; but outdoor maps can be connected to each other, so it's necessary to define a set of usable sprites that covers all the connected maps.
Edit data/maps/outdoor_sprites.asm:
 OutdoorSprites:
 ; entries correspond to map groups
 	table_width 2, OutdoorSprites
 	dw OlivineGroupSprites
 	...
 	dw CherrygroveGroupSprites
+	dw GlobalTerminalSprites
	assert_table_length NUM_MAP_GROUPS

 ...

+GlobalTerminalSprites:
 GoldenrodGroupSprites:
 	db SPRITE_SUICUNE
 	db SPRITE_SILVER_TROPHY
 	db SPRITE_POKE_BALL
 	db SPRITE_POKEDEX
 	db SPRITE_WILL
 	db SPRITE_KAREN
 	db SPRITE_NURSE
 	db SPRITE_OLD_LINK_RECEPTIONIST
 	db SPRITE_BIG_LAPRAS
 	db SPRITE_BIG_ONIX
 	db SPRITE_SUDOWOODO
 	db SPRITE_BIG_SNORLAX
 	db SPRITE_GRAMPS
 	db SPRITE_YOUNGSTER
 	db SPRITE_OFFICER
 	db SPRITE_POKEFAN_M
 	db SPRITE_DAY_CARE_MON_1
 	db SPRITE_COOLTRAINER_F
 	db SPRITE_ROCKET
 	db SPRITE_LASS
 	db SPRITE_DAY_CARE_MON_2
 	db SPRITE_FRUIT_TREE
 	db SPRITE_SLOWPOKE
The Global Terminal is going to be connected to the west edge of Goldenrod City, so they'll have to have identical sprite sets; to save space, they can literally use the same data. Note that, for instance, OlivineGroupSprites and CianwoodGroupSprites are two different sets but have identical contents, since you can Surf from Olivine City to Cianwood City.
In general you can use this template for defining new sprite sets:
	; 12 non-walking filler sprites
	db SPRITE_SUICUNE
	db SPRITE_SILVER_TROPHY
	db SPRITE_FAMICOM
	db SPRITE_POKEDEX
	db SPRITE_WILL
	db SPRITE_KAREN
	db SPRITE_NURSE
	db SPRITE_OLD_LINK_RECEPTIONIST
	db SPRITE_BIG_LAPRAS
	db SPRITE_BIG_ONIX
	db SPRITE_SUDOWOODO
	db SPRITE_BIG_SNORLAX
	; 9 walking sprites
	db SPRITE_COOLTRAINER_M
	db SPRITE_COOLTRAINER_F
	db SPRITE_BUG_CATCHER
	db SPRITE_TWIN
	db SPRITE_YOUNGSTER
	db SPRITE_LASS
	db SPRITE_TEACHER
	db SPRITE_BUENA
	db SPRITE_SUPER_NERD
	; 2 non-walking sprites
	db SPRITE_POKE_BALL
	db SPRITE_FRUIT_TREE
A sprite set has 23 sprites, but only nine of them can have walking frames. (Replace those nine with whichever ones your particular maps need.) Examining the VRAM in BGB reveals why they're like this:
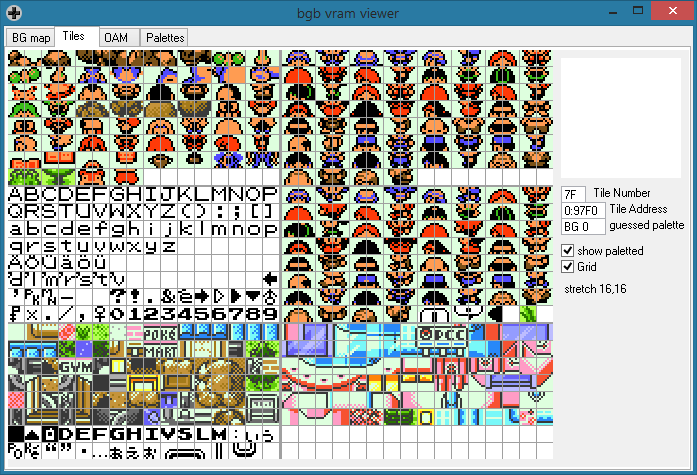
VRAM is divided into six areas, each 128 tiles large. The middle-right area is for sprites' walking frames. 3 frames per sprite (up/down/side) × 4 tiles per frame = 12 tiles per sprite. 9 NPC sprites + the player sprite = 10 sprites = 120 walking frame tiles. (The remaining 8 are used for special effects like emotes, ledge-hopping shadows, rustling grass, fishing rods, etc.)
Notice how text characters are in the middle-left area. This is why, if an NPC is using a sprite from the top-left area that doesn't have walking frames, it will glitch and appear as text when it takes a step.
This may seem annoying to edit. You have to keep connected sets in sync, like OlivineGroupSprites and CianwoodGroupSprites; you have to ignore the filler sprites like SPRITE_FAMICOM to see which sprites actually get used; and you can't use more than nine sprites with walking frames in a set, even if only nine of them actually walk in any of the maps, because you can't determine which nine will have their walking frames loaded. I strongly recommend following this tutorial to change the system and fix all of those issues.
5. Define its properties
Edit data/maps/maps.asm:
 MapGroupPointers::
 ; pointers to the first map of each map group
 	table_width 2, MapGroupPointers
 	dw MapGroup_Olivine     ;  1
 	...
 	dw MapGroup_Cherrygrove ; 26
+	dw MapGroup_GlobalTerminal ; 27
	assert_table_length NUM_MAP_GROUPS

 ...

+MapGroup_GlobalTerminal:
+	table_width MAP_LENGTH, MapGroup_GlobalTerminal
+	map GlobalTerminalOutside, TILESET_JOHTO_MODERN, ROUTE, LANDMARK_GOLDENROD_CITY, MUSIC_GOLDENROD_CITY, FALSE, PALETTE_AUTO, FISHGROUP_SHORE
+	map GlobalTerminal1F, TILESET_RADIO_TOWER, INDOOR, GLOBAL_TERMINAL, MUSIC_GOLDENROD_CITY, FALSE, PALETTE_DAY, FISHGROUP_SHORE
+	assert_table_length NUM_GLOBAL_TERMINAL_MAPS
The map macro defines these different properties:
- map name: The name of the map. For consistency the same name should be used in every label or filename related to a map.
- tileset: The tileset used by the map. The tileset constants are defined in constants/tileset_constants.asm.
GlobalTerminalOutsidehas to useTILESET_JOHTO_MODERN, the same tileset asGoldenrodCity, because they'll be connected. - environment: The map environment. Environments have various effects; a subtle one is that the graphics for rustling tall grass are only loaded outdoors, and the graphics for pushing Strength boulders are only loaded indoors (so don't place any Strength boulders outdoors). Valid environments are defined in constants/map_data_constants.asm:
TOWN: Outdoors. Can use Fly or Teleport.ROUTE: Outdoors. Can use Fly or Teleport.INDOOR: Indoors. Can't use the Bicycle.CAVE: Indoors. Can use Dig or Escape Rope out to the last outdoor map (with some hard-coded exceptions).ENVIRONMENT_5: Neither outdoors nor indoors. Can't use the Bicycle.GATE: Indoors. Won't show pop-up location name signs.DUNGEON: Indoors. Can't use the Bicycle. Can use Dig or Escape Rope just likeCAVE.
- location: Which landmark corresponds to the map. This affects where you appear on the Town Map and what the pop-up location name sign will say. Note that the
LANDMARK_GLOBAL_TERMINALlandmark hasn't been defined yet; we'll do that later. - music: What music plays on the map. Some music constants can have unusual behavior; if a map plays the wrong music, you can correct this design flaw.
- phone service flag:
TRUEif Pokégear phone service is disabled, otherwiseFALSE. - time of day: Controls the color palette. One of
PALETTE_AUTO,PALETTE_MORN,PALETTE_DAY,PALETTE_NITE, orPALETTE_DARK.PALETTE_AUTOis based on the actual time of day.PALETTE_DARKrequires Flash. - fishing group: Controls the group of wild Pokémon available by fishing. Valid fishing groups are defined in constants/map_data_constants.asm:
6. Define its attributes
Edit data/maps/attributes.asm:
-	map_attributes GoldenrodCity, GOLDENROD_CITY, $35, NORTH | SOUTH
+	map_attributes GoldenrodCity, GOLDENROD_CITY, $35, NORTH | SOUTH | WEST
 	connection north, Route35, ROUTE_35, 5
 	connection south, Route34, ROUTE_34, 5
+	connection west, GlobalTerminalOutside, GLOBAL_TERMINAL_OUTSIDE, 2
+
+	map_attributes GlobalTerminalOutside, GLOBAL_TERMINAL_OUTSIDE, $35, EAST
+	connection east, GoldenrodCity, GOLDENROD_CITY, -2

 ...

 	...
 	map_attributes Route31VioletGate, ROUTE_31_VIOLET_GATE, $00, 0
+	map_attributes GlobalTerminal1F, GLOBAL_TERMINAL_1F, $00, 0
The map_attributes macro takes four arguments: the map name, map ID, border block, and connections. The name and ID just identify the map; they aren't defining anything important.
The border block is the block ID that fills the map's surroundings when you get too close to the edge. Usually it's trees for an outdoor map, water for the ocean, clifftop for a cave, solid black for a house, etc.
The connections value is a combination of NORTH, SOUTH, WEST, or EAST, or 0 if the map has no connections. Only outdoor maps have connections; they're what let you walk straight from one map to another, without needing to warp via a door or staircase. Whatever connections a map has, it's followed by a connection macro for each of them, in north-south-west-east order.
The connection macro takes four arguments: the direction, map name, map ID, and sideways offset. Again, the direction, map name, and map ID are just for identification. The sideways offset is how many blocks to shift the connected map perpendicular to its direction. A north or south connection gets shifted right/east, a west or east connection gets shifted down/south. (So negative offsets will shift left/west or up/north, respectively.)
If the offset isn't clear, try comparing screenshots of other maps with their own offset values, and base your own connections on similarly aligned ones. In this case, GLOBAL_TERMINAL_OUTSIDE is two blocks lower than GOLDENROD_CITY, so their offsets are −2 and 2 respecitvely.
(Before November 10, 2018, the connection macro took six parameters; instead of a single sideways offset, you had to specify a target offset, source offset, and strip length, which were confusing and harder to calculate. The current macro definition has legacy support for the old one, since in all of the official maps, sideways offset = target offset − source offset, with the strip length being completely redundant. I strongly recommend porting the new macro to any old pokecrystal projects.)
7. Define its SGB roof palettes
Even though Pokémon Crystal isn't compatible with the Super Game Boy, there's a table defining roof palettes for this mode and if we don't edit it then we'll get assembly errors when building the ROM, so we need to add the corresponding constant and define its colors.
First, let's edit data/maps/sgb_roof_pal_inds.asm:
 MapGroupRoofSGBPalInds:
 ; entries correspond to map groups
	table_width 1, MapGroupRoofSGBPalInds
	db PREDEFPAL_ROUTES
	...
	db PREDEFPAL_CHERRYGROVE
+	db PREDEFPAL_GLOBAL_TERMINAL
	assert_table_length NUM_MAP_GROUPS + 1
We've put PREDEFPAL_GLOBAL_TERMINAL in the list, but the constant hasn't been defined yet. Let's create it in constants/scgb_constants.asm:
 ; PredefPals indexes (see gfx/sgb/predef.pal)
 ; GetPredefPal arguments (see engine/gfx/color.asm)
	const_def
	const PREDEFPAL_ROUTES
	...
	const PREDEFPAL_DUNGEONS
+	const PREDEFPAL_GLOBAL_TERMINAL
	const PREDEFPAL_NITE
	...
Now the only thing left is to define the colors associated to it. Since which colors we choose really don't matter (again, the SGB mode can't be accesed) let's take the ones from Goldenrod City and edit gfx/sgb/predef.pal:
	RGB 31,31,31, 22,25,19, 16,21,30, 00,00,00 ; PREDEFPAL_ROUTES
	...
	RGB 31,31,31, 21,14,09, 15,20,20, 00,00,00 ; PREDEFPAL_DUNGEONS
+	RGB 31,31,31, 29,26,18, 15,20,31, 00,00,00 ; PREDEFPAL_GLOBAL_TERMINAL
	RGB 31,31,31, 12,28,22, 15,20,20, 00,00,00 ; PREDEFPAL_NITE
	...
8. Define any new landmarks
If you don't need any new landmarks, skip this step.
We assigned the GlobalTerminal1F map to the new GLOBAL_TERMINAL landmark (like how the Radio Tower gets its own landmark), so let's add that next.
Edit constants/landmark_constants.asm:
 ; Landmarks indexes (see data/maps/landmarks.asm)
 	const_def
  	const LANDMARK_SPECIAL       ; 00
 ; Johto landmarks
 	...
 	const LANDMARK_RADIO_TOWER       ; 11
+	const LANDMARK_GLOBAL_TERMINAL
 	const LANDMARK_ROUTE_35          ; 12
 	...
The Town Map will cycle through landmarks in their constant order.
Now edit data/maps/landmarks.asm:
 Landmarks:
 ; entries correspond to constants/landmark_constants.asm
 	table_width 4, Landmarks
 	landmark  -8, -16, SpecialMapName
 	landmark 140, 100, NewBarkTownName
 	...
 	landmark  50,  92, RadioTowerName
+	landmark  44,  92, GlobalTerminalName
 	landmark  52,  76, Route35Name
 	...
 	landmark 140, 116, FastShipName
	assert_table_length NUM_LANDMARKS

 NewBarkTownName:     db "NEW BARK¯TOWN@"
 ...
 SpecialMapName:      db "SPECIAL@"
+GlobalTerminalName:  db "GLOBAL¯TERMINAL@"
The two numbers passed to the landmark macro are the X and Y coordinates on the Town Map, in pixels from the top-left corner of the screen.
Note the use of "¯" in some landmark names. That character gets treated as a line break in the Town Map, but as a space in pop-up location name signs.
9. Write its event scripts
Create maps/GlobalTerminalOutside.asm:
+	object_const_def
+	const GLOBALTERMINALOUTSIDE_ROCKET
+
+GlobalTerminalOutside_MapScripts:
+	def_scene_scripts
+
+	def_callbacks
+
+GlobalTerminalOutside_MapEvents:
+	db 0, 0 ; filler
+
+	def_warp_events
+	warp_event  8, 13, GLOBAL_TERMINAL_1F, 1
+
+	def_coord_events
+
+	def_bg_events
+
+	def_object_events
+	object_event 24, 16, SPRITE_ROCKET, SPRITEMOVEDATA_STANDING_UP, 0, 0, -1, -1, 0, OBJECTTYPE_SCRIPT, 0, GoldenrodCityRocketScoutScript, EVENT_GOLDENROD_CITY_ROCKET_SCOUT
And create maps/GlobalTerminal1F.asm:
+	object_const_def
+
+GlobalTerminal1F_MapScripts:
+	def_scene_scripts
+
+	def_callbacks
+
+GlobalTerminal1F_MapEvents:
+	db 0, 0 ; filler
+
+	def_warp_events
+	warp_event  8, 11, GLOBAL_TERMINAL_OUTSIDE, 1
+	warp_event  9, 11, GLOBAL_TERMINAL_OUTSIDE, 1
+
+	def_coord_events
+
+	def_bg_events
+
+	def_object_events
The only events defined so far are warps, so you can use the doors into and out of the Global Terminal building. (Their coordinates can be found with Polished Map's "Event Cursor" tool.)
(There's also one object_event in GlobalTerminalOutside.asm: a Team Rocket scout copied from GoldenrodCity.asm with only the coordinates changed. That NPC is close enough to the west edge of Goldenrod that it can be seen while you're standing in the Global Terminal map. But NPCs on connected maps aren't visible, so a copy had to be made.)
Writing event scripts is beyond the scope of this tutorial, but you can refer to docs/map_event_scripts.md and docs/event_commands.md for help, and of course use existing map scripts for reference.
You'll probably want a variety of NPCs in the Global Terminal, some from regions beyond Johto and Kanto, maybe with unique items and Pokémon to trade. It's a tall building, with room for more floors than just the one in this example. Or, of course, design your own map. :P
Note that before August 2020, maps did not have def_* macros, so they had to manually declare their quantities of scene_scripts, callbacks, warp_events, etc. So instead of def_warp_events, you would have db 1 or db 2, depending on how many warp_events the map has. If any of those db values were wrong, the map could glitch or crash when you enter it.
10. Include the block and script data
We created some new files in maps/, but they aren't INCLUDEd in the project yet.
Edit data/maps/blocks.asm:
+SECTION "Map Blocks 4", ROMX
+
+GlobalTerminalOutside_Blocks:
+	INCBIN "maps/GlobalTerminalOutside.blk"
+
+GlobalTerminal1F_Blocks:
+	INCBIN "maps/GlobalTerminal1F.blk"
And edit data/maps/scripts.asm:
 SECTION "Map Scripts 25", ROMX

 INCLUDE "maps/SilverCaveOutside.asm"
 INCLUDE "maps/Route10North.asm"
+INCLUDE "maps/GlobalTerminalOutside.asm"
+INCLUDE "maps/GlobalTerminal1F.asm"
It doesn't really matter which SECTION these files go in. You can make new ones to keep them organized, or just keep filling the existing sections until they run out of space. (If make gives you a "Section is too big" or "Unable to place section in bank" error, you've overfilled a bank.)
Anyway, we're done!

11. Common mistakes
...Well, hopefully we're done. You may be having issues with some aspects of new maps. Here are some common ones and their fixes.
Understanding the warp structure
The warp_event data is split into three components: the warp location (its X+Y coordinates), the map target (where you want the warp to take you), and finally the warp target (which warp do you want to enter from). It's a fairly common beginner mistake to always define the third value as 1, even for maps with more than one warp.
Let's visualize it using the starting town: you're about to leave the player's house, and you step on the exit carpet. The game will check what warp you're currently on, and look what the map target and warp targets are (here, NEW_BARK_TOWN and 2). Then, the game looks into New Bark Town's def_warp_events data, and look for the second entry in the list. You'll thus be sent to New Bark Town, on coordinates 13, 5.
; PlayersHouse1F.asm
	def_warp_events
	warp_event  6,  7, NEW_BARK_TOWN, 2
	warp_event  7,  7, NEW_BARK_TOWN, 2
	warp_event  9,  0, PLAYERS_HOUSE_2F, 1

; NewBarkTown.asm
	def_warp_events
	warp_event  6,  3, ELMS_LAB, 1
	warp_event 13,  5, PLAYERS_HOUSE_1F, 1
	warp_event  3, 11, PLAYERS_NEIGHBORS_HOUSE, 1
	warp_event 11, 13, ELMS_HOUSE, 1
Understanding the different warp types
The game has many different ways of taking the player in and out of a map, so much so that it can be confusing to keep track of them all, and each type's attributes:
COLL_DOOR: Warping into a map onto a block with this collision type will always have the player stepping one space down.COLL_STAIRCASE/COLL_CAVE: Both work the same asCOLL_DOOR, but play a different sound effect each.COLL_LADDER: Warping into a map onto a block with this collision type will not move the player down. The direction the player faced upon being warped will be retained on the new map.COLL_PIT: A unique "falling from the sky" animation will play upon warping into the new map. The direction the player faced upon being warped will be retained on the new map.COLL_WARP_PANEL: A "fade to white" animation will play upon warping into the new map. The player will always face down after the warp.COLL_WARP_CARPET_*(DOWN/LEFT/UP/RIGHT): Unique in that, unlike the others, this set of collision types will not warp the player on contact. The player will have to push the D-Pad in the correct direction while on the warp tile. Moreover, a solid surface needs to be adjacent to the carpet for it to work (for example, a warp withCOLL_WARP_CARPET_RIGHTneeds a block space with aWALLcollision directly to the right).
Some maps have "missing" .blk files
A beginner's first look through pokecrystal's maps directory may prove a tad confusing, since a good handful of map scripts seem to be missing their corresponding .blk maps. This simply boils down to optimization, seeing that a lot of locations share the same layout (Pokémon Centers, Poké Marts, NPC houses, etc.), having multiple copies of identical maps would be terribly inneficient, all while taking up a lot of space.
Reusing an already existing .blk like this is actually a really easy thing to do. For example, if one wishes to add a café in Goldenrod City, they can reuse the design of Celadon's own café by INCLUDE-ing it like so in data/maps/blocks.asm:
CeladonCafe_Blocks:
+ GoldenrodCafe_Blocks:
	INCBIN "maps/CeladonCafe.blk"
This skips the map creation part of things, though obviously this will only copy the actual look of the map, and not the data that comes with it (dimensions, tileset, music, etc.) To edit the script of a map with a shared .blk, simply open the "base" map file (a common list of which is found below) in PolishedMap, and from there Select Data and Load Event Script, also accessed through the Ctrl+A shortcut.
House1.blk: The standard NPC house that's used across the entire game.House2.blk: The "traditional" NPC house, used in Violet City and Ecruteak City.Pokecenter1F.blk: The Pokémon Center lobby.Mart.blk: The Poké Mart.EastWestGate.blk: The horizontal gate houses.NorthSouthGate.blk: The vertical gate houses.
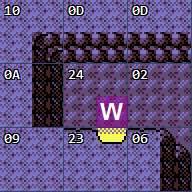
Cave entrance/exit warp doesn't work
The glowing yellow cave mouth looks like what warps you in and out, but it's not. The actual warp_event is placed right above it, on block $24 of the cave or dark_cave tilesets. This block looks just like block $02, the regular floor block, but it has the WARP_CARPET_DOWN collision in the bottom-right corner above where the cave mouth would be.
Cut/Whirlpool doesn't work
Strength boulders and Rock Smash rocks are map objects, Flash darkness is a map palette, and Fly depends on the map environment. Surf and Waterfall look for map tile collision types. So do Cut and Whirlpool, but you'll find that they won't work just by giving a tile the right collision. That's because these field effects work by temporarily replacing one map block with another, and which blocks should be swapped need to be defined for each tileset. This is done in data/collision/field_move_blocks.asm:
; these blocks all use COLL_CUT_TREE in one quadrant
CutTreeBlockPointers:
; tileset, block list pointer
	dbw TILESET_JOHTO,        .johto
	dbw TILESET_JOHTO_MODERN, .johto_modern
	dbw TILESET_KANTO,        .kanto
	dbw TILESET_PARK,         .park
	dbw TILESET_FOREST,       .forest
	db -1 ; end

.johto:
; facing block, replacement block, animation
	db $03, $02, 1 ; grass
	db $5b, $3c, 0 ; tree
	db $5f, $3d, 0 ; tree
	db $63, $3f, 0 ; tree
	db $67, $3e, 0 ; tree
	db -1 ; end

...


; these blocks all use COLL_WHIRLPOOL in one quadrant
WhirlpoolBlockPointers:
	dbw TILESET_JOHTO, .johto
	db -1 ; end

.johto:
; facing block, replacement block, animation
	db $07, $36, 0
	db -1 ; end
The comments explain the data structure: first create a dbw pointer table entry for the new tileset and the label for it to jump to; then under that label, create db sets defining the block ID (in hexadecimal) of the block that should be replaced, the block that should replace it, and the animation to use while swapping them (and end the label with a db -1 ; end terminator). Whirlpools always use 0 for the animation; Cut can be used to mow down tall grass as well as to remove trees, so use 0 for the tree-slicing animation and 1 for the grass-mowing animation. Also note that the graphics for the tree-cutting animation are only loaded on maps with outdoor environments, so don't put a Cut tree on an indoor map.
Use Polished Map to find the hex IDs of the blocks that have Cut trees or Whirlpools, and suitable blocks to change them into after using the HM move. If you look at the existing tilesets, you'll see how there's always a green-floor block to replace the tall grass block, and any block that contains a Cut tree or Whirlpool will have an identical block, only without that tree or whirlpool, for it to change into. You can't have more than one tree or whirlpool within the same block, since the entire block gets replaced when using the field move once.