Allow tiles to have different attributes in different blocks (including X and Y flip) - pret/pokecrystal GitHub Wiki
Note: You should expand your tilesets before following this tutorial! (It's required for convenient map editing.) You should not implement PRIORITY colors. (It's harmless but redundant; this tutorial will undo that work.)
Maps in pokecrystal are designed with blocks, not tiles, where each block (aka "metatile") is a 4x4 square of tiles. Each 8x8-pixel tile always has the same appearance in every block. But the GameBoy hardware is capable of more. The same tile graphic can be reused with different attributes—not just color, but X and Y flip, as well as "priority" to appear above sprites.
For example, here's the kanto tileset. The tiles highlighted in fuchsia are just flipped or recolored copies of the ones highlighted in cyan, so by following this tutorial, you can eliminate all those tiles. And with the priority attribute, you can (for instance) let NPCs walk behind the roof tiles highlighted in yellow. (Although if that's all you want to do, just follow the PRIORITY color tutorial.)

This tutorial will show you how to switch from per-tile *_palette_map.asm files to per-block *_attributes.bin files, which assign full attributes (not just colors) to the individual tiles of each block. By the end, you'll be able to make maps like this.
(The code for this feature was adapted from Pokémon Polished Crystal.)
Contents
- Review how tilesets and VRAM work
- Create *_attributes.bin files from *_palette_map.asm and *_metatiles.bin files
- Remove the old files and include the new ones
- Store attribute pointers in tileset metadata
- Start changing how tile attributes are loaded
- Declare space in WRAM for on-screen tile attributes
- Continue changing how tile attributes are loaded
- Finish changing how tile attributes are loaded
- Rename *.blk to *.ablk
- Use up to 512 tiles in a tileset
1. Review how tilesets and VRAM work
Here's a quick overview of how tilesets work:
- The gfx/tilesets/*.png files are the tileset graphics. Each tile is 8x8 pixels, and a tileset can have up to 192 tiles. (Although they can be expanded to 255.)
- The gfx/tilesets/*_palette_map.asm files assign a color to each tile. There are eight possible colors, declared at the bottom of constants/tileset_constants.asm, although
TEXTis not useful since it's reserved for textboxes. - The data/tilesets/*_metatiles.bin files define the blocks. Each block has 16 bytes declaring the tiles it's composed of, from top-left to bottom-right.
- The data/tilesets/*_collision.asm files assign collisions to the four quadrants of each block where NPCs can walk (or bump, slide, warp, Surf, etc, as the case may be). Valid collision values are declared in constants/collision_constants.asm.
- The maps/*.blk files define the maps. Each one has WxH bytes declaring the blocks it's composed of, from top-left to bottom-right. (The width and height of each map are declared in constants/map_constants.asm.)
(The *.bin and *.blk files are binary data, so unlike *.asm files, a text editor won't work for them. You'll need a hex editor, or a program like Polished Map that can edit maps and tilesets.)
However, this tileset system doesn't use the full potential of the GBC hardware. Specifically, each tile on the screen has an attribute byte (as described in the PRIORITY color tutorial) that controls more than just its color. Here's what the eight bits of an attribute byte mean:
- Bits 0–2 ($00–$07): The color. You can see the color values in constants/tileset_constants.asm.
- Bit 3 ($08): The tile bank. The way pokecrystal's tileset system works, tile IDs $80–$FF need this bit set.
- Bit 4 ($10): Unused by the GameBoy Color.
- Bit 5 ($20): X flip. Set this bit to flip the tile horizontally.
- Bit 6 ($40): Y flip. Set this bit to flip the tile vertically.
- Bit 7 ($80): Priority. Set this bit to make the tile appear above any sprites (although white pixels will be transparent).
For example, the attribute byte $A9 = $80 + $20 + $08 + $01. It has the priority bit, X flip bit, and tile bank bit set, and its color is 1 (RED).
Let's take a closer look at the tile bank bit. We can understand it better by looking at BGB's VRAM viewer:
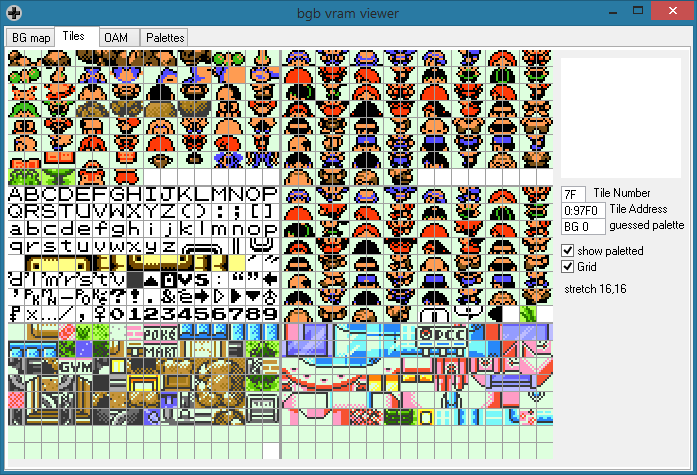
VRAM is divided into six areas, each 128 tiles large. The top and middle four can be used by sprites, and the bottom and middle four can be used by background tiles.
At the hardware level, here's how things go:
- Tile IDs $00–$7F with bank 0 use the lower-left area.
- Tile IDs $80–$FF with bank 0 use the middle-left area.
- Tile IDs $00–$7F with bank 1 use the lower-right area.
- Tile IDs $80–$FF with bank 1 use the middle-right area.
But here's how pokecrystal's data works:
- Tile IDs $00–$7F use the lower-left area; the palette map sets their bank to 0.
- Tile IDs $80–$FF use the lower-right area; the palette map sets their bank to 1.
- The middle areas can't be used for map tilesets.
2. Create *_attributes.bin files from *_palette_map.asm and *_metatiles.bin files
To start with, let's change the tileset data files to work like the GBC hardware. We'll create data/tilesets/*_attributes.bin files that assign attributes to the blocks, just like how *_metatiles.bin assign tile IDs. We'll also change the *_metatiles.bin files to only use IDs from $00 to $7F; any tiles that were using $80 to $FF will instead have their bank bit set to 1 in the corresponding *_attributes.bin file.
We can generate *_attributes.bin and modify *_metatiles.bin by automatically correlating the *_palette_map.asm and *_metatiles.bin files. The end result will not take advantage of X/Y flip or eliminate redundant tiles; it will just enable you to do that manually.
Save this as palmap2attr.py in the same directory as main.asm:
import glob

color_attrs = {
	'GRAY': 0, 'RED': 1, 'GREEN': 2, 'WATER': 3,
	'YELLOW': 4, 'BROWN': 5, 'ROOF': 6, 'TEXT': 7,
	'PRIORITY_GRAY': 0x80, 'PRIORITY_RED': 0x81,
	'PRIORITY_GREEN': 0x82, 'PRIORITY_WATER': 0x83,
	'PRIORITY_YELLOW': 0x84, 'PRIORITY_BROWN': 0x85,
	'PRIORITY_ROOF': 0x86, 'PRIORITY_TEXT': 0x87,
}

palette_map_names = glob.glob('gfx/tilesets/*_palette_map.asm')
for palette_map_name in palette_map_names:

	if 'unused_museum_palette_map' in palette_map_name:
		continue

	palette_map_name = palette_map_name.replace('\\', '/')
	metatiles_name = (palette_map_name.replace('gfx/', 'data/')
		.replace('_palette_map.asm', '_metatiles.bin'))
	attributes_name = metatiles_name.replace('_metatiles', '_attributes')

	print('Convert', palette_map_name.split('/')[-1], '...')

	tile_colors = {}

	with open(palette_map_name, 'r', encoding='utf8') as palette_map:
		reached_vram1 = False
		tile_index = 0
		for line in palette_map:
			if not line.startswith('\ttilepal'):
				continue
			line = line[len('\ttilepal '):]
			colors = (c.strip() for c in line.split(','))
			bank = next(colors)
			if not reached_vram1 and bank == '1':
				reached_vram1 = True
				tile_index = 0x80
			for color in colors:
				tile_attr = color_attrs.get(color, 0)
				tile_attr |= (tile_index >= 0x80) << 3
				tile_colors[tile_index] = tile_attr
				tile_index += 1

	print('... to', attributes_name.split('/')[-1], '...')

	metatile_bytes = b''
	with open(metatiles_name, 'rb') as metatiles:
		with open(attributes_name, 'wb') as attributes:
			for block_tiles in iter(lambda: metatiles.read(16), b''):
				block_attrs = (tile_colors.get(t, (t >= 0x80) << 3)
					for t in block_tiles)
				attributes.write(bytes(block_attrs))
				metatile_bytes += block_tiles

	print('... and modify', metatiles_name.split('/')[-1], '!')

	with open(metatiles_name, 'wb') as metatiles:
		metatiles.write(bytes(t & 0x7f for t in metatile_bytes))
Then run python3 palmap2attr.py, just like running make. It should output:
$ python3 palmap2attr.py
Convert aerodactyl_word_room_palette_map.asm ...
... to aerodactyl_word_room_attributes.bin ...
... and modify aerodactyl_word_room_metatiles.bin !
...
Convert underground_palette_map.asm ...
... to underground_attributes.bin ...
... and modify underground_metatiles.bin !
(If it gives an error "python3: command not found", you need to install Python 3. It's available as the python3 package in Cygwin.)
If you followed the PRIORITY color tutorial before this one, that's okay; palmap2attr.py supports PRIORITY colors too. If you haven't followed it, that's even better, because it's totally redundant with this one. :P
3. Remove the old files and include the new ones
Now that all the *_attributes.bin files are created, delete all the *_palette_map.asm files. Also delete gfx/tileset_palette_maps.asm.
Edit gfx/tilesets.asm:
 ...

 SECTION "Tileset Data 8", ROMX

 TilesetHoOhWordRoomMeta:
 INCBIN "data/tilesets/ho_oh_word_room_metatiles.bin"

 TilesetKabutoWordRoomMeta:
 INCBIN "data/tilesets/kabuto_word_room_metatiles.bin"

 TilesetOmanyteWordRoomMeta:
 INCBIN "data/tilesets/omanyte_word_room_metatiles.bin"

 TilesetAerodactylWordRoomMeta:
 INCBIN "data/tilesets/aerodactyl_word_room_metatiles.bin"
+
+
+SECTION "Tileset Data 9", ROMX
+
+Tileset0Attr::
+TilesetJohtoAttr::
+INCBIN "data/tilesets/johto_attributes.bin"
+
+TilesetJohtoModernAttr::
+INCBIN "data/tilesets/johto_modern_attributes.bin"
+
+TilesetKantoAttr::
+INCBIN "data/tilesets/kanto_attributes.bin"
+
+TilesetBattleTowerOutsideAttr::
+INCBIN "data/tilesets/battle_tower_outside_attributes.bin"
+
+TilesetHouseAttr::
+INCBIN "data/tilesets/house_attributes.bin"
+
+TilesetPlayersHouseAttr::
+INCBIN "data/tilesets/players_house_attributes.bin"
+
+TilesetPokecenterAttr::
+INCBIN "data/tilesets/pokecenter_attributes.bin"
+
+TilesetGateAttr::
+INCBIN "data/tilesets/gate_attributes.bin"
+
+TilesetPortAttr::
+INCBIN "data/tilesets/port_attributes.bin"
+
+TilesetLabAttr::
+INCBIN "data/tilesets/lab_attributes.bin"
+
+
+SECTION "Tileset Data 10", ROMX
+
+TilesetFacilityAttr::
+INCBIN "data/tilesets/facility_attributes.bin"
+
+TilesetMartAttr::
+INCBIN "data/tilesets/mart_attributes.bin"
+
+TilesetMansionAttr::
+INCBIN "data/tilesets/mansion_attributes.bin"
+
+TilesetGameCornerAttr::
+INCBIN "data/tilesets/game_corner_attributes.bin"
+
+TilesetEliteFourRoomAttr::
+INCBIN "data/tilesets/elite_four_room_attributes.bin"
+
+TilesetTraditionalHouseAttr::
+INCBIN "data/tilesets/traditional_house_attributes.bin"
+
+TilesetTrainStationAttr::
+INCBIN "data/tilesets/train_station_attributes.bin"
+
+TilesetChampionsRoomAttr::
+INCBIN "data/tilesets/champions_room_attributes.bin"
+
+TilesetLighthouseAttr::
+INCBIN "data/tilesets/lighthouse_attributes.bin"
+
+TilesetPlayersRoomAttr::
+INCBIN "data/tilesets/players_room_attributes.bin"
+
+TilesetPokeComCenterAttr::
+INCBIN "data/tilesets/pokecom_center_attributes.bin"
+
+TilesetBattleTowerInsideAttr::
+INCBIN "data/tilesets/battle_tower_inside_attributes.bin"
+
+TilesetTowerAttr::
+INCBIN "data/tilesets/tower_attributes.bin"
+
+
+SECTION "Tileset Data 11", ROMX
+
+TilesetCaveAttr::
+TilesetDarkCaveAttr::
+INCBIN "data/tilesets/cave_attributes.bin"
+
+TilesetParkAttr::
+INCBIN "data/tilesets/park_attributes.bin"
+
+TilesetRuinsOfAlphAttr::
+INCBIN "data/tilesets/ruins_of_alph_attributes.bin"
+
+TilesetRadioTowerAttr::
+INCBIN "data/tilesets/radio_tower_attributes.bin"
+
+TilesetUndergroundAttr::
+INCBIN "data/tilesets/underground_attributes.bin"
+
+TilesetIcePathAttr::
+INCBIN "data/tilesets/ice_path_attributes.bin"
+
+TilesetForestAttr::
+INCBIN "data/tilesets/forest_attributes.bin"
+
+TilesetBetaWordRoomAttr::
+INCBIN "data/tilesets/beta_word_room_attributes.bin"
+
+TilesetHoOhWordRoomAttr::
+INCBIN "data/tilesets/ho_oh_word_room_attributes.bin"
+
+TilesetKabutoWordRoomAttr::
+INCBIN "data/tilesets/kabuto_word_room_attributes.bin"
+
+TilesetOmanyteWordRoomAttr::
+INCBIN "data/tilesets/omanyte_word_room_attributes.bin"
+
+TilesetAerodactylWordRoomAttr::
+INCBIN "data/tilesets/aerodactyl_word_room_attributes.bin"
All we're doing here is INCBIN-ing each of the *_attributes.bin files with an appropriate label. Of course, if you've added or removed any tilesets, they'll need their own labels and INCBIN statements. It doesn't matter which section any of them go in, or whether you create new sections.
Also, notice that cave_attributes.bin is being used for the cave and dark_cave tilesets. That's because they already shared cave_metatiles.bin and cave_collision.asm. The only reason dark_cave_metatiles.bin and dark_cave_collision.asm exist is so programs like Polished Map can easily render tilesets and maps.
4. Store attribute pointers in tileset metadata
Edit data/tilesets.asm:
 MACRO tileset
-	dba \1GFX, \1Meta, \1Coll
+	dba \1GFX, \1Meta, \1Coll, \1Attr
	dw \1Anim
-	dw NULL
-	dw \1PalMap
 ENDM

 ; Associated data:
-; - The *GFX, *Meta, and *Coll are defined in gfx/tilesets.asm
-; - The *PalMap are defined in gfx/tileset_palette_maps.asm
+; - The *GFX, *Meta, *Coll and *Attr are defined in gfx/tilesets.asm
 ; - The *Anim are defined in engine/tilesets/tileset_anims.asm
Edit ram/wram.asm:
 wTileset::
 wTilesetBank:: db
 wTilesetAddress:: dw
 wTilesetBlocksBank:: db
 wTilesetBlocksAddress:: dw
 wTilesetCollisionBank:: db
 wTilesetCollisionAddress:: dw
+wTilesetAttributesBank:: db
+wTilesetAttributesAddress:: dw
 wTilesetAnim:: dw ; bank 3f
-	ds 2 ; unused
-wTilesetPalettes:: dw ; bank 3f
 wTilesetEnd::
	assert wTilesetEnd - wTileset == TILESET_LENGTH
And edit constants/tileset_constants.asm:
 ; wTileset struct size
-DEF TILESET_LENGTH EQU 15
+DEF TILESET_LENGTH EQU 14
Now each tileset will be associated with the correct attribute data.
5. Start changing how tile attributes are loaded
We just removed the wTilesetPalettes pointer and the *_palette_map.asm data it pointed to, so it's time to see how they were being used and update that code to use the *_attributes.bin files instead.
It turns out that wTilesetPalettes is only used in engine/tilesets/map_palettes.asm, which defines two routines: _SwapTextboxPalettes and _ScrollBGMapPalettes. _SwapTextboxPalettes is only called by SwapTextboxPalettes, and _ScrollBGMapPalettes is only called by ScrollBGMapPalettes, both in home/palettes.asm. Furthermore, SwapTextboxPalettes and ScrollBGMapPalettes are only called in home/map.asm.
First, delete engine/tilesets/map_palettes.asm.
Edit main.asm:
 SECTION "bank13", ROMX

-INCLUDE "engine/tilesets/map_palettes.asm"
-INCLUDE "gfx/tileset_palette_maps.asm"
Edit home/palettes.asm:
-SwapTextboxPalettes::
-	homecall _SwapTextboxPalettes
-	ret
-
-ScrollBGMapPalettes::
-	homecall _ScrollBGMapPalettes
-	ret
Finally, we need to edit home/map.asm; but it's pretty long, and we need to do something else first.
6. Declare space in WRAM for on-screen tile attributes
Edit ram/wram.asm again:
 ; This union spans 480 bytes.
 SECTION UNION "Miscellaneous", WRAM0

-; surrounding tiles
-; This buffer determines the size for the rest of the union;
-; it uses exactly 480 bytes.
-wSurroundingTiles:: ds SURROUNDING_WIDTH * SURROUNDING_HEIGHT
-
-SECTION UNION "Miscellaneous", WRAM0

 ; box save buffer
 ; SaveBoxAddress uses this buffer in three steps because it
 ; needs more space than the buffer can hold.
 wBoxPartialData:: ds 480
 wBoxPartialDataEnd::
 wCurDamage:: dw

-	ds 2
+wTilesetDataAddress:: dw
+SECTION "Surrounding Data", WRAMX
+
+wSurroundingTiles:: ds SURROUNDING_WIDTH * SURROUNDING_HEIGHT
+wSurroundingAttributes:: ds SURROUNDING_WIDTH * SURROUNDING_HEIGHT
+
+
 SECTION "GBC Video", WRAMX, ALIGN[8]

 ...
And edit layout.link:
 WRAMX 2
	"Pic Animations"
+	"Surrounding Data"
 WRAMX 3
	"Battle Tower RAM"
 	...
As we'll see next, wSurroundingTiles stores the tile IDs of all the blocks surrounding the player on-screen. (It gets updated when the player moves, of course.) The screen is 20x18 tiles, so 6x5 blocks are needed to cover it; each block has 4x4 tiles, so that's 480 bytes of tile data. Now that each of those tiles can have its own attributes, we need to introduce wSurroundingAttributes to play a similar role for attribute data. However, there's not enough free space in WRAM0 for both wSurroundingTiles and wSurroundingAttributes, so we have to put wSurroundingAttributes in a different bank, and for convenience we move wSurroundingTiles to the same bank. WRAMX 2 has enough space, so that's where they go.
(We also introduce wTilesetDataAddress, which will store either wTilesetBlocksAddress when writing to wSurroundingTiles, or wTilesetAttributesAddress when writing to wSurroundingAttributes.)
7. Continue changing how tile attributes are loaded
Now we can edit home/map.asm. Let's go over it piece by piece.
 OverworldTextModeSwitch::
-	call LoadMapPart
-	call SwapTextboxPalettes
-	ret
+	; fallthrough

 LoadMapPart::
 	ldh a, [hROMBank]
 	push af

 	ld a, [wTilesetBlocksBank]
 	rst Bankswitch
 	call LoadMetatiles

 	ld a, "■"
 	hlcoord 0, 0
 	ld bc, SCREEN_WIDTH * SCREEN_HEIGHT
 	call ByteFill
+
+	ld a, [wTilesetAttributesBank]
+	rst Bankswitch
+	call LoadMetatileAttributes

 	ld a, BANK(_LoadMapPart)
 	rst Bankswitch
 	call _LoadMapPart

 	pop af
 	rst Bankswitch
 	ret
We deleted SwapTextboxPalettes, so now OverworldTextModeSwitch just calls LoadMapPart; but since the latter is right after the former, they can just be two labels for the same routine.
Anyway, LoadMapPart calls LoadMetatiles to load certain data from the *_metatiles.bin files, and we're going to define a LoadMetatileAttributes routine that does the same thing with the *_attributes.bin files, so this is where it will be called.
 LoadMetatiles::
+	ld hl, wSurroundingTiles
+	ld de, wTilesetBlocksAddress
+	jr _LoadMetatilesOrAttributes
+
+LoadMetatileAttributes::
+	ld hl, wSurroundingAttributes
+	ld de, wTilesetAttributesAddress
+	; fallthrough
+
+_LoadMetatilesOrAttributes:
+	ld a, [de]
+	ld [wTilesetDataAddress], a
+	inc de
+	ld a, [de]
+	ld [wTilesetDataAddress + 1], a
+
 	; de <- wOverworldMapAnchor
 	ld a, [wOverworldMapAnchor]
 	ld e, a
 	ld a, [wOverworldMapAnchor + 1]
 	ld d, a
-	ld hl, wSurroundingTiles
 	ld b, SCREEN_META_HEIGHT

 .row
 	push de
 	push hl
 	ld c, SCREEN_META_WIDTH

 .col
 	push de
 	push hl
 	; Load the current map block.
 	; If the current map block is a border block, load the border block.
 	ld a, [de]
 	and a
 	jr nz, .ok
 	ld a, [wMapBorderBlock]

 .ok
 	; Load the current wSurroundingTiles address into de.
 	ld e, l
 	ld d, h
 	; Set hl to the address of the current metatile data ([wTilesetBlocksAddress] + (a) tiles).
-; BUG: LoadMetatiles wraps around past 128 blocks (see docs/bugs_and_glitches.md)
-	add a
 	ld l, a
 	ld h, 0
+	add hl, hl
 	add hl, hl
 	add hl, hl
 	add hl, hl
-	ld a, [wTilesetBlocksAddress]
+	ld a, [wTilesetDataAddress]
 	add l
 	ld l, a
-	ld a, [wTilesetBlocksAddress + 1]
+	ld a, [wTilesetDataAddress + 1]
 	adc h
 	ld h, a
+
+	ldh a, [rSVBK]
+	push af
+	ld a, BANK("Surrounding Data")
+	ldh [rSVBK], a

 	; copy the 4x4 metatile
 rept METATILE_WIDTH + -1
 rept METATILE_WIDTH
 	ld a, [hli]
 	ld [de], a
 	inc de
 endr
 	ld a, e
 	add SURROUNDING_WIDTH - METATILE_WIDTH
 	ld e, a
 	jr nc, .next\@
 	inc d
 .next\@
 endr
 rept METATILE_WIDTH
 	ld a, [hli]
 	ld [de], a
 	inc de
 endr
+
+	pop af
+	ldh [rSVBK], a
+
 	; Next metatile
 	pop hl
 	ld de, METATILE_WIDTH
 	add hl, de
 	pop de
 	inc de
 	dec c
 	jp nz, .col
 	; Next metarow
 	pop hl
 	ld de, SURROUNDING_WIDTH * METATILE_WIDTH
 	add hl, de
 	pop de
 	ld a, [wMapWidth]
 	add MAP_CONNECTION_PADDING_WIDTH * 2
 	add e
 	ld e, a
 	jr nc, .ok2
 	inc d
 .ok2
 	dec b
 	jp nz, .row
 	ret
The LoadMetatiles routine copies data from *_metatiles.bin (pointed to by [wTilesetBlocksAddress]) into wSurroundingTiles. We've reused most of its code for LoadMetatileAttributes, which copies data from *_attributes.bin (pointed to by [wTilesetAttributesAddress]) into wSurroundingAttributes. Since wSurroundingTiles and wSurroundingAttributes are not in WRAM0, we have to switch banks at one point.
We also fixed the bug that only allowed 128 blocks, since you'll probably need 256 to take full advantage of this block attribute system.
 ScrollMapUp::
 	hlcoord 0, 0
 	ld de, wBGMapBuffer
 	call BackupBGMapRow
-	ld c, 2 * SCREEN_WIDTH
-	call ScrollBGMapPalettes
+	hlcoord 0, 0, wAttrmap
+	ld de, wBGMapPalBuffer
+	call BackupBGMapRow
 	...

 ScrollMapDown::
 	hlcoord 0, SCREEN_HEIGHT - 2
 	ld de, wBGMapBuffer
 	call BackupBGMapRow
-	ld c, 2 * SCREEN_WIDTH
-	call ScrollBGMapPalettes
+	hlcoord 0, SCREEN_HEIGHT - 2, wAttrmap
+	ld de, wBGMapPalBuffer
+	call BackupBGMapRow
 	...

 ScrollMapLeft::
 	hlcoord 0, 0
 	ld de, wBGMapBuffer
 	call BackupBGMapColumn
-	ld c, 2 * SCREEN_HEIGHT
-	call ScrollBGMapPalettes
+	hlcoord 0, 0, wAttrmap
+	ld de, wBGMapPalBuffer
+	call BackupBGMapColumn
 	...

 ScrollMapRight::
 	hlcoord SCREEN_WIDTH - 2, 0
 	ld de, wBGMapBuffer
 	call BackupBGMapColumn
-	ld c, 2 * SCREEN_HEIGHT
-	call ScrollBGMapPalettes
+	hlcoord SCREEN_WIDTH - 2, 0, wAttrmap
+	ld de, wBGMapPalBuffer
+	call BackupBGMapColumn
 	...
ScrollBGMapPalettes used to update wBGMapPalBuffer when the screen was scrolled. We deleted it, so now have to update it the same way as wBGMapBuffer.
(Note that before June 17, 2019, the names of ScrollMapUp and ScrollMapDown were mistakenly reversed, as were ScrollMapLeft and ScrollMapRight.)
8. Finish changing how tile attributes are loaded
One more thing: edit engine/overworld/load_map_part.asm:
 _LoadMapPart::
 	ld hl, wSurroundingTiles
+	decoord 0, 0
+	call .copy
+	ld hl, wSurroundingAttributes
+	decoord 0, 0, wAttrmap
+.copy
 	ld a, [wPlayerMetatileY]
 	and a
 	jr z, .top_row
 	ld bc, SURROUNDING_WIDTH * 2
 	add hl, bc

 .top_row
 	ld a, [wPlayerMetatileX]
 	and a
 	jr z, .left_column
 	inc hl
 	inc hl

 .left_column
-	decoord 0, 0
+	ldh a, [rSVBK]
+	push af
+	ld a, BANK("Surrounding Data")
+	ldh [rSVBK], a
 	ld b, SCREEN_HEIGHT
 .loop
 	ld c, SCREEN_WIDTH
 .loop2
 	ld a, [hli]
 	ld [de], a
 	inc de
 	dec c
 	jr nz, .loop2
 	ld a, l
 	add METATILE_WIDTH
 	ld l, a
 	jr nc, .carry
 	inc h

 .carry
 	dec b
 	jr nz, .loop
+	pop af
+	ldh [rSVBK], a
 	ret
The _LoadMapPart routine initializes wSurroundingTiles with the relevant area of map data. Here we've updated it to also initialize wSurroundingAttributes, and switch to the new WRAM bank that both of them are in.
9. Rename *.blk to *.ablk
We're almost done, but when we try to open a .blk file in Polished Map, it complains that the palette_map.asm file is missing. It can't read the new attributes.bin files. Until 2019, that would have forced us to design maps and tilesets in a hex editor, like savages. But now there's Polished Map++, a fork of Polished Map designed for these new files. There's just one thing left to change in our project for more convenient editing.
Edit data/maps/blocks.asm, replacing each occurrence of ".blk" with ".ablk".
Then run this command in the terminal:
for f in maps/*.blk maps/**/*.blk; do git mv $f ${f%.blk}.ablk; done
It will rename every *.blk file to *.ablk. (If you're not using Git, then just use mv instead of git mv.)
This has no effect on the ROM itself; it's just so that we can have a clean separation of .blk files associated with Polished Map, and .ablk associated with Polished Map++.
Now we're done! make works, and all the maps look the same as before—but now they're capable of looking very different.
The pokecrystal map engine didn't support flipped, recolored, or priority tiles, so of course the tileset graphics were not designed to take advantage of those features. But now you can. And all of those engine features did exist in Gen 3, so if you're devamping tiles from RSE or FRLG, they'll benefit from this change.
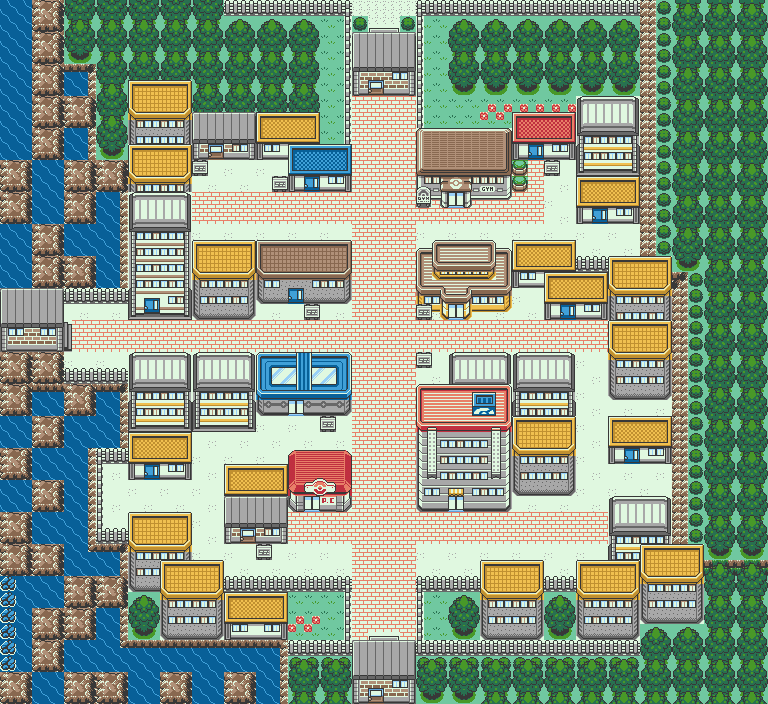
Case in point: here's Goldenrod City from Red++ 4:
The same tiles can appear in different colors, like lit YELLOW and unlit BROWN windows using a single tile, or multicolored roofs. Trees are horizontally symmetrical, as are some roofs and walls, so they only needed half as many tiles. Vertical symmetry is also useful, like for the pattern on the Dept. Store's roof. And with the priority attribute, NPCs can walk behind things like treetops or some rooftops. (That doesn't work for every roof, since some have white highlights that would be transparent, but it works for the Pokémon Center roof.) All the tiles that saved, plus expanding tilesets from 192 to 255 tiles, allowed a wide variety of unique buildings and decorations. This is the entire tileset:
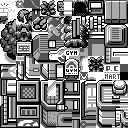
(Notice that tile $7F is still the space character, but is also used as a solid white tile in maps. The tileset expansion tutorial emphasizes that you shouldn't use tile $7F in maps because it will always be TEXT-colored, but with this block attribute system, that's no longer the case. So you don't need an extra white tile just for mapping.)
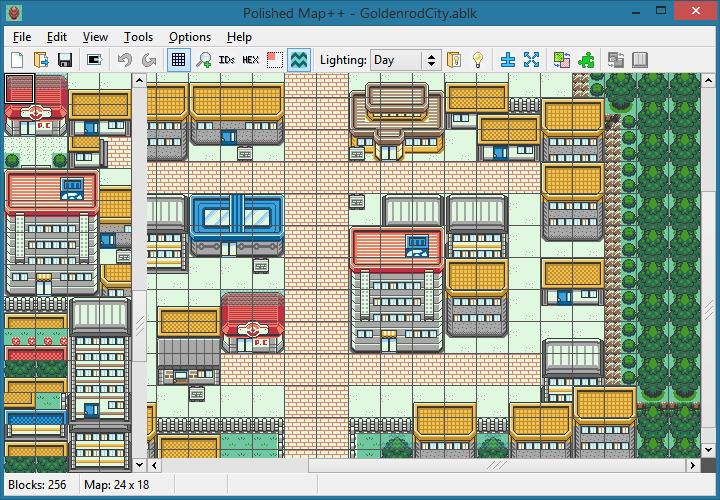
And here's how that map looks in Polished Map++:
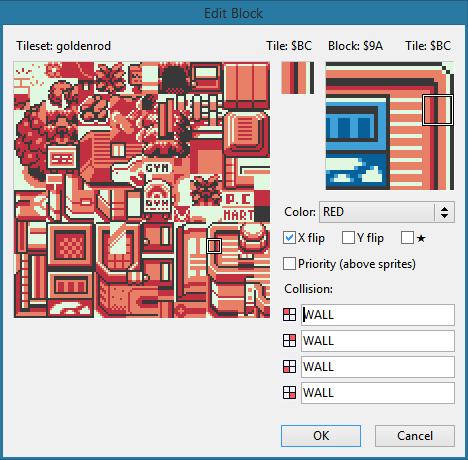
Now when you edit blocks, you can assign attributes to their individual tiles:
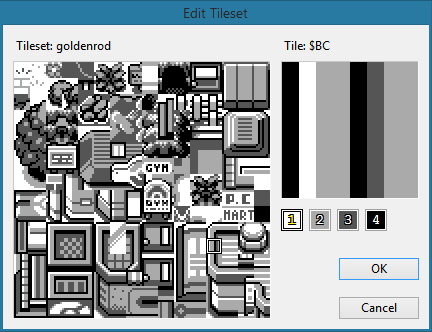
And the tileset itself is a colorless image:
Note that Polished Map++ assumes you have also expanded the tilesets to 255 tiles. If you don't apply that tutorial, your maps will look incorrect.
10. Use up to 512 tiles in a tileset
If you were paying attention during the review of how VRAM works, you'll have noticed that technically a map can use 512 different tiles. The tile ID goes from 0 to 255, and the bank bit is 0 or 1; 256 × 2 = 512.
That's what the 512 Tiles option is for. It lets your tileset graphic have up to 512 tiles instead of up to 256. By default, extra tiles are assumed to go in $1:80-FF first, and then $0:80-FF; the $0:80-FF Before $1:80-FF option inverts this. The default choice is made because Polished Crystal freed up its $1:80-FF VRAM to allow up to 384 tiles. Depending on which extra VRAM you free for tileset use, either choice might be more convenient.
Keep in mind that LoadTilesetGFX in home/map.asm only loads 256 tiles. You'll have to devise your own scheme for loading extra tiles into whichever VRAM you want to use. There's no one-size-fits-all solution to recommend, since $0:80-FF is taken up for font tiles and $1:80-FF for NPCs' walking sprites. Polished Map++ won't care about how the code loads the graphics, as long as it sees a single tileset image with all the tiles in order.
