Edit the Town Map - pret/pokecrystal GitHub Wiki
The Town Map's in-game appearance depends on a few files: the tileset image, the color palette, and the tilemap. This tutorial will explain how it works.
Contents
- The tileset
- The color palettes
- The Johto and Kanto tilemaps
- The landmarks
- Remove the gray border for more map area
1. The tileset
Like everything else on the GameBoy, the Town Map is composed of 8x8-pixel tiles. Its tile graphics are stored in gfx/pokegear/town_map.png:

You can freely edit this image to change the tiles, but you can't make it larger. That's because all the available tileset space is taken up by Pokégear and font graphics. You can see this in BGB's VRAM viewer:
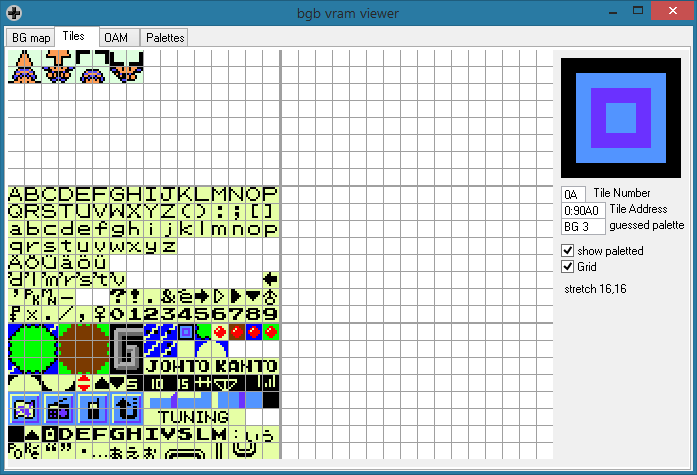
(If you want to add more tiles, there are those three unused blank ones on the right side of the tileset. You can also replace the two "-TO" tiles of "KANTO", since they're identical to the "JOHTO" ones. Or follow this tutorial to free up even more tiles.)
2. The color palettes
The tileset image is grayscale, but it's colorful in-game. The colors are defined in gfx/pokegear/pokegear.pal and gfx/pokegear/pokegear_f.pal. Each file defines six palettes: for the gray border, the green-on-blue earth, the brown-on-green mountains, etc.
You can view the palette with BGB's VRAM viewer again:
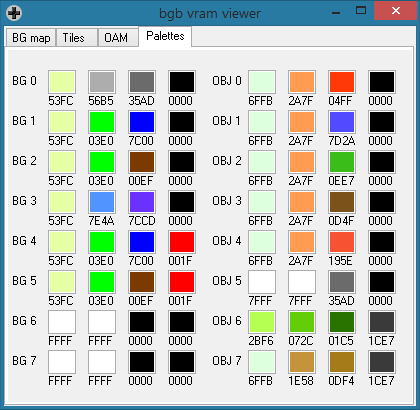
Do note that while only six palettes are ever loaded in vanilla Crystal, the other two slots can still be used. To take advantage of them, edit engine/gfx/cgb_layouts.asm:
_CGB_PokegearPals:

...

.got_pals
	ld hl, PokegearPals
	ld de, wBGPals1
-	ld bc, 6 palettes
+	ld bc, 8 palettes
	ld a, BANK(wBGPals1)
	call FarCopyWRAM
	call ApplyPals
	ld a, TRUE
	ldh [hCGBPalUpdate], a
	ret
Anyway, gfx/pokegear/town_map_palette_map.asm defines the correspondence between tiles and colors. For example, notice how the nine MOUNTAIN entries in that file correspond with the nine mountain tiles in gfx/pokegear/town_map.png.
3. The Johto and Kanto tilemaps
The two regions' maps are defined in gfx/pokegear/johto.bin and gfx/pokegear/kanto.bin. Each of those is a 361-byte binary tilemap: 20x18 bytes covering the entire screen, from top-left to bottom-right, with a $FF at the very end. The bytes are tile IDs, starting at 0. For example, $0A (10 in decimal) is the eleventh tile in the tilemap, the town or city icon. And if you look at where the $0A bytes are in johto.bin and kanto.bin, you'll notice they correspond to the locations of towns and cities.
Luckily, we don't actually need to think about byte values. Until September 2019, it required a hex editor to edit the tilemap files, but that was inconvenient. So we'll use Tilemap Studio, a program for Windows or Linux that can edit tilemaps, including these $FF-terminated ones.
To install Tilemap Studio, just follow the instructions in its INSTALL.md: download install.bat and tilemapstudio.exe from the latest release; run install.bat with admin privileges; and delete the downloaded files, since a shortcut to the installed copy of Tilemap Studio should now exist on your Desktop. If you need help using it, read the documentation in the Help menu.
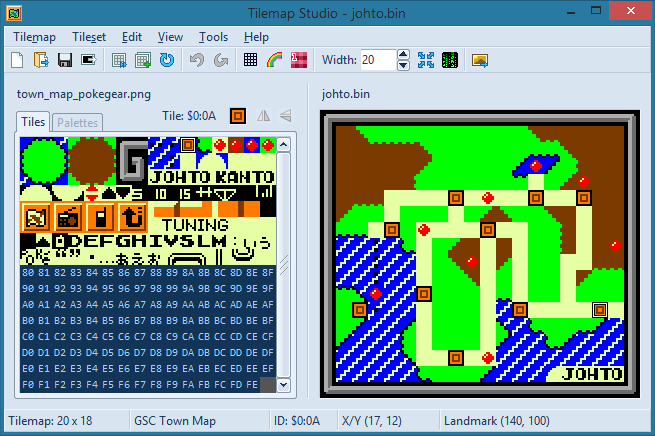
Anyway, open the johto.bin or kanto.bin tilemap, pick the GSC Town Map format, and load the town_map.png tileset. Then place the tiles however you want and save the edited Town Map. That's all!
...Actually, there's one catch. Tilemap Studio doesn't understand the palette data, so it shows the tileset in grayscale. It would be nice to edit the Town Map in color. Luckily, it comes with some example files, including a colored Town Map tileset: example/pokecrystal/town_map_pokegear.png. Load that instead of gfx/pokegear/town_map.png (or make your own colored image) and you'll be able to edit in color.
One more thing: even though town_map_pokegear.png combines the town_map.png and pokegear.png tiles, only use the first three rows for the Town Map. The rest aren't always available when you view the Town Map, unless you follow this tutorial to expand the tileset.
4. The landmarks
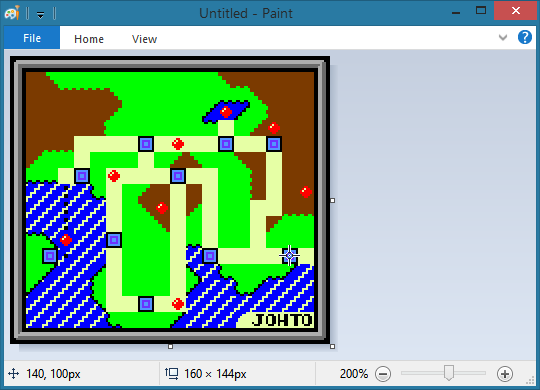
Landmarks are defined in data/maps/landmarks.asm. Each one has an X coordinate, Y coordinate, and name. The coordinates are in pixels from the top-left corner of the 160x140-pixel screen. For example:
	landmark 140, 100, NewBarkTownName

...

NewBarkTownName:     db "NEW BARK¯TOWN@"
If you look at the Tilemap Studio screenshot above, you'll see that the cursor is on New Bark Town, and the status bar says "Landmark (140, 100)". Also, if you print a screenshot of the Johto map (with Ctrl+P, Tilemap→Print, or the toolbar button), and look at pixel coordinates (140, 100), it's right in the middle of the New Bark Town icon:
Be careful, though! Currently pokecrystal defines the landmark macro like this:
landmark: MACRO
; x, y, name
	db \1 + 8, \2 + 16
	dw \3
ENDM
But versions older than July 18, 2018 define it like this:
landmark: MACRO
; x, y, name
	db \1, \2
	dw \3
ENDM
This means that older versions of pokecrystal have their landmark X coordinates increased by 8 and their Y coordinates by 16. For example, New Bark Town used to be at (148, 116).
If you're wondering why those offsets exist, it's because of how the GameBoy hardware works. From the Pan Docs:
Byte0 - Y Position Specifies the sprites vertical position on the screen (minus 16). An offscreen value (for example, Y=0 or Y>=160) hides the sprite.
Byte1 - X Position Specifies the sprites horizontal position on the screen (minus 8). An offscreen value (X=0 or X>=168) hides the sprite, but the sprite still affects the priority ordering - a better way to hide a sprite is to set its Y-coordinate offscreen.
For more information on editing landmarks, see the tutorial on how to add a new map and landmark.
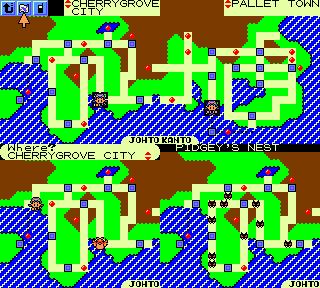
5. Remove the gray border for more map area
If you're making a large region, you may want to get rid of the gray border around the map to make room for more terrain. But there's more to it than just redesigning the .bin files without any border tiles. The top three rows of tiles are covered by the Pokégear interface, the map name, and the "Where?" prompt when using Fly.
You can minimize those elements by making them only take up two rows. Edit engine/pokegear/pokegear.asm:
 InitPokegearTilemap:
 	...

 .Map:
 	ld a, [wPokegearMapPlayerIconLandmark]
 	cp FAST_SHIP
 	jr z, .johto
 	cp KANTO_LANDMARK
 	jr nc, .kanto
 .johto
 	ld e, 0
 	jr .ok

 .kanto
 	ld e, 1
 .ok
 	farcall PokegearMap
-	ld a, $07
-	ld bc, SCREEN_WIDTH  - 2
-	hlcoord 1, 2
-	call ByteFill
-	hlcoord 0, 2
-	ld [hl], $06
-	hlcoord 19, 2
-	ld [hl], $17
 	ld a, [wPokegearMapCursorLandmark]
 	call PokegearMap_UpdateLandmarkName
 	ret
 _TownMap:
 	...

 .InitTilemap:
 	ld a, [wTownMapPlayerIconLandmark]
 	cp KANTO_LANDMARK
 	jr nc, .kanto2
 	ld e, JOHTO_REGION
 	jr .okay_tilemap

 .kanto2
 	ld e, KANTO_REGION
 .okay_tilemap
 	farcall PokegearMap
-	ld a, $07
-	ld bc, 6
-	hlcoord 1, 0
-	call ByteFill
-	hlcoord 0, 0
-	ld [hl], $06
-	hlcoord 7, 0
-	ld [hl], $17
-	hlcoord 7, 1
-	ld [hl], $16
-	hlcoord 7, 2
-	ld [hl], $26
-	ld a, $07
-	ld bc, NAME_LENGTH
-	hlcoord 8, 2
-	call ByteFill
-	hlcoord 19, 2
-	ld [hl], $17
 	ld a, [wTownMapCursorLandmark]
 	call PokegearMap_UpdateLandmarkName
 	farcall TownMapPals
 	ret
 TownMapBubble:
 ; Draw the bubble containing the location text in the town map HUD

 ; Top-left corner
-	hlcoord 1, 0
+	hlcoord 0, 0
 	ld a, $30
 	ld [hli], a
 ; Top row
-	ld bc, 16
+	ld bc, 18
 	ld a, " "
 	call ByteFill
 ; Top-right corner
 	ld a, $31
+	ld [hli], a
-	ld [hl], a
-	hlcoord 1, 1
-
-; Middle row
-	ld bc, SCREEN_WIDTH - 2
-	ld a, " "
-	call ByteFill
-
 ; Bottom-left corner
-	hlcoord 1, 2
 	ld a, $32
 	ld [hli], a
 ; Bottom row
-	ld bc, 16
+	ld bc, 18
 	ld a, " "
 	call ByteFill
 ; Bottom-right corner
 	ld a, $33
 	ld [hl], a

 ; Print "Where?"
-	hlcoord 2, 0
+	hlcoord 1, 0
 	ld de, .Where
 	call PlaceString
 ; Print the name of the default flypoint
 	call .Name
 ; Up/down arrows
 	hlcoord 18, 1
 	ld [hl], $34
 	ret
 Pokedex_GetArea:
 	...

 .PlaceString_MonsNest:
 	hlcoord 0, 0
 	ld bc, SCREEN_WIDTH
 	ld a, " "
 	call ByteFill
-	hlcoord 0, 1
-	ld a, $06
-	ld [hli], a
-	ld bc, SCREEN_WIDTH - 2
-	ld a, $07
-	call ByteFill
-	ld [hl], $17
 	call GetPokemonName
 	hlcoord 2, 0
 	call PlaceString
 	ld h, b
 	ld l, c
 	ld de, .String_SNest
 	call PlaceString
 	ret
Now you'll have more regional real estate: