Expand the Town Map tileset - pret/pokecrystal GitHub Wiki
Note: You should not follow this tutorial and the alternate one! Pick one.
This tutorial describes how to edit the Town Map with Tilemap Studio. However, you're limited to using 48 different tiles, which is not enough for more detailed maps. Here we'll see how to use at least 33 more tiles for designing Town Maps.
This alternate tutorial shows another way to do the same thing. It's more involved, but allows the Town Map tiles to be consecutive before the Pokégear tiles.
Contents
1. Combine the Town Map and Pokégear graphics
The Pokégear graphics are right after the Town Map graphics in VRAM, and they have a couple of unused tiles. Plus gfx/pokegear/town_map_palette_map.asm already assigns palettes to them both. It's fairly simple to combine them into a single tileset.
First, edit gfx/pokegear/town_map.png, appending the gfx/pokegear/pokegear.png tiles to it:
You can then delete gfx/pokegear/pokegear.png.
Then edit gfx/misc.asm:
SECTION "Unown Font", ROMX

UnownFont::
INCBIN "gfx/font/unown_font.2bpp"


-SECTION "Pokégear GFX", ROMX
-
-PokegearGFX::
-INCBIN "gfx/pokegear/pokegear.2bpp.lz"
Edit layout.link:
ROMX $77
	"Unown Font"
	"Print Party"
	"Tileset Data 7"
	"bank77"
-	"Pokégear GFX"
	"European Mail"
Edit the Makefile:
-gfx/pokegear/pokegear.2bpp: rgbgfx += -x2
Edit gfx/pokegear/town_map_palette_map.asm:
-; gfx/pokegear/pokegear.png
(Removing the Makefile rule and the comment won't really do anything, but it avoids confusion from mentioning a file that we just deleted.)
And edit engine/pokegear/pokegear.asm:
 Pokegear_LoadGFX:
 	call ClearVBank1
 	ld hl, TownMapGFX
 	ld de, vTiles2
 	ld a, BANK(TownMapGFX)
 	call FarDecompress
-	ld hl, PokegearGFX
-	ld de, vTiles2 tile $30
-	ld a, BANK(PokegearGFX)
-	call FarDecompress
 	ld hl, PokegearSpritesGFX
 	ld de, vTiles0
 	ld a, BANK(PokegearSpritesGFX)
 	call Decompress
 	...
 LoadTownMapGFX:
 	ld hl, TownMapGFX
 	ld de, vTiles2
-	lb bc, BANK(TownMapGFX), 48
+	lb bc, BANK(TownMapGFX), 96
 	call DecompressRequest2bpp
 	ret
Now the whole set of 96 tiles gets loaded at once, but there's one flaw. The Pokédex area map only ever loaded the Town Map graphics; it skipped the Pokégear graphics because it used that space for the Pokédex's own graphics. Now that we're treating the Pokégear tiles as just extra Town Map tiles, we need to reload the Pokédex tiles when we close the Area map.
Edit engine/pokedex/pokedex.asm:
 DexEntryScreen_MenuActionJumptable:
 	dw Pokedex_Page
 	dw .Area
 	dw .Cry
 	dw .Print

 .Area:
 	...
 	ld a, [wDexCurLocation]
 	ld e, a
 	predef Pokedex_GetArea
 	call Pokedex_BlackOutBG
+	call Pokedex_LoadGFX
+	call Pokedex_LoadAnyFootprint
 	call DelayFrame
 	...
Now we can use tile IDs $30–$5F for the Town Map, not just $00–$2F. Most of them are needed for the Pokégear, but the last two bottom-right blank tiles, $5E and $5F, are unused. Tile $5D is also blank, but it's used once in the Radio Card, so if you overwrite it with graphics for the Town Map, you'll have to replace the byte 5D with 7F in gfx/pokegear/radio.tilemap.rle. (You can open *.tilemap.rle files in Tilemap Studio with the "Pokégear card" format, or use a hex editor.)
Two or three extra tiles isn't much of an advantage; we'd have to simplify the Pokégear graphics to make room for Town Map ones. That is possible: some tiles could be eliminated (like the embossed border tiles used only by the Radio Card), and any tile that's just black and white can be moved into gfx/font/font.png and gfx/font/font_inversed.png. However, we'd then have to thoroughly update the gfx/pokegear/*.tilemap.rle files, and track down all the places in the source code that refer to changed tile IDs, which can be tedious. Luckily there's a more efficient solution.
2. Move the "extra" font graphics and use their space
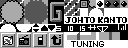
Tiles $00–$2F are the original Town Map graphics, $30–5F are the Pokégear graphics, $60–7E are some "extra" font graphics, $7F is the space character, and $80–$FF are the standard font graphics. We can see how they're laid out in BGB's VRAM viewer:
Those extra font graphics also take up space that could be used for overworld map tilesets. This tutorial explains how to expand map tilesets from 192 to 255 tiles, and part of that involves moving the extra font graphics from tiles $60–7E to within the standard font tile space, $80–FF. (Tile $7F stays as the space character.)
If you haven't followed the 192-to-255-tile tutorial yet, you don't actually have to do the whole thing. Steps 1–5 and 9–10 explain how to move the extra font tiles out of the $60–$7E space, and steps 6–8 explain how to repurpose that space for map tilesets. So if all you care about is the Town Map, you can skip steps 6–8. However, I recommend following the whole tutorial anyway, because if you care about graphics enough to be redesigning the Town Map, you'll probably end up pushing the limits of what 192 map tiles can do.
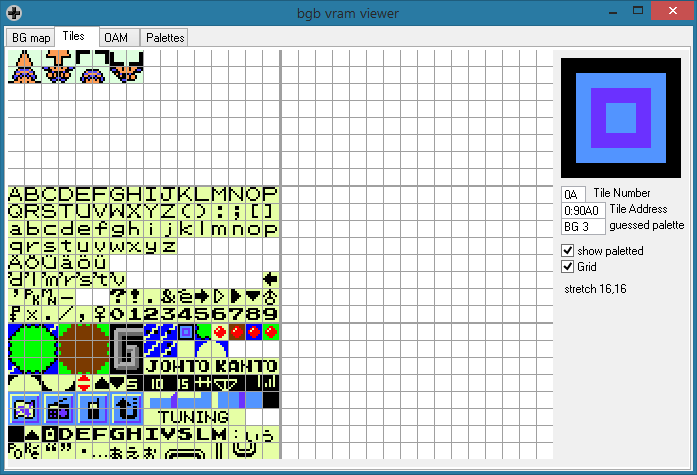
Anyway, after we combine the Town Map and Pokégear graphics, and move the extra font tiles by following this tutorial, then the VRAM looks like this:
Let's enable those 31 tiles for use in the Town Map.
First, edit gfx/pokegear/town_map.png, adding another two rows of empty tiles:
Note that the bottom-right tile $7F is the space character, so it should stay blank.
Then edit gfx/pokegear/town_map_palette_map.asm:
 ; gfx/pokegear/town_map.png
 	townmappals EARTH,    EARTH,    EARTH,    MOUNTAIN, MOUNTAIN, MOUNTAIN, BORDER,   BORDER
 	townmappals EARTH,    EARTH,    CITY,     EARTH,    POI,      POI_MTN,  POI,      POI_MTN
 	townmappals EARTH,    EARTH,    EARTH,    MOUNTAIN, MOUNTAIN, MOUNTAIN, BORDER,   BORDER
 	townmappals EARTH,    EARTH,    BORDER,   EARTH,    EARTH,    BORDER,   BORDER,   BORDER
 	townmappals EARTH,    EARTH,    EARTH,    MOUNTAIN, MOUNTAIN, MOUNTAIN, BORDER,   BORDER
 	townmappals BORDER,   BORDER,   BORDER,   BORDER,   BORDER,   BORDER,   BORDER,   BORDER
-; gfx/pokegear/pokegear.png
 	townmappals BORDER,   BORDER,   BORDER,   BORDER,   POI,      POI,      POI,      BORDER
 	townmappals BORDER,   BORDER,   BORDER,   BORDER,   BORDER,   BORDER,   BORDER,   BORDER
 	townmappals CITY,     CITY,     CITY,     CITY,     CITY,     CITY,     CITY,     CITY
 	townmappals CITY,     CITY,     CITY,     CITY,     CITY,     CITY,     CITY,     BORDER
 	townmappals CITY,     CITY,     CITY,     CITY,     CITY,     CITY,     CITY,     CITY
 	townmappals BORDER,   BORDER,   BORDER,   BORDER,   BORDER,   BORDER,   BORDER,   BORDER
+	townmappals BORDER,   BORDER,   BORDER,   BORDER,   BORDER,   BORDER,   BORDER,   BORDER
+	townmappals BORDER,   BORDER,   BORDER,   BORDER,   BORDER,   BORDER,   BORDER,   BORDER
+	townmappals BORDER,   BORDER,   BORDER,   BORDER,   BORDER,   BORDER,   BORDER,   BORDER
+	townmappals BORDER,   BORDER,   BORDER,   BORDER,   BORDER,   BORDER,   BORDER,   BORDER
And edit engine/pokegear/pokegear.asm:
 TownMapPals:
 ; Assign palettes based on tile ids
 	hlcoord 0, 0
 	decoord 0, 0, wAttrmap
 	ld bc, SCREEN_WIDTH * SCREEN_HEIGHT
 .loop
 ; Current tile
 	ld a, [hli]
 	push hl
-; The palette map covers tiles $00 to $5f; $60 and above use palette 0
-	cp $60
+; The palette map covers tiles $00 to $7e; $7f and above use palette 0
+	cp $7f
 	jr nc, .pal0
 	...
 LoadTownMapGFX:
 	ld hl, TownMapGFX
 	ld de, vTiles2
-	lb bc, BANK(TownMapGFX), 96
+	lb bc, BANK(TownMapGFX), 50
 	call DecompressRequest2bpp
 	ret

+ LoadTownMapGFX2:
+ 	ld hl, TownMapGFX
+ 	ld de, vTiles2
+	lb bc, BANK(TownMapGFX), 96
+ 	call DecompressRequest2bpp
+ 	ret
_FlyMap:
	call ClearBGPalettes
	call ClearTilemap
	call ClearSprites
	ld hl, hInMenu
	ld a, [hl]
	push af
	ld [hl], $1
	xor a
	ldh [hBGMapMode], a
	farcall ClearSpriteAnims
-	call LoadTownMapGFX
+	call LoadTownMapGFX2
	ld de, FlyMapLabelBorderGFX
	ld hl, vTiles2 tile $30
	lb bc, BANK(FlyMapLabelBorderGFX), 6
	call Request1bpp
Pokedex_GetArea:
; e: Current landmark
	ld a, [wTownMapPlayerIconLandmark]
	push af
	ld a, [wTownMapCursorLandmark]
	push af
	ld a, e
	ld [wTownMapPlayerIconLandmark], a
	call ClearSprites
	xor a
	ldh [hBGMapMode], a
	ld a, $1
	ldh [hInMenu], a
	ld de, PokedexNestIconGFX
	ld hl, vTiles0 tile $7f
	lb bc, BANK(PokedexNestIconGFX), 1
	call Request2bpp
	call .GetPlayerOrFastShipIcon
	ld hl, vTiles0 tile $78
	ld c, 4
	call Request2bpp
-	call LoadTownMapGFX
+	call LoadTownMapGFX2
	call FillKantoMap
	call .PlaceString_MonsNest
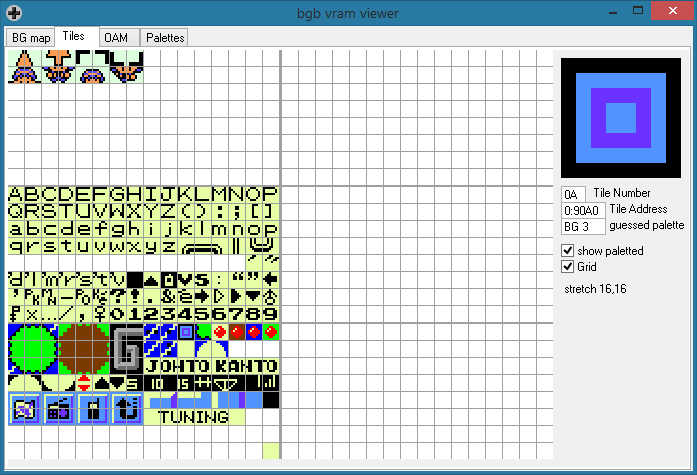
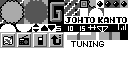
Now we're done! With extra tiles and custom colors, your project can have a really unique Town Map:
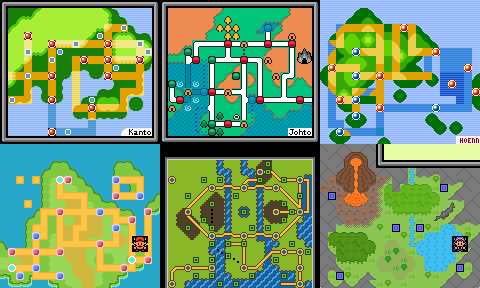
(Example Town Maps: FRLG-style Kanto by Rangi, HGSS-style Johto from Polished Crystal, RSE-style Hoenn by SaveState, DPPt-style Sinnoh by SaveState, Unova by JaceDeane, and Invar by Wasabi_Raptor for Brass.)