msa publishers db import clm - ajtruckle/meeting-schedule-assistant-support GitHub Wiki
Importing Data from CLM Explorer
This importer transfers publisher information exported from CLM Explorer into the Publishers Database. It can also import assignment history from the CLM Explorer Calendar database.
The import consists of two stages: exporting one or two CSV files from CLM Explorer, then importing those files into Meeting Schedule Assistant.
Please follow this process to import your data from CLM Explorer.
[!IMPORTANT] Please perform a complete backup before undertaking the steps below, as this operation cannot be undone.
Step 1
Start CLM Explorer and use the Export to Excel tool in the File menu:

Step 2
Select Students, then ensure every available field is selected as shown below.

Step 3
Click Export, then choose where to save the CSV file.
Step 4 (Optional – Assignment History)
ℹ️ Note: If you also intend to import assignment history, first read Using the Right Date Format.
Once the correct date is set, repeat Steps 1 to 3 again. Make sure that Calendar is selected in the dropdown list and that all fields are ticked as per the screenshot below:

Step 5
Start Meeting Schedule Assistant and display the Publishers Database. Then select CLM Explorer from the Import flyout menu in the Database menu:

Step 6
The window below will appear:
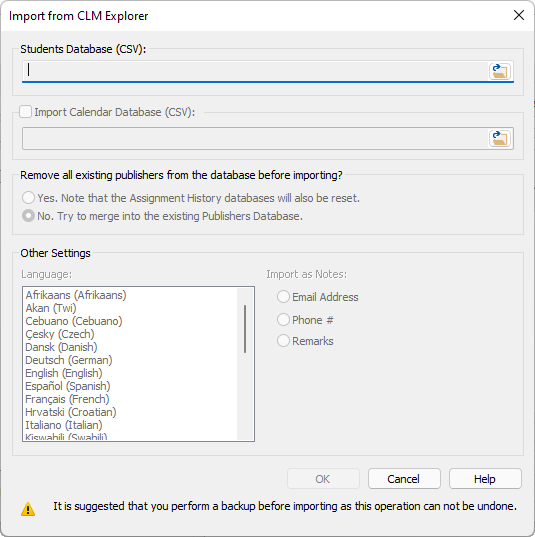
Figure 55. The Import From CLM Explorer window
Complete the import options:
- Browse to the location used in Step 3 and select the Students Database CSV file.
- Optional - if importing assignment history, tick Import Calendar Database and browse to the location used in Step 4 and select the Calendar Database CSV file.
- Decide if you want to reset the Publishers Database. Choose from:
- Yes: This will remove all existing publishers from the database and reset the Assignment History database files.
- No: This will attempt to merge the imported students. Only publishers that do not exist in the database will be imported. - Select the language of the CSV database. This is the language selected when using CLM Explorer.
- Select which field you want to map to the Publisher’s Notes.
- Click OK.
[!IMPORTANT] To import the Calendar database, you must choose Yes to reset the Publishers Database.
You will be informed if the import was successful. Otherwise, you will be prompted to view the error log which will detail any problems the importer encountered.
How the Importing Works
This is how the data is imported from the student’s database:
| CLM Explorer | Meeting Schedule Assistant |
|---|---|
| Student ID | Not used |
| First Name | Not used |
| Last Name | Not used |
| Alt Name | Name |
| Gender | Gender |
| Active | Not used |
| Role | Appointed As |
| Use For | Assignments |
| Use Where | Not used |
| Email Address | Notes (if option selected) |
| Phone # | Notes (if option selected) |
| Remarks | Notes (if option selected) |
The following assignment types are supported for the Use For field:
- Chairman
- Treasures – Talk
- Treasures – Gems
- Student – Bible Reading
- Student – Demonstration
- Student – Talk
- Assistant
- Living
- CBS Conductor
- CBS Reader
- Prayer
Other Notes
Newly imported publishers are created with these default settings:
- Serving as: Publisher
- Assigned To: Congregation
- Available Midweek: Yes
- Available Weekend: Yes
ℹ️ Note: Review the imported publishers and adjust their settings where necessary.
Navigation
- Parent topic: Publishers
- Previous topic: Generic Importing