software installation - UviDTE-FPSoC/Zynq7000-dnn-inference GitHub Wiki
This guide is created to walk you through the installation process of all the required software needed to execute inference of deep neural networks using a ZedBoard FPSoC.
The guide is divided in three main parts, which include the installation of the Vivado SDK and the configuration of a simple PetaLinux project that can be booted from the board with a SD card. It is important to note that the versions for PetaLinux and Vivado SDK should be the same. We will be working with version 2019.2 in this guide. The last part consists on the installation of the DNNDK v3.1 package both in the host machine and the ZedBoard.
1. Previous to the configuration of the PetaLinux project, in the section below, you have to create a .xsa file following the instructions in the FPSoC hardware description project page. If you don want to build the project by your own, there is a copy of the .xsa file you need in this link.
2. In order to install the DNNDK package in ZedBoard, it is necesary to have completed the section Petalinux project configuration to run Deep Neural Networks.
- Vivado SDK
-
PetaLinux
- Installation
-
Configuration
- Bash or Dash
- Source PetaLinux Tools
- Creating a Project with the Board Support Package
- Hardware Configuration
- Import Hardware Configuration
- Build a system image
- Generate the boot image
- Create the SD card partitions
- Configure PetaLinux to boot with SD card
- Boot PetaLinux image on Hardware with an SD card
- Configure IP to connect to the board through SSH
- Add libraries to PetaLinux image
- Connect to the board
- Deep Neural Network Development Kit
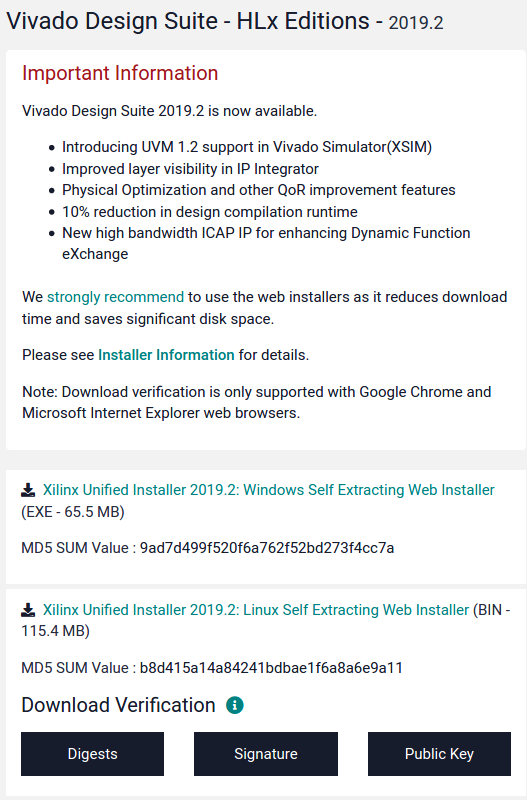
First of all, it is neccesary to install the Vivado SDK. The software can be dowloaded from the Xilinx webpage, where it's neccesary to create an account in order to download any packages. To install both the Vivado and Vitis IDE, click here. The page gives you access to an unified installer for both softwares, although Vitis AI is not included. The software can be installed to any directory.
Open the terminal of the computer and access the directory where you've previously saved the downloaded file with the 'cd' command.
Example:
cd dl
Enable the exectuion of this file with the following command, and execute it:
chmod +x 'file_name'.bin
sudo ./'filename'.bin
The last command starts runnin the installer of the SDK. On the first pop-up window, some information about the operating systems that support this software is handed out. Your Ubuntu release has to be 16.04.5 or higher in order to install the 2019.2 version. Click next and in the next window the information of your account will be required.
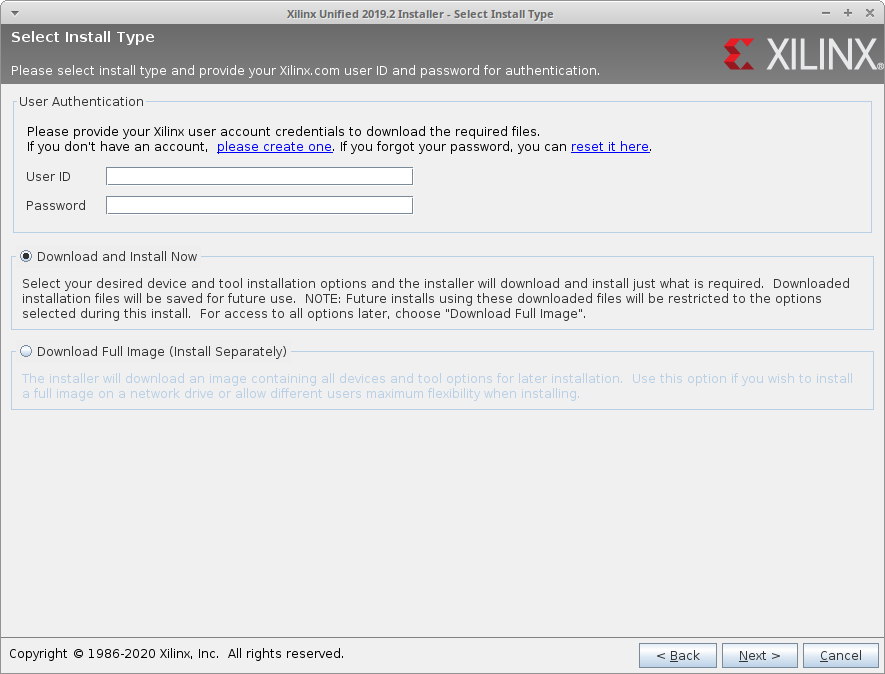
If you want download the software and installe it later with no internet access select the option 'Download full image', otherwise click next and accept the terms and conditions of the software.
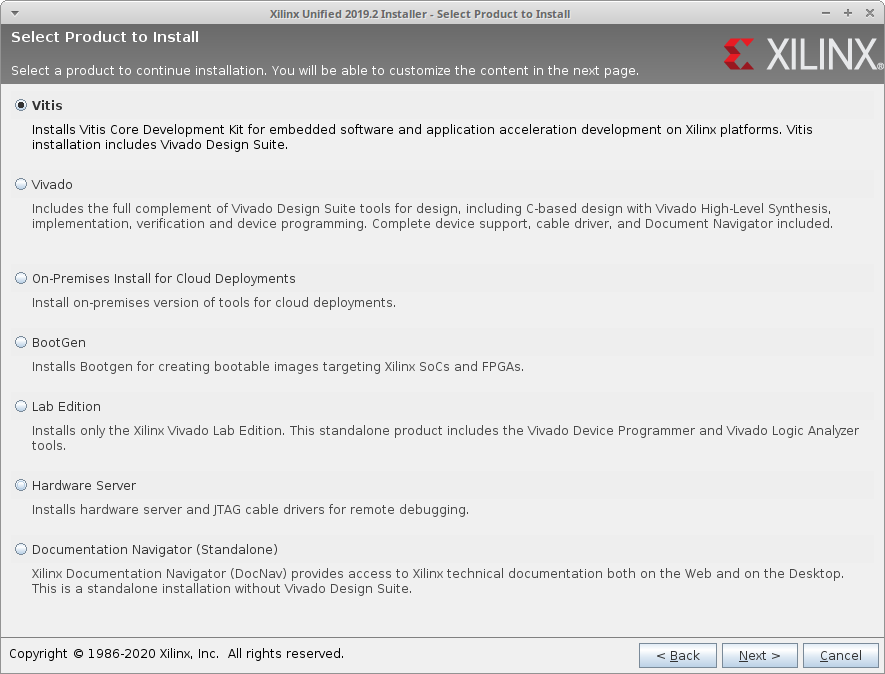
On the new window, you can select what software you want to install. Select Vitis and click next.
Now, you'll be able to customize the download. In this case we are going to leave the following configuration, where we are installing both Vivado and Vitis software, and also the devices for custom platforms of the Zynq-7000, which is the chip we are using. It's okay to download all the packages, but it takes up quite a lot of space, so is better to select what you need, as you can add other packages later.
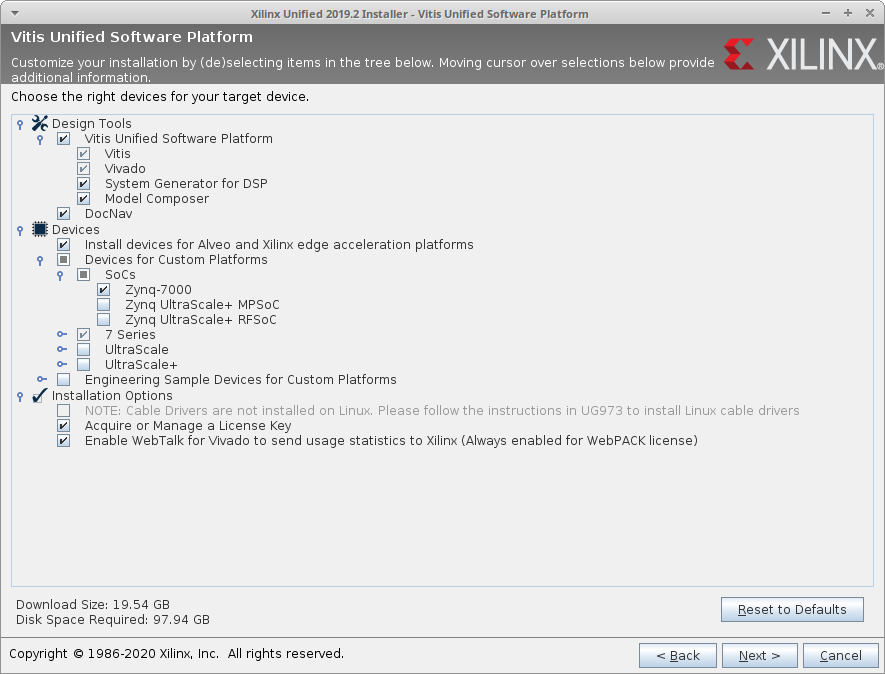
Note that, for Linux, the cable drivers aren't installed. Follow the UG973 isntructions to install them. The document that we are using is the Vivado Design Suite User Guide, page 44. There is a copy of this document uploaded in the "Xilinx Guide" folder of this repository. To install the cable drivers, enter the following instructions in the command window:
${vivado_install_dir}/data/xicom/cable_drivers/lin64/install_script/install_drivers/install_drivers
Modify the ${vivado_install_dir} with the directory of the data folder in your computer.
In our case we used the following commands from the vivado install directory:
cd /data/xicom/cable_drivers/lin64/install_script/install_drivers

sudo ./instal_drivers
The installation of the XRT should be performed if using a chip of the family Zynq UltraScale+ MPSoC-based, as it is implemented as a combination of user-space and kernel driver components. If you are using a chip from another family, it also provides a software interface to Xilinx programmable logic devices. The steps to install the package are followed from Vitis Unified Software Platform Documentation. Embedded Software Development. Page: 17. There is a copy of this document uploaded in the "Xilinx Guide" folder of this repository just in case new versions of the Xilinx guide are uploaded. To download the DEV file for Linux 18.04 click here. If you have other Linux versions, go to the documentation page before mentioned.
Once the packet has been downloaded, type in the following command to install it.
sudo apt install <'deb-dir'>/<'xrt_filename_OS'>.deb
<'deb-dir'> : Path to the directory where the '.deb' file was downloaded to
<'xrt_filename_OS'> : Name of the file
In our case, the full command line would look like this.
sudo apt install /media/hdd/dl/xrt_201920.2.3.1301_16.04-xrt.deb
The next thing to take care of will be to set up the environment to run the Vitis Software Platform. The set up procedure is followed from the Vitis Unified Software Platform Documentation. Embedded Software Development. Page: 19.
This includes sourcing the 'settings64.sh' and 'setup.sh' files in the Vitis and Xilinx XRT installation directories, respectively. To avoid needing to type the source commands into the shell every time we want to use the tools, you can add a couple lines to the .bashrc script. To modify this system wide, we will use a text editor, atom, to modify the script. For Ubuntu, the bash.bashrc script is located in the /etc directory. The script can be easily openned with the following command. The 'atom' sentence can be switched for any other text editor installed in the system.
sudo atom /home/.bashrc
Once the script is opened, add the two commands for sourcing the appropriate files. The path that is now idicated simply outlines where the 'settings.sh' and 'settings64.sh' files are located at.
source /media/hdd/Xilinx/Vitis/2019.2/settings64.sh

source /opt/xilinx/xrt/setup.sh
No embedded platform installation is made as there is no definition for the Zedboard at this particular moment. One of the builds that include the same chip as the Zedboard would be the Zynq-7000 SoC 7C702 evaluation kit. We will try to perform the setup avoiding this installation step.
If any of the possible Embedded Platforms were to be istalled, the following environment variable setup would have to be done.
export PLATFORM_REPO_PATHS=<'path to platforms'>
In this section we will focus in the installation of the Digilent Board Files for Vivado's version 2019.2. The guide provided by Diligent here is followed.
Download the archive with the Vivado board files.
Extract this file at any directory and enter the folder within this folder named /new/board-files/. Copy all the files that you find in this directory.
Finally, go to the directory you have installed Vivado SDk at, enter the following folswe and copy the previous files to this folder:
cd <vivado_installation_directory>/Vivado/2019.2/data/boards/board_files/
Vivado has now access to diligent board files, in which ZedBoard is included.
In order to install PetaLinux in your device, it is very important to download the same PetaLinux version as the one previously downloaded for the Vivado SDK. In this case, we will download the Petalinux Tools installer by clicking here.
It is also very important to make sure that the file system of the operating system in your computer, Ubuntu 16.04 LTS in this case, hasn't been encrypted. One option to decrypt it would be to reinstall the SO in you computer.
Finally, make sure the PetaLinux installation directory is within home, as otherwise you could have permission problems.
Previous to installing PetaLinux, it is neccesary to install a series of tools indicated in the Petalinux Tools Documentation. Reference Guide page: 10. There is a copy of this document uploaded in the "Xilinx Guide" folder of this repository.
The installation of these tools for an Ubuntu machine can be performed with the following command.
sudo apt-get install tofrodos iproute gawk make net-tools libncurses5-dev tftpd zlib1g:i386 libssl-dev flex bison libselinux1 gnupg wget diffstat chrpath socat xterm autoconf libtool tar unzip texinfo zlib1g-dev gcc-multilib build-essential screen pax gzip python
If the package iproute gives any trouble when installing, you can switch this package for iproute2.
Once the installer file has been downloaded, create a directory where you want the PetaLinux Tools to be installed in. It is highly recommended to create this directory in /home, as the installation needs special permissions. The space required by PetaLinux is around 20 GB. Once you've created this folder, open a terminal in the directory the installer has been downloaded to, likely "Downloads", and introduce the following commands to give execution permission for the file and running the installer.
chmod +x 'name_of_the_file'.run
./'name_of_the_file'.run {directory}/PetaLinux
In the directory part you shall enter the path to your PetaLinux folder in your computer, for example:
./petalinux-v2019.2-final-installer.run /home/arroas/PetaLinux
The completion of the installation requires the acceptance of the license agreement of the software itself, the WebPACK software and several third party software licenses as well.
PetaLinux configuration is performed following the Petalinux Tools Documentation. Reference Guide.
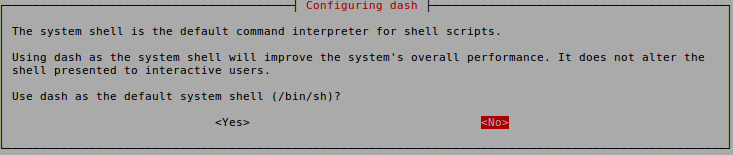
First of all, Petalinux requires the usage of the 'bash' shell rather than the 'dash'. Bash is the Bourne-Once extra shell. Bash is a full-featured shell acceptable for interactive use. Bash a superset of POSIX efficiency. Dash is the Debian Almquist Shell. Dash implements the Single Unix Spec. Dash is for non-interactive script execution. Dash Only helps POSIX compliant choices.
In order to stablish the bash as default, type on the command line the following.
sudo dpkg-reconfigure dash
After typing in the command, we are asked if we want to set up the 'dash' as our default shell, and we have to select 'NO'.
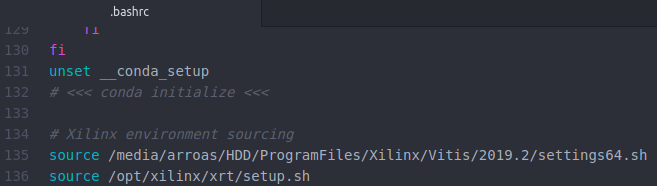
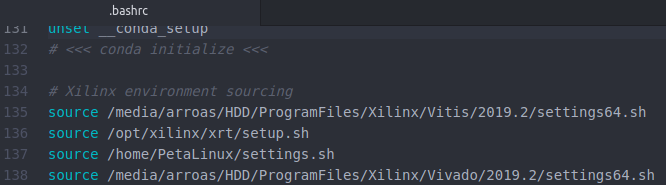
The next thing to take care of will be to source the tools for PetaLinux to use within the terminal window. This includes the 'settings64.sh' and 'settings.sh' files in the Vivado and PetaLinux installation directories, respectively. To avoid typing the source commands into the shell every time, you can add a couple lines to the .bashrc script. To modify this system wide, we will use a text editor, atom, to modify the script. For Ubuntu, the bash.bashrc script is located in the /etc directory. The script can be easily openned with the following command. The 'atom' sentence can be switched for any other text editor installed in the system.
sudo atom /home/.bashrc
Once the script is opened, add the two commands for sourcing the appropriate files. The path that is now idicated simply outlines where the 'settings.sh' and 'settings64.sh' files are located at.
source /home/arroas/PetaLinux/settings.sh
source /media/hdd/Xilinx/Vivado/2019.2/settings64.sh
With the two lines added, save the changes and close the editor.
The BSP provides a functioning Linux image for begginers with PetaLinux. In this case, to download the BSP for the Zedboard, clik here.
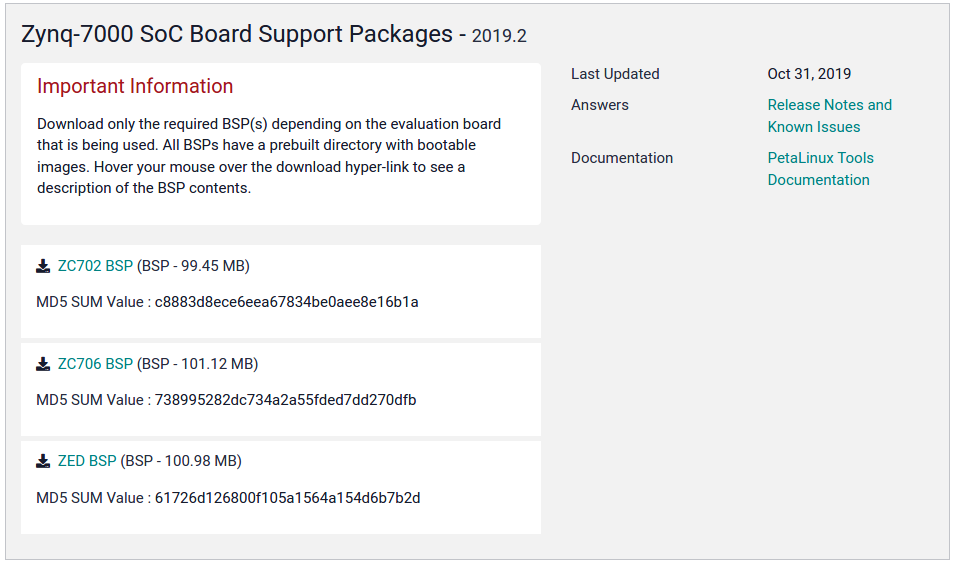
The download of the BSP will start after identifying your user in the Xilinx web page. Once the download is performed, some aid can be found in the 'PetaLinux Documentation. Reference Guide. Page 16' to correctly install the BSP.
First of all, make sure the previous configuration setup of PetaLinux has been carried out. Open a new terminal and access the directory you want your PetaLinux projects to be saved at, in our case the following.
In order to avoid any kind of future problems, this directory should be created withing your /home directory.
cd /home/arroas/PetaLinux_Projects
Now, run the following command, indicating the location of the BSP file that was just downloaded and making sure you uncompress this file first.
petalinux-create -t project -s <'path-to-bsp'>
In our case:
petalinux-create -t project -s /media/hdd/dl/avnet-digilent-zedboard-v2019.2-final.bsp
If you were to create a fresh project, without using a BSP, you type in the following command.
petalinux-create --type project --template zynq --name test_01
The type should not be changed, the template has to be the adecuate one for your board and finally the name can be chosen by you as well. This command though simply provides a folder structure for the projects. The actual build to use PetaLinux would have to be created by the user.
Once you have created the project, you can change its name, for example to ZedBoard_DNNs_DPUv3_0.
First of all, it is neccesary to create a hardware configuration, which later you will have to export into a .xsa file. This hardware configuration is created with Vivado, as explained in the FPSoC hardware descritpion project page. If you don't want to create the whole project, a copy of the needed file has been included into this link.
Download the file and copy it to the following directory, <petaLinux_project_directory>/project-spec/
In our case, this directory would be:
/home/arroas/PetaLinux_Projects/ZedBoard_DNNs_DPUv3_0/project-spec/
From the PetaLinux project directory, run the following comand, giving the path to the .xsa file.
petalinux-config --get-hw-description=
In our case the directory we open the terminal on and the command are as follows.
cd home/arroas/PetaLinux_Projects/ZedBoard_DNNs_DPUv3_0/

petalinux-config --get-hw-description=project-spec/hw-description/
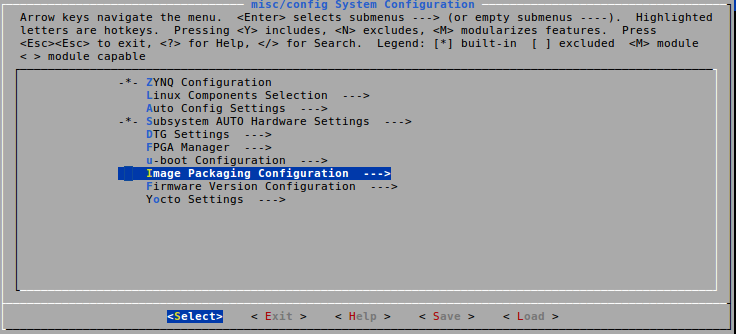
After executing the command, the following window is opened, and we have to select the 'Subsystem AUTO Hardware Settings'. For additional information of the 'Subsystem AUTO Hardware Settings' checkout Petalinux Tools Documentation. Reference Guide. Page 99.
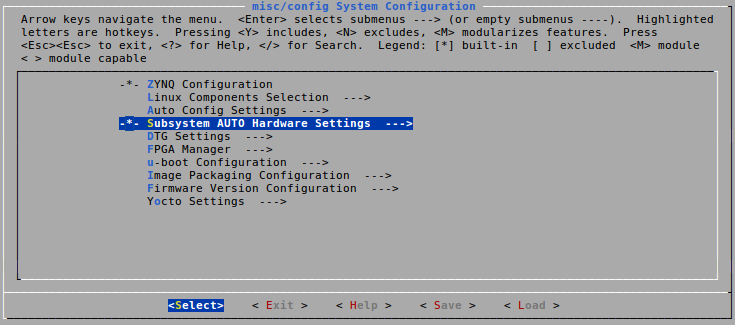
After pressing the enter key, press the esc key until the project starts to configurate.
In the project directory, type in the following command.
petalinux-build
This command should be run in the same directory than the previous, and it might take a bit of time as well. The last step would be to run the next command, and after its execution you should have the BOOT.bin and U-boot files ready to go.
petalinux-package --boot --fsbl <FSBL image> --fpga <FPGA bitstream> --u-boot
In order to correctly fill in the fields FSBL image and FPGA bitstream, we derive to the PetaLinux Tools Documentation. Command Line Reference Guide. Page 20. The following images highlingth the options that have to be selected according to the use of the zedboard. The command line for our case would be the following.
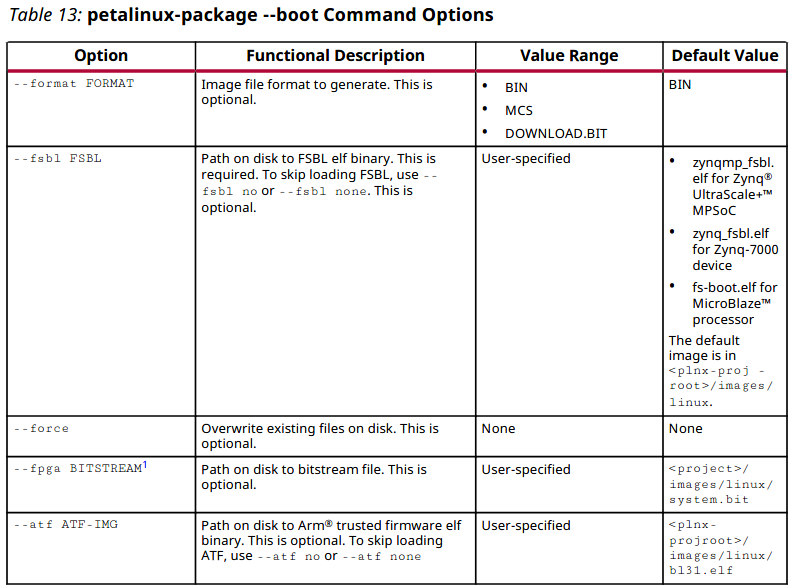
petalinux-package --boot --force --fsbl ./images/linux/zynq_fsbl.elf --fpga ./images/linux/system.bit --u-boot
The /images/linux/ is in the directory created by the command petalinux-create command, in this case, /home/fcarp/Desktop/TFM/PetaLinuxProjects/avnet-digilent-zedboard-2019.2/.
First of all, we have to create two partitions in the SD card. In order to do this, you can use the utility fdisk or GParted. It is highly recommended to use GParted though , specially if you are using a Linux machine, as it simplifies and speeds up the task.
1. Procedure with fdisk
First of all we are going to see a list of all the disks in the device with the following command.
sudo fdisk -l
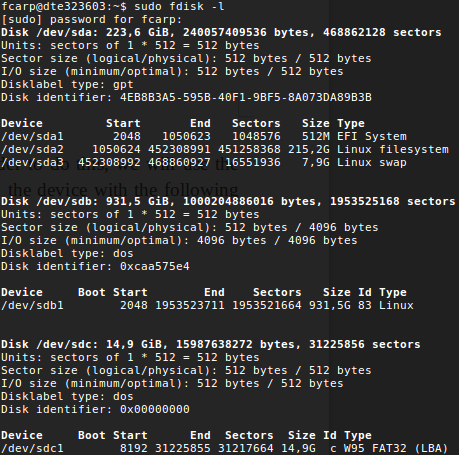
The SD, in our case, is 16 GB, and it is identified as /dev/sdc. Now we have to enter the command mode in that disk.
sudo fdisk /dev/sdc
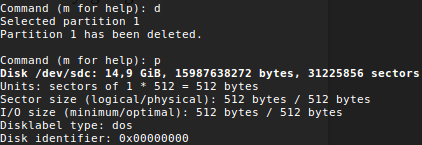
Inside the command mode, if we press p, we can print a table with the partitions of the card. In this case there is only one partition.
To delete a partition, we would type the command d, and afterwards the number of the partition. In this case, as there is only one partition, we don't have to enter the number.
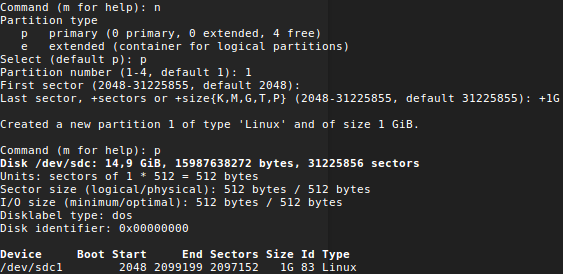
To create a partition, we type the command n. In this case, as we are only going to have two partitions, we are going to create two primary partitions, p. The first one is going to have 1 GB of space. In order to create we have to indicate is a primary partition, p; specify the number, 1; where the partition starts, default; and the size of the partition, 1 GB (+1G).
The second partition is created as shown in the next image.
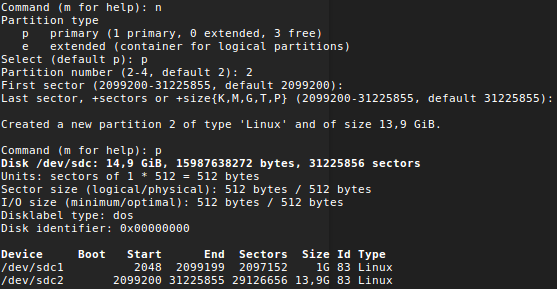
The second partition has a size of 13.9 GB.
We now have to specify the type of the partition. In this case, we see that both partitions have a Linux type. Partition sdc 1 has to be type FAT32, as indicated in the Petalinux Tools Documentation. Reference Guide. Page 40.
In order to change the type, we put in the command line t; the number of the partition, 1; and the type we want to stablish, b. To see a list with all the available types, type in L.
Now we can see that the type of the first partition has been switched to 'W95 FAT32'.
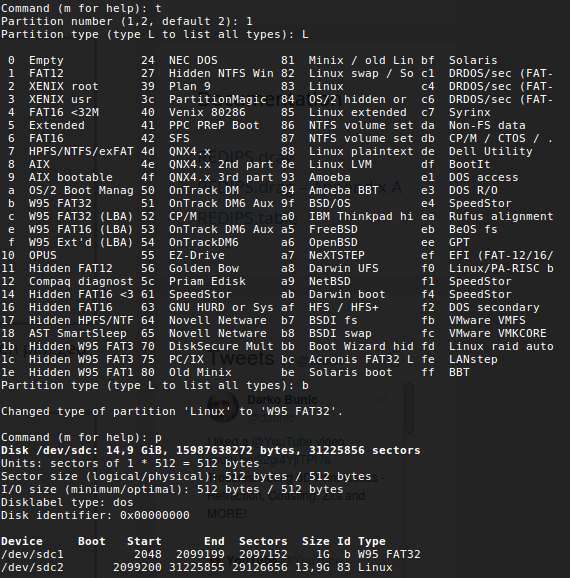
The second partition we leave it as Linux type. Once we have the partitions, we write the changes typing w.
Now, we have to format the first partition, /dev/sdc1, as FAT; and the second parition, /dev/sdc2, as ext4. In order to do this, we type in the next commands.
sudo mkfs.fat /dev/sdc1

sudo mkfs.ext4 /dev/sdc2

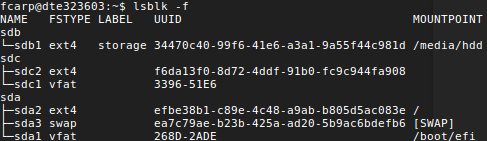
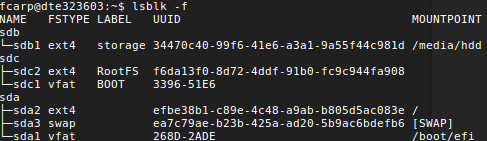
To check if the partitions were correctly formated, we type the following.
lsblk -f
Now, we change the label of the partitions, specifying BOOT for the first one and RootFS for the second one, using the following commands.
sudo fatlabel /dev/sdc1 BOOT

sudo e2label /dev/sdc2 RootFS
2. Procedure with GParted
Enter the SD card in the SD card reader of your computar and open up GParted. If the SD is empty, you should see that all its space is unallocated, as shown the image below.
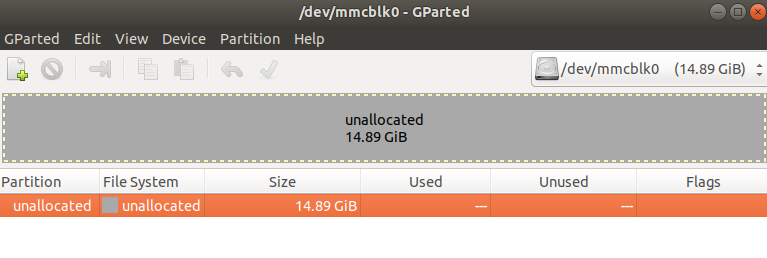
If this is not the case, right click each of the partitions and delete them. Before doing this, create a security copy of the old contents of the SD card, as you will lose them otherwise.
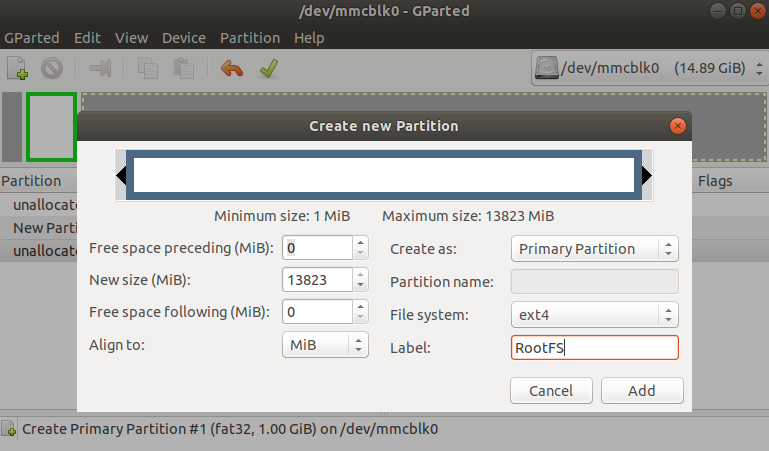
Now, right click on top of the unallocated partition, and click New. You have to configure the BOOT partition as shown in the following picture.
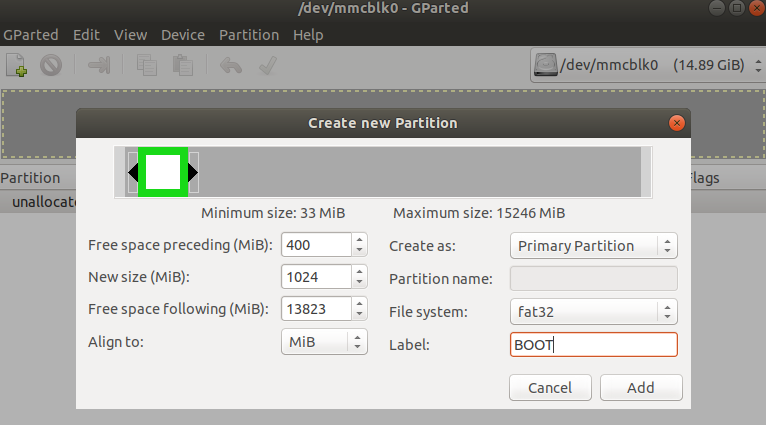
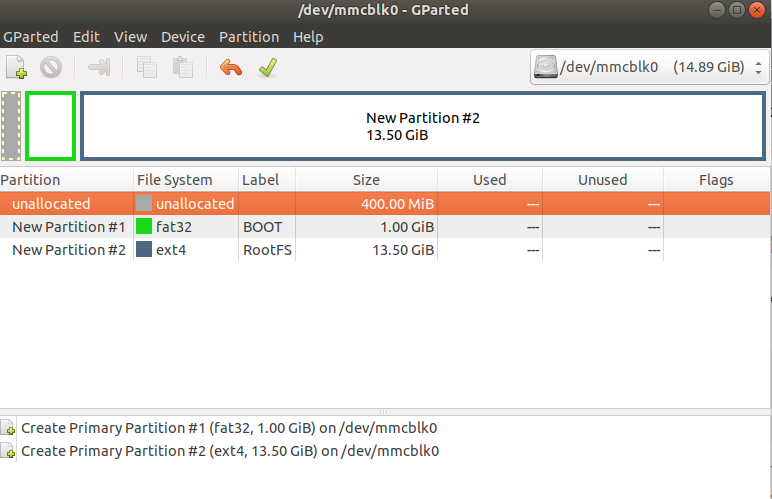
Repeat the operation and create the RootFS partition.
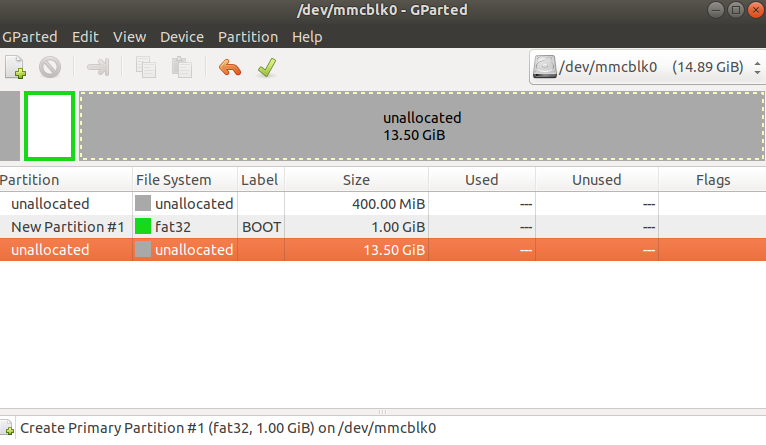
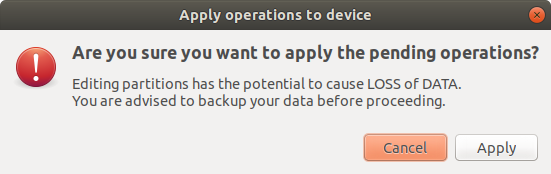
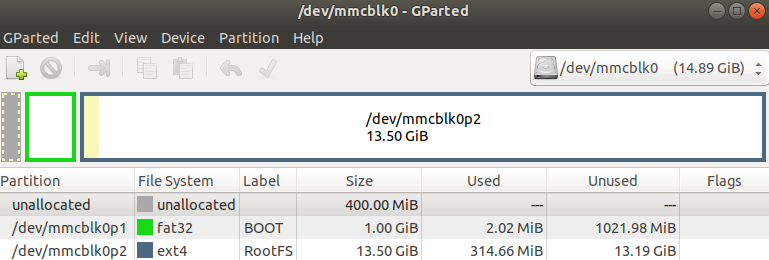
Click over the tic symbol, which will create the partitions after popping up the following warning message.
The final result is indicated in the next image. It is not necessary to leave the 400 MB of unallocated space if you don't want to.
The files that we now have to save on each partition are specified in Petalinux Tools Documentation. Reference Guide. Page 65.
In order to boot PetaLinux with the SD card, we need to make a couple of changes to the configuration. Get into the PetaLinux project directory, and insert the following comands.
cd /home/arroas/PetaLinux_Projects/ZedBoard_DNNs_DPUv3_0/

petalinux-config
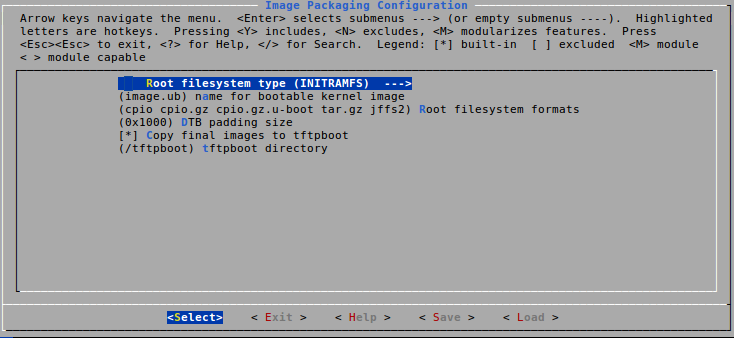
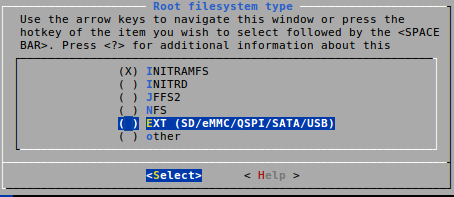
Exit configuration menu and save the settings. Build and generate the boot image.
petalinux-build

petalinux-package --boot --force --fsbl ./images/linux/zynq_fsbl.elf --fpga ./images/linux/system.bit --u-boot
Extract the 'rootfs.tar.gz' file present in the /images/linux directory of your PetaLinux project. This step is specified in the Xilinx documentation but you probably can skip it.
cd images/linux

tar xvf rootfs.tar.gz
The final steps are to copy several files into the partitions previously created. Enter the directory of your PetaLinux project with the terminal. Once in the directory, copy to the BOOT partition the BOOT.bin file and the image.ub file. This second file contains the device tree and the kernel image files.
cp images/linux/BOOT.BIN /media/arroas/BOOT/

cp images/linux/image.ub /media/arroas/BOOT/

cp images/linux/boot.scr /media/arroas/BOOT/
Copy the rootfs.tar.gz file to the RootFS partition, and extract the file system.bit.
cd images/linux

sudo tar xvf rootfs.tar.gz -C /media/arroas/RootFS
Once all the files have been copied to you board, execute the sync command and unmount you partitions to make sure no data is lost by the SD card. This is an important step, as it is possible to get weird errors if any files are lost from any of the partitions.
$ sync

$ sudo umount -l /media/arroas/BOOT/

$ sudo umount -l /media/arroas/RootFS/
NOTE: The previous commands copy this files to the previously created partitions, which are accessible from the /media/fcarp/ directory in our case. This directory can change on other devices.
The procedure is specified in Petalinux Tools Documentation. Reference Guide. Page 41.
Connect the Zedboard to the power and to the computer through the serial port with the micro USB cable.
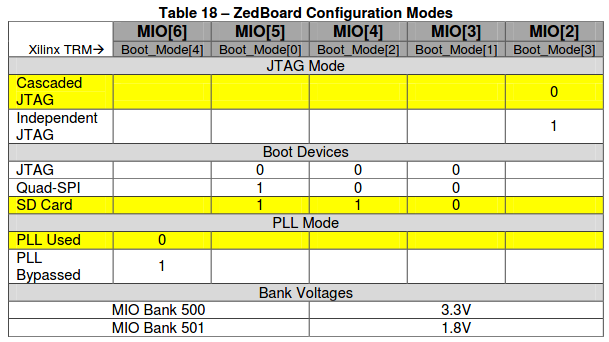
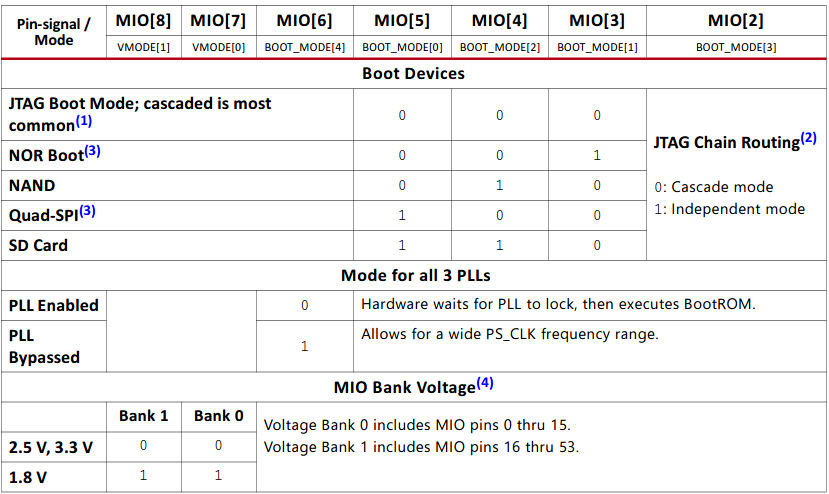
Before powering on the board, set up the SD boot mode with the MIO Zedboard bank, as shown in table 1 in the ZedBoard manual, table 2 in the Zynq 7000 chip manual and in the figure.
The configuration of an IP address to directly connect to the board to your computer is really easy. First of all, you need to connect to the board through an UART connection, as explained here. Once you've entered the username and pasword, with the following command you will setup an IP in your board for the eth0 interface.
ifconfig eth0 192.168.0.21 netmask 255.255.255.0
In the case you don't want to always have to type in this command, you can create a .sh file with the previous command typed in it. After this you would only have to copy this file to the board using an IP connection as shown here. Note while the .sh is not in the board you have to manually set up the IP, as shown before.
Once the .sh file is copied to the board, next time you boot it, to setup the IP you only have to access the directory your file is stored at and run the following command.
./<file_name>.sh
The addition of supported libraries is done with the following command:
petalinux-config -c rootfs
Once you have found the file you want to install, you have to press the key [Y] to add it or [N] to remove it.
The libraries that are not available can be added precompiled (.so file) or its source added and it will be compiled during Petalinux compilation.
After any library addition, you should build again your project, generate the operating system image and copy them again in the SD card.
This section of the guide is focused on showing some of the different processes you could use to connect to the board running PetaLinux through an SD card.
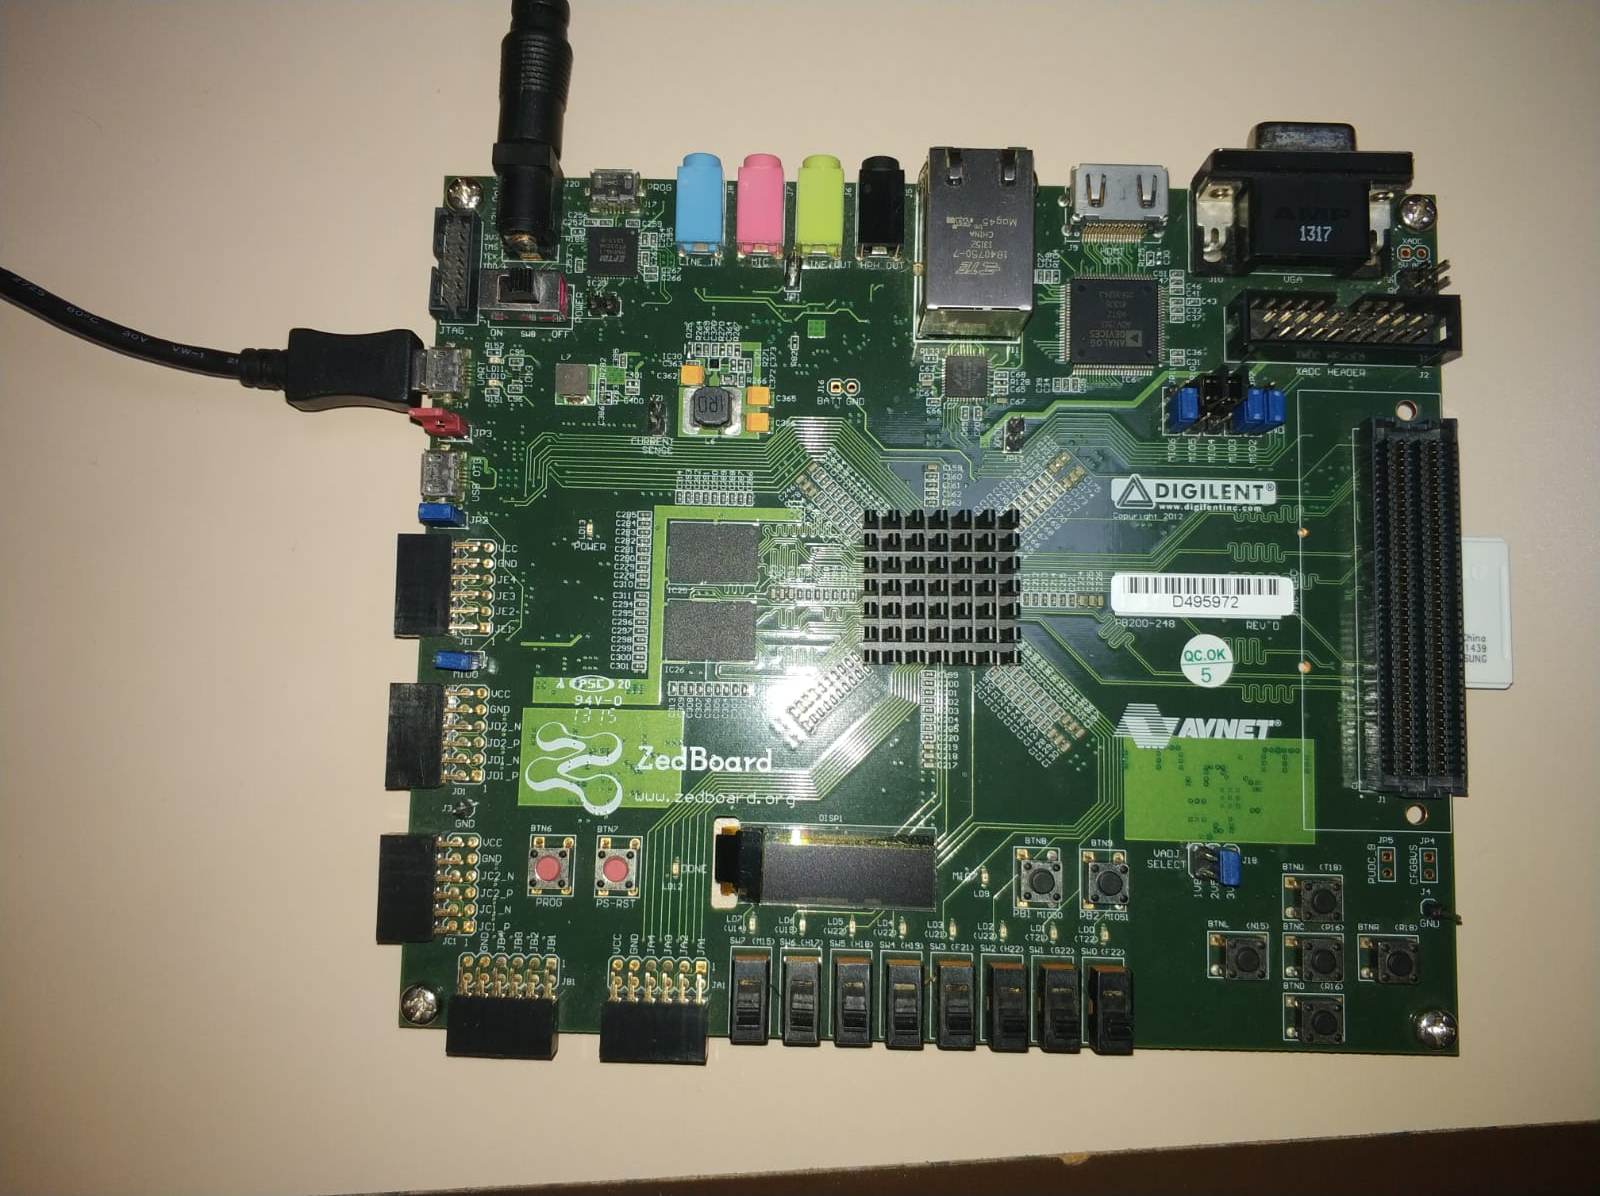
This example was carried out using a ZedBoard, which uses a Zynq-7000 chip from Xilinx. In order to connect to the board, we used a computer running Ubuntu 18.04 LTS with the software Putty installed. It is also neccesary to have the power cable for the board and a micro-usb cable connected to the UART connector in the board, which in this case is the J14 connector. The image shows how to easily make this connections.
In order to use Putty, we need to know what computer USB port is the board being connected to. The easiest way arroud to do this is accessing the following directory with your computer's console and running the following command.
cd /dev/

ls
The ls command should print all the ports within this directory. Now, power on the board, and connect it to one of the USB ports of the computer. Once this is done, run the ls command again. Now, the command should print one additional name. This would be the USB's port name. In our case, the name of the USB port would be ttyACM0.
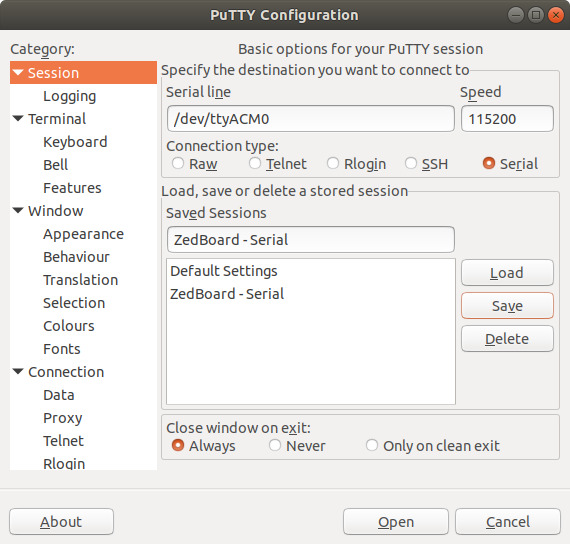
You can now power off the board and open Putty. We configure the connection as shown in the next image, selecting a serial connection, with a baud rate of 115200 and the directory where the board is connected to /dev/ttyACM0.
Once the configuration is set, power on the board, making sure it is correctly connected to the computer, and click the Open button. If there is any kind of problem open Putty again and repeat the proccess a couple of times until you get a console window opened. I you still cannot open the connection, you might have to go to a new console, and open putty using the root permissions.
sudo putty
After this, repeat the previous process. Once the connection is done, you should see the board booting. If you just see a black console, press any key and type in boot. After this the board should reboot.
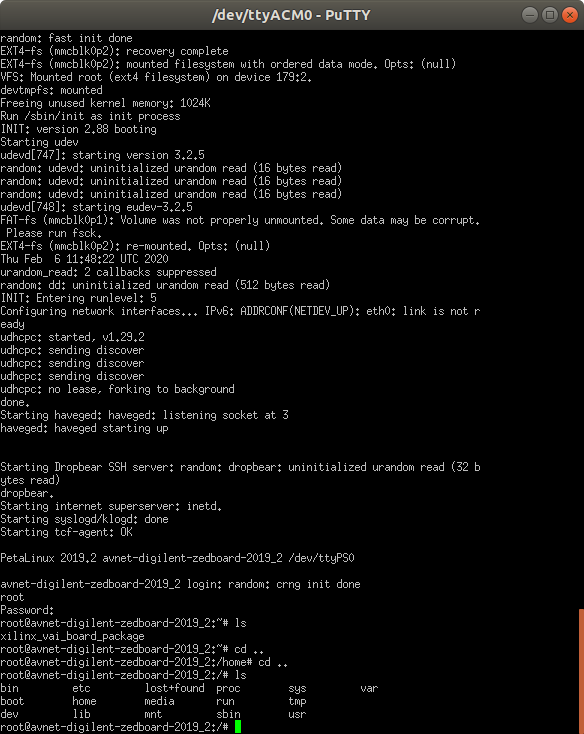
Once the board has correctly booted, it'll ask for the user name root and the pass root as well.
The next picture ilustrates the result you should get if connected properly.
The first step to establish a SSH connection with the board is to configure an IP address for the board, as shown here. Once the board is setup, you have to go to your network settings, and establish a manual IPv4 as shown in the following figure.
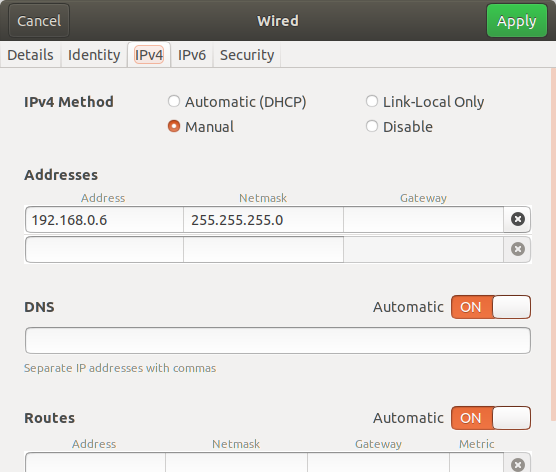
As you can see, the netmask is the same given to the board and the IP has to be in the same range as the one assigned to the board.
Once the network is applied, you can ping the board to see if you can connect.
ping 192.168.0.1
If the connection works, the last step would be to create the SSH connection. You can use PuTTy or other software. We are directly going to create the connection through the terminal typing in the following.
After this, you will get asked the username, which is root and the password, which is the same.
Previously, you have to create an SSH connection as shown here. Now, open a new terminal and introduce the following command changing the file directory you want to copy for yours and introducing the IP of your board.
scp -r <file_directory>/file.* root@<your_board_IP>
As an example we have copied the following file to our board.
scp -r /media/arroas/HDD/MinhasCousas/EEI/Mestrado/2º_Curso/TFM/Zynq7000-examples/Useful-scripts/ip_address_assign.sh [email protected]:~/
This command copies the file ip_address_assign.sh to the /home/root directory of the board.
The Deep Neural Network Development Kit (DNNDK) is a full-stack deep learning SDK for the Deep- learning Processor Unit (DPU). It provides a unified solution for deep neural network inference applications by providing pruning, quantization, compilation, optimization, and run time support. The pruning tool can only be utilized with the use of a lincense.
There is a newer tool from Xilinx to work with Deep Neural Network inference on edge devices, which is [Vitis-AI(https://github.com/Xilinx/Vitis-AI)]. The problem with this tool is that the run time support has only been compiled for devices that mount a processor with a armv8-A architecture, that can execute 64-bit instructions, while ZedBoard has a Z-7020 chip, which has a Cortex-9 processor that has an architecture armv7-A, and can only execute 32-bit instructions.
This means that to work with ZedBoard the only option is using the latest release of the DNNDK, version 3.1. The installation of this tool and execution of the first examples is carried out following the DNNDK User Guide.
In order to install the DNNDK package in ZedBoard, it is necessary to have completed the section Petalinux project configuration to run Deep Neural Networks.
The latest version of the DNNDK can be downloaded here, under Edge AI Tools. To download the release that corresponds to the v1.6 documentation you can just click here. The download requires to log into you Xilinx account, but its totally free. Once the package is downloaded, we create the following directory and extract the package.
cd /home/arroas/Xilinx-AI_Tools

tar xvzf xilinx_dnndk_v3.1_190809.tar.gz
The “host_x86” folder contains the Deep Compression Tool (DECENT) and Deep Neural Network Compiler (DNNC), the DDump and the DLet host tools, which allow neural networks to be optimized and accelerated on the DPU inference engine.
This release of the DNNDK enables the use of deep neural network models both from Caffe and TensorFlow framework.
The Caffe models need the installation of a series of dependent libraries.
sudo apt-get install -y --force-yes build-essential autoconf libtool libopenblas-dev libgflags-dev libgoogle-glog-dev libopencv-dev protobuf-compiler libleveldb-dev liblmdb-dev libhdf5-dev libsnappy-dev libboost-all-dev libssl-dev
Regarding TensorFlow, we create a conda environment to make sure it is not affected by future installations of TensorFlow packages. In this case, the TensorFlow version we are going to install is the CPU version with python 3.6, as we couldn't correctly create the environment fo the GPU version, which has faster execution time when running the decent tools.
$ cd /<dnndk_v3.1_extraction_directory>

$ conda create -n decent pip python=3.6

$ source activate decent

(decent)$ pip install /home/arroas/Xilinx-AI_Tools/xilinx_dnndk_v3.1/host_x86/decent-tf/ubuntu18.04/tensorflow-1.12.0-cp36-cp36m-linux_x86_64.whl

(decent)$ pip install numpy opencv-python sklearn scipy progressbar2
To check if the decent environment has been correctly created, run the following command.
(decent)$ decent_q --help
If the libraries and the conda environment have been added, install the DNNDK host tools.
cd /<dnndk_v3.1_extraction_directory>/host_x86

sudo ./install.sh
Finally, mount the SD card as indicated here, sections Create SD card partitions, Configure PetaLinux to boot with SD card and Boot PetaLinux image on Hardware with SD card.
It is necessary to copy the ZedBoard package into the board. In the board, create the folder xilinx-dnndk-v3.1 under /home/root/:
# cd /home//root/

mkdir xilinx-dnndk-v3.1
Execute the following commands with a SSH connection created with the ZedBoard. Check this guide to create this type of connection, in section SSH conection.
$ cd /<xilinx-dnndk-v3.1_directory>

$ sudo scp -r ./ZedBoard [email protected]:~/xilinx-dnndk-v3.1
Sometimes I get this error before I'm able to copy the folder to the board.
$ sudo scp -r ./ZedBoard [email protected]:~/xilinx-dnndk-v3.1
[sudo] password for arroas:

@@@@@@@@@@@@@@@@@@@@@@@@@@@@@@@@@@@@@@@@@@@@@@@@@@@@@@@@@@@
@    WARNING: REMOTE HOST IDENTIFICATION HAS CHANGED!     @
@@@@@@@@@@@@@@@@@@@@@@@@@@@@@@@@@@@@@@@@@@@@@@@@@@@@@@@@@@@
IT IS POSSIBLE THAT SOMEONE IS DOING SOMETHING NASTY!
Someone could be eavesdropping on you right now (man-in-the-middle attack)!
It is also possible that a host key has just been changed.
The fingerprint for the RSA key sent by the remote host is
SHA256:NXknQw8Sg71ieM+vdgvNB0o8PyVa9bwcBdwYIME8LFA.
Please contact your system administrator.
Add correct host key in /root/.ssh/known_hosts to get rid of this message.
Offending RSA key in /root/.ssh/known_hosts:1
  remove with:
  ssh-keygen -f "/root/.ssh/known_hosts" -R "192.168.0.21"
RSA host key for 192.168.0.21 has changed and you have requested strict checking.
Host key verification failed.
lost connection
To solve it, run the following command.
$ sudo ssh-keygen -f "/root/.ssh/known_hosts" -R "192.168.0.21"
Once the folder has been copied to de board, you are ready to install the package. This package installs DPU drivers, the DNNDK package and some python libs. The DPU and DNNDK have already been installed though. Therefore, the DPU drivers installation should not be re-performed. A different story happnes with the DNNDK, as the installation done in the PetaLinux project doesn't create the include folder needed to compile applications in the ZedBoard. To solve this issue, run the install.sh script, deleting all the code related with the DPU driver's installation.
# cd ~/xilinx-dnndk-v3.1/ZedBoard/

# ./install.sh
This is the code you should delete:
echo "Install DPU Driver ..."

mkdir -p /lib/modules/$(uname -r)/extra/ || install_fail
touch /lib/modules/$(uname -r)/modules.order
touch /lib/modules/$(uname -r)/modules.builtin
cp pkgs/driver/dpu.ko /lib/modules/$(uname -r)/extra/ || install_fail

depmod -a
rst="$(lsmod | grep dpu 2>&1)"
if [ -n "$rst" ] ; then
    rmmod dpu
    [ $? != 0 ] && install_fail
fi
modprobe dpu
[ $? != 0 ] && install_fail

if ! grep -Fxq "dpu" /etc/modules ; then
    sh -c 'echo "dpu" >> /etc/modules' ;
    [ $? != 0 ] && install_fail
fi

chmod og+rw /sys/module/dpu/parameters/cache || install_fail
chmod og+rw /sys/module/dpu/parameters/coremask || install_fail
chmod og+rw /sys/module/dpu/parameters/debuglevel || install_fail
chmod og+rw /sys/module/dpu/parameters/extension || install_fail
chmod og+rw /sys/module/dpu/parameters/mode || install_fail
chmod og+rw /sys/module/dpu/parameters/profiler || install_fail
chmod og+rw /sys/module/dpu/parameters/timeout || install_fail
chmod og+rw /sys/module/dpu/parameters/accipmask || install_fail
NOTE: During the installation of the package, it is necesary that the file
opencv.pcis located in the RootFS/usr/lib/pkgconfig/folder. The only configuration that seems to generate this file at this location is adding the opencv package to the RootFS file system with the commandpetalinux-config -c rootfsat the> Filesystem > libs > opencv. The addition of the needed libraries is better explained in section Add libraries to RootFS.
An alternative to using the PetaLinux configuration indicated in this guide is to directly use the .img file for ZedBoard that can be downloaded at the AI Developer site. To install this image, boot it to the SD card using a program such as Etcher, as explained in page 17 of the DNNDK v3.1 documentation, and execute the install.sh script without erasing the DPU driver installation part. With this configuration you won't be able to execute the tf_mobilenet networks. The reason is that this PetaLinux image has a DPU configuration that doesn't enable to execute the depthWiseConv layer.
After installing the DNNDK ZedBoard package in the board, there is several examples ready to be executed. This way you can see if everything is working properly.
-
Resnet50: The resnet50 example has been created in C++. In the directory
# ~/xilinx-dnndk-v3.1/ZedBoard/samples/resnet50there is two folders and a Makefile. The makefile is neccesary to create the executable of the model, which is going to have the same name as the model. The Makefile is executed with themakecommand. In themodelfolder, there is the DPU model of the used DNN. This file can be created with the DNNDK libraries that can be used in the host machine. In the foldersrc, there is the C++ code for the processor that actually manages the DPU and processor kernels, loads the images, and executes the application. Here is where it is possible to implement in the ZedBoard CPU the execution of DNN layers the DPU has no support for, such as thesoftmasklayer.
In order to run this example, execute this lines in a linux console of your host machine connected to the board through ssh. There is a guide on how to stablish this type of conection here, in section SHH connection.
Once the connection has been established, run the following commands in the board through this connection.
# cd ~/xilinx-dnndk-v3.1/ZedBoard/samples/resnet50/

# make

# ./resnet50
The result printed in your screen should be similar to this one.
Load image : PIC_001.jpg

Run DPU Task for ResNet50 ...
  DPU Task Execution time: 100915us
  DPU Task Performance: 76.4009GOPS
top[0] prob = 0.759646  name = Border collie
top[1] prob = 0.169500  name = collie
top[2] prob = 0.008439  name = Irish wolfhound
top[3] prob = 0.008439  name = borzoi, Russian wolfhound
top[4] prob = 0.006572  name = Saint Bernard, St Bernard
The input image in this case whas the following.

-
inception_v1_mt: This other example has been created with python. The file
inception_v1_mtcontains the code for the processor of the board, that, similarly to the last example, manages the DPU and processor kernels, loads the images, and executes the application.
To run this example, execute the following comand, indicating the number of threads you want to be used. Depending on the board, the most efficient number of threads can differ.
# cd ~/xilinx-dnndk-v3.1/ZedBoard/samples/inception_v1_mt/

# ./inception_v1_mt.py 1
The printed result should be the following for one thread:
Loading  PIC_001.jpg
Input thread number is: 1
17.65 FPS