petalinux project configuration to run deep neural networks - UviDTE-FPSoC/Zynq7000-dnn-inference GitHub Wiki
Installing PetaLinux in the host requires a series of steps that are clearly explained here.
In order to configure PetaLinux to perform inference of DNNs, we have to configure the OS in a certain way. First of all, from the previous guide, make sure to complete all the steps in the PetaLinux Configuration section. This section will guide you through the process of setting up your host machine to work with PetaLinux, as well as the creation and configuration of a PetaLinux project for ZedBoard. The creation of the project is done with the Xilinx ZedBoard .bsp file, which includes the ZedBoard drivers needed by PetaLinux.
If you are able to boot PetaLinux on ZedBoard, as explained in the guide, you can continue with the following specific configuration steps. Once the PetaLinux configuration has been completed, go back to section Software Installation and install the DNNDK package both in the host and ZedBoard.
In the case you don't want to create the PetaLinux project step by step, you can also configure it using the .bsp file that has been created with our own project. This file enables you to create a PetaLinux with already the same configuration that is explained here. The process of creating the project from the .bsp file is explained section Generate bsp file.
There is two ways of adding drivers and packages. This task can be done with each driver or package individually, or using an adtional script that will make it easier to add or remove drivers and packages. In this section both processes are explained, as they are very similar. First of all, the DPU drivers will be added individually, and later on we'll add a script that includes all needed packages.
There is two additional packages that will be included as it is mentioned in the Xilinx AR# 73058, where a PetaLinux project is configured to port resnet50 to a ZedBoard.
Once the PetaLinux project has been created, it is necessary to import the DPU drivers into the project. In order to do this, go back to the DNNDK v3.1 package folder that was downloaded when importing the DPU IP block into the Vivado project, here. Once in that folder, enter the following directory.
$ cd <dnndk-v3.1_download_directory>/apu/dpu_petalinux_bsp/
In this directory there is one .bsp file for ZCU102. Untar the file.
$ tar xvzf xilinx-zcu102-v2019.2-final-4dpu-1.4.1.bsp
The file contains several folders that would be added to our project if the PetaLinux project was created using this .bsp. This cannot be done though, as the project wouldn't contain the needed drivers for ZedBoard. Therefore, it is necessary to copy the DPU drivers from this folder into our project's folder. Enter the following directory.
$ cd zcu102-dpu-trd-2019-1/project-spec/meta-user/recipes-modules/
The DPU folder that is found in this directory contains the DPU driver source. With a terminal opened in this directory, copy the dpu folder into the PetaLinux project.
$ cp dpu /home/arroas/PetaLinux_Projects/ZedBoard_DNN_2019.2/project-spec/meta-user/recipes-modules/
Once the DPU driver is in the project directory, there is several more steps to be made. The DPU kernel driver requires that the “version magic” match the kernel that we are building in the petalinux project. This is accomplished by modifying the LINUX_VERSION_EXTENSION of the kernel.
- In the PetaLinux project directory, open he following file.
$ cd <petalinux_proj_directory>/project-spec/meta-user/recipes-kernel/linux/

$ gedit linux-xlnx_%.bbappend
Once the file has been opened, insert the following line at the end of it.
LINUX_VERSION_EXTENSION = "+"
Without this change, the DPU kernel driver (dpu.ko) will fail to be inserted at boot.
In addition to loading the DPU kernel driver, it is also needed to define the details of the DPU instantiation in the device tree content.
According to the DPU for Convolutional Neural Network v3.0, DPU IP Product Guide, page 41, the DPU device needs to be configured correctly under the PetaLinux device tree so that the DPU driver can work properly. Create a new node for the DPU, in a new file called dpu.dtsi, and place it as the child node of “amba”, in the directory <plnx_proj_directory>/project-spec/meta-user/recipes-bsp/device-tree/files/.
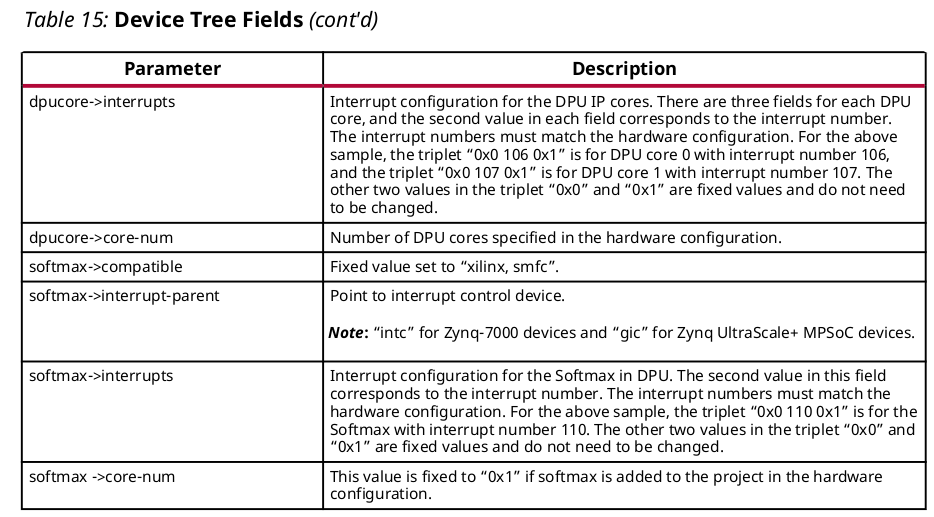
The parameters to the DPU and Softmax node are listed and described in the following table, which is table 15 of the DPU product guide.
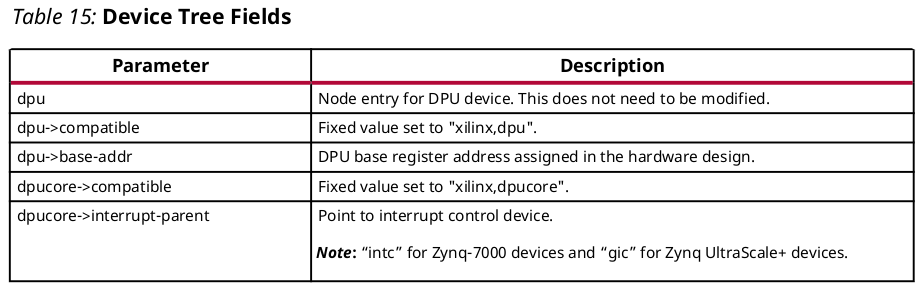
The following node configuration stands for the DPU usage in the ZedBoard, with a Z-7020 chip. Below the example, there is the justification for each of the selected parameters.
/ {
        amba{
		dpu{
		    #address-cells = <1>;
    		    #size-cells = <1>;
    		    compatible = "xilinx,dpu";
    		    base-addr = <0x40000000>;

		    dpucore {
		        compatible = "xilinx,dpucore";
		        interrupt-parent = <&intc>;
		        interrupts = <0x0 29 0x4>;
		        core-num = <0x1>;
		    };

		};
	};


	amba_pl@0 {
                /delete-node/ dpu_eu@40000000;
	};
};- dpu->compatible: Fixed value to "xilinx,dpu".
-
dpu->base-addr: DPU base register address assigned in the Vivado project. This address is the same as the offset address that was obtained in section assign register address for the design. The value of the address would be
0x4000_0000. - dpucore->compatible: Fixed value to "xilinx,dpucore".
-
dpucore->interrupt-parent: Point to interrupt control device, which in the case of a Zynq-7000 device should be
&intc. -
dpucore->interrupts: The
0x0and the0x1are fixed values that do not have to be changed. The value that is placed in the middle indicates the Linux IRQ# obtained in section assign register address for the design. The value would be0x1D. - dpucore->core-num: The number of DPU cores. This parameter is configured in section import and interconnect all necessary IP blocks.
The softmax options aren't included, as this option is not compatible with Zynq-7000 family chips.
Now, enter the system-user.dtsi file and make sure the content is the following.
/include/ "system-conf.dtsi"
/ {
};

#include "dpu.dtsi"
Finally, go to the <plnx_proj_directory>/project-spec/meta-user/recipes-bsp/device-tree/ and open the file device-tree.bbappend, which should look like it is now shown.
FILESEXTRAPATHS_prepend := "${THISDIR}/files:"

SRC_URI += "file://system-user.dtsi \
	          file://dpu.dtsi \
	          file://openamp.dtsi"
The openmap.dtsi is added because an indication at AR# 73058.
Once the previous configuration has been carried out, it is time to install the drivers in the PetaLinux project. The steps that are now indicated can be found in the README.md document within the DPU driver folder, at <petalinux_proj_directory>/project-spec/meta-user/recipes-modules/dpu/.
To compile and install the module to the target file system copy on the host, execute the following lines in the petalinux project directory:
- The module has to be added to the RootFS file system. First of all, go to the directory
<petalinux_proj_directory>/project-spec/meta-user/conf/and add the following line to the fileuser-rootfsconfig. This process is explained in the Petalinux Tools Documentation. Reference Guide. Page 83 in the Add existent recipe into RootFS.
CONFIG_dpu
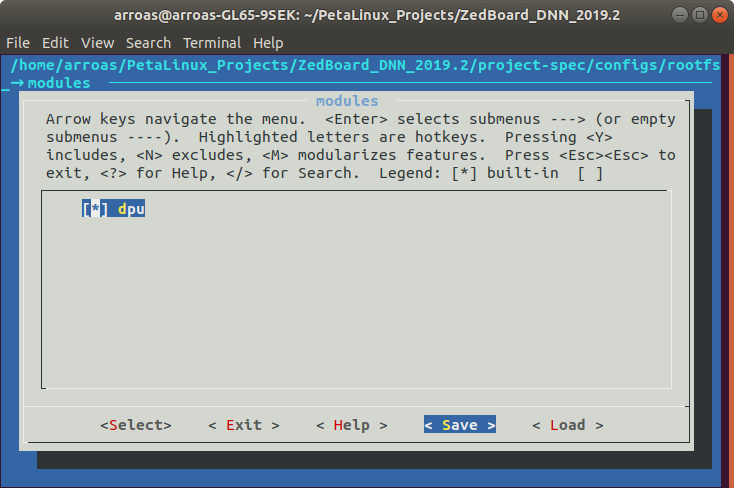
Open now a terminal in the PetaLinux project directory, and add the module to the file system. Enter the following command, and access the folder indicated below.
$ petalinux-config -c rootfs
modules > dpu
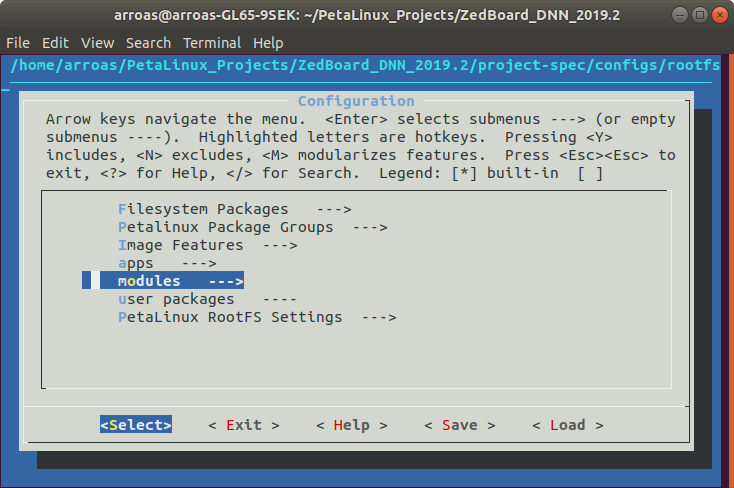
To add the module press the "y" key and select the <save> option. Now exit the configuration screen.
- Now, execute the following commands. The first line builds the kernel, and the second one builds the module command.
$ petalinux-build -c kernel

$ petalinux-build -c dpu
- It is also needed to rebuild PetaLinux bootable images so that the images are updated with the updated target filesystem copy.
$ petalinux-build -x package
- The PetaLinux command to compile the module, install it to the target filesystem host copy and update the bootable images can be executed.
$ petalinux-build
Once the DPU drivers have been installed into the project, it is turn for the DNNDK package. Go back to the zcu102-dpu-trd-2019-1 folder that was untared from the .bsp file when copying the DPU drivers folder here.
$ cd <zcu102-dpu-trd-2019-1>/project-spec/meta-user/recipes-apps/
The folder with the DNNDK package is called DNNDK, and the one with the autostart one is called autostart. Copy both folders to your project under <petalinux_proj_directory>/project-spec/meta-user/recipes-apps/. This packages have to bee added to the RoofFS file system. Therefore, add the lines CONFIG_autostart and CONFIG_dnndk to the user-rootfsconfig at <petalinux_proj_directory>/project-spec/meta-user/conf/. Now, execute the following command.
$ petalinux-config -c rootfs
In the config manager, add the autostart and dnndk packages as once done for the dpu. The packages can be found at:
apps > autostart
user packages > dnndk
If there is more than one driver or additional package that you want to include to the PetaLinux configuration, this method is the most comfortable one. The idea would be to use a script where you can add all the drivers and packages not included in the rootfs of PetaLinux so that you don't have to compile them individually. If you just want to work with the DNNDK v3.1 package, it is recommended to skip this section. If you need to install libraries such as apt or dnndk, a solution is exposed here.
The best example can be found in the DPU-TRD .bsp file that can be found in the Vitis-AI repository. The file can be downloaded in a similar way to the .bsp file untar done in section DPU drivers. This file is a pre-configured PetaLinux project for ZCU102 where Xilinx has done all the necessary configuration in order to perform inference with this a board using Vitis-AI instead of the DNNDK v3.1 package. Visis-AI is not compatible with Zynq-7000 family chips at the writing of this guide, but in this DPU-TRD there is a good way of adding several libraries that could result to be really useful.
In the DPU-TRD .bsp file, folder where all the external packages are included is found at /<bso_directory>/project-spec/meta-user/recipes-core/packagegroups/. the packagegroup-petalinux-xlnx-ai.bb file. Its content is now shown.
DESCRIPTION = "Xlnx AI Packages"

inherit packagegroup

XLNX_AI_LIBS = " \
	glog \
	gtest \
	gtest-staticdev \
	json-c \
	json-c-dev \
	libeigen-dev \
	libcanberra-gtk3 \
	libdrm \
	libdrm-kms \
	libdrm-tests \
	libx11-locale \
	opencv \
	opencv-dev \
	protobuf \
	protobuf-dev \
	protobuf-c \
	python3-pip \
"

XLNX_AI_UTILS = " \
	apt \
	auto-resize \
	cmake \
	dpkg \
	i2c-tools \
	packagegroup-petalinux-v4lutils \
	xrandr \
"

XLNX_AI_APP = " \
	dhcp-client \
	glmark2 \
	xauth \
	nfs-utils \
	openssh-sftp-server \
"

XLNX_AI_PACKAGES = " \
	ai-camera \
	base-files \
	dpcma \
	dpu \
	dpuclk \
	resolvconf \
	screen-flicker \
	tzdata \
	ntp \
	packagegroup-petalinux-weston \
	xfce4-terminal \
	${XLNX_AI_LIBS} \
	${XLNX_AI_UTILS} \
	${XLNX_AI_APP} \
"

RDEPENDS_${PN} = "${XLNX_AI_PACKAGES}"
In the libs tab we can find the libraries that the target could need when running inference. The utils tab includes several command libraries which can be useful. The one used to install .deb packages would be dpkg. There is also others such as apt, which is the linux installation manager.
In the packages tab, the DPU is included. Therefore, this script can be copied, avoiding having to create one from scratch. Go to your /<petalinux_proj_directory>/project-spec/meta-user/ and create the directory /recipes-core/packagegroups/, copying the file packagegroup-petalinux-xlnx-ai.bb to it. You can now include or remove the packages that you want. The script you could end up with would look as follows.
DESCRIPTION = "Xlnx AI Packages"

inherit packagegroup

XLNX_AI_LIBS = " \
	glog \
	gtest \
	gtest-staticdev \
	json-c \
	json-c-dev \
	libeigen-dev \
	libcanberra-gtk3 \
	libdrm \
	libdrm-kms \
	libdrm-tests \
	libx11-locale \
	opencv \
	opencv-dev \
	protobuf \
	protobuf-dev \
	protobuf-c \
	python3-pip \
"

XLNX_AI_UTILS = " \
	apt \
	cmake \
	dpkg \
	i2c-tools \
	packagegroup-petalinux-v4lutils \
	xrandr \
"

XLNX_AI_APP = " \
	dhcp-client \
	glmark2 \
	xauth \
	nfs-utils \
	openssh-sftp-server \
"

XLNX_AI_PACKAGES = " \
  autostart \
	dpu \
  dnndk \
	${XLNX_AI_LIBS} \
	${XLNX_AI_UTILS} \
	${XLNX_AI_APP} \
"

RDEPENDS_${PN} = "${XLNX_AI_PACKAGES}"
If you haven't included the DPU drivers yet, go back to sections DPU drivers and DPU device tree definition.
The installation of this packages is now analog to the DPU drivers individual installation.
- The packages have to be added to the RootFS file system. First of all go to the directory
<petalinux_proj_directory>/project-spec/meta-user/conf/and add the following line to the fileuser-rootfsconfig. This process is explained in the Petalinux Tools Documentation. Reference Guide. Page 83 in the Add existent recipe into RootFS.
CONFIG_packagegroup-petalinux-xlnx-ai
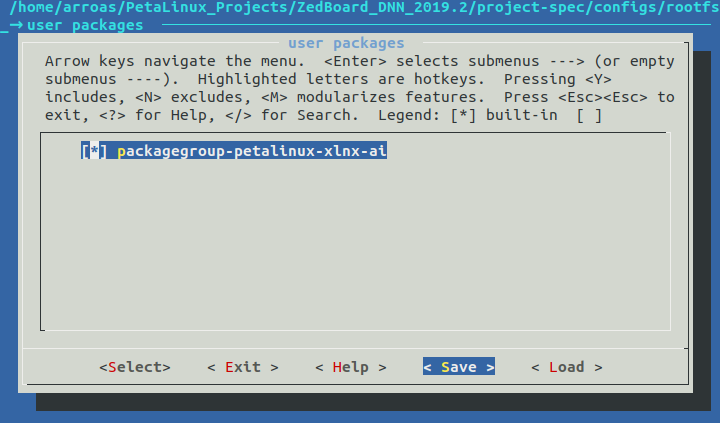
- Open now a terminal in the PetaLinux project directory, and add the module to the file system. Enter the following command, and access the folder indicated below.
$ petalinux-config -c rootfs
user packages > packagegroup-petalinux-xlnx-ai
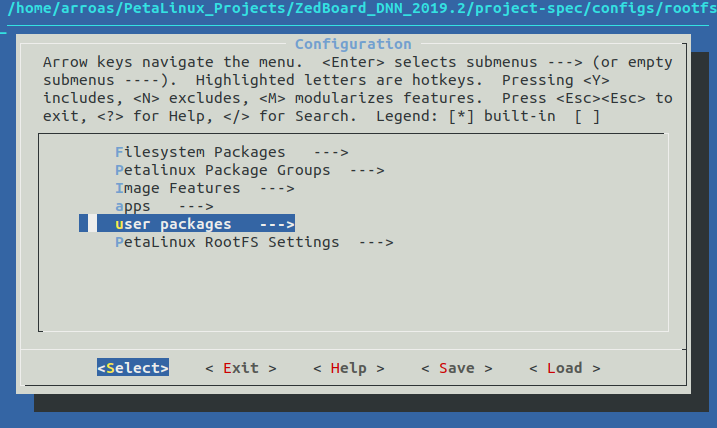
To add the module press the "y" key and select the <save> option. Now exit the configuration screen.
- To compile and install the modules to the target file system copy on the host, execute the following lines in the PetaLinux project directory. The first line builds the kernel, and the second one builds the modules command.
$ petalinux-build -c kernel

$ petalinux-build -c packagegroup-petalinux-xlnx-ai
- It is also needed to rebuild PetaLinux bootable images so that the images are updated with the updated target filesystem copy.
$ petalinux-build -x package
- The PetaLinux command to compile the module, install it to the target filesystem host copy and update the bootable images can be executed.
$ petalinux-build
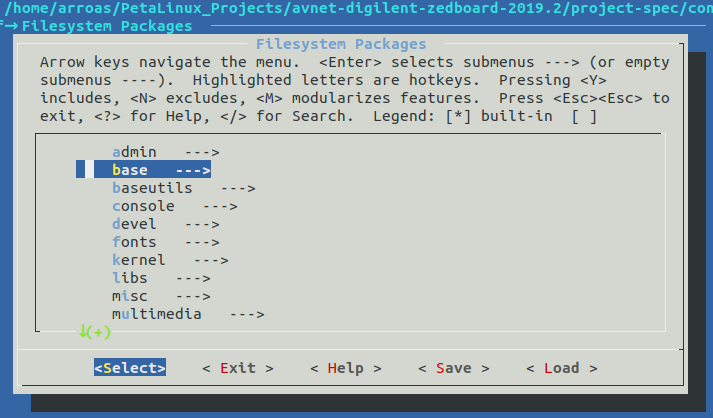
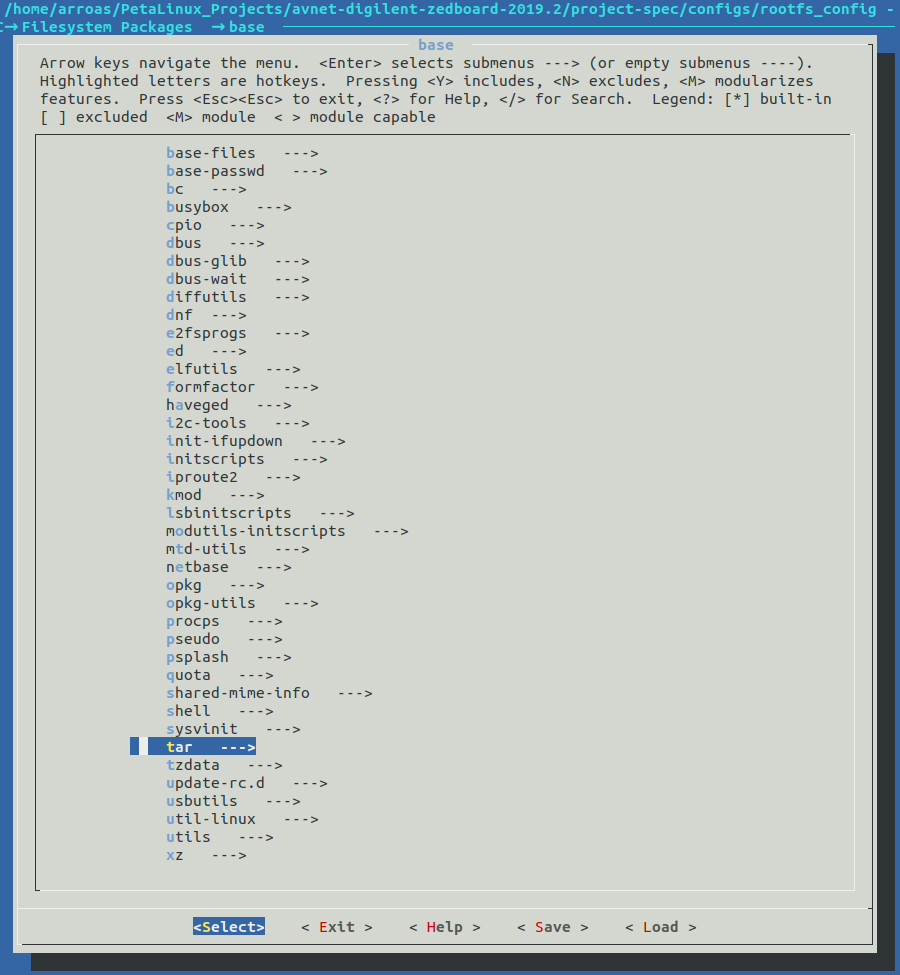
The installation and execution of the DNNDK v3.1 package and the DPU need to have certain libraries installed in the OS. Add the following list of libraries:
Filesystem > base > tar > tar
Filesystem > console > utils > vim > vim
Filesystem > libs > opencv > opencv
Filesystem > libs > opencv > opencv-dev
Filesystem > libs > opencv > opencv-apps
Filesystem > libs > opencv > opencv-samples
Filesystem > libs > opencv > opencv-dbg
Filesystem > misc > packagegroup-core-buildessential > packagegroup-core-buildessential
Petalinux Package Groups > packagegroup-petalinux-pyton-modules > packagegroup-petalinux-pyton-modules
Petalinux Package Groups > packagegroup-petalinux-opencv > packagegroup-petalinux-opencv
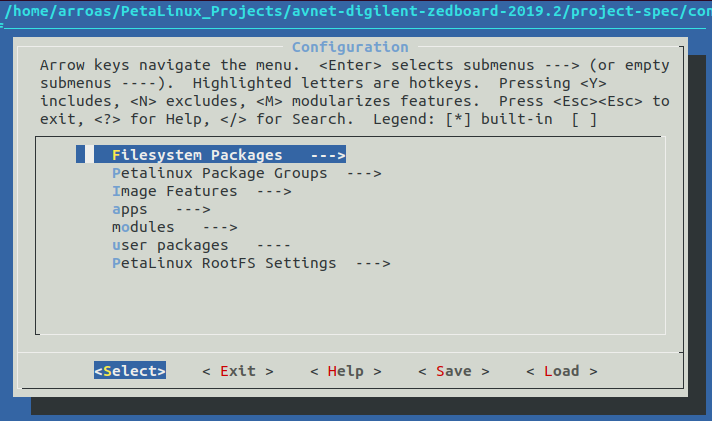
- To add this libraries, follow this procedure:
$ petalinux-config -c rootfs
Filesystem > base > tar > tar
- Press
enter.
- Press
enter.
- Press
enter.
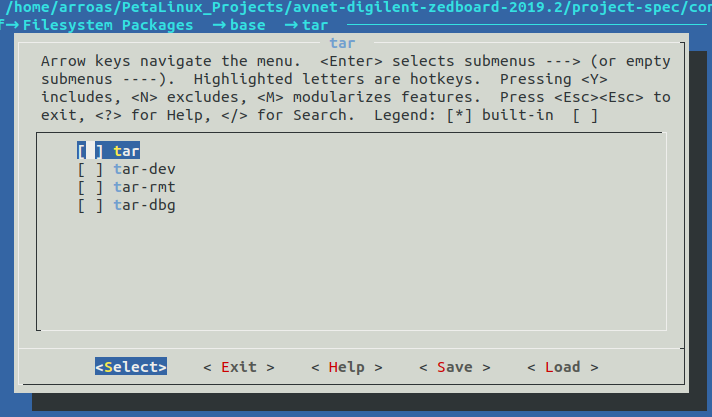
- To add the module press the "y" key and select the
<save>option. Now exit the configuration screen.
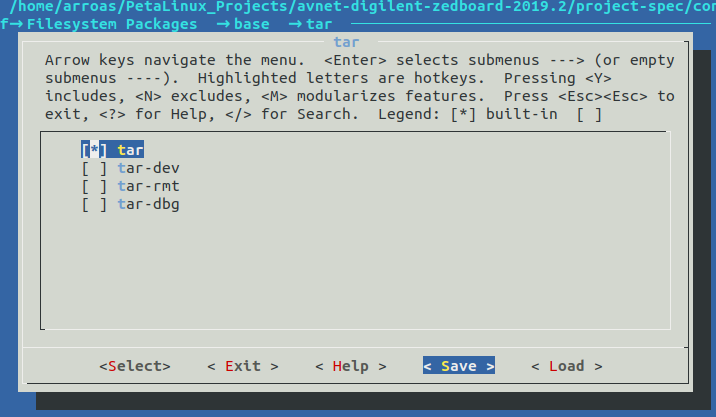
The rest of the libraries would be added in an analog manner.
It is important to add all the opencv libraries under >> file system >> libs >> opencv, as the compilation of them generates a file opencv.pc in the RootFS file system at <rootfs_partition>/usr/lib/pkgconfig/ that is necessary to compile the DNN applications when using the DNNDK. It is also important to add the packagegroup-petalinux-pyton-modules, as they enable executing the pip command, which is necessary to install some python dependencies later on. The packagegroup-core-buildessential is fundamental to execute the make command when compiling applications in the ZedBoard. It is also recommended to add the tar package just in case it is necessary to untar some files and the vim text editor, as a console editor can be very helpful when debugging your applications with ZedBoard. Here is a link to a vim command tutorial.
- Re-build the project.
$ petalinux-build
All the steps followed in this sub-section are performed as specified in AR# 73058.
- Expand the available memory of the kernel:
$ petalinux-config -c kernels
kernel features > maximum zone Border
Modify the value from 11 to 15.
- Open the file
dpu.bbappendat<petalinux_proj_directory/project-spec/meta-user/recipes-modules/dpuand add the following line to the end of the file in order to set the DPU to autoload.
KERNEL_MODULE_AUTOLOAD += "dpu"
Build the PetaLinux design and generate the BOOT.bin file:
$ petalinux-build

$ petalinux-package --boot --force --fsbl ./images/linux/zynq_fsbl.elf --fpga ./images/linux/system.bit --u-boot
Once the PetaLinux configuration has been completed, go back to section Software Installation and install the DNNDK package both in the host and ZedBoard.
Once you have created a PetaLinux configuration, the easiest way to reproduce it in another host machine is to generate a .bsp file. This type of file contains all the configuration files, as well as all the recipes imported to the PetaLinux project. In order to generate this file, use the following command.
petalinux-package --bsp -p /home/arroas/PetaLinux_Projects/ZedBoard_DNN_DPUv3.0/ --output ZedBoard_DNNs_DPUv3_0.bsp
In order to create a new project with the same configuration as the one in your .bsp file, go to through this README file.