ZG SWTOR Area Tools - SWTOR-Slicers/WikiPedia GitHub Wiki
(Back to ZG SWTOR Tools Add-on's index)
The SWTOR Area Tools comprise an Area Assembler tool, plus a couple of Blender Collections tools that ought to help deal with the results of importing massive area sets (whole SWTOR worlds, usually).

- Area Assembler.
- Enable/Disable Collections.
- Group Areas in SubCollections.
Area Assembler.
The Area Assembler tool (co-written with fellow slicer @crunch) assembles SWTOR game locations based on the information produced by Jedipedia.net's World Viewer and File Reader online tools. Those tools are able to export lists of objects in an human-readable-ish .json format, which this one uses to import the objects and position them correctly.
In this guide we will show you:
- How to use Jedipedia's tools to find and download the game location data in .json format.
- How to feed it to the Area Assembler.
- And its possibilities and limitations.
Requirements.
In order to work, this tool needs:
- To have selected in this Add-on's Preferences a 'resources' folder from an assets extraction produced with ExtracTOR (or with the now deprecated Slicers GUI's 'Full' preset. A smaller, 'Static' preset-based one ought to work, too, but that hasn't been thoroughly verified yet). The Status panel will indicate if such a folder is selected. If not set, both the indicator and the tool will appear in red.
- The latest .gr2 Importer Add-on for Blender (it does the actual importing of objects).
And to obtain SWTOR areas' data, we'll have to:
- Visit Jedipedia.net's World Viewer webpage to copy game location' IDs.
- And then use Jedipedia.net's File Reader webpage to export the relevant files related to those IDs.
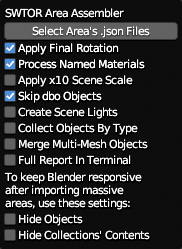
Importing options.
These are the tool's basic importing options. The default settings are quite alright for most cases.
-
Change Scene Scale (default=off): automatically scale the entire scene after import by a factor.
SWTOR uses decimeters as coordinate units, so, objects are internally sized as their real world size divided by 10. As many advanced operations in Blender (physics simulations, automatic weighting, etc.) depend on objects having real world sizes, this option will let us resize the imported areas for us if we need it.
Such scalings could be done after an Assembling with Blender's usual tools or with the ZG Tools' Quickscaler afterwards, anyway, but, when importing whole worlds, Blender can be really slow at doing a Select All > Scale, so, this is a convenience.
-
Apply Final Rotation (default=on): applies an X-Axis 90º Degrees rotation to the area's set of objects. Just leave it on.
(This is more of a diagnostics tool than anything else. Due to Blender's Z-is-up coordinate system being at odds with SWTOR's Y-is-up one, which is a source of complications when using SWTOR objects transformation data and chaining those transformations when parenting objects, we delay the final 90º rotation to the very last moment. Un-ticking this checkbox would bypass that rotation)
-
Process Named Materials (default=on): it applies the Process Named Materials tool (available in the Materials Tools subpanel) to auto-texture the imported objects. As we don't cover all SWTOR materials yet, depending on the type of area (indoors, outdoors, spaceship interiors) we can get fully textured environments or ones with lots of untextured stuff showing up as white (uneven terrains, vegetation, water bodies, etc.).
-
Skip dbo Objects (default=on): Don't import design blockout (DBO) objects such as blockers, portals, etc. Replace them with Blender's "Empties", instead.
DBOs are game engine objects, invisible during gameplay, used by the level designers to set barriers to movement, mob spawning points, etc. Normally, such objects are just a nuisance for the purpose of assembling a game location in Blender, so, the default setting is on.
However: we aren't fully sure yet about whether some of those objects determine the position, rotation and/or scale values of some visible objects in the scene (that is, they act as their parent objects) or not. Because of that, at the moment we are replacing them with Blender's Empties, which are a nuisance of their own but at least they aren't rendered in the scene (during Assembling, we are doing a "delete parentless/childless Empties" pass to minimize them to an extent).
-
Import Terrain Only (default=off): import only terrain objects (exported by UltimaKaosXIII: SWTOR Terrain Extractor). Again, more of a diagnostic tool than anything else. Can be fun to play with 😛.
-
Create Scene Lights (default=off): automatically create very basic scene lighting based on in-game lighting nodes' positions and angles (if their numbers exceed 100, they will be set as excluded from view for Blender responsiveness reasons). As we don't have more lighting specifics (point, spotlight, intensity, etc.) in the area data, it's mostly a starting point.
-
Collect Objects by Type (default=off): if checked, the areas' objects are further arranged in Area sub-Collections. For each area (.json file), we get this Collection hierarchy:
- Area name
- Area name - Lights (if Create Scene Lights is on)
- Area name - Terrains (if any)
- Area name - Objects
- Area name
-
Merge Multi-Mesh Objects (default=off): joins single .gr2 file-originated multi-meshes into single objects.
Some of SWTOR's .gr2 objects contain several meshes at once. For example, there is an open crate object that has a separate lid and several tools spread around it, plus some invisible blocking object to keep a player from walking across it. These are the objects that slow down the importing process the most, despite some attempts at optimizing it. Then again, those are great objects for kitbashing if we keep their sub-meshes separate.
Still, if one doesn't care for that, this option would just merge the sub-meshes into a single object, easier to pick and move around in Blender. This might marginally speed up the importing process if there are duplicates of this object listed in the .json files.
-
Full Report In Terminal (default=off): by default, the Add-on will show the progress of each of the importing job's stages in an abbreviated manner: continuously overwriting a single line except when there is some error to report. Ticking this checkbox will show all the lines, instead.
If set to on, given the tremendous amount of lines a whole world import can mean, we recommend increasing the console app's buffer settings (or the one in a debugging environment such as VSCode's) to some ludicrous size: we are talking about 500 lines per processed .json file or so. This option doesn't make much sense otherwise, as the full report's first half or more would easily get truncated out without an ample buffer size.
(Terminal reporting is a bit borky in this release of the tool. We are reworking it to be more usable, and writing to a log file is being considered, too)
Options for reducing Blender's lag when importing MASSIVE Areas.
If we are importing whole worlds because of course we are 😏:
After importing massive amounts of objects, such as a whole planet's set of .json area files, it's typical that Blender's responsiveness to operations such as a innocent Select All lags horribly. We are talking half minutes or worse just to respond to our cursor hovering over a button (if this button has to do a check for a selection of objects before making itself clickable). Even just moving through an Outliner overloaded with thousands of objects will lag considerably.
The following options mitigate or fully eliminate that problem by hiding the objects in two manners that keep Blender from getting choked, and give us a chance to save the project and organize things a little before unhiding them.
-
Hide Objects (default=off): imported Area objects are hidden in the 3D Viewport (as when turning their 'eye' icon off in Outliner or using the
hshortcut) to keep Blender more responsive when having massive amounts of objects per individual Collections.Recommended for dealing with single .json files weighting in the MegaByte range, such as certain juicy single location/.json file areas where the game developers put ALL the decorations to test them. That means a single resulting Collection with thousands of objects.
Lag could persist, as the Outliner still has to list the objects, but it should be fairly tolerable.
-
Hide Collections' Contents' (default=off): imported per area (per .json file) Collections are excluded from the View Layer (as when unticking their checkboxes in the Outliner or using the
eshortcut) to keep Blender fully responsive and be able to manage them without any lag at all.Recommended when importing a massive number of areas, such as whole worlds.
Excluded Collections won't list their objects in the Outliner, as usual, which immediately alleviates the Outliner's workload and makes Blender brisky. The idea is to activate the specific area Collection or Collections we want to tinker with and deactivate them to move on to others instead of having it all active and crush both poor Blender and our patience.
Hiding Collections' Contents resets the hide/show state of the Collections' Objects. That means that, if we enable both options, the Objects After Importing option's effects will be overridden anyway.
How to use the Area Assembler tool.
(Before assembling outdoor locations, we'll want to convert the game's terrain heightmaps to an usable format with the SWTOR Terrain Extractor. That's not necessary for the example we are using in this guide: a Player Character ship. It's explained afterwards, anyway)
Locating Area IDs, and Downloading Area .json files.
The first step to assemble a SWTOR game area is knowing its ID. As an example, we are going to use the Sith Warrior's Fury Interceptor player ship. The steps for this area apply to all other areas as well.
-
First, we navigate to Jedipedia's World Viewer, which lists all the game's locations (ships, planets, Flashpoints, Operations, etc.) and check the
Player shipssection for theFury (Sith Warrior)entry. Simply clicking on it will autofill theAreaIDtext field below the1. Choose an areaheading, as seen below. We copy this Area ID to the clipboard or to a text document for use in the next step, and we're done with the World Viewer!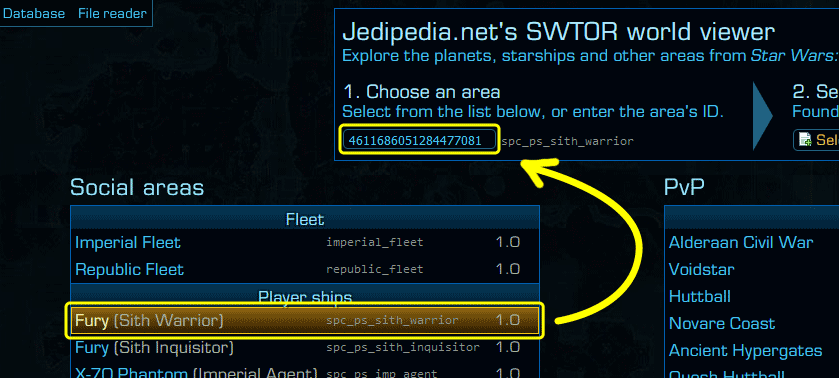
-
Now, we navigate to Jedipedia's File Reader (the link is available at the top left corner of the World Viewer page, too) and click the
Add Assetsbutton, which will produce a file browser.
We have to navigate to the
AssetsDirectory inside SWTOR's game files and select all the.torfiles within the folder (pressingawill do it), then open them. Loading them takes very little: from less than 10 to 60 seconds (there are progress indicators).(This action doesn't alter the game's files in any way or shape: it just reads them, so, it's completely safe to do)
Location of the 'Assets' folder:
-
On a Steam Install, it typically is at:
C:\Program Files (86)\Steam\steamapps\common\Star Wars – The Old Republic\Assets -
On a traditional SWTOR Launcher Install:
C:\Program Files (x86)\Electronic Arts\BioWare\Star Wars - The Old Republic\Assets
-
-
Once all the
.torfiles have loaded into the File Reader, we switch to the 'Files' tab on the top left, and then, in the input search field, we paste or type in theAreaIDwe got earlier. In this case, theAreaIDis4611686051284477081. Doing that will narrow the displayed files down to a handful, all relating to thespc_ps_sith_warriorarea: these are the area's.datfiles, with names that are fairly descriptive of their content.
-
We don't need to download them one by one: it's quicker and easier to just download the whole area (unless we know we'll only need a certain section).
All locations have an
area.datfile, which lists all the location's areas and lets us download them all at once. -
So, let's select the
area.dat…
-
…And, in its results, scroll down until we see a heading labeled
Assetswith a large button labeledExtract as zipped JSON.
After clicking it, it might take it a little bit to actually produce the download, depending on the size of the location (should be almost instantaneous for a player ship, and take some 10 seconds at most for a whole planet). We save the ZIP file generated by this button wherever we like, and unzip it. The resulting folder contains the
.jsonfiles we'll actually use.
Processing the area .json files.
-
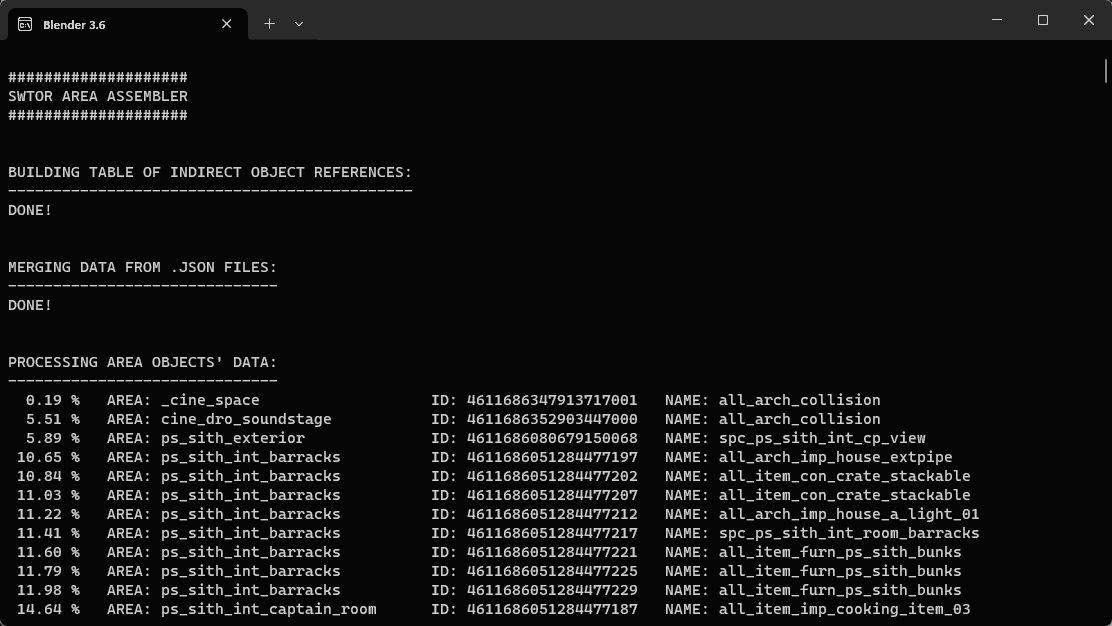
Before proceeding any further: as Blender hardly offers any means for proper progress reports, and importing areas is a rather complex task (and quite lengthy if importing whole worlds), we strongly recommend to open the system console to watch the information that this tool (and others in the same Add-on) produces as it goes through it. The option is at
top menu bar > Window > Toggle System Console. It gives us progress percentages of each phase of the importing and assembling, which area and objects are being processed, notes on any failures during the process… -
We adjust any importing options we need (the defaults ought to be fine. All checkboxes have tooltips, anyway) and click on the
Select Area's json Filesbutton, which will open a file browser: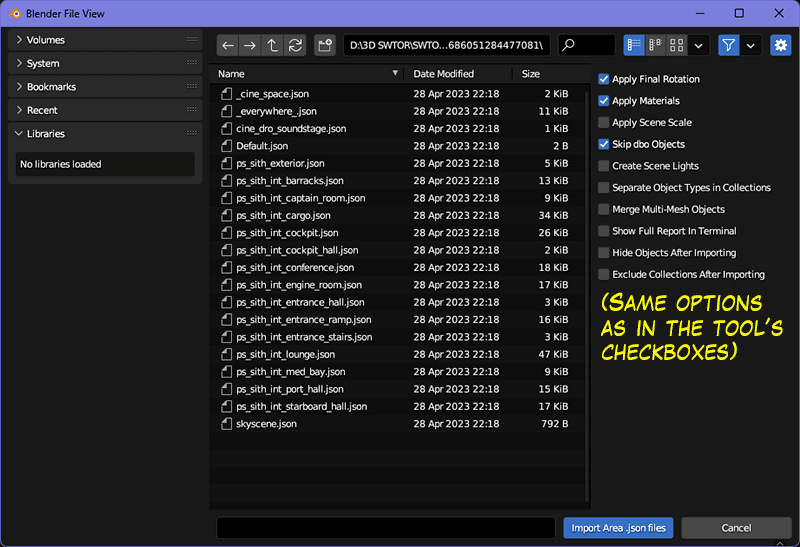
-
We navigate to where we unzipped the .json files. Here we can select as many or as few as we choose to. Obviously, the more files we import, and the bigger they are, the longer the process will take.
For this guide, we will select everything (by pressing
a, or manually highlighting all the displayed.jsonfiles). Then, we click theImport Area .json filesbutton, and wait.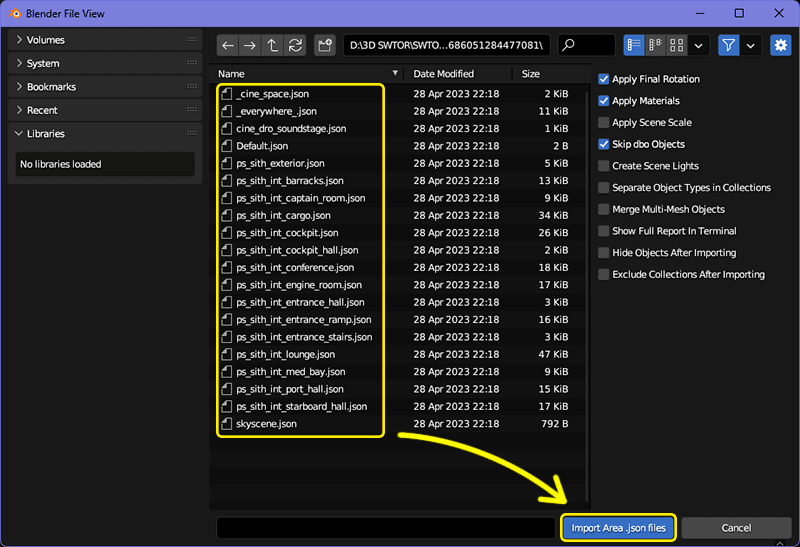
-
For an area like a player ship, on a decent PC with SSD storage, it ought to take less than ten seconds. If we opened the system console we should be able to see a flurry of activity as the tool imports and processes each .gr2 object file listed in the .json data.
While assembling the location, Blender will appear to be unresponsive save for its icon-cycling cursor. That's normal. If importing something as relatively small as the Fury ship takes more than one minute, that would be definitely odd. Blender's System Console is invaluable to see its progress or where things might have gone wrong.
The progress of the importing that the console shows goes through several stages:
- A fairly quick one where all the .json files' information is merged into a single list (it helps streamline the process a whole lot).
- The actual importing of the objects with some additional diagnostic data: imports, duplications, discardings… with speedups and downs (the tool tries to avoid reimporting objects that were imported already and instance them instead, which is far faster).
- A parenting pass where child objects are parented to parent objects, inheriting their positions, rotations and sizes accordingly. Some failure warnings are expected here, as the area data doesn't include certain animated objects that could act as parents. See the Known Limitations and To Do sections at the end of this guide.
- An object renaming pass.
- An object texturing pass.
- Other minor tidying up passes.
(The Assembler is fairly tolerant to errors due to missing game assets and data, and keeps on going despite reporting them. Better to have some misplaced or absent objects than nothing at all)
-
When the Add-on has finished processing the files, you should see the fully textured model of the Fury (remember to switch the 3D View to Viewport Shading mode 🙂)
Congratulations, you've assembled your first area. Now go forth, recreate the whole game in Blender, and enjoy your lag 😅!
Adding Terrain.
We have preliminary support for processing heightmap-based terrain objects reference data. The Add-on imports terrain objects exported as .obj files and placed in a new folder at resources\world\heightmaps by a Windows command line tool still in development by fellow Slicer UltimaKaosXIII: SWTOR Terrain Extractor. The tool is able to process ALL the terrains in the game in one go in three or four minutes, the results occupying some 8.3 GB**.
There are some caveats: the lack of UV information to apply textures correctly, which textures and shaders to use, etc. The issue with gaps between terrain patches we used to have were solved in a recent update (save for those done by the game devs themselves 😏).
(SWTOR's heightmaps aren't simple images but a binary format we are still trying to fully decipher)
How Automatic Lighting Works.
The area data exported in the .json files contains references to light sources' positions and rotations, but nothing else about them (so far). As that information might be useful when lighting the locations in Blender, the tool can produce generic lights out of that data as a reference (this can be enabled via the importing options'checkboxes).
At this moment, things are set so that all the lights in a "room" (a .json file) share settings (that is, they use the same Blender light data block) such as type, intensity, color, etc., so, changing one of them will change all the lights in the room. They can always be individualized by using the Object > Relations > Make Single User > Object + Data > Selected Object (or All if you need that) option.
General information about Object Types and Empties.
Similar to the case of lights, many objects in the results of an import are linked duplicates sharing mesh data blocks, as that accelerates assembling a whole lot. Any linked duplicate can be turned into a fully independent object through the usual Blender means. We might add tools to expedite that in further releases.
(To facilitate debugging, the objects have some Custom Properties keeping some data from the .json files such as object ID, parent's object ID, the name of the .json file it came from, and some positional data that Jedipedia pre-calculated to check against. Those properties can be found in the Custom Properties section of both the 3D Viewport Editor sidebar's Item tab and the Properties editor's Object Properties tab)
Known Limitations.
-
We can't do successive imports inside a same Blender project: due to coordinate system issues, we do a final 90º rotation of the scene at the end of each assembling, and that would tumble any previously imported objects. We are investigating how to avoid needing that rotation.
That said, we just solved an issue with the rotation's pivot point, so that now it stays consistently at 0,0,0. That means that doing partial assemblies in different files and appending them afterwards should be possible. That said…
-
We have to be careful when importing single or few .json files instead of all of them at once: there could be objects in a file whose parents are in another. Without assembling that other one, too, the objects might end up floating somewhere else (that's the reason we do that initial .json data merging pass).
Getting all the .json files sharing the first common bits in their names (say, the "ps_sith_int" in "ps_sith_int_cockpit", "ps_sith_int_cockpit_hall", "ps_sith_int_conference", etc.) might solve it, but we simply don't know.
-
A nuisance about the results of an import is that everything (95%-100%) is correctly positioned, but their origins or parentings are a mess (objects' origins can be far, far from their bases or center of mass). There's a logic behind it, but still it is inconvenient if we want to manipulate them for, say, kitbashing new environments or objects. Not that it makes it impossible, not at all, but still…
Also, the tools rely on instancing any duplicates present in the areas' .json files to save time and memory during the import, which is, again, a bother when we want to alter the results or collect stuff for kitbashing (we are seeing about adding some kind of instance-to-standalone pass, and how it impacts the already gargantuan whole worlds imports).
-
We added support for "placeables" (holoprojectors, spaceship cockpits' seats, GTN Booths, etc), but it is incomplete: we need some means to export up-to-date data from the 64-bit version of the game (we have some ideas, watch this space). Also, we aren't covering objects under the control of SWTOR's particle and FX system yet (again, we have some ideas, if very bare-boney).
-
Not an Area Assembler issue per se but a Named Materials Processor tool one: SWTOR has some six main materials, which we cover, and are usually enough for interiors, spaceships, and buildings' exteriors, but we still need to implement lots of simpler things like water body shaders, several vegetation types, etc. Which means that imported exterior areas will show many things as textureless, white objects.
-
Those wanting to export these areas to other platforms such as VRChat, Roblox, etc., via FBX, will find that our SWTOR materials for Blender don't move well through such formats: they are just too complex and don't even depend on standardized-ish shaders such as the Principled BSDF one.
Most area-type materials could be reduced to, say, a diffuse map and a principled shader, maybe adding the gloss map too (although it's not meant to be used in that way). The normal maps would need some preprocessing, though, as they are packed with normals, opacity, and emissiveness data channels (see https://github.com/SWTOR-Slicers/WikiPedia/wiki/SWTOR-materials-and-texture-files).
There is a tool in the Materials Tools subpanel, the Convert To Legacy Materials one, that converts our current SWTOR materials to an older version that is Principled shader-based and also better lends itself to a baking approach. That could help, if maybe not by much. We are seeing how to produce a proper SWTOR-to-FBX-friendly materials tool, but we are just swamped with work.
To Do.
-
Tool-side:
- See if any standard Python module such as NumPy can be applied somehow to accelerate processing.
- Check the implications of making the duplicates of imported objects unlinked (each having their own mesh data) on processing speed and Blender responsiveness.
- imported objects may have Bone Bounds properties. Their duplicates don't, at the moment. Investigate (it might be a matter of some simple parameter).
- See if we can entirely disregard the Empties replacing DBOs.
-
Named Materials Processor tool-related:
- There are lots of little materials that we need to cover: animated holograms, vegetation, glass and water, stain cards…
Enable/Disable Collections.
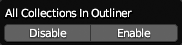
This is something we can do in the Outliner, but in the case of having assembled a whole world, accidentally letting all the resulting Collections and their objects become visible, trying to do it (select all Collections in the Outliner and bring up the contextual menu to disable them in the View Layer) could be excruciatingly slow to achieve (we are talking minutes). This tool's buttons are far faster to use.
Group Areas in SubCollections.
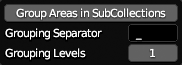
The results of the Area Assembler tool appear as Collections whose names follow a tree or directory-like logic, with words/branches separated by underline (_) separator characters.
This tool lets us group areas/Collections inside new Collections named after those branch names. For example, all of Dantooine's Republic interiors start with "dan_int_rep": dan_int_rep_base_01, dan_int_rep_base_02, etc. Same happens with the Imperial interiors, etc. By selecting which separator to use (the third one, in the example below), we can group them all logically and get a far more manageable Outliner.

(It works on selections of Collections, too)
The grouping Collections are prefixed with a hyphen: as Blender's Collections have all unique names, not prefixing the new ones would trigger Blender's dreaded .001, 002, etc. suffixes here and there, to prevent coincidences.
Options.
-
Keep Collections Sorted (default: on): Blender doesn't do that by itself, so…
-
Hide Collections' Content (default: on): As new Collections are created as visible (technically, enabled in the View Layer), this operation could make a whole gigantic world become suddenly visible without us meaning to. To avoid that, this option disables their visibility (unticks their checkboxes). A future release might add extra smarts to remember their previous state, instead.