PaletteTool - Maproom/qmapshack GitHub Wiki
Prev (Grid tool) | Home | Manual | Index | (Optional GDAL settings) Next
Table of contents
Quite often RGBA colors are used in raster map files because the large color space allows to scale and rotate the map without any loss of quality. But it results in rather large files. The file size can be optimized by using a color palette instead of the RGBA color space. The impact on quality is low as long as the user doesn't want to scale or rotate the map. If it is necessary to combine several files with a color palette, all files need to have the same palette.
The palette tool (color tool) helps to carry out quickly the transformation of raster map images with RGB(A) colors to map images with a color palette.
If an attempt is made to convert a raster map already having a color palette, then the user is informed about this fact (error message:
Raster band count of source file must be either 3 or 4). gdalinfo can be called to get information about the color type used in the map image.
Look in the output for lines of the form
-
Band 1 Block=4540x1 Type=Byte, ColorInterp=Paletteor -
Band 1 Block=4096x1 Type=Byte, ColorInterp=RedBand 2 Block=4096x1 Type=Byte, ColorInterp=GreenBand 3 Block=4096x1 Type=Byte, ColorInterp=Blue
In the first case, the map has already a color palette. In the second one RGB colors are used and the palette tool can be applied to convert the map image to a new one with a color palette.
To add a color palette to a map proceed as follows:
-
Select the menu entry
Window - Shellto open the QMT shell window (docked window, can be moved on the desktop). -
Click the
Add color palettebutton in the QMTToolswindow to open the palette tool. -
Click the
Open(Add map files to list) icon ( ) and select one or several raster maps.
- Attention: If more than one map is loaded into the palette tool, then all maps must be georeferenced with the same coordinate system.
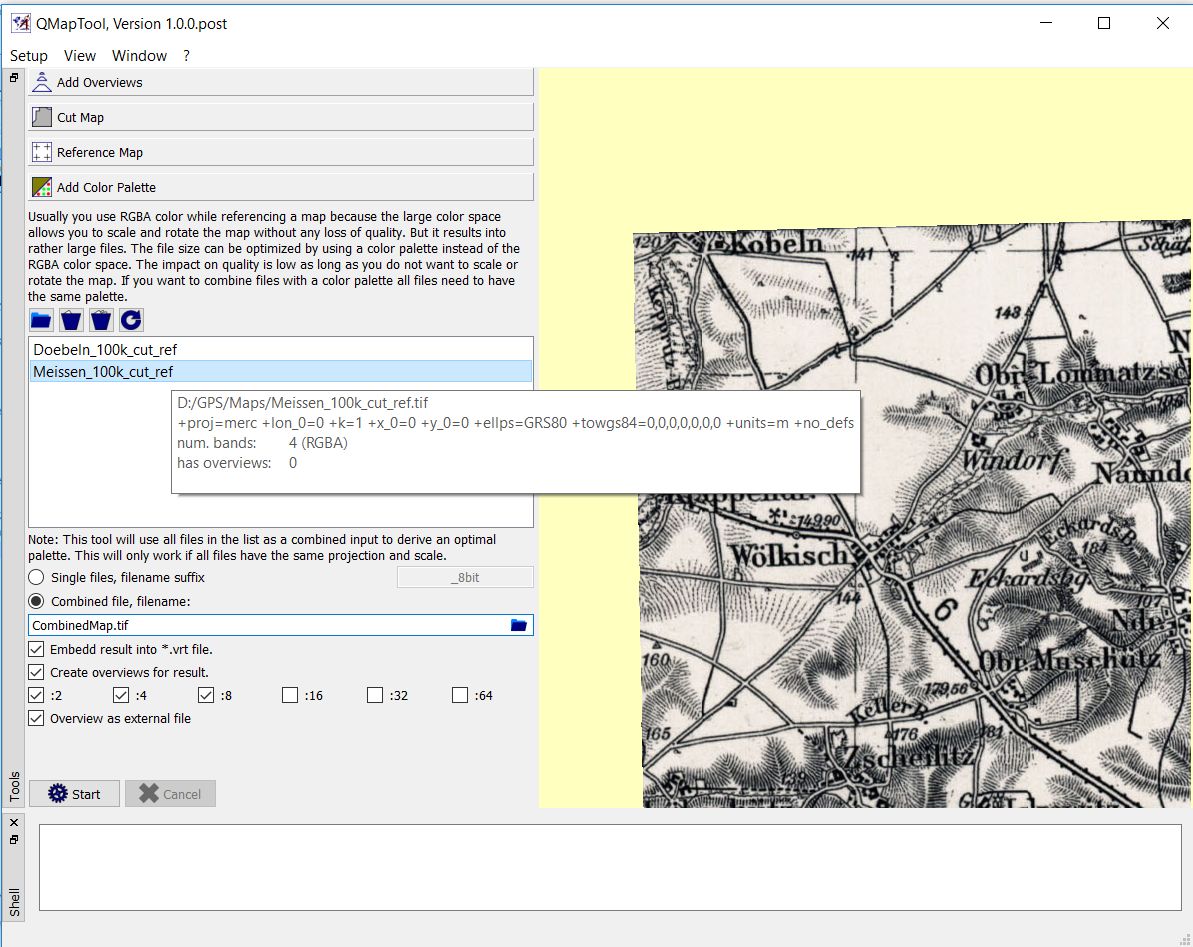
- A tooltip pops up when the mouse pointer is located on the filename of a map. This tooltip shows some of the properties of the map. Here, the user can see if the map is georeferenced and what the coordinate system is.
- A selected raster map is loaded into the QMT map window.
-
Select the radio button
Single files, filename suffix, if a color palette should be added to each file.- Use the edit field to define a suffix for the output filename (default:
_8bit). - Remark: A single color palette is calculated from all the input files and added to each of the files.
- Use the edit field to define a suffix for the output filename (default:
-
Select the radio button
Combined file, filename, if the input maps should be merged into 1 map for output. Define a filename for the output file (output format is TIFF!). -
Select the checkbox
Embed result into *.vrt file, if a VRT file should be created for the output map(s). -
Select the checkbox
Create overviews for result, if overviews should be created. Select the wanted overview levels and select the checkboxOverview as external fileif appropriate. -
Click the
Startbutton to carry out the selected actions. -
The shell window (if activated) shows the used GDAL commands and the progress of the operation.
The following image shows the complete palette tool with 2 maps and the tooltip for one of the maps.

-
In addition to the basic steps described in the previous section some more actions with maps can be carried out in the palette tool:
Icon Tooltip 
Remove selected (map) file from the list 
Clear complete list of map files 
Reload the currently selected map
Remarks:
- The
Create overviews ...option is available in 4 QMT tools (cut tool, overview tool, reference tool, palette tool). This is necessary because there is no fixed order of using these tools. When one of these tools calls GDAL for some operation, then GDAL doesn't read the overview information contained in the raster map file. Thus, overview information should be recreated after such a GDAL operation and this is supported in each of the tools. - Experienced users may change some GDAL default parameters to equilibrate performance, image file size, and image accuracy using a special group box for GDAL parameters. For details compare the page "Optional GDAL settings".
Prev (Grid tool) | Home | Manual | Index | Top | (Optional GDAL settings) Next