Beginner Walkthrough - Herbertofury/Advent-of-Ascension GitHub Wiki
Start playing AoA: shelter, equipment and your first portal
Edition: Minecraft 1.21.1 · AoA 3.7.16.1. This is a playable-session checklist, not a promise that every historical realm exists in this release. If you use 1.12.2, 1.16.5 or 1.20.1, select that release in the recipe explorer and consult the version matrix before following a recipe.
1. Know what you installed
Open Minecraft's mod list and record both Minecraft and AoA versions. The Advent GUI also displays the mod version. If you cannot find its key, inspect the game's Controls menu rather than assuming a default that your modpack may have changed.
Checkpoint: you can identify your exact release, open its recipe references, and return to your world. A missing item in a different release is not automatically a broken installation.
2. Make a safe place before chasing new creatures
Start with the ordinary Minecraft survival essentials: a pickaxe, a sheltered place to recover, food, basic armour and a weapon. The bundled AoA guide recommends establishing shelter early because the Overworld adds threats. A small marked shelter is enough to begin; you do not need a finished base before exploring.
Practical preparation:
- Mark the shelter and store spare supplies before a long trip.
- Keep food, lighting and building blocks available.
- Give yourself an exit route rather than testing an unfamiliar creature in a dead end.
- Check the selected release's bestiary before pursuing a specific drop. Unknown spawn evidence is not an instruction to search every biome blindly.
Checkpoint: you can retreat, heal and replace basic equipment without restarting your expedition from nothing.
3. Learn your weapon's actual cost
AoA weapon categories do not all use the same resource. Read the individual tooltip and make a few controlled test attacks near safety before entering a difficult fight.
| Weapon/resource | What to check before leaving |
|---|---|
| Guns | The specific ammunition named in the tooltip. Do not assume every gun uses the same bullet. |
| Staves | Required runes and the staff's own effect; utility and attack staves are not interchangeable. |
| Blasters | Spirit availability. Regeneration and enemy drain can affect sustained use. |
| Vulcanes | Rage availability; this resource builds from entity damage and decays over time. |
| Special actions | Energy. Taking damage or exhausting the bar can interrupt regeneration. |
This table describes the bundled modern guide. It does not impose the planned optional premium weapon overhaul's reload system on vanilla AoA weapons.
Checkpoint: you know what makes your chosen weapon stop firing, and you have a fallback instead of discovering that during a boss fight.
Detailed preparation: Ammunition, the 48-bullet recipe, and Ammo Void Pouch safety. Exp Flask storage and recovery explains where collected vanilla XP goes and how to reclaim it.
4. Find a ruined teleporter frame
Once basic survival is reliable, explore deep underground. The bundled getting-started guide places ruined teleporter frames near the bottom of the world and associates the Corrupted Traveller with them. It does not give a guaranteed coordinate or fixed search distance, so this walkthrough does not invent one.
Interact with the living Traveller without sneaking to open the exchange screen. Put a food item into its input slot. The inspected menu consumes one food item and gives a Worn Book to the player. The item must actually have food properties; a food-looking crafting ingredient is not automatically accepted. If shift-click only rearranges your inventory, place the food into the input slot directly.
Read the Worn Book for the portal clues. Scavenge Ancient Rock from the structure for your own frame. Record a safe route back before carrying valuable supplies farther underground. This exchange is checked against the menu source and the released class method's Worn Book/give-item/shrink-one operations; it is not a new live-game test.
Checkpoint: you have located the structure, investigated the Traveller, and started collecting Ancient Rock. Do not substitute an invented Ancient Rock crafting recipe.
5. Collect the five distinct carved runes
Your finished frame requires 13 Ancient Rock and five different carved runes: Power, Space, Direction, Reality and Travel. Four copies of the same decorative-looking rune do not meet the requirement.
The non-Power runes have loot-based acquisition routes. For the inspected modern Overworld global loot modifier, player kills of hostile entities are relevant and AoA-marked spawner-born entities are excluded. A particular kill is not guaranteed to produce a rune. Modpack changes may alter this behavior.
For the Power rune, gather Runium and use a valid crafting variant:
- Mine appropriate Runium Ore with the required tool tier. Normal, deepslate and Nether Runium Ore are in the iron-tool requirement tag; Charged Runium Ore is in the diamond-tool requirement tag.
- Stonecut one Runium Chunk into 16 Unpowered Runes. Charged Runium Chunks similarly produce 16 Charged Runes.
- For the pictured variant, place an Eye of Ender at top centre, Ancient Rock at centre, and seven Unpowered Runes in the other slots.
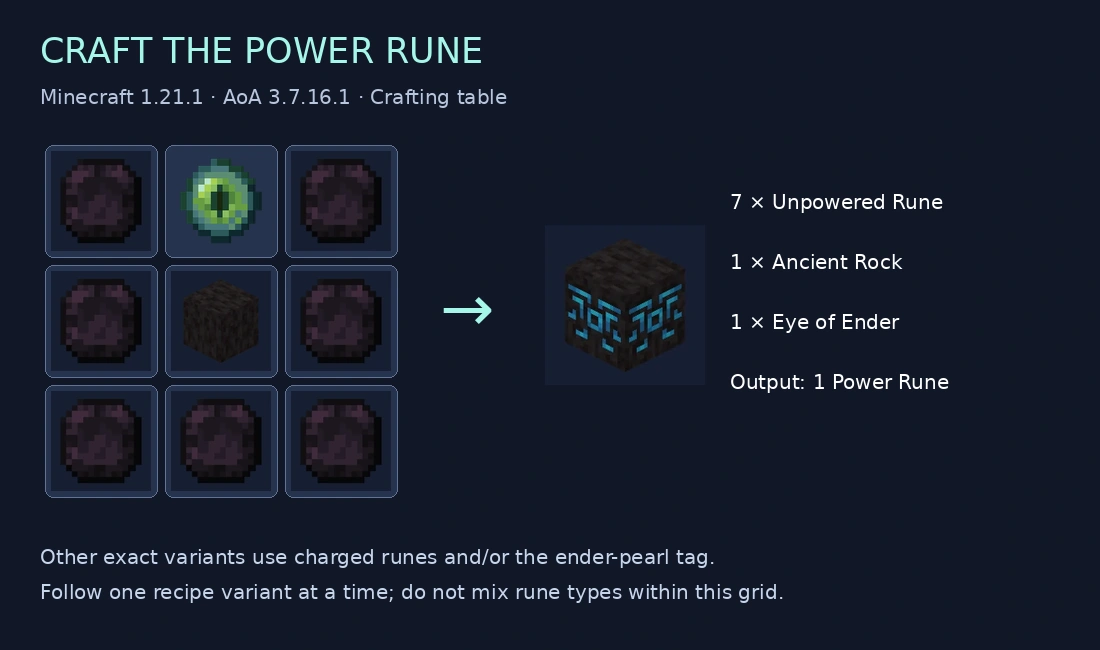
Inspect the release's Power rune recipes and alternatives. Follow one complete pattern; the existence of charged-rune alternatives does not prove arbitrary mixed ingredients work.
For a checked destination-key route, follow Precasia Realmstone: jungle archaeology. It explains the relevant Suspicious Gravel, biome selectors and near-surface generation rules.
6. Build and check the frame
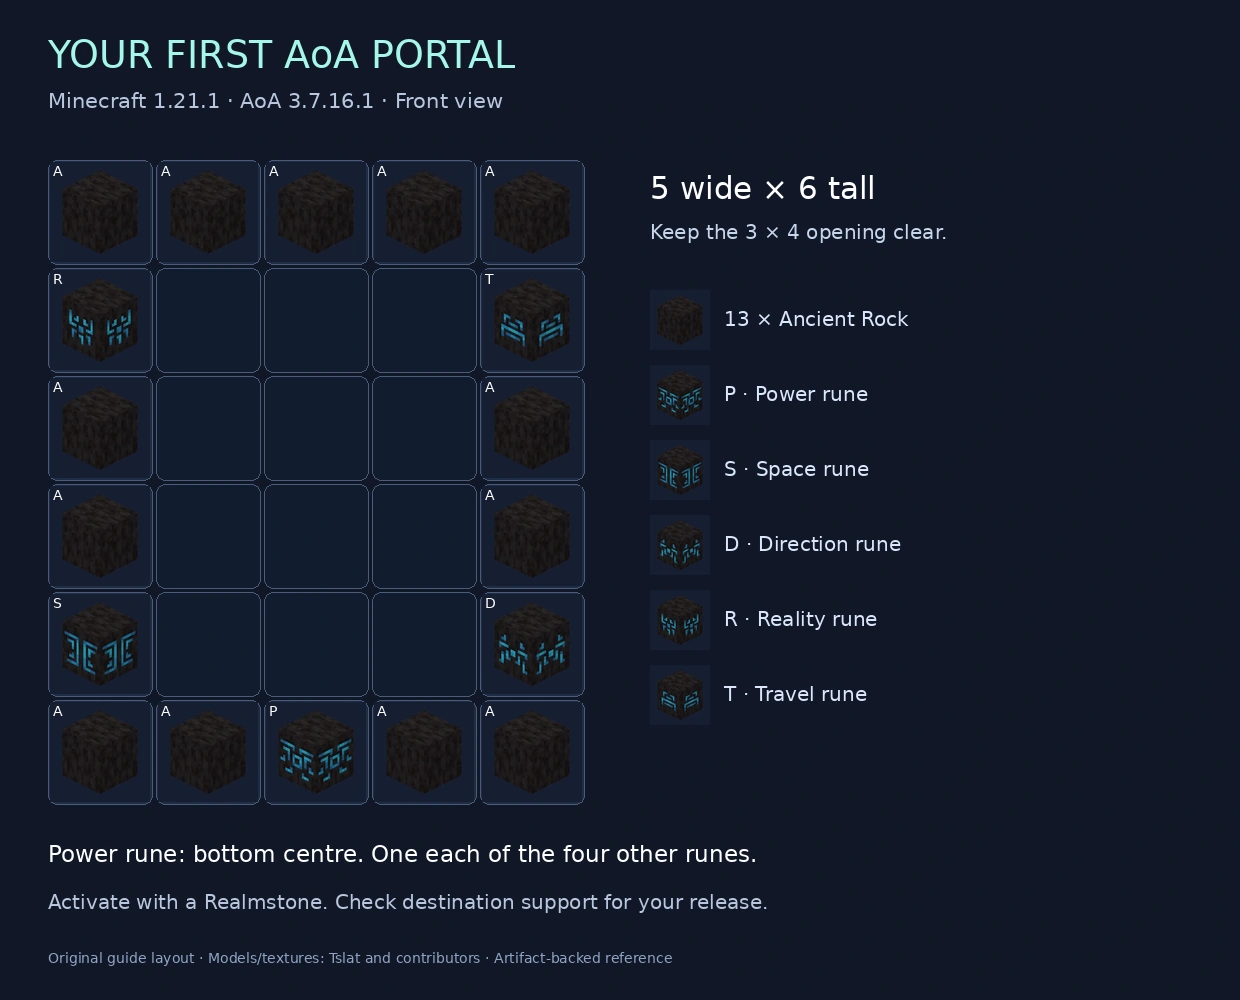
Build a 5-wide × 6-tall outer frame, leaving a 3-wide × 4-tall empty opening. The Power rune goes at bottom centre. Insert one of each other required rune into the frame. The diagram shows one valid arrangement.
Before activation, check:
- 13 Ancient Rock and five distinct runes
- Power rune at bottom centre
- A clear interior and correct outer dimensions
- A destination supported by this release
- The appropriate Realmstone for that destination
Use the appropriate Realmstone on the Power rune. The focused portal guide includes additional source details and troubleshooting.
7. Make the first expedition small
Before travelling, prepare a return plan, spare food and equipment, and storage for the first useful finds. Mark the arrival area and investigate nearby terrain before committing to a long fight. This is practical expedition advice, not a claim that all destinations have the same hazards or travel behavior.
Use the bestiary to choose the release, then narrow dimension and biome evidence. Read conditions alongside loot: an item appearing in a table does not guarantee it drops on every kill. Nested tables, special events, spawning methods and Looting can matter.
Checkpoint: return safely with a small set of useful finds and a clear next objective. Do not treat a historical boss or dimension name as proof it is available in this build.
8. Choose your next goal deliberately
- Better equipment: follow a known output in the recipe explorer, inspect every ingredient and check activation conditions.
- A particular drop: inspect the creature's version-specific loot and spawn evidence; avoid farming a similarly named creature from another release.
- Skill progression: read that skill's training method and unlocked abilities. Skill cycling is a later decision: the bundled guide describes resetting to level 1 and zero XP at level 100 in exchange for future XP benefits. Do not cycle accidentally just to inspect a menu.
- A boss: prepare against its actual encounter dossier, including access, hazards and reward conditions. Generic base health alone is not a strategy guide.
Troubleshooting by symptom
| Problem | Check first |
|---|---|
| Recipe does not match | Correct release, exact item ID/metadata, tag alternatives and modpack overrides |
| Weapon will not fire | Individual ammo/rune/resource requirement, then controls and cooldown behavior |
| Desired mob never appears | Release, spawn method, biome selector, conditions and event restrictions; unknown evidence is not proof of natural spawning |
| Farm produces no carved runes | Whether the inspected global modifier applies, including the spawner-born exclusion; random rewards are not guaranteed |
| Portal does nothing | Dimensions, rune counts, bottom-centre Power rune, clear interior and supported Realmstone/destination |
| A guide lists content absent from your game | Historical versus modern release; consult the version matrix before diagnosing a bug |
Evidence and what still needs expansion
Original guidance checked against the official AoA 3.7.16.1 artifact's bundled getting_started, the_portal, advent_gui_base, skills_overview, cycles, energy, spirit, rage, guns, staves and related guide entries, plus the recipes and loot evidence linked in the portal walkthrough. This is documentation research, not a new live-game test.
This chapter covers the start-to-first-expedition route. Continue with the checked modern skill-training guide, boss-entry guide, Bone Horn acquisition walkthrough, and loot-table reference. Additional realm routes, equipment comparisons and remaining encounter tactics are still being expanded; these links do not imply every historical route is present or runtime-tested.
Daylight combat preparation
Daylight is not universally safe. Ancient Golem and Bomb Carrier compares their armor, thrown explosives, spawn conditions and illustrated loot without treating spawn weights as encounter percentages.