GUI Run - HenriquesLab/NanoJ-Fluidics GitHub Wiki
Starting the GUI
Depending on how you installed the GUI, you can start the application in different ways.
- As an ImageJ Plugin: You can access the GUI from the Plugins>NanoJ-Fluidics menu option.
- As a Micro-Manager Plugin: You can access the GUI from Micro-Manager window and choosing the Plugins>NanoJ-Fluidics menu option.
- As a stand-alone application: You can start the GUI by double-clicking the NanoJ-Fluidics.jar file (or the .bat file, if you are having issues with dpi scaling.
Connecting to pumps
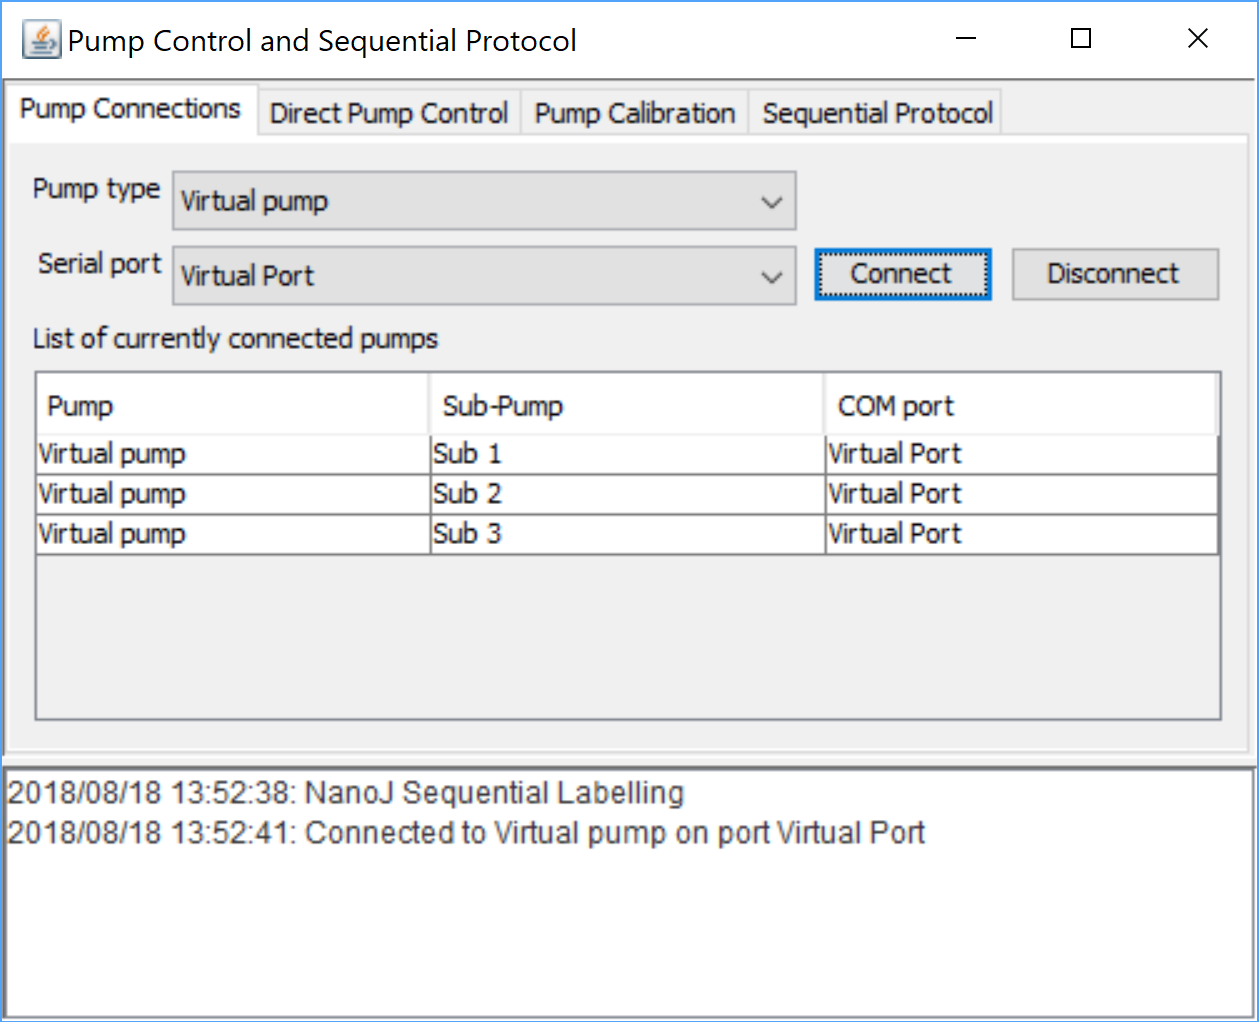
As soon as the GUI starts, it will present you with the tab to connect to the pumps. It will show you two dropdown lists: one to choose what is the type of pump you are connecting to, and another to choose what is the COM port where the pump is connected. After choosing the appropriate options, you can connect to the pumps. In the case of the Lego pumps, they can control 4 pumps per shield and you can attach several shields. Therefore, when you connect the the Arduino, it will tell the GUI how many shields are installed and provide 4 sub-pumps per shield for you to control through the GUI.
You can connect to as many controllers as you want, the GUI will identify them accordingly. To disconnect from a specific controller, make sure the right serial port is selected in the dropdown list, and press the Disconnect button. You only need to choose the serial port, not the type of pump that is connected to it.
Directly controlling a pump

The Direct Pump Control tab allows you to control a single pump directly. The pumps will be listed by the sub-pump number as well as COM port, so you can identify which is which. The GUI need to know the size of the syringe to calculate the movement accordingly, so you have to choose the brand and size of syringe in the dropdown Syringe. The flow-rate will update accordingly and allow you to choose how fast/slow you want to go, how much volume to inject and whether to push on the plunger (Infuse) or to pull on it (Withdraw). Finally, you can then start and stop the pump movement from the respective buttons.
Peristaltic pumps
If you are using a peristaltic pump, choose Peristaltic as the syringe type. With peristaltic pumps, instead of entering a volume, users only need to enter how long they wish to pump for.
Calibrating pumps
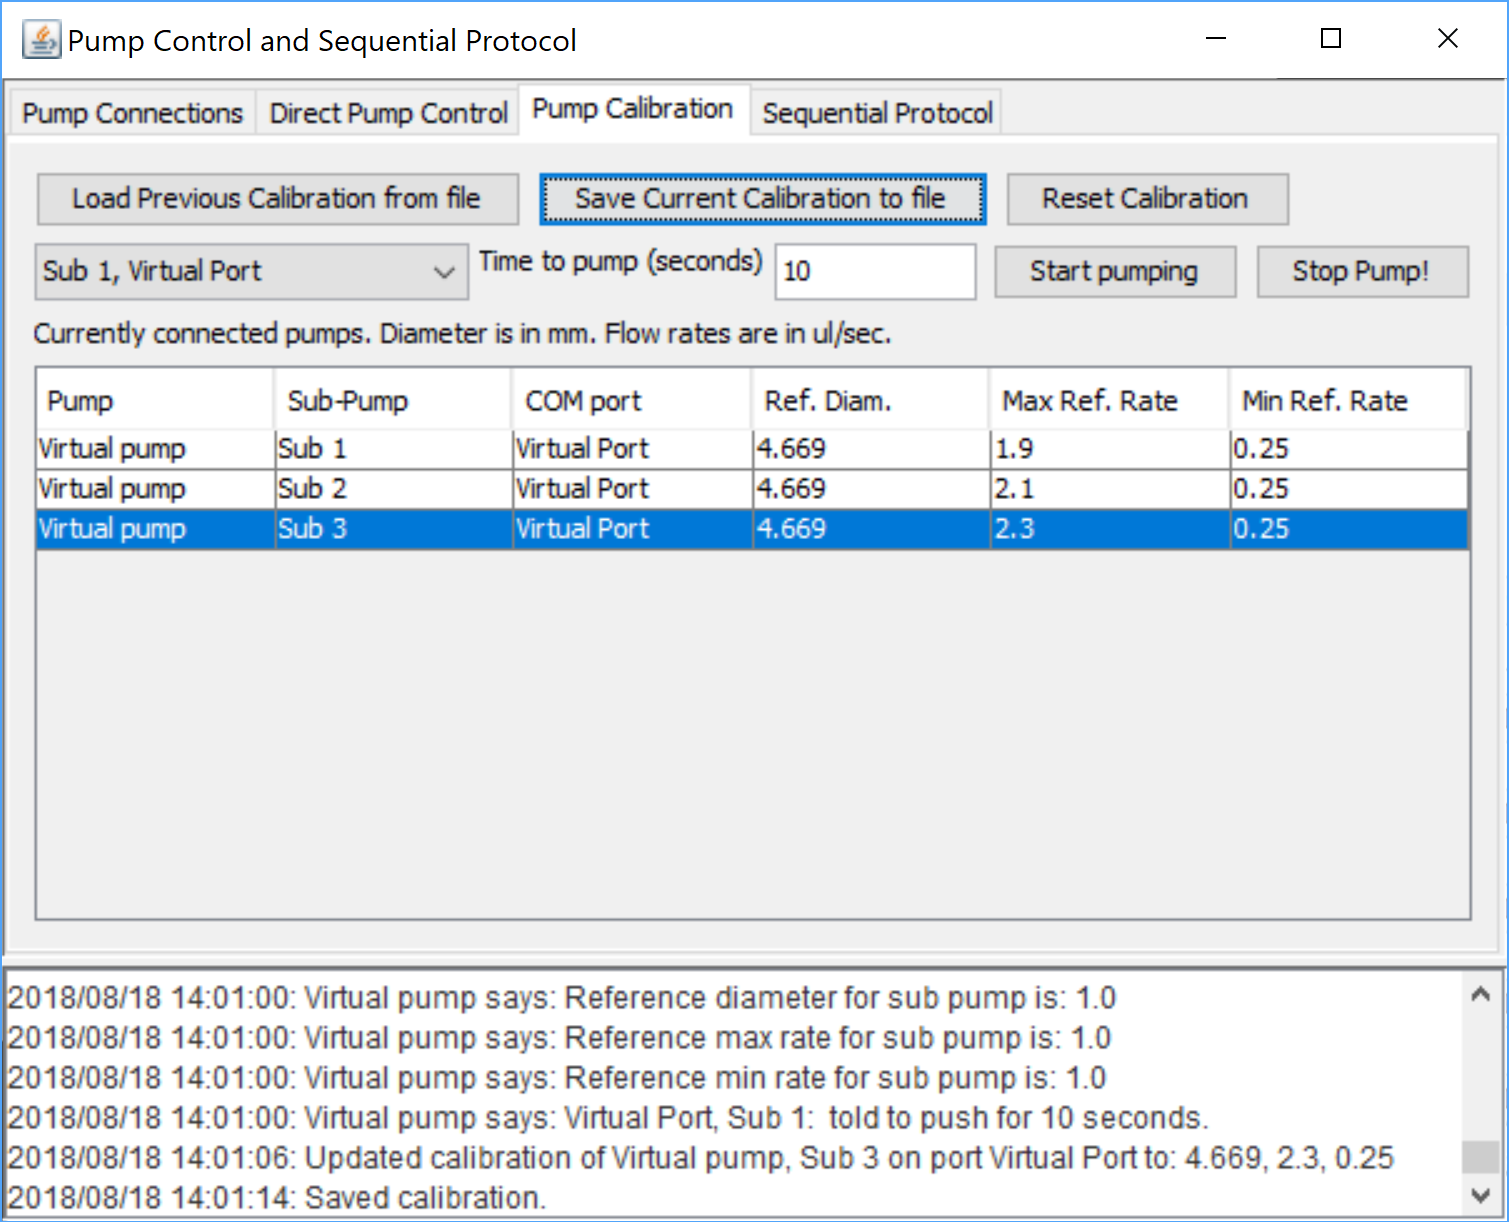
The Pump Calibration tab allows you to calibrate each individual Lego pump. You can find out more about the calibration procedure in the calibration page. It is split into three sections:
-
The top button row
The top button row allows you to load a previous calibration file, save the current calibration to a file and to reset the whole calibration table to each pump's default calibration value. Please note that whenever you type in a new calibration value, the GUI will try to remember those values when you start it again.
-
The calibration row
This row allows you to start a specific pump for
xamount of seconds. This feature is what allows you to determine what is the maximum flow-rate a pump can achieve for a given syringe internal diameter. -
The calibration table
The table shows all currently connected pumps, and their reference calibration values. For each pump, you can edit these values: The reference syringe diameter, the reference maximum flow-rate and the reference minimum flow-rate. These values can be user determined using the calibration procedure and edited here. Otherwise, the pumps will use the default values shown on the table.
Creating a sequential protocol
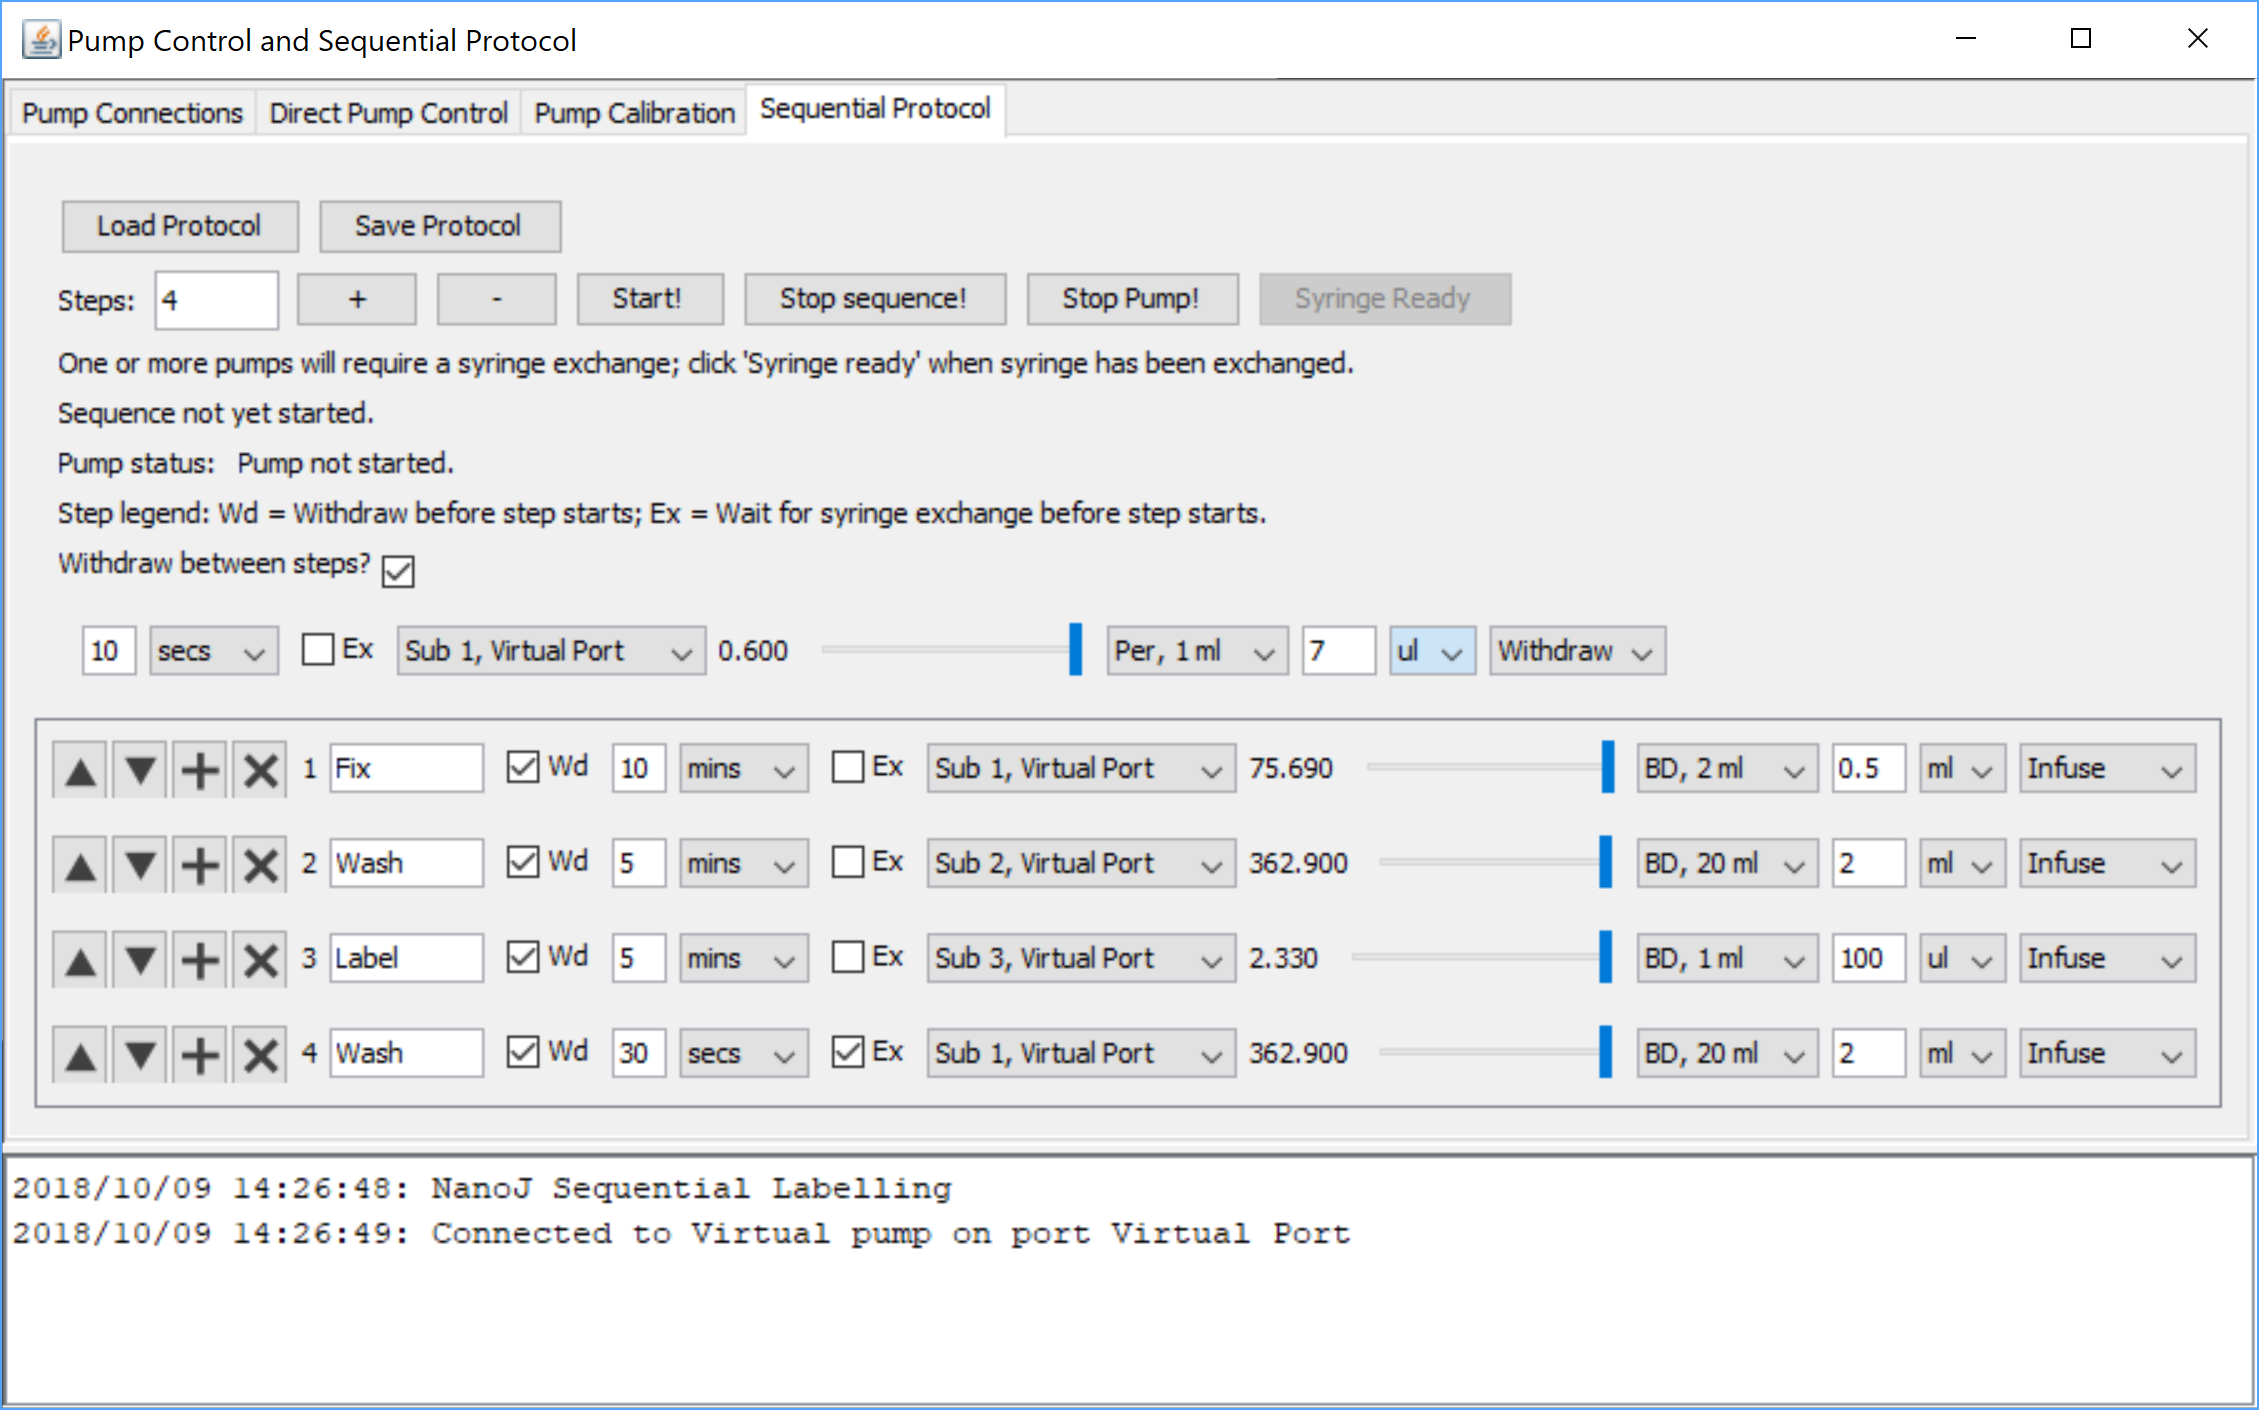
The Sequential Protocol tab is where you can create a protocol for a sequence of steps to be performed by the pumps.
Step list
At the middle of the GUI is the list of steps for the current protocol. Each step has 4 buttons at the left which allow you to reorder the list as required.
- The
▲arrow button reorders the current step to precede the previous step (i.e. switch from position 2 to 1). - The
▼button reorders the current step so it will be after the next step (i.e. switch from position 1 to 2). - The
+button makes a duplicate of the current step (useful if you have lots of repetitive steps). - The
xbutton removes the current step from the list.
Defining steps
For each step you can define:
- A label to describe what the step will do (for your own reference)
- Whether or not to withdraw after. If the
Withdraw between steps?checkbox is turned on, this checkbox allows you to define that you don't want this to happen for this particular step (for example, this is useful if you want to apply a drug during live imaging). - Time to wait between steps. The time starts counting from beginning of starting pumping.
- Whether or not the step requires the syringe to be exchanged before starting.
- The pump that will do the pumping.
- The flow-rate in μl/sec.
- The brand and size of the syringe. This is important is it's how the flow-rate and time to pump are determined.
- The volume to pump in either μl or ml.
- Whether to push on the plunger and infuse the sample, or to pull on the plunger and withdraw liquid from the sample.
Number of steps
You can type the number of steps you want on the respective box or you can use the + and - sign buttons to increase or decrease the number of steps.
Withdrawal step
If your protocol requires the sample medium to be withdrawn between each step (which is usually the case) you will want to turn on the checkbox to Withdraw between steps?. Just below it you can define the withdrawal settings here: time to wait for the step to finish, which pump to use, flow-rate and volume to inject. If the withdrawal pump is a peristaltic pump, the information above also applies.
One thing to note is that the time setting is different from the actual time it takes to withdraw liquid. This is in case users want to have a period of waiting before moving on to the next step. There is also a bit of a delay to send the serial command to start the pump so it's best to add a couple of seconds to wait for that as well.
Reusing the same pump / Exchanging syringes
If for a given step you want to use the same pump for different syringes, you can tick a checkbox on the relevant step and this will tell the GUI that, before the step starts, the user must confirm whether or not the syringe has been exchanged. This is done by pressing the Syringe Ready/Syringe Not Ready button at the top of the GUI. This is a toggle button, meaning you can toggle between ready/not-ready and the text will always display the current state.
This check allows you to do two things: make sure the syringes are not empty before proceeding; and if you would like to refill the current syringe (or exchange for a new one with different contents), this allows you to do so.
Starting/Stopping
Once the step list is defined you can start the protocol by pressing the Start! button at the top of the GUI. If you need to stop the whole sequence, press Stop Sequence!, but if you just want to stop the pumps without stopping the whole sequence, press Stop pump!.
Saving and Loading protocols
You can load and save protocols from the top buttons, if you wish to reuse the same settings at a later time.