configuring your application - qwasi/ios-pushkit GitHub Wiki
Configuring your application is simple. This guide assumes you have an application to which you are adding the QWASI iOS SDK. For an example application, see the iOS AcmePush example.
This guide assumes you have knowledge of programming languages, xCode with the iOS SDK and an Apple Developer Account with iOS developer access.
-
Apple Developer : https://developer.apple.com/programs/ios/
-
The latest Xcode and iOS for development
-
An iOS application provisioned for push. See the iOS Getting Started Guide
-
An iOS device connected to your Mac with a USB and configured in your Provisioning Profile.
-
Unzip the archive file.
-
Drag and drop the PushKit.framework folder into xCode as shown in the following screen.
[](Comment > For Step by Step instructions on creating a new application that receives push notifications from scratch visit the Simple iOS Push App Tutorial.)
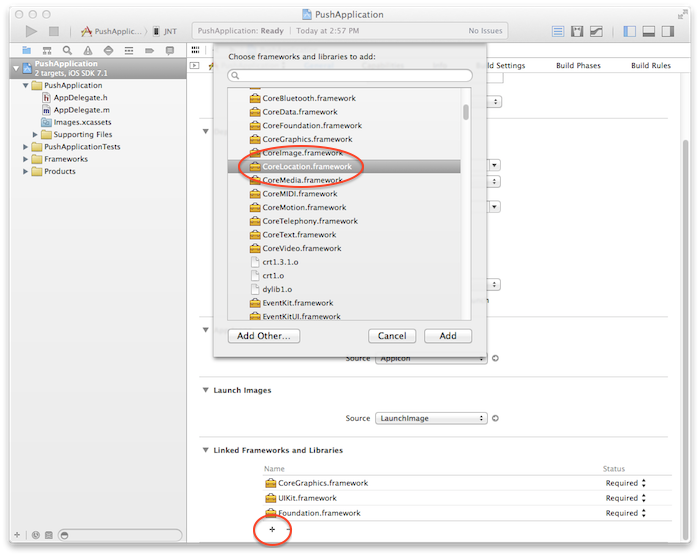
The PushKit.framework requires that you also link your project with CoreLocation.framework, CoreBluetooth.framework, SystemConfiguration.framework and libz.dylib.
-
Add the CoreLocation.framework to your project by pressing the button and selecting CoreLocation.framework from the Frameworks and Libraries dialog.
-
Add the SystemConfiguration.framework to your project by pressing the button and selecting SystemConfiguration.framework from the Frameworks and Libraries dialog.
-
Add the libz.dylib library to your project by pressing the button and selecting libz.dylib from the Frameworks and Libraries dialog.
-
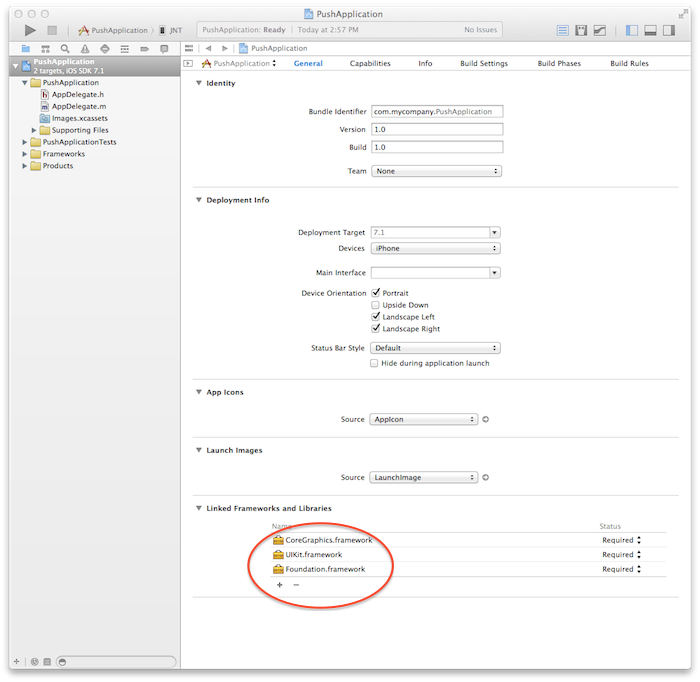
You should now see PushKit.framework, CoreLocation.framework, SystemConfiguration.framework, and the libz.dylib listed in the Linked Frameworks and Libraries section of the General settings.
-
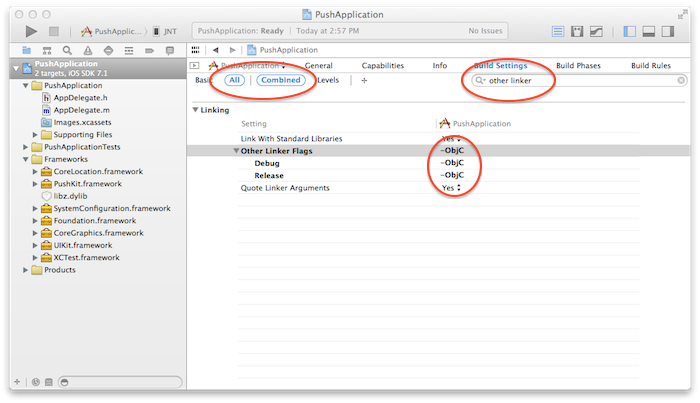
In the Project you must adjust the Build Settings Other Linker flags to contain -ObjC
-
This setting can be found by selecting All Combined and typing other linker in the search field
-
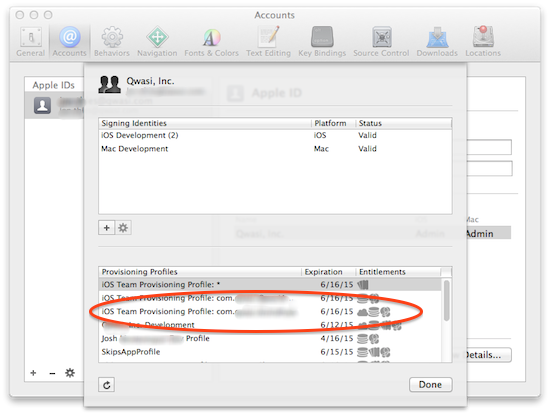
Set the Provisioning Profile - Debug in the Code Signing section. If you do not see your Provisioning Profile with your Bundle Identifier you will need to update your Apple Developer Account and/or Update the Accounts
Import PushKit/PushKit.h in your project's precompiled header. Every project has a file such as ProjectName-Prefix.pch
//
//  Prefix header
//

#import <Availability.h>

#ifndef __IPHONE_5_0
   #warning "This project uses features only available in iOS SDK 5.0 and later."
#endif

#ifdef __OBJC__
    #import <UIKit/UIKit.h>
    #import <Foundation/Foundation.h>
    #import <PushKit/PushKit.h>
#endifThe AppDelegate.h needs to implement the NotificationManagerDelegate prototype.
#import <UIKit/UIKit.h>
#import <PushKit/PushKit.h> // If you have not added the header to the ProjectName-Prefix.pch

@interface AppDelegate : UIResponder <UIApplicationDelegate, NotificationManagerDelegate>

@property (strong, nonatomic) UIWindow *window;

@end
Modify AppDelegate.m to initialize with PushKit. PushKit initialization will happen automatically when the application launches. This happens when the didFinishLaunchingWithOptions in AppDelegate.m returns. You also should implement the didRegisterForApplication and didReceiveNotification methods.
@implementation AppDelegate

- (BOOL)application:(UIApplication *)application didFinishLaunchingWithOptions:(NSDictionary *)launchOptions {

    // If we are using Sandbox Mode (for development only)
    #ifdef DEBUG
        [NotificationManager shared].debug = YES;
    #endif

    // Push notifications are enabled by default, but can be disabled
    // This is useful if you want to have another user interface perform an opt-in
    // [NotificationManager shared].pushEnabled = NO;
    [NotificationManager shared].userToken = @"17755551212";

    // Here we are going to allow notifications in the background
    [NotificationManager shared].notificationMode = PKNotificationModeAll;

    // Location tracking is disabled by default and requires manual activation at anytime
    [LocationManager shared].enabled = NO; // YES to activate
    [LocationManager shared].locationMode |= PKLocationModeTrackChangesInUse;

    [[NotificationManager shared] subscribeToChannels: @[ @"foo"]];

    // Event reporting is enabled by default, it can easily be disabled at any time
    // [NotificationManager shared].eventsEnabled = NO;
    [[NotificationManager shared] postEvent: @"Foo" withData: @{@"SomeField" : @"SomeValue"}];

    // To augment any class that you want to use receive PushKit Notifications on add an observer
    //  to PushKit.  This will allow you to receive notifications on another class instead of the AppDelegate didReceiveNotification
    [[NSNotificationCenter defaultCenter] addObserver: self selector: @selector(gotAMessage:) name: @"PushKit.didReceiveNotification" object: nil];

    return YES;
}

- (void)gotAMessage:(NSNotification*)note {
    // note.object is an instance of PKNotification
    NSLog(@"Got a note here %@", note.object);
}

-(void)didInitializeNotificationManager:(NotificationManager *)manager {
    NSLog(@"App has registered for your Push Application: %@", manager.application);
}

-(void)didFailToInitializeNotificationManager:(NotificationManager *)manager withError:(NSError *)err {
    NSLog(@"%@", err);
}

-(void)didReceiveNotification:(PKNotification *)note {
    NSLog(@"Got a notification! %@", note);
}For your application to communicate with QWASI it must set the following properties.
-
The App Id you received from your QWASI Account Manager.
-
The API Key you received from your QWASI Account Manager.
-
Optional - if you are using a QWASI API Server other than https://api.qwasi.com/v1 you will also need an API URL as well
You can configure these properties either in code by calling NotificationManager.configureWithApplication or by adding a PushKit.plist file to your project.
To set the properties in code you should call configureWithApplication in your AppDelegate.m as follows
[[NotificationManager shared] configureWithApplication:(NSString *) withApiKey:(NSString *) withApiUrl:(NSString *)];-
In the xCode Project Navigator drill down into the Supporting Files and create a New File (by right clicking).
-
Select Property List and press Next
-
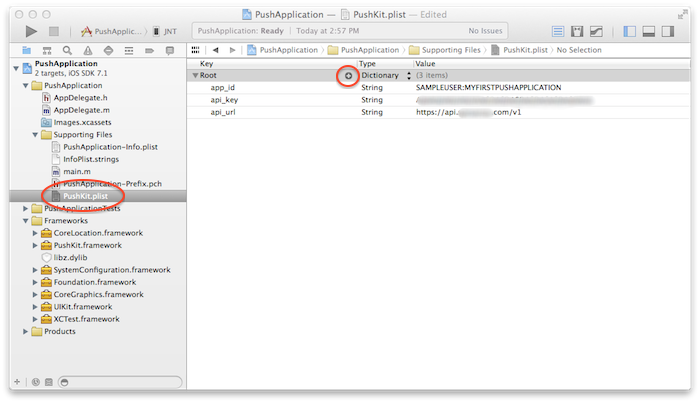
Save the file with the name PushKit.plist
-
Create an
app_idproperty by clicking on the as shown below. -
Set the
app_idvalue to the App Id you received from your QWASI Account Manager. -
Also create a
api_keyproperty and set the value to the API Key you received from your QWASI Account Manager. -
Optional - if you are using a QWASI API Server other than https://api.qwasi.com/v1 you can add
api_urlas well
Under most circumstances a user token should be associated with a device. This is done by setting the userToken. Typically, we suggest using a mobile number, or possibly a member id. This is dependent on your application implementation and integration with QWASI. If using the mobile number (or msisdn), please use the international format of “+(country code) (number)”. If you choose to not set a userToken, the default device identifier will be used.
When a push notification has been sent to a QWASI push enabled device, the didReceiveNotification method is invoked. This method should also be present in the AppDelegate.m file. If you want to receive notifications elsewhere in your application, we suggest using the iOS event bus.
// This method is called every time a new notification is received in the AppDelegate
-(void)didReceiveNotification:(PKNotification *)note {
    NSLog(@"Got a notification! %@", note);
}

// Receiving a PKNotification on a class other than the AppDelegate use the iOS event bus
[[NSNotificationCenter defaultCenter] addObserver: self selector: @selector(gotAMessage:) name: @"PushKit.didReceiveNotification" object: nil];

// Example NSNotification
- (void)gotAMessage:(NSNotification*)note {
  // note.object is an instance of PKNotification
  NSLog(@"Got a note here %@", note.object);
}The most simple way to test sending a Push Notification to your App is using curl. Notice that the API KEY and APP ID are required. The "to" parameter can be a user token set in the app OR for tags use "tags":["baseball"]. Your API server may be different in production.
curl -X POST -H Content-Type:application/json -H X-QWASI-API-KEY:YOUR_API_KEY -H X-QWASI-APP-ID:YOUR_APP_ID -H Cache-Control:no-cache -H -d '{
        "jsonrpc":"2.0",
        "id":1234,
        "method":"message.send",
        "params": {
           "to": ["552ff2bad51692823f868e4f"],
            "notification": {
               "text": "This is a test"
            },
            "payload": "This is a short message.",
            "options": {
               "encodedPayload": false
            }
        }
    }' https://api.qwasi.com/v1
If you would like to send application usage or notifications back to your systems, or to your QWASI AIM Account, we suggest using the built in Event Notification Service. Events can be anything you dream up. The data you send back to QWASI is an NSDictionary object, so it can contain anything.
[[NotificationManager shared] postEvent: @"Foo" withData: @{@"SomeField" : @"SomeValue"}];If your QWASI account has Location Services enabled, you can begin tracking your app location usage by adding the following line after the app has successfully registered with QWASI.
[LocationManager shared].enabled = YES;