Zigbee Custom Clusters CN - markding/iot-developer-boot-camp GitHub Wiki
English | 中文
Table of Contents
Zigbee 联盟已经定义了很多标准Cluster。它还允许制造商根据需要自定义自己的Cluster。在本文中,我们将介绍如何在 EmberZnet 中扩展Cluster。扩展Cluster的两种场景:
- 扩展标准Cluster上的属性或命令
- 创建全新的自定义Cluster
请注意,在这两种情况下,基于自定义Cluster的功能只能与具有这些自定义Cluster的产品进行交互操作,这意味着您的产品只能与您自己的产品进行交互操作。我们建议您仅在必须使用自定义Cluster时才使用。
根据 ZCL 规范的描述, 一部分Cluster ID是预留给厂商自行定义的:
| Cluster ID | 描述 |
|---|---|
| 0x0000 – 0x7fff | 标准 Cluster |
| 0xfc00 – 0xffff | 厂商自定义 cluster |
| 其他值 | 保留 |
Zibgee Clusters 在 EmberZnet SDK 中是以xml文件的形式来定义的. 这些xml文件可以在SDK下面的app\zcl 目录中找到。
例如:
C:\SiliconLabs\SimplicityStudio\v4\developer\sdks\gecko_sdk_suite\v2.7\app\zcl
你可以查看其中的xml文件内容来尝试去理解这些格式。
例如,general.xml 这个文件定义了一些通用类别的Cluster,比如Basic、Identify、Groups、Scenes、On/Off等等。
扩展标准Clusters意味着我们将自定义属性或命令添加到标准Clusters。
首先,您需要创建一个 xml 文件。编辑此文件,定义自定义的属性和命令。
在SDK中已经有一个示例的xml文件,即 app\zcl 文件夹下的 sample-extensions.xml。
<!-- Use the cluster extension Extend the on/off cluster -->
<clusterExtension code="0x0006">
<attribute side="server" code="0x0000"
define="SAMPLE_MFG_SPECIFIC_TRANSITION_TIME"
type="INT16U" min="0x0000" max="0xFFFF" writable="true"
default="0x0000" optional="true"
manufacturerCode="0x1002">Sample Mfg Specific Attribute: 0x0000 0x1002</attribute>
<attribute side="server" code="0x0000"
define="SAMPLE_MFG_SPECIFIC_TRANSITION_TIME_2"
type="INT8U" min="0x0000" max="0xFFFF" writable="true"
default="0x0000" optional="true"
manufacturerCode="0x1049">Sample Mfg Specific Attribute: 0x0000 0x1049</attribute>
<attribute side="server" code="0x0001"
define="SAMPLE_MFG_SPECIFIC_TRANSITION_TIME_3"
type="INT8U" min="0x0000" max="0xFFFF" writable="true"
default="0x00" optional="true"
manufacturerCode="0x1002">Sample Mfg Specific Attribute: 0x0001 0x1002</attribute>
<attribute side="server" code="0x0001"
define="SAMPLE_MFG_SPECIFIC_TRANSITION_TIME_4"
type="INT16U" min="0x0000" max="0xFFFF" writable="true"
default="0x0000" optional="true"
manufacturerCode="0x1049">Sample Mfg Specific Attribute: 0x0001 0x1040</attribute>
<command source="client" code="0x00"
name="SampleMfgSpecificOffWithTransition" optional="true" manufacturerCode="0x1002">
<description>Client command that turns the device off with a transition given
by the transition time in the Ember Sample transition time attribute.</description>
</command>
<command source="client" code="0x01"
name="SampleMfgSpecificOnWithTransition" optional="true" manufacturerCode="0x1002">
<description>Client command that turns the device on with a transition given
by the transition time in the Ember Sample transition time attribute.</description>
</command>
<command source="client" code="0x02"
name="SampleMfgSpecificToggleWithTransition" optional="true" manufacturerCode="0x1002">
<description>Client command that toggles the device with a transition given
by the transition time in the Ember Sample transition time attribute.</description>
</command>
<command source="client" code="0x01"
name="SampleMfgSpecificOnWithTransition2" optional="true" manufacturerCode="0x1049">
<description>Client command that turns the device on with a transition given
by the transition time in the Ember Sample transition time attribute.</description>
</command>
<command source="client" code="0x02"
name="SampleMfgSpecificToggleWithTransition2" optional="true" manufacturerCode="0x1049">
<description>Client command that toggles the device with a transition given
by the transition time in the Ember Sample transition time attribute.</description>
</command>
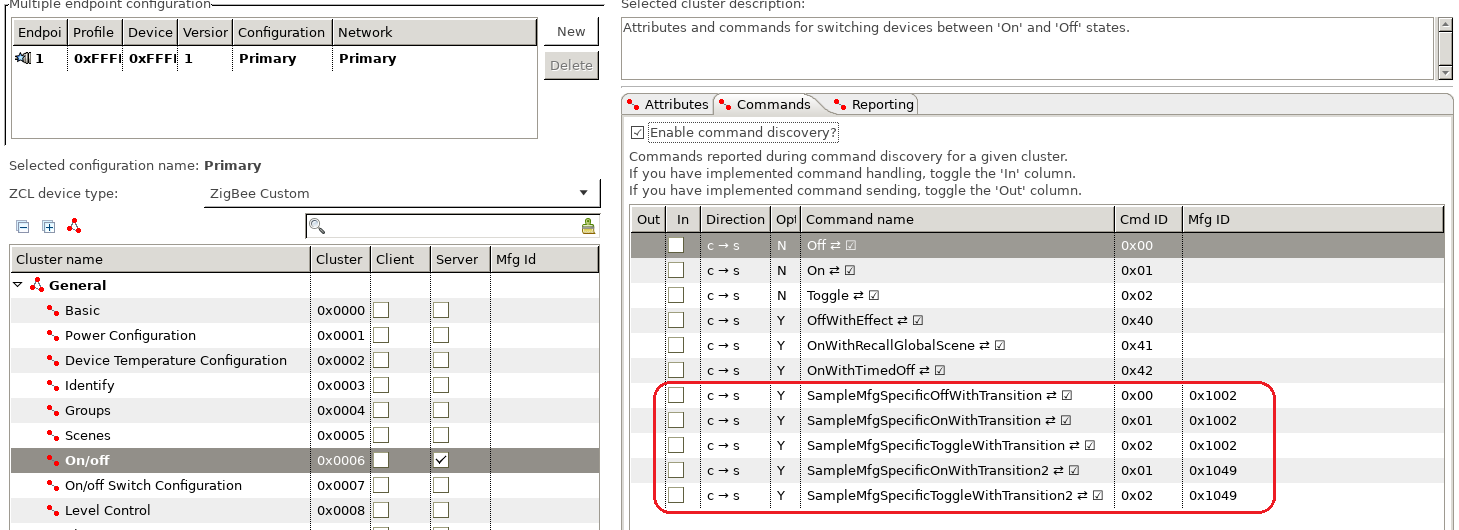
</clusterExtension>在此示例中,我们通过添加一些属性和命令来扩展标准Cluster On/Off。以下属性是自定义的:
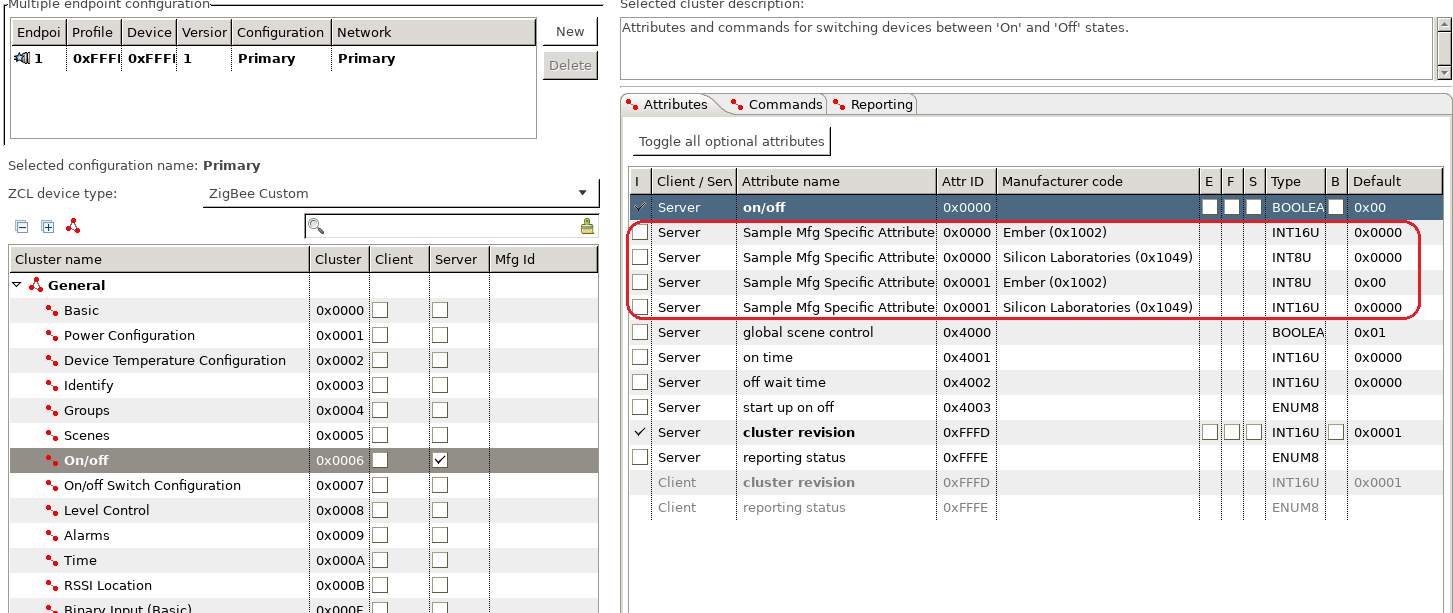
以下命令是自定义的:
注意:
- 扩展属性 ID 和命令 ID 可以与标准属性 ID 相同,因为这些扩展属性和命令仅适用于特定制造商的产品(可以通过Manufacture Code来区分)。
- 不同制造商的扩展属性 ID 和命令 ID 可以相同。
- 所有扩展属性和命令必须是可选的。
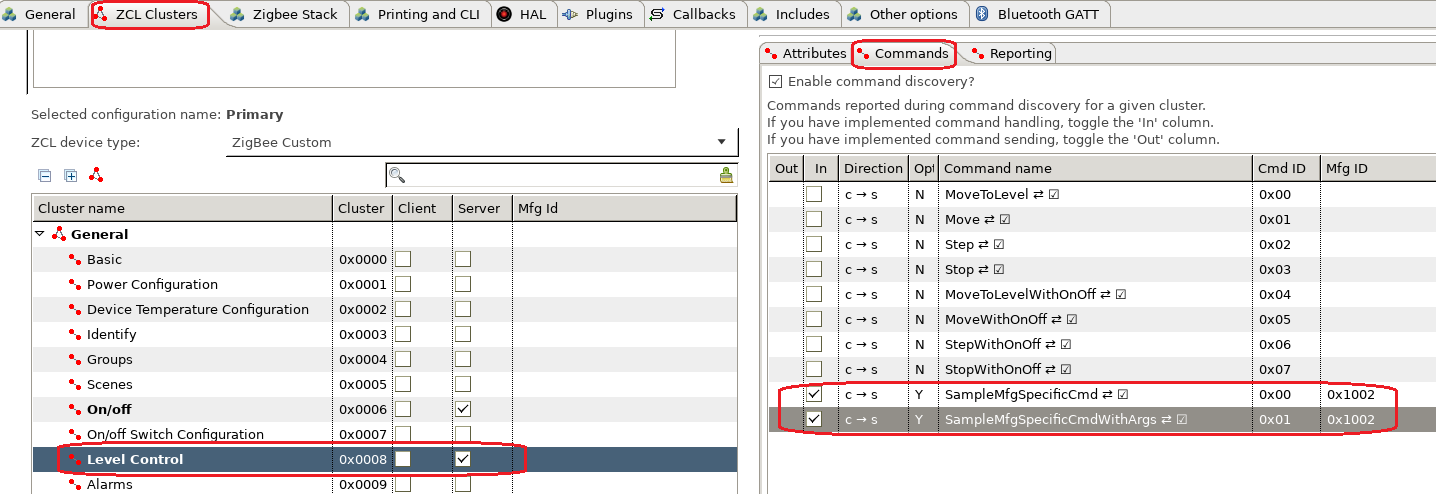
作为测试,我们扩展了 Level Control 这个Cluster的属性和命令。以下是 xml 的内容:
<configurator>
  <domain name="Test" />

  <!-- Use the cluster extension Extend the on/off cluster -->
  <clusterExtension code="0x0008">
    <attribute side="server" code="0x0000"
      define="SAMPLE_MFG_SPECIFIC_ATTRIBUTE"
      type="INT16U" min="0x0000" max="0xFFFF" writable="true"
      default="0x0000" optional="true"
      manufacturerCode="0x1002">Extend attribute for testing.</attribute>

    <command source="client" code="0x00"
      name="SampleMfgSpecificCmd" optional="true" manufacturerCode="0x1002">
      <description>Extend command for testing.</description>
    </command>
    <command source="client" code="0x01"
      name="SampleMfgSpecificCmdWithArgs" optional="true" manufacturerCode="0x1002">
      <description>Extend command with args for testing.</description>
	  <arg name="argOne" type="INT8U" />
    </command>
  </clusterExtension>

</configurator>将定义好的 xml 文件放入项目文件夹,然后转向 Zigbee Stack 标签,在底部有一个 Custom ZCL additions 的区域。单击按钮"Add",然后选择 xml 文件将其添加到项目中。
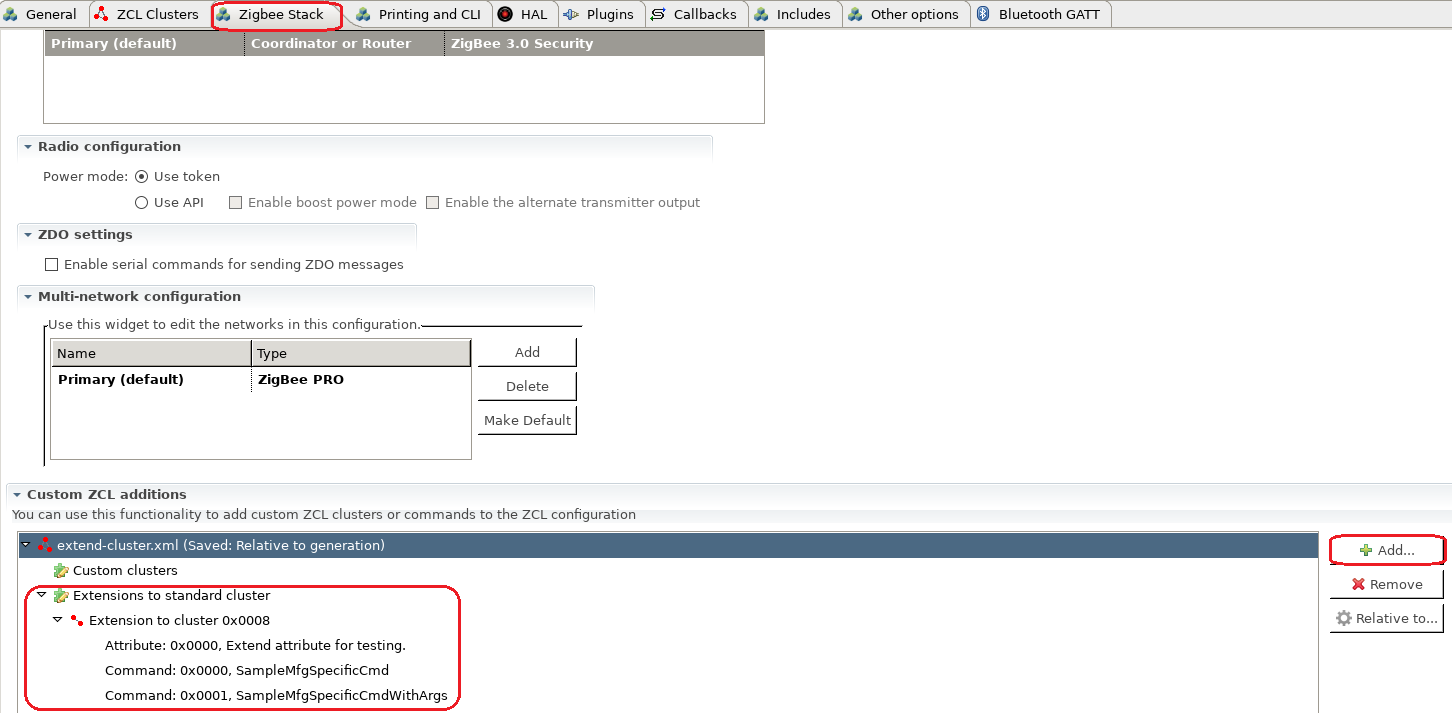
之后,检查能否在 ZCL Clusters 标签中找到扩展属性和扩展命令。
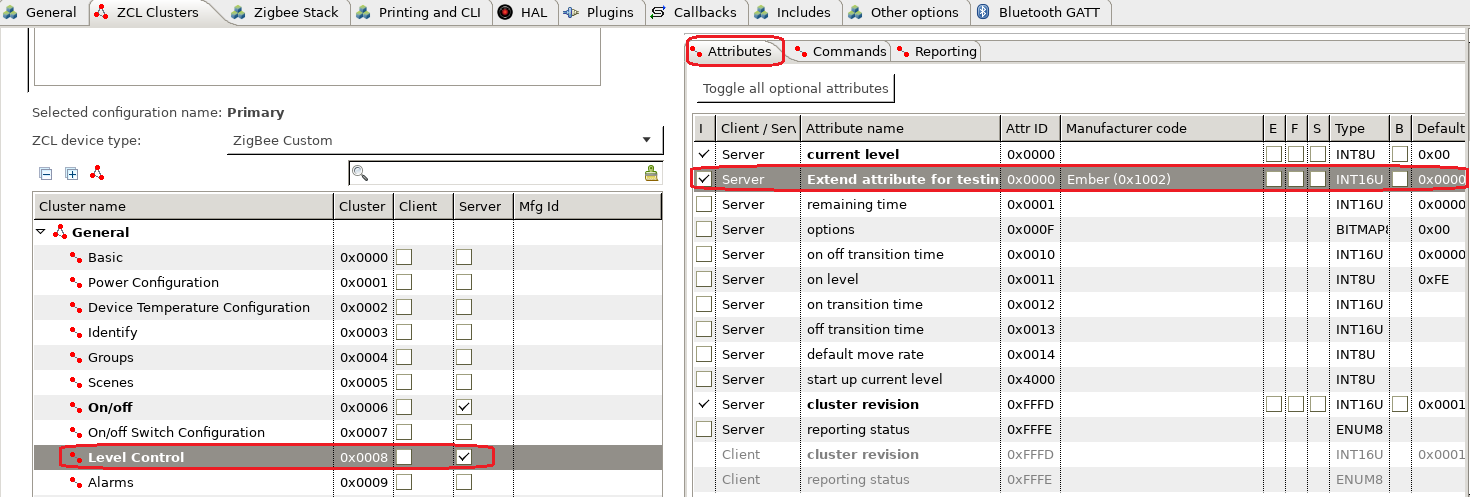
创建一个启用了 Level Control 服务器端的项目,以及启用了 Level Control 客户端的另一个项目。在服务器项目中,勾选回调 Sample Mfg Specific Cmd 和 Sample Mfg Specific Cmd With Args 进行测试。
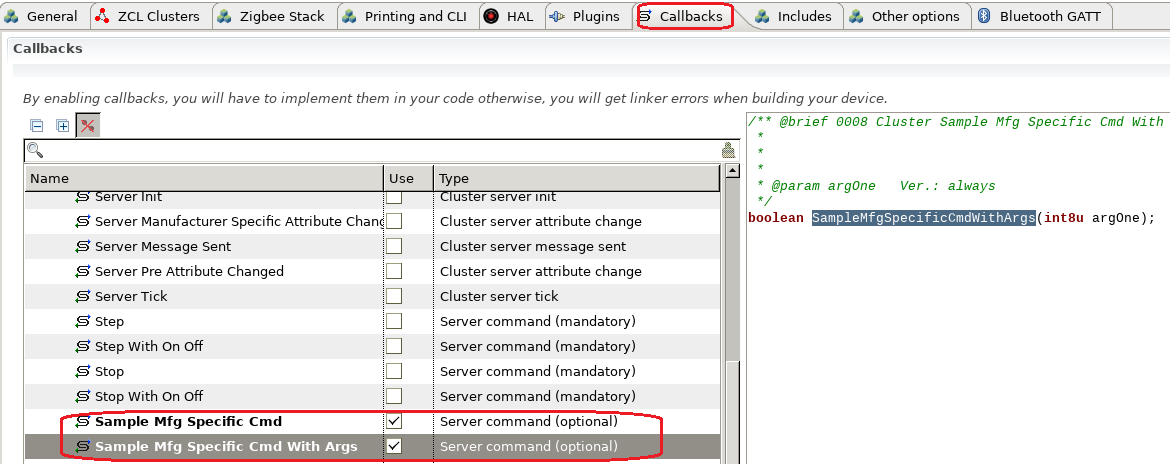
在文件 <projectname>_callbacks.c 中, 添加下面两个回调函数的实现:
boolean emberAfLevelControlClusterSampleMfgSpecificCmdCallback(void)
{
	emberAfCorePrintln("[%s] called", __func__);
	return true;
}

boolean emberAfLevelControlClusterSampleMfgSpecificCmdWithArgsCallback(int8u argOne)
{
	emberAfCorePrintln("[%s] called argOne=%X", __func__, argOne);
	return true;
}
注意: 注意扩展Cluster的回调函数的名称可能与命令名称不完全相同。这取决于您现在使用的Simplicity Studio版本。建议读取生成的文件 call-command-handler.c 的源代码,然后在函数 emberAfClusterSpecificCommandParse 中,查找您扩展的Cluster和您添加的命令,然后您将在此处找到回调函数名称。回调将在这里调用。
在此测试中,我们使用协调器作为服务器端。我们添加一个自定义命令来发送 Level Control Cluster的两个扩展命令。(如果您不知道如何添加自定义命令,可以参考自定义 CLI 命令)
static void custom_test_noargcmd()
{
	EmberStatus status;

	emberAfFillCommandLevelControlClusterSampleMfgSpecificCmd();
    emberAfSetCommandEndpoints(1, 1);
	status = emberAfSendCommandUnicast(EMBER_OUTGOING_DIRECT, 0x0000);
	emberAfCorePrintln("send custom level control cmd with no args, status=%X", status);
}

static void custom_test_1argcmd()
{
	EmberStatus status;
	int8_t arg = emberSignedCommandArgument(0);

	emberAfFillCommandLevelControlClusterSampleMfgSpecificCmdWithArgs(arg);
    emberAfSetCommandEndpoints(1, 1);
	status = emberAfSendCommandUnicast(EMBER_OUTGOING_DIRECT, 0x0000);
	emberAfCorePrintln("send custom level control cmd with 1 arg=%X, status=%X", arg, status);
}

EmberCommandEntry emberAfCustomCommands[] = {
  emberCommandEntryAction("test_cmd_noarg", custom_test_noargcmd, "", ""),
  emberCommandEntryAction("test_cmd_1arg", custom_test_1argcmd, "s", ""),
  emberCommandEntryTerminator()
};
将客户端和服务器加入网络。在客户端,运行以下命令:
custom test_cmd_noarg
custom test_cmd_1arg 100
然后在服务器端,你会看到以下输出:
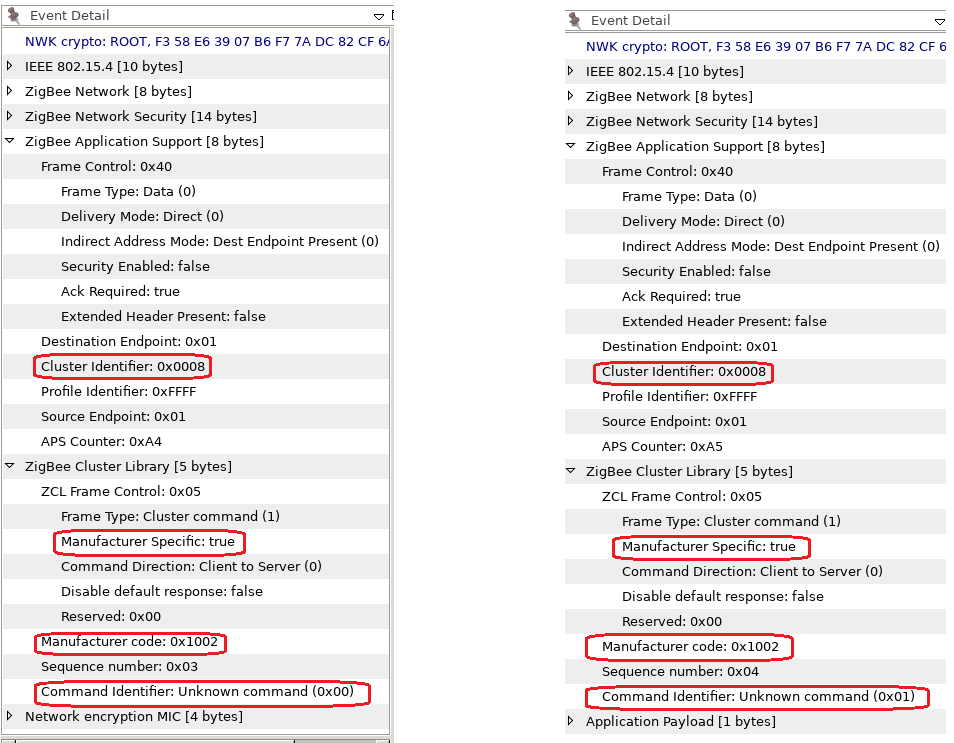
T00000000:RX len 5, ep 01, clus 0x0008 (Level Control) mfgId 1002 FC 05 seq 03 cmd 00 payload[]
[emberAfLevelControlClusterSampleMfgSpecificCmdCallback] called
Processing message: len=6 profile=FFFF cluster=0008

T00000000:RX len 6, ep 01, clus 0x0008 (Level Control) mfgId 1002 FC 05 seq 04 cmd 01 payload[64 ]
[emberAfLevelControlClusterSampleMfgSpecificCmdWithArgsCallback] called argOne=64
在抓包中,您可以找到有关这两个命令的详细信息。
要添加自定义Cluster,我们需要首先在 xml 中定义它。我们有一个示例,它是 app\zcl 目录中的 sample-extensions.xml。
  <cluster manufacturerCode="0x1002">
    <name>Sample Mfg Specific Cluster</name>
    <domain>Ember</domain>
    <description>This cluster provides an example of how the Application
      Framework can be extended to include manufacturer specific clusters.
      </description>
    <!-- Cluster Id must be within the mfg spec range 0xfc00 - 0xffff -->
    <code>0xFC00</code>
    <define>SAMPLE_MFG_SPECIFIC_CLUSTER</define>
    <client init="false" tick="false">true</client>
    <server init="false" tick="false">true</server>
    <attribute side="server" code="0x0000" define="ATTRIBUTE_ONE"
      type="INT8U"  min="0x00"   max="0xFF"   writable="true"
      default="0x00" optional="true">ember sample attribute</attribute>

    <attribute side="server" code="0x0001" define="ATTRIBUTE_TWO"
      type="INT8U"  min="0x00"   max="0xFF"   writable="true"
      default="0x00" optional="true">ember sample attribute 2</attribute>
    <command source="client" code="0x00"
      name="CommandOne"
      optional="true">
      <description>
        A sample manufacturer specific command within the sample manufacturer specific
        cluster.
      </description>
      <arg name="argOne" type="INT8U" />
    </command>
  </cluster>
在此示例中,我们定义了一个自定义Cluster,其制造商代码为 0x1002。Cluster ID 为 0xFC00,其中定义了两个属性和一个命令。
作为测试,我们可以定义如下自定义Cluster:
<configurator>
  <domain name="Test" />

  <cluster manufacturerCode="0x1002">
    <name>Hello World</name>
    <domain>Ember</domain>
    <description>This cluster provides an example of how the Application
      Framework can be extended to include manufacturer specific clusters.
      </description>
    <!-- Cluster Id must be within the mfg spec range 0xfc00 - 0xffff -->
    <code>0xFC10</code>
    <define>SAMPLE_MFG_SPECIFIC_HELLOWORLD_CLUSTER</define>
    <client init="false" tick="false">true</client>
    <server init="false" tick="false">true</server>
    <attribute side="server" code="0x0000" define="ATTRIBUTE_ONE"
      type="CHAR_STRING"  min="0x00"   max="0xFF"   writable="true"
      default="" optional="true">ember sample attribute</attribute>
    <command source="client" code="0x00"
      name="CommandOne"
      optional="true">
      <description>
        A sample manufacturer specific command within the sample manufacturer specific
        cluster.
      </description>
      <arg name="argOne" type="CHAR_STRING" />
    </command>
  </cluster>

</configurator>将自定义的 xml 文件放入项目文件夹,然后转向 Zigbee Stack 标签,在底部有一个 Custom ZCL additions 的区域。单击按钮"Add",然后选择 xml 文件将其添加到项目中。
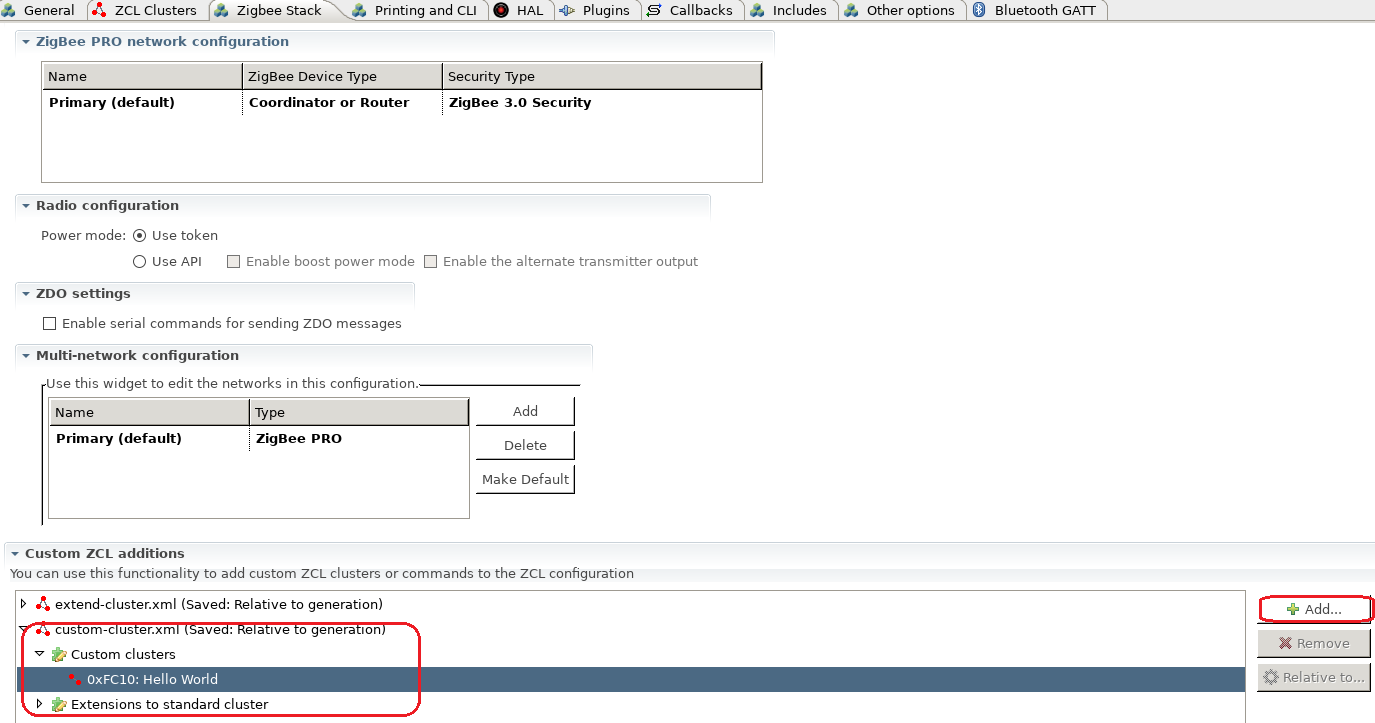
之后,请检查能否在 ZCL Clusters 标签中找到自定义Cluster以及属性和命令。
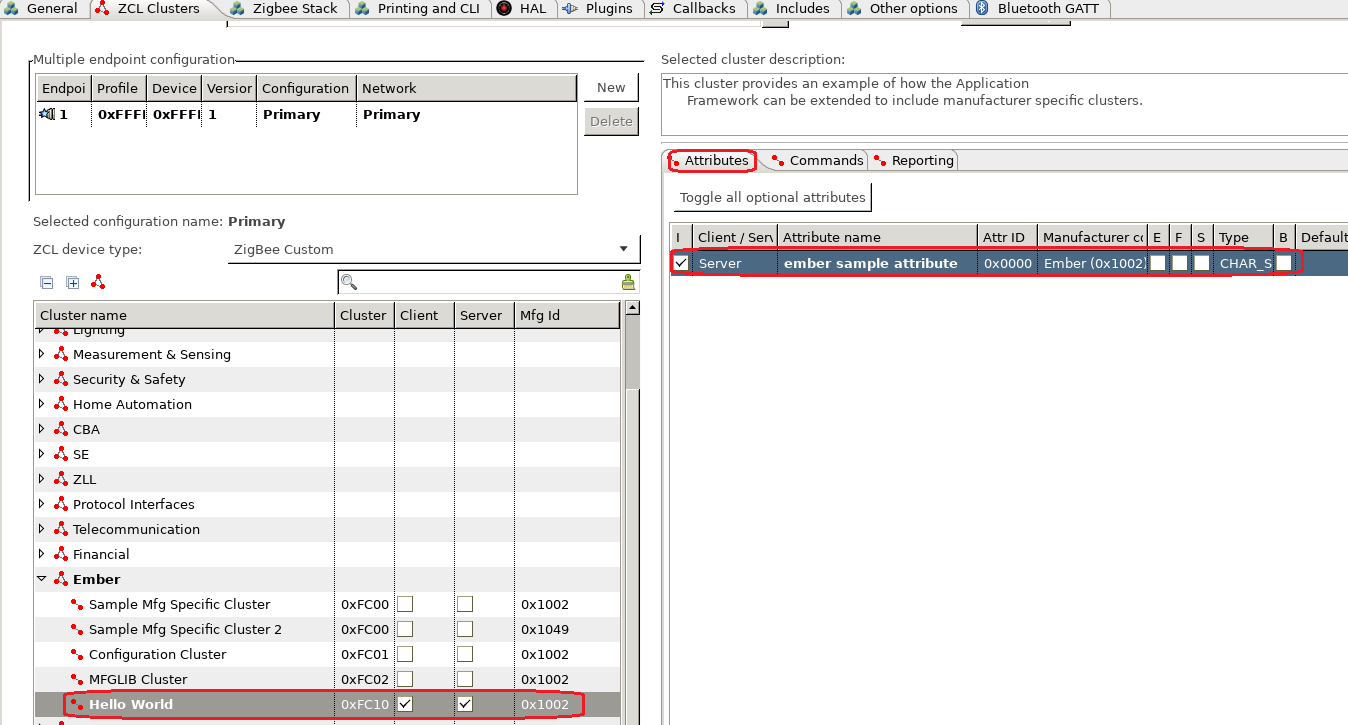
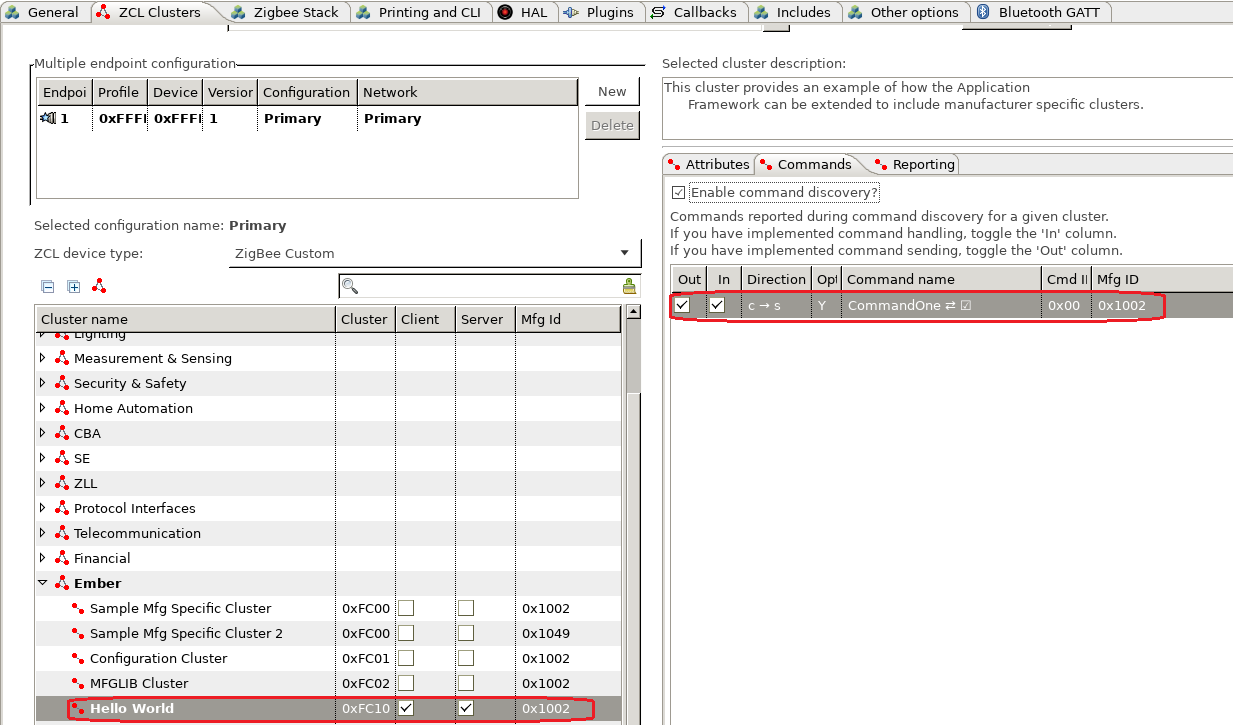
创建启用自定义Cluster Hello World 的服务器端的项目,同时创建一个启用自定义Cluster Hello World 的客户端的另一个项目。在服务器项目上,勾选要测试的回调 Command One。
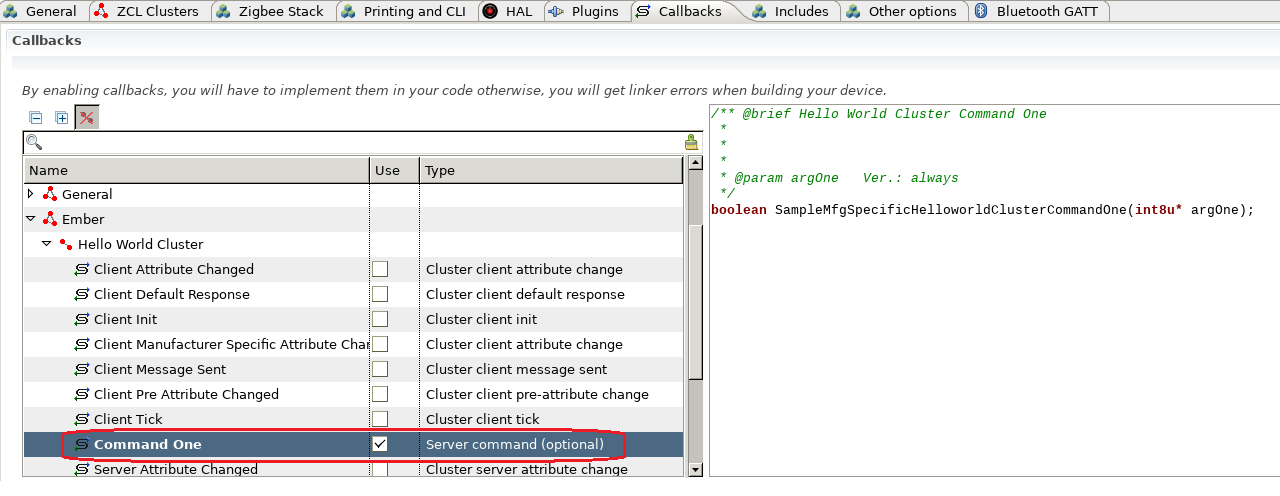
在文件 <projectname>_callbacks.c 中, 添加回调函数的实现:
boolean emberAfSampleMfgSpecificHelloworldClusterCommandOneCallback(int8u* argOne)
{
	emberAfCorePrintln("[%s] called argOne=%s", __func__, argOne);
	return true;
}在此测试中,我们使用协调器作为服务器端。我们在客户端添加自定义命令以发送自定义Cluster的命令。(如果您不知道如何添加自定义命令,可以参考自定义 CLI 命令)
static void custom_helloworld_cmd()
{
	EmberStatus status;
	uint8_t length;
  char buffer[128];
	uint8_t *arg = emberStringCommandArgument(0, &length);

  if (length >= sizeof(buffer)) {
    emberAfCorePrintln("input string too long, length=%d", length);
    return;
  }

  //for string arguments, first byte is the length
  buffer[0] = length;
  memcpy(&buffer[1], arg, length);

	emberAfFillCommandSampleMfgSpecificHelloworldClusterCommandOne(buffer);
  emberAfSetCommandEndpoints(1, 1);
	status = emberAfSendCommandUnicast(EMBER_OUTGOING_DIRECT, 0x0000);
	emberAfCorePrintln("send custom helloworld cmd with 1 status=%X", status);
}

EmberCommandEntry emberAfCustomCommands[] = {
  emberCommandEntryAction("helloworld_cmd", custom_helloworld_cmd, "b", ""),
  emberCommandEntryTerminator()
};
将客户端和服务器加入网络。在客户端,运行以下命令:
custom helloworld_cmd "hello world"
然后在服务器端,你会看到以下输出:
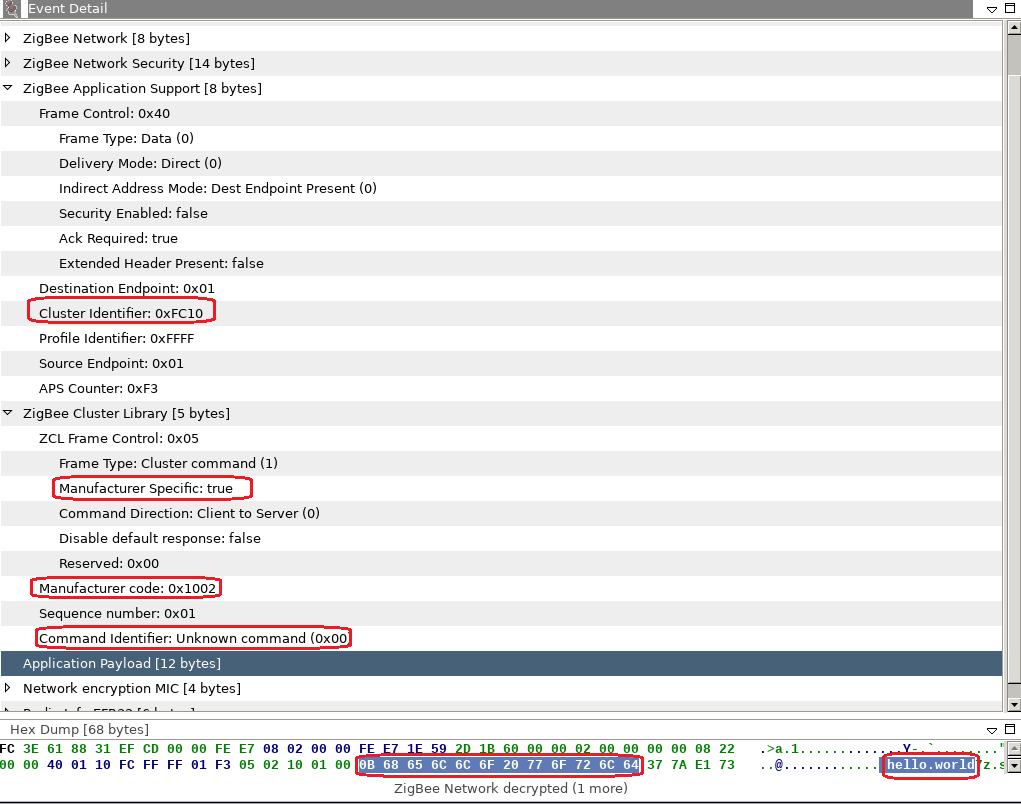
T00000000:RX len 17, ep 01, clus 0xFC10 (Hello World) mfgId 1002 FC 05 seq 00 cmd 00 payload[0B 68 65 6C 6C 6F 20 77 6F 72 6C 64 ]
[emberAfSampleMfgSpecificHelloworldClusterCommandOneCallback] called argOne=hello world
在抓包中,您可以找到有关自定义命令的详细信息。
 Home |
 ![]() Zigbee |
Zigbee | ![]() Bluetooth |
Bluetooth | ![]() ZWave |
ZWave | ![]() Proprietary |
Proprietary | ![]() Hardware |
Hardware | ![]() Common
Common
All resources of this repository are released under license CC BY-NC-ND 4.0 