Zigbee Custom CLI Commands - markding/iot-developer-boot-camp GitHub Wiki
Table of Contents
CLI commands are very helpful at develop stage. EmberZnet has provided a lot of debug commands. In AppBuilder, customer can choose the provided debug commands or to add custom CLI commands.

To use the provided CLI commands, you just need to enable the commands you need, then generate your project. To use the provided CLI commands of clusters or plugins, you need to enable these clusters and plugins first. The command line usage can be found at our official docs website.
In this page, we will introduce how we add a new custom command.
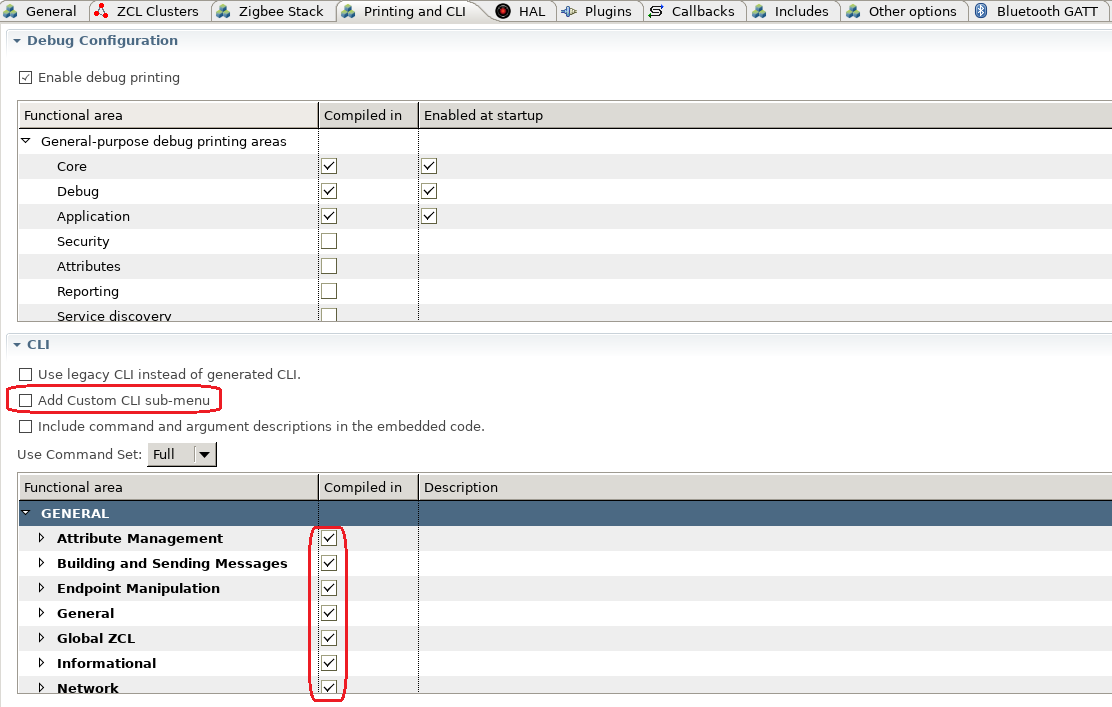
To add custom CLI command, you need to enable the option "Add Custom CLI sub-menu" in tab "Printing and CLI". Then generate your project.
There is another option in the picture above which is the option "Include command and argument descriptions in the embeded code". With this option enabled, the description info of the command line will be compiled into the image, then you can get the description of the command on the console. It's more user friendly but costs more flash space. Below is a picture to illustrate the effects of this opetion. On the left side, this option is not enabled and you can't see any description about the command key words. On the right side, you can see the usage of the command key word.

Then you need to source code like below to define your custom CLI command. It's recommended to add your own code in <projectname>_callbacks.c:
EmberCommandEntry emberAfCustomCommands[] = {
  emberCommandEntryAction("test", customtestcmd, "", ""),
  emberCommandEntryTerminator()
};
The macro "emberCommandEntryAction" is defined as below:
#if defined(EMBER_COMMAND_INTEPRETER_HAS_DESCRIPTION_FIELD)
/* @brief Macro to define a CLI action */
  #define emberCommandEntryAction(name, action, argumentTypes, description) \
  { (name), (action), (argumentTypes), (description), NULL }
#else  // Don't include description data in struct
  #define emberCommandEntryAction(name, action, argumentTypes, description) \
  { (name), (action), (argumentTypes) }
#endif
There are four parameters in the macro "emberCommandEntryAction":
- Command Key word. In the example above, we've added a command "custom test".
- Command handler. When the input command matches this key word, this handler will be called. The prototype is like: typedef void (*CommandAction)(void).
- Argument types. It's a special string.
- Description of the command.
Argument type is a string that specifies the number and types of arguments the command accepts. The argument specifiers are:
- u: one-byte unsigned integer.
- v: two-byte unsigned integer.
- s: one-byte signed integer.
- b: string. The argument can be entered in ASCII by using quotes, for example: "foo". It can also be entered in hexadecimal values by using curly braces, for example: { 08 A1 f2 }. The number of hexadecimal digits must be even and spaces are ignored.
- *: zero or more of the previous type. If used, this must be the last specifier.
- ?: unknown number of arguments. If used this must be the only character, which means that the command interpreter will not perform any validation of arguments and will call the action directly trusting that it will handle whatever arguments are passed in.
Integer arguments can be either decimal or hexadecimal. A 0x prefix indicates a hexadecimal integer, for example: 0x3ed.
These specifiers can be bound together. e.g. "vus" means the command has 3 arguments. The first one is a two-byte unsigned integer, the second one is an one-byte unsigned integer and the third one is a one-byte signed integer.
The prototype of the CLI command handler is like:
static void customtestcmd(void)
{
    emberAfCorePrintln("This is a test");
}
There are some APIs you might need to use in order to handle the arguments.
- int32_t emberSignedCommandArgument(uint8_t argNum) - get value of a signed integer
- uint32_t emberUnsignedCommandArgument(uint8_t argNum) - get value of an unsigned integer
- uint8_t *emberStringCommandArgument(int8_t argNum, uint8_t *length) - get the pointer of a string argument
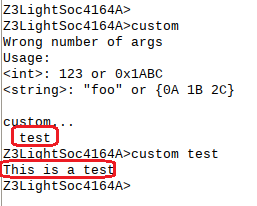
Build the project and flash it to a kit, then you will see the command key word "test" under the sub menu "custom".


