Setting up MaRGE and MaRCoS from scratch (Ubuntu) - josalggui/MaRGE GitHub Wiki
MaRGE and MaRCoS installation from scratch (Ubuntu)
Index
- Requirements
- Software requirements
- Hardware and Network requirements
- Set up MaRGE
- Install MaRGE from PyPI
- Install MaRGE from source
- Minimal Hardware Configuration
- Guided set up of MaRCoS Server, MaRCoS Client, and Tyger (Only for Ubuntu)
- Set up MarCoS Server
- Set up Client
- Configure a static IP address
- Set up Tyger
1. Requirements
i. Software Requirements
| Component | Requirement Level | Tested Version(s) | Notes |
|---|---|---|---|
| Operating System | Required | Ubuntu 22.04 LTS, Ubuntu 24.04 LTS, Ubuntu 26.04 LTS | Officially tested platforms |
| Python | Required | 3.12, 3.13, 3.14 | Other Python 3 versions may work but have not been tested |
| pip | Required | The one corresponding to the Python version | Required for installing Python packages |
| venv | Required | The one corresponding to the Python version | Required for creating virtual environments |
| git | Required | Any recent version | Required for cloning repositories and installing some dependencies |
| Qt Runtime Libraries | Required | Ubuntu packages | Required for the graphical user interface |
| GNOME Terminal | Recommended (Ubuntu 26.04) | Any recent version | Recommended instead of Ptyxis due to connection issues observed during testing |
Install the required packages on Ubuntu:
sudo apt install git python3-pip python3-venv
Install the required Qt runtime libraries:
sudo apt update
sudo apt install -y \
    libxcb-cursor0 \
    libxcb-xinerama0 \
    libxcb-icccm4 \
    libxcb-image0 \
    libxcb-keysyms1 \
    libxcb-render-util0 \
    libxkbcommon-x11-0 \
    libxcb-randr0 \
    libxcb-shape0 \
    libxcb-xfixes0 \
    libgl1 \
    libegl1
Recommended (Ubuntu 26.04):
sudo apt install gnome-terminal
ii. Hardware and Network Requirements
| Component | Status | Notes |
|---|---|---|
| Red Pitaya board | Required | Target hardware for MaRGE |
| MicroSD card | Required | Used to flash and boot the Red Pitaya image |
| Ethernet port | Required | Available Ethernet port on the host computer |
| Internet connection | Required during installation | Needed to download dependencies and complete the setup process |
2. Set up MaRGE
i. Install MaRGE from PyPI
MaRGE is available on PyPI, making it easy to install with pip.
This option is ideal for users who want to use the existing sequences and toolkits.
If you plan to customize or add sequences, modify the GUI, or develop new features, proceed to the next section.
-
Go to your project folder and create and activate a virtual environment:
python3 -m venv venv source venv/bin/activate -
Install marge-mri
pip install marge-mri==1.0.0b2 -
Launch the GUI from terminal:
marge-mri -
Go to Minimal Hardware Configuration section
ii. Install MaRGE from Source
Installing MaRGE from source is recommended for users who want full control over the codebase.
This option allows you to modify existing sequences, extend the GUI, contribute new features, or adapt MaRGE to your specific workflows.
Note that the commands indicated here for Windows run on GitBash, not in PowerShell.
-
Go to the folder where you want to create the project and clone the repo
git clone https://github.com/josalggui/MaRGE.git -
Go into the created
MaRGEfolder. Create and activate a virtual environment. Then, add the current folder (MaRGE) to Python's module search path:cd MaRGE python3 -m venv venv source venv/bin/activate export PYTHONPATH=$(pwd) -
Install requirements
pip install -r requirements.txt -
Go into
MaRGE/margefolder and run themain.py.cd marge python3 main.py -
Go to Minimal Hardware Configuration section
iii. Minimal Hardware Configuration
After running MaRGe by the first time, you have to do a minimal configuration of the session and hardware to access the main window. This implies:
- Go to
Sessiontab and create aProjectand aStudy.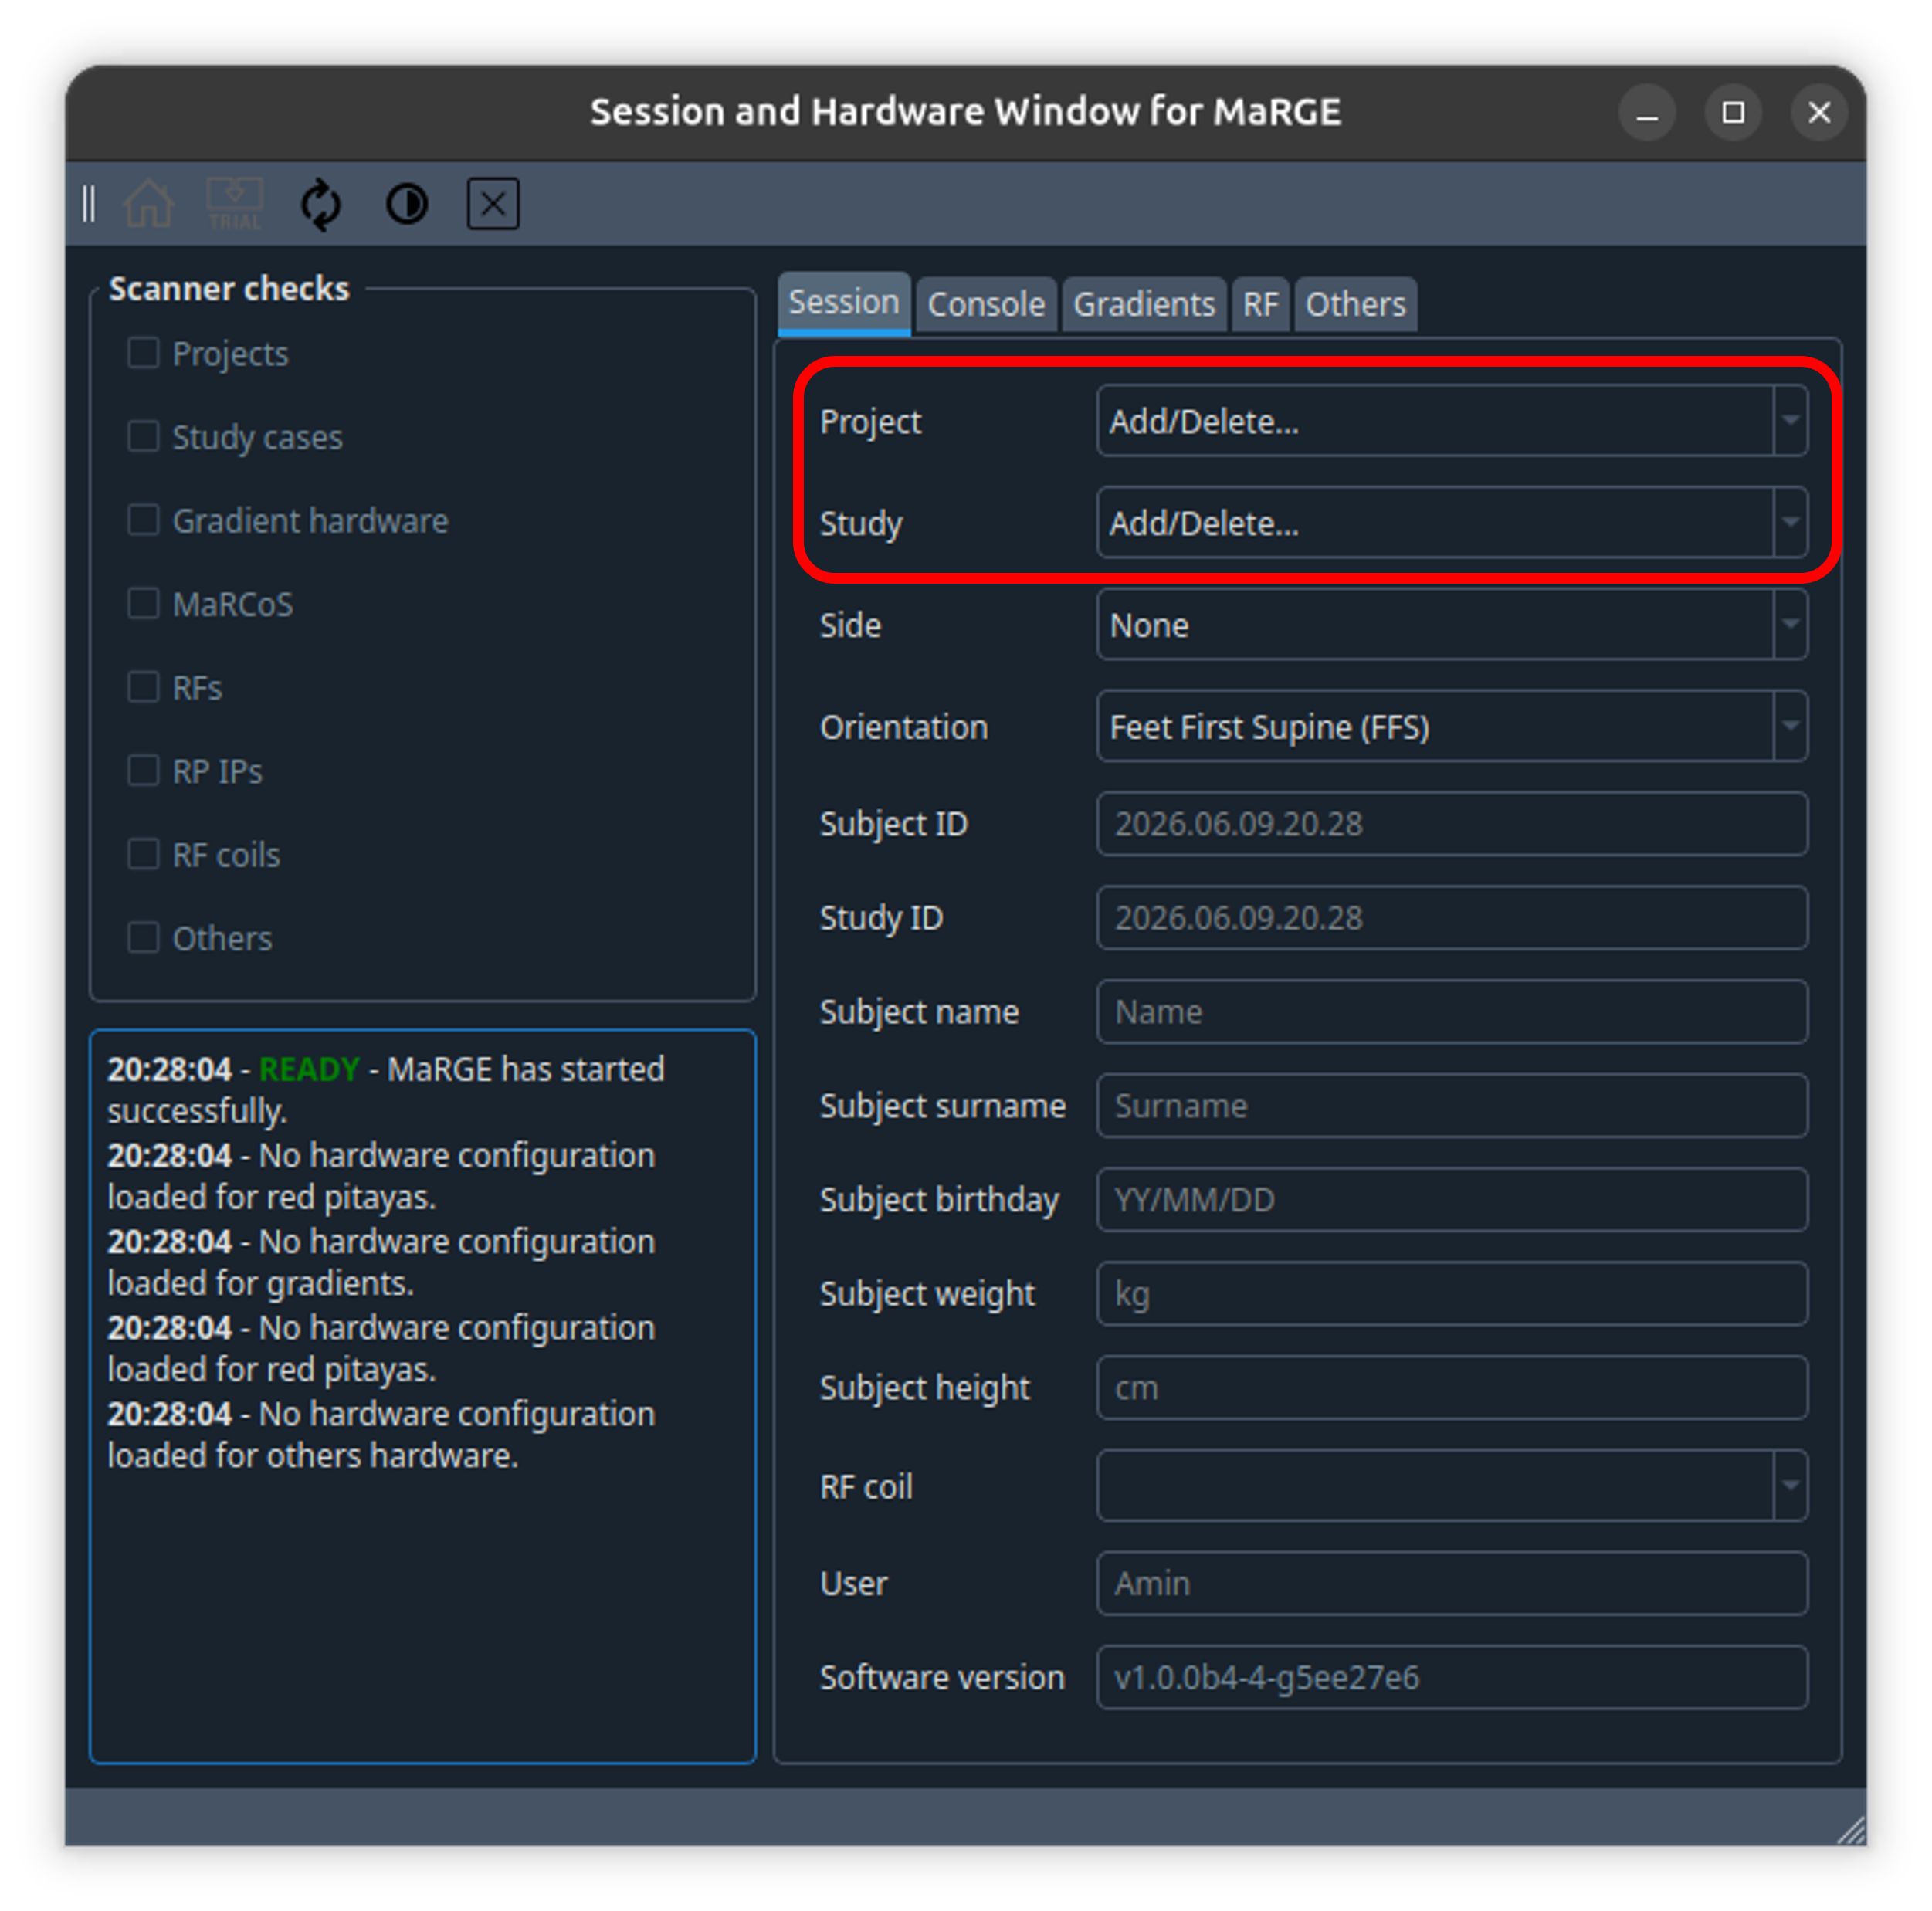
- Go to
Consoletab and add the IP address in the available text box for the Red Pitaya, then clickSave.
- Go to
Gradientstab and clickSave.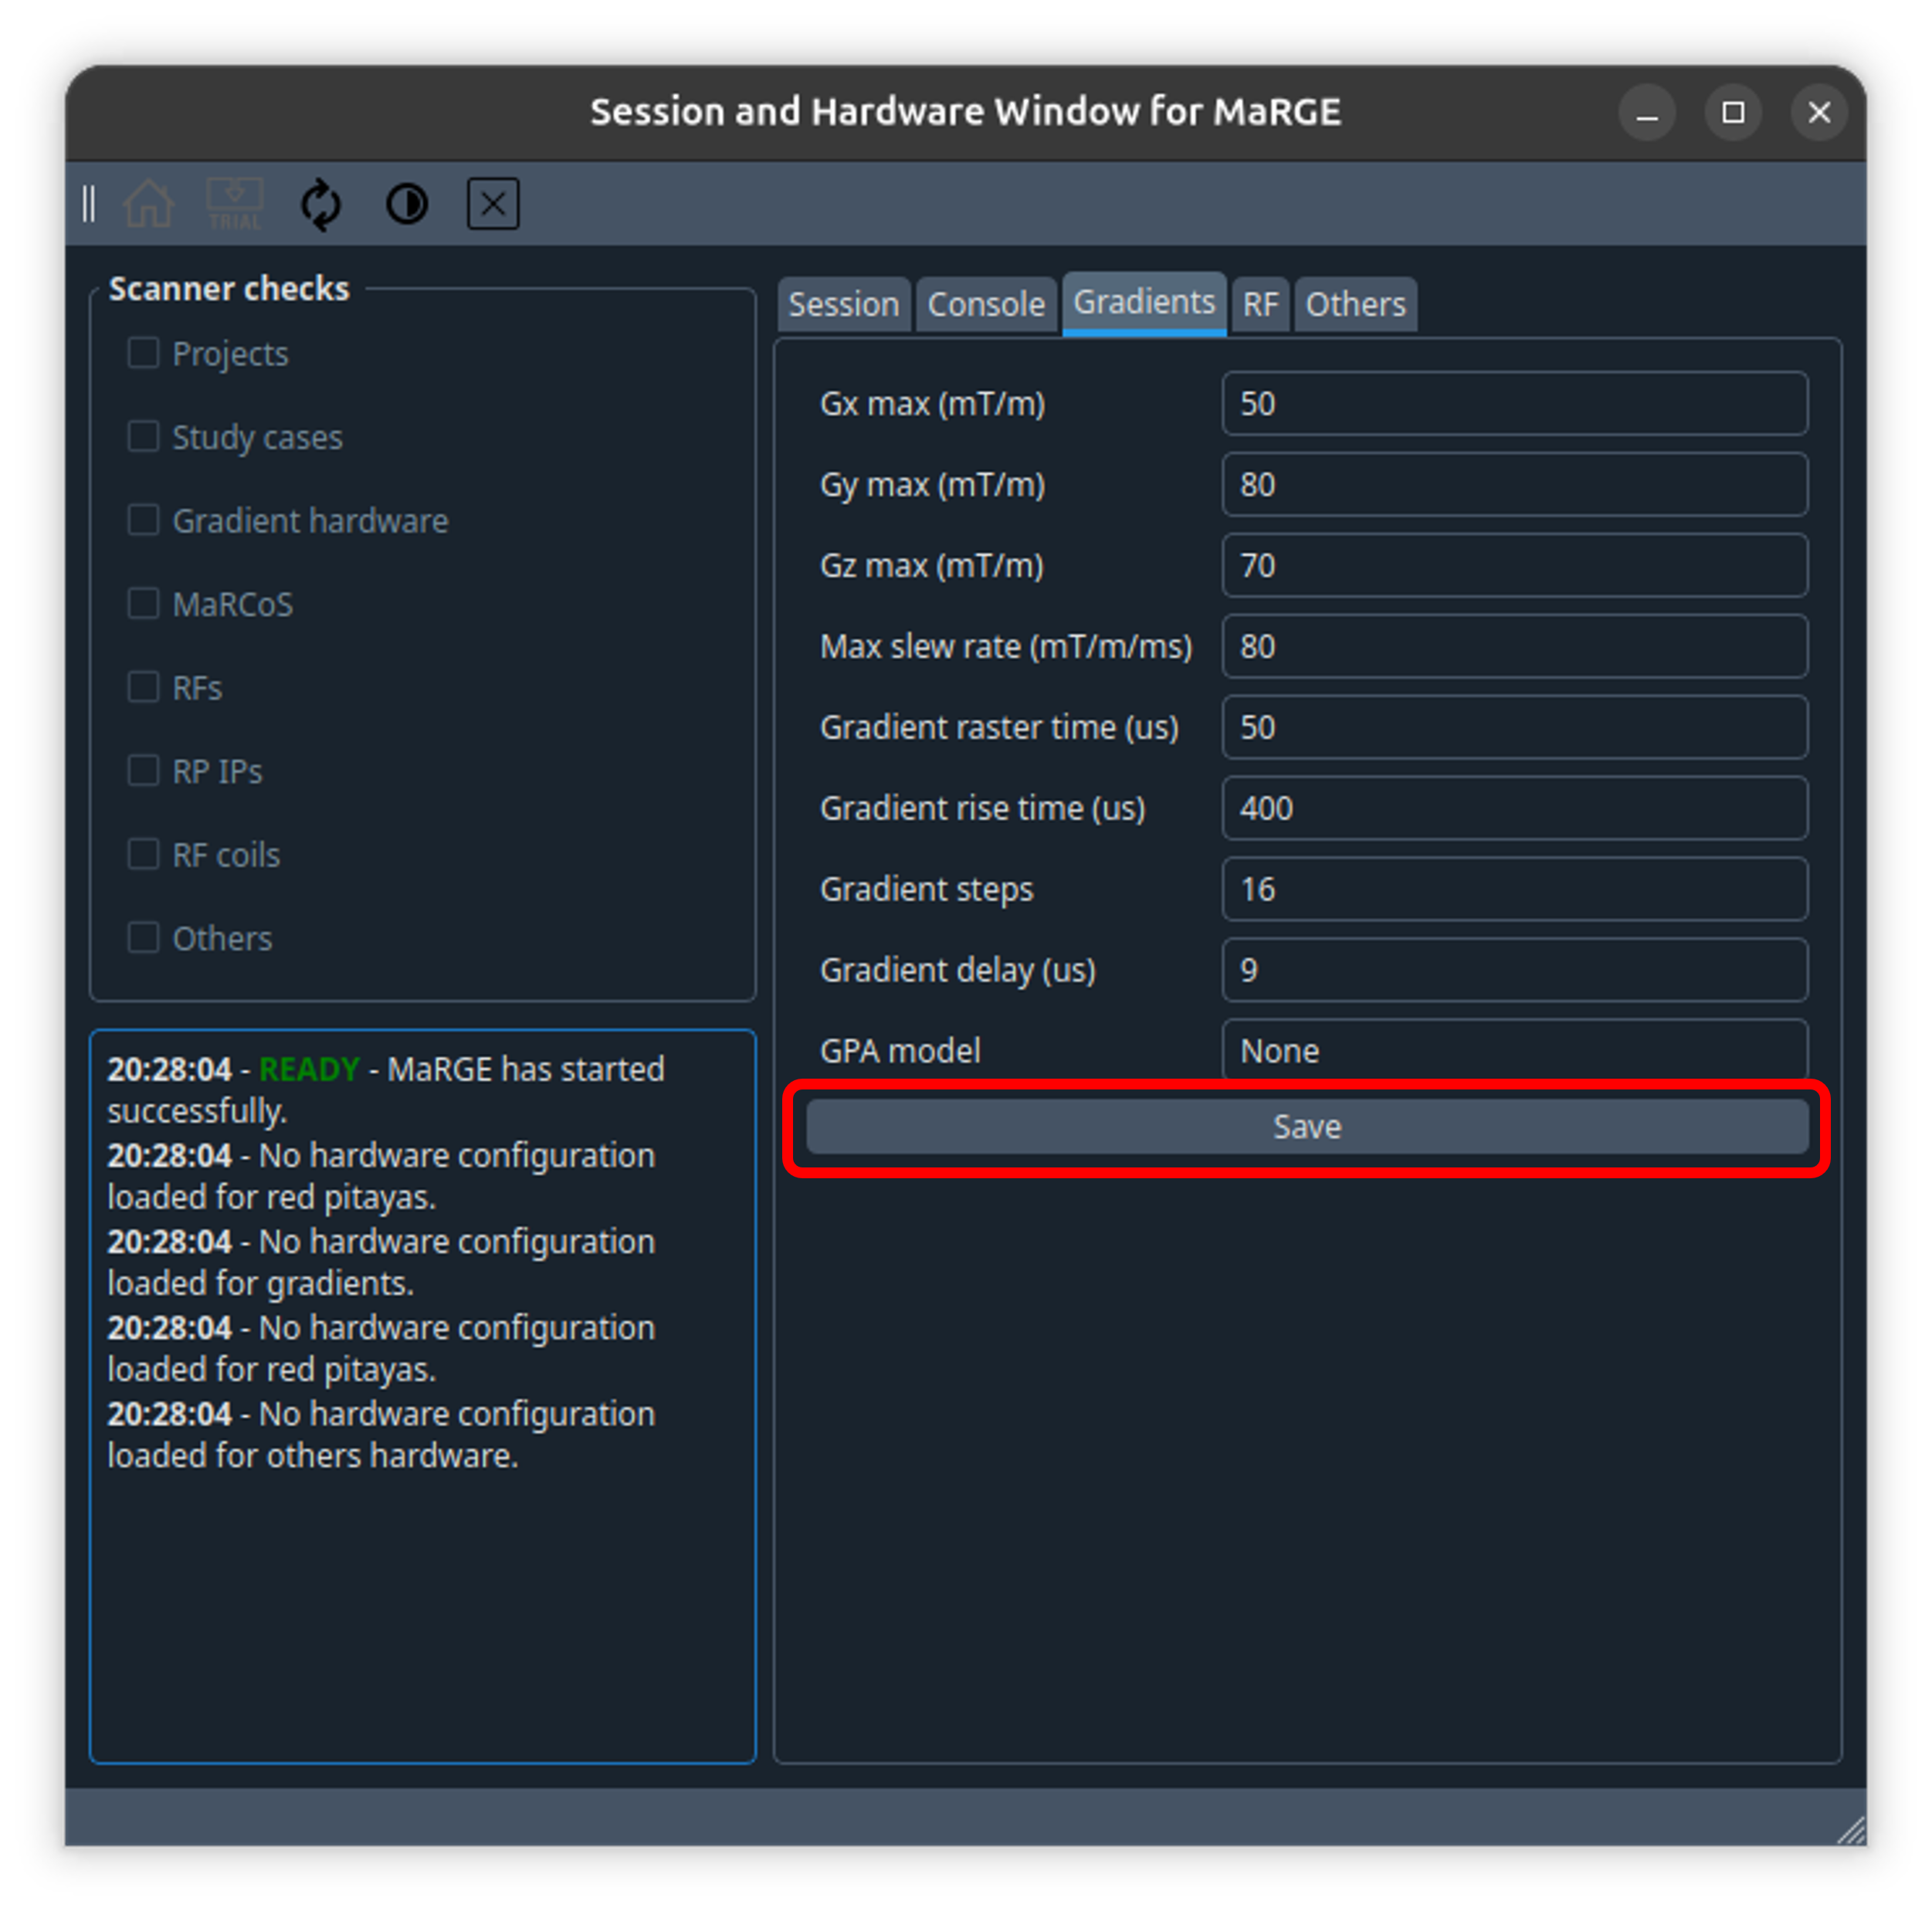
- Go to
RFtab and add a new RF coil using the text boxes available, then clickSave.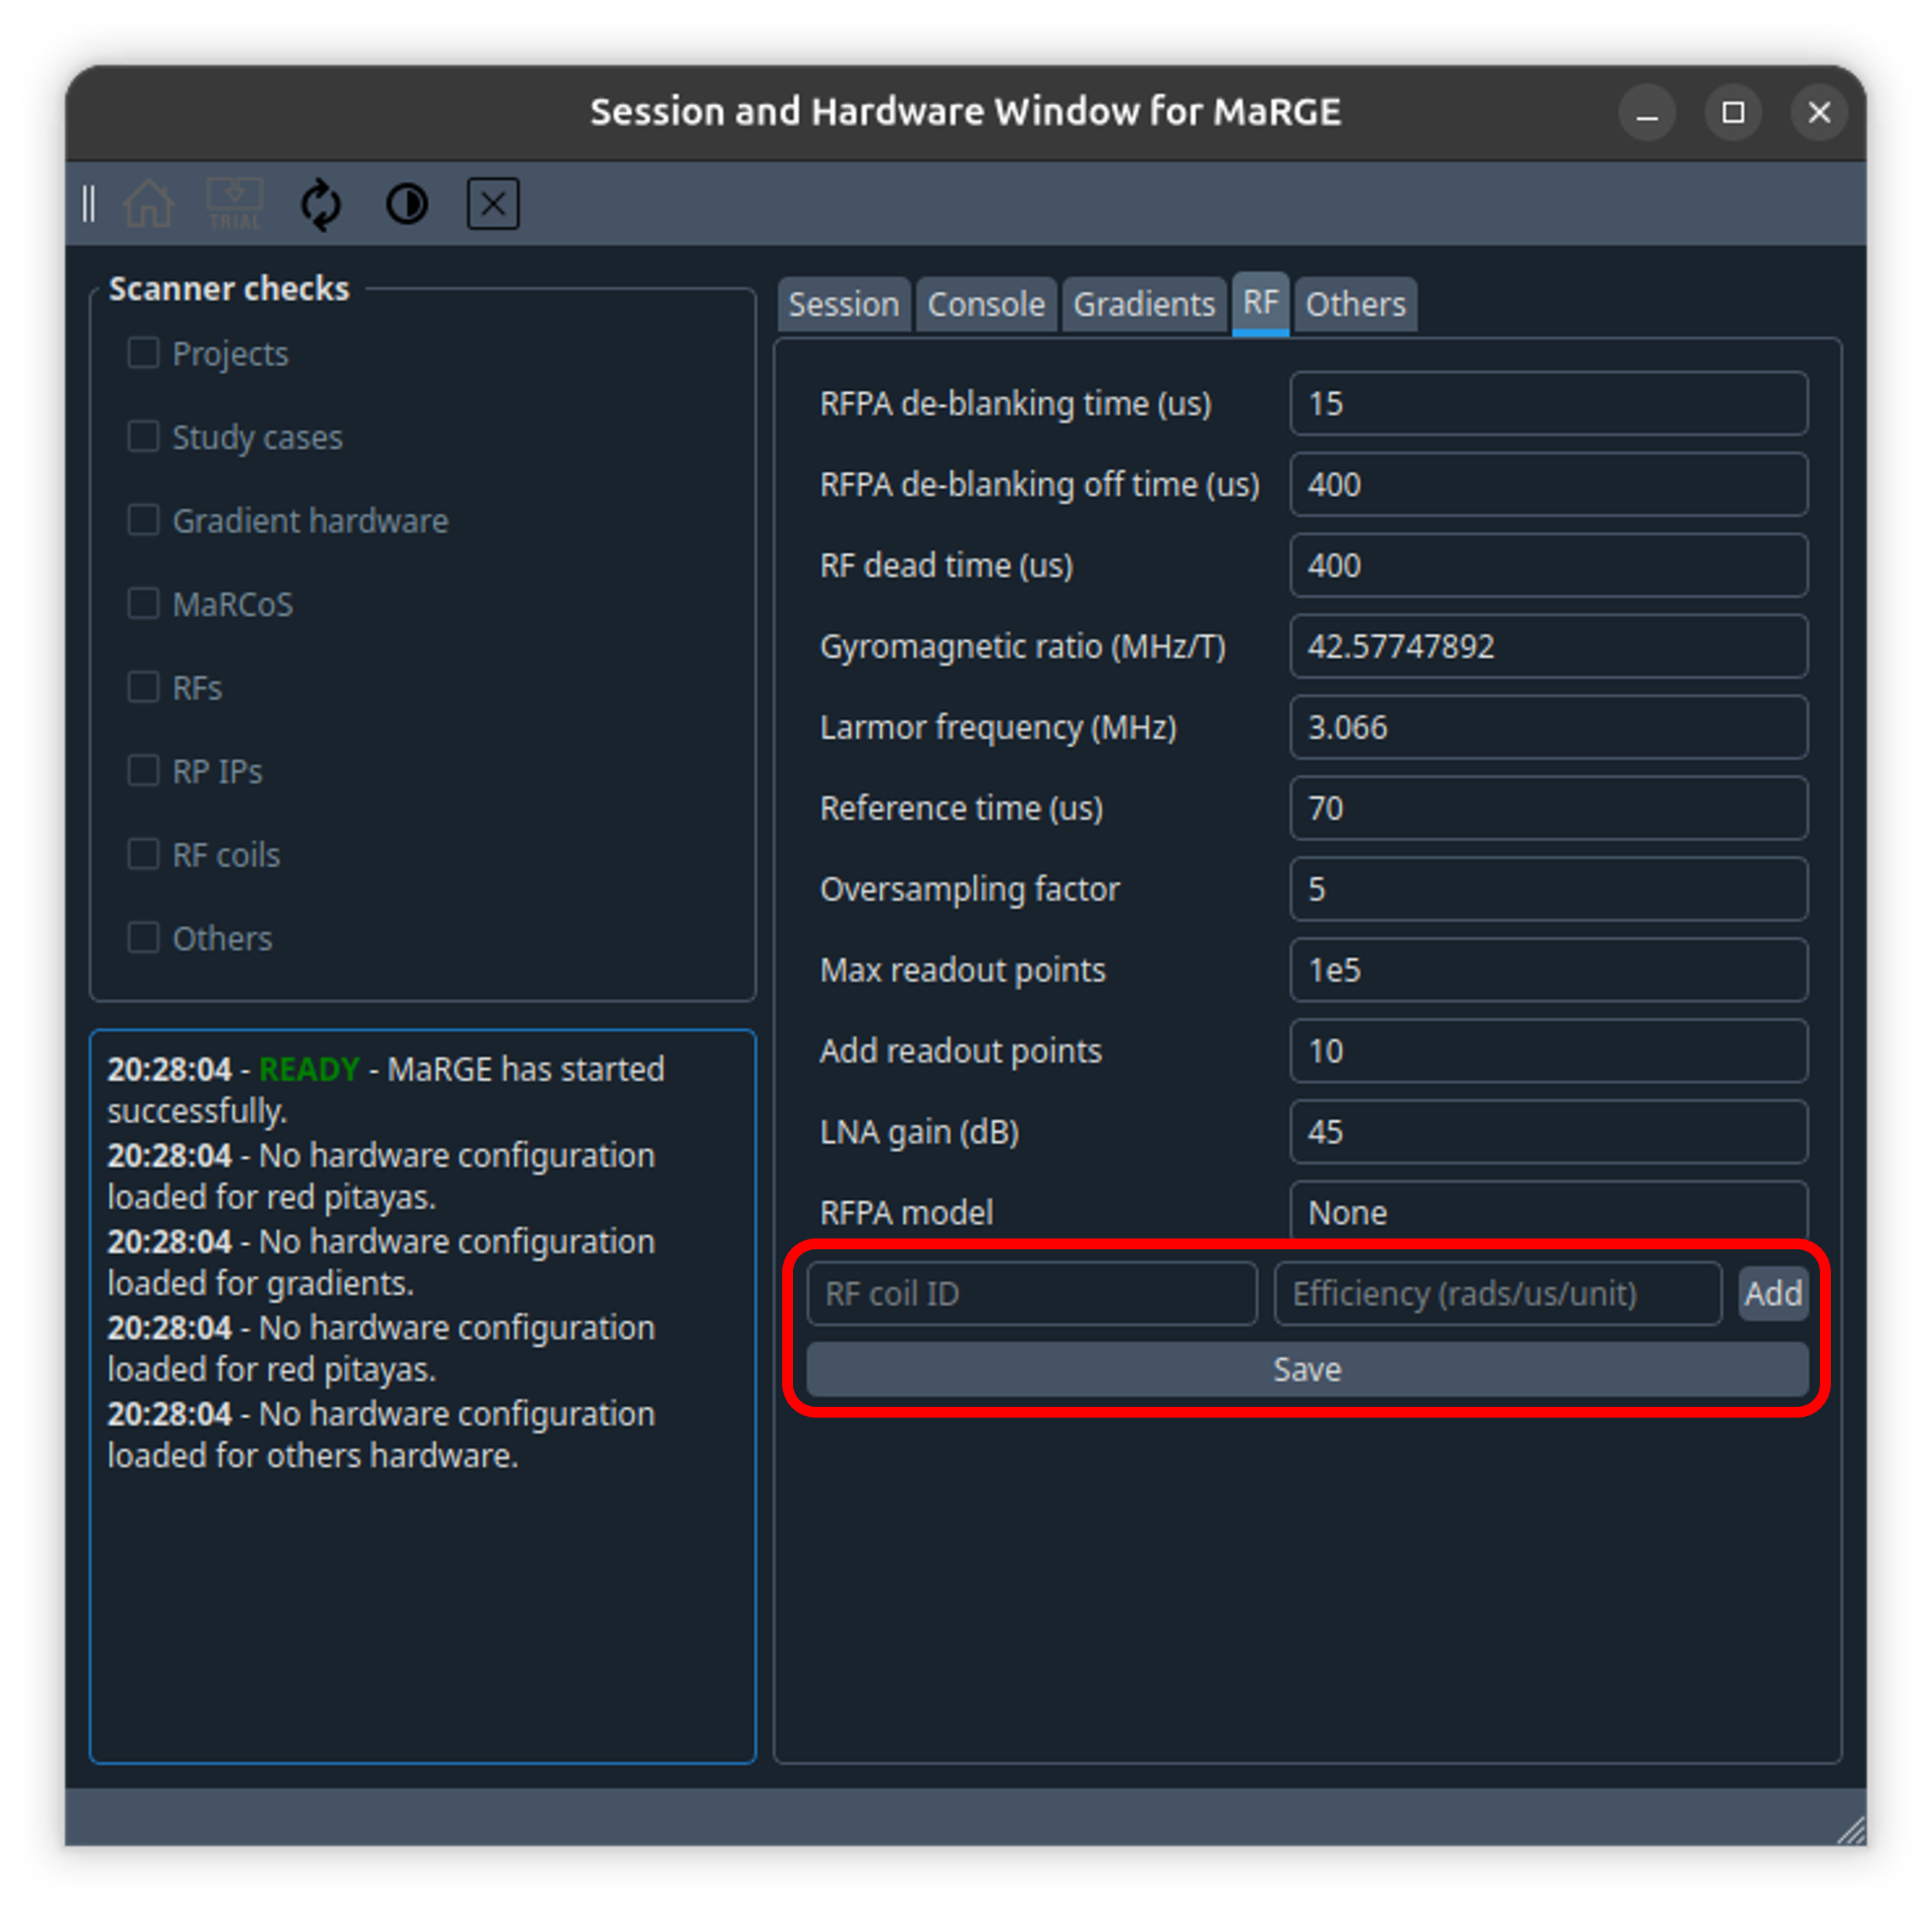
- Go to
Otherstab and write the name of your terminal on the Bash path. You can also configure your Tyger credentials if you want.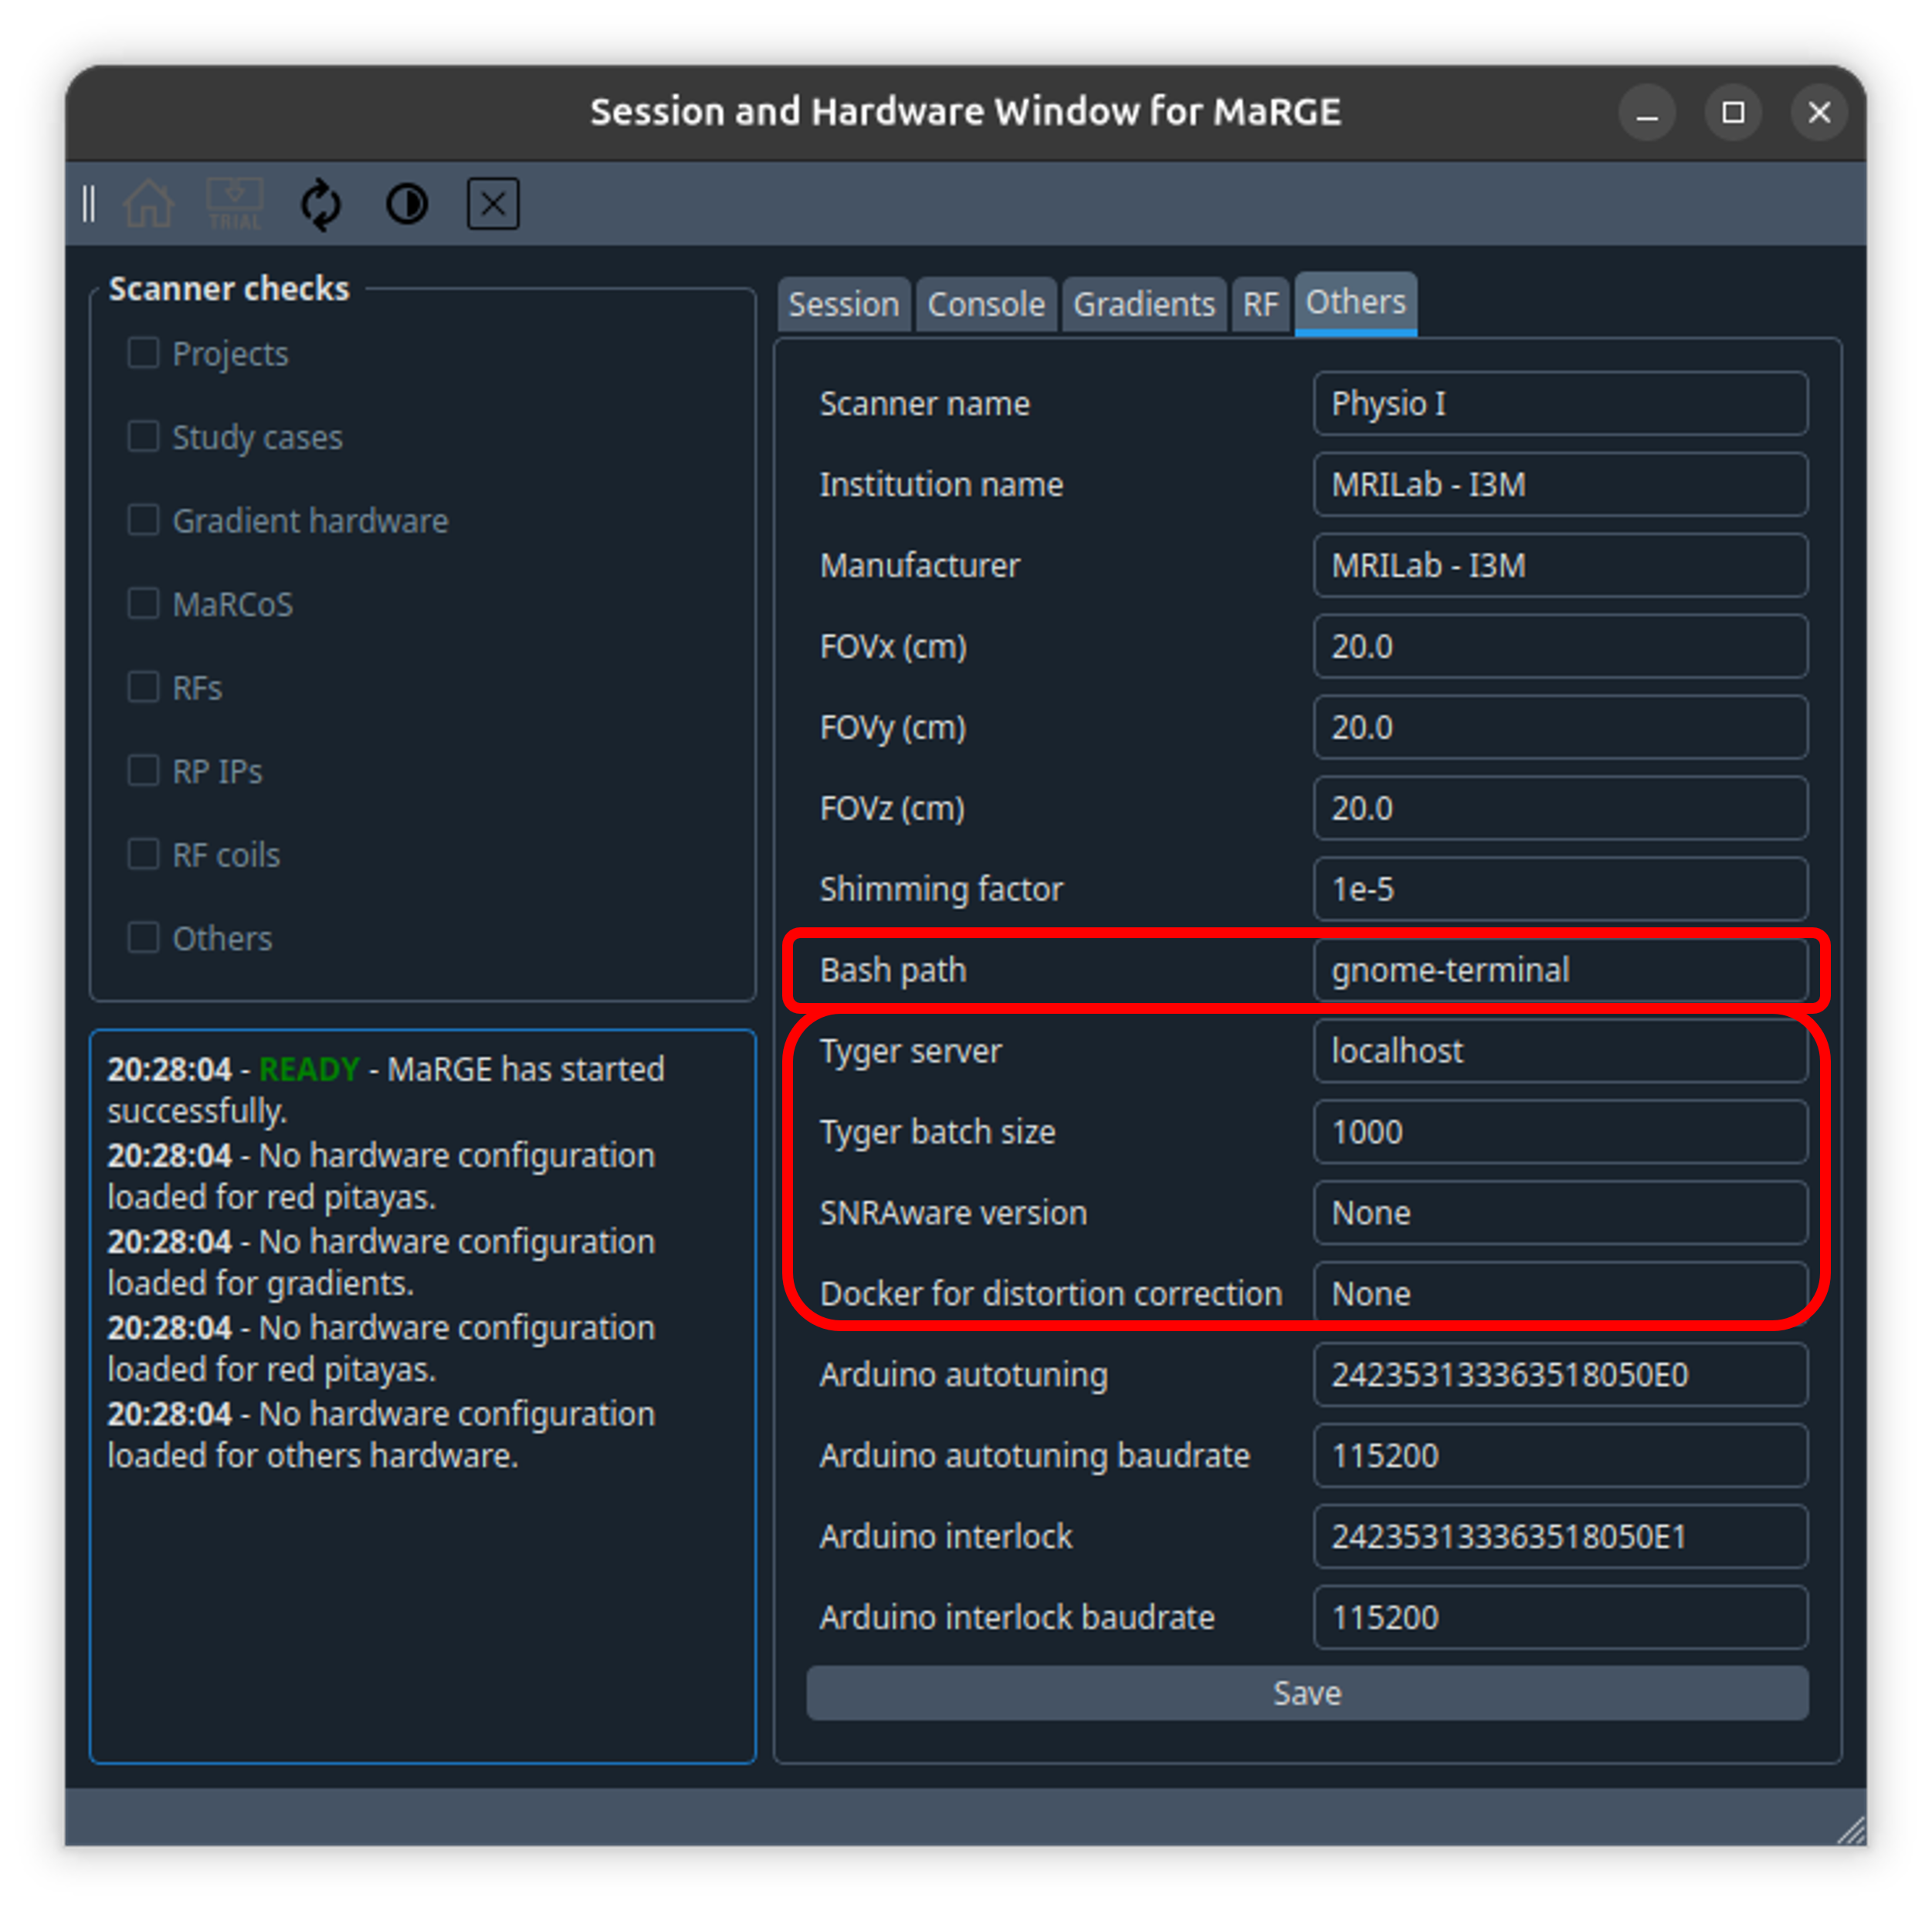
For tyger configuration:
| Parameter | Example 1 | Example 2 |
|---|---|---|
| Tyger server | ssh://user@<IP>:22/opt/tyger/api.sock |
https://i3m.tyger.cloud |
| Tyger batch size | 200 |
1000 |
| SNRAware version | Local |
TEP |
| Docker for distortion correction | ghcr.io/mrilab-i3m/rare-recon:v1 |
ghcr.io/teresaguallartnaval/dist_corr_tyger:v1 |
Replace <IP> with the IP address of the server running Tyger.
For detailed information about Tyger installation, server configuration, reconstruction workflows, and advanced usage, see the Advanced Reconstruction with Tyger guide.
More details here: Hardware Configuration Guide.
The default terminal for Ubuntu 26.04 is
Ptyxis, it is recommended to install and usegnome-terminal
3. Guided set up of MaRCoS Server, MaRCoS Client, and Tyger (Only for Ubuntu)
This is the recommended setup method for Ubuntu users installing MaRCoS from scratch.
The marcos_install.sh script guides the complete installation and configuration process, including the Red Pitaya SD card, the MaRCoS server, the host computer network configuration, the MaRCoS client, and Tyger.
This procedure is intended for new Red Pitaya setups and new MaRCoS installations on Ubuntu.
The procedure described here has been developed and tested on Ubuntu systems. Other Linux distributions may not be compatible. Windows and macOS are not supported by this guided setup.
After completing this section, Sections 4 and 5 do not need to be followed manually. Those sections are provided for manual setup procedures or for troubleshooting specific parts of the installation.
The script performs the following steps:
- Downloads the Red Pitaya OS image, when it is not already present.
- Extracts the image archive, when needed.
- Writes the image to the SD card.
- Mounts the SD card root partition.
- Sets a static IP address for the Red Pitaya.
- Optionally configures the host computer Ethernet interface.
- Updates the Ethernet configuration of the client computer.
- Removes old SSH keys associated with the Red Pitaya and adds the new one.
- Installs and configures the MaRCoS server on the Red Pitaya.
- Installs Tyger on the host computer.
i. Run the guided installer
There are three ways to access the marcos_install.sh script:
-
When MaRGE is already installed on the computer, the script can be located inside the
margefolder. -
The script can be downloaded from this
link. -
The installer can be launched from the MaRGE GUI by clicking the button located in the MaRCoS toolbar.
This option is available only when the hardware has already been configured in MaRGE.
For options 1 and 2, a terminal must be opened in the folder containing the script. The script must be executed with administrator permissions:
sudo ./marcos_install.sh
ii. Follow the terminal instructions
The installer guides the full process, from inserting the SD card into the computer to installing the MaRCoS server on the Red Pitaya.
The terminal instructions cover the configuration of:
- The Red Pitaya SD card.
- The Red Pitaya static IP address.
- The host computer Ethernet interface.
- The SSH connection.
- The MaRCoS server.
- The MaRCoS client configuration.
- Tyger on the host computer.

iii. Important warnings
Before running the script, the following points must be considered:
-
The script modifies the Ethernet configuration of the host computer.
A backup of the previous configuration is created in/etc/netplan. -
The script updates the SSH configuration associated with the Red Pitaya.
The ownership of.ssh/known_hostschanges after running the script withsudo. -
The script writes an operating system image to the selected SD card.
The correct storage device must be selected, because its contents will be overwritten.
This script must be run under the user’s own responsibility.
4. Set up MaRCoS Server
This section describes the manual setup of the MaRCoS server on the Red Pitaya.
It includes preparing the SD card, flashing the Red Pitaya image, and assigning a static IP address to the Red Pitaya Ethernet interface.
This manual procedure is only required when the guided installer described in Section 3 is not used.
At the end of this section, the Red Pitaya server IP address should be fixed to 192.168.1.101.
i. Prepare the SD card image
-
Insert the SD card into the computer SD card slot.
-
Download the compressed SD image from this link.
-
Extract the SD image:
tar -xvf sdimage-bootpart-202004030120-mmcblk0.direct.tar.bz2 -
Flash the SD image into the SD card:
sudo dd if=./sdimage-bootpart-202004030120-mmcblk0.direct of=/dev/mmcblk0 bs=1M && syncIn this command,
/dev/mmcblk0corresponds to the SD card device. This device name may be different depending on the computer. Before running the command, the correct SD card device must be identified carefully, because the selected device will be overwritten.
ii. Configure the Red Pitaya static IP address
-
Mount the SD card and access the
/etc/networkfolder inside the SD card root partition. -
Open the
interfacesfile:sudo nano interfaces -
Replace the
# Wired or wireless interfacessection with the following content:# Wired or wireless interfaces auto eth0 iface eth0 inet static address 192.168.1.101 netmask 255.255.255.0 gateway 192.168.1.1 -
Save the file and exit the editor.
-
Safely remove the SD card from the computer.
-
Insert the SD card into the Red Pitaya.
After completing these steps, the Red Pitaya MaRCoS server will use the static IP address 192.168.1.101.
5. Set Up the Client Computer
The client computer must be configured with a static IP address on the Ethernet interface connected to the Red Pitaya. This can be done either through the Ubuntu graphical interface or from the terminal.
i. Configure a Static IP Address
Option 1: Using the Ubuntu Graphical Interface
Recent Ubuntu releases allow network interfaces to be configured directly from the graphical settings application.
-
Connect the Red Pitaya to the computer using an Ethernet cable.
-
Open Settings → Network and locate the Ethernet interface.

-
Click the configuration button corresponding to the Ethernet interface.

-
Open the IPv4 tab and select Manual configuration.
-
Configure the interface as follows:
Parameter Value Address 192.168.1.100 Netmask 255.255.255.0 Gateway 192.168.1.1 
The IP address shown above is only an example. Any static IP address within the same subnet as the Red Pitaya can be used.
Option 2: Using Netplan
-
Open the Netplan configuration directory:
cd /etc/netplan sudo nano 01-network-manager-all.yaml -
Edit the file and replace
your_ethernet_interfacewith the name of the Ethernet interface connected to the Red Pitaya.network: version: 2 renderer: NetworkManager ethernets: your_ethernet_interface: dhcp4: no addresses: [192.168.1.100/24] gateway4: 192.168.1.1 nameservers: addresses: [8.8.8.8, 8.8.4.4] -
Apply the configuration:
sudo netplan try -
Confirm the changes when prompted.
-
Verify the configuration:
ip addrThe Ethernet interface should be assigned the configured static IP address.
ii. Install Tyger
Download the latest Linux release of Tyger:
wget -q https://github.com/microsoft/tyger/releases/latest/download/tyger_linux_x86_64.tar.gz
Extract the archive and install the executable:
tar -xvzf tyger_linux_x86_64.tar.gz
sudo cp tyger /usr/local/bin
Verify the installation:
tyger --version
Configure Tyger in MaRGE
Open the session configuration window and configure Tyger as follows:
| Parameter | Example 1 | Example 2 |
|---|---|---|
| Tyger server | ssh://user@<IP>:22/opt/tyger/api.sock |
https://i3m.tyger.cloud |
| Tyger batch size | 200 |
1000 |
| SNRAware version | Local |
TEP |
| Docker for distortion correction | ghcr.io/mrilab-i3m/rare-recon:v1 |
ghcr.io/teresaguallartnaval/dist_corr_tyger:v1 |
Replace <IP> with the IP address of the server running Tyger.
For detailed information about Tyger installation, server configuration, reconstruction workflows, and advanced usage, see the Advanced Reconstruction with Tyger guide.