Configuration System - jackeys/Power-Armor-to-the-People GitHub Wiki
In furthering player choice, Power Armor to the People exposes many settings to the user to configure if they are using Mod Configuration Menu. Sensible defaults are always used to make this optional.
Making configuration values understandable is an essential part of the configuration system. As much as possible, global variables are used within the mod such that their value corresponds to exactly what a user would expect, which allows for that global variable to be directly set by the Mod Configuration Menu. However, this can't always be done. To help with this, a configuration manager (PATTP_ConfigurationManager) exists in the core that uses a script to translate values that don't make sense to a user. For example, asking a user to set the chance that a Raider does not wear rare power armor doesn't make as much sense as asking them to set the chance that a Raider does get a rare set of power armor.
Values of this type typically have three properties to make them work: an Auto Const Mandatory property that points to the global variable that gets used within the mod, an Auto property prefixed with MCM_ to set from the Mod Configuration Menu, and a property with a custom getter and setter to translate between the two. This setup is necessary because MCM requires an Auto property, which cannot have a custom getter and setter.
GlobalVariable Property PAttP_Setting_RaiderRareSetChanceNone Auto Const Mandatory
{AUTOFILL}

; Convert our ChanceNone into a Chance so it makes more sense
float Property MCM_RaiderRareSetChance Auto
float Property RaiderRareSetChance
    float Function get()
        return 100.0 - PAttP_Setting_RaiderRareSetChanceNone.GetValue()
    EndFunction
    Function set(float value)
        PAttP_Setting_RaiderRareSetChanceNone.SetValue(100.0 - value)
    EndFunction
EndProperty
Then, when the player loads the game, the MCM property is set from the custom property so that the correct value can be displayed:
MCM_RaiderRareSetChance = RaiderRareSetChanceLikewise, when the Mod Configuration Menu is closed, the custom property is set from the MCM property so that the underlying global variable is properly set:
RaiderRareSetChance = MCM_RaiderRareSetChanceBecause Power Armor to the People is modular, there may be some configuration values that make sense if you have one of several mods present, but don't make sense otherwise. For example, T-51 doesn't have a rusty texture by default, and would look out of place in a mixed rusty set of power armor, but a mod like Consistent Power Armor Overhaul adds that rusty texture back in. However, user choice is paramount, so if a user just wants the T-51 included for Raiders regardless, they are able to do that in the configuration.
To facilitate this, the configuration manager will, by default, check to see if any of the mods that would affect default settings have been installed or removed when a player loads their game. If they have, it will automatically change the configuration for the user. This can be disabled in the Mod Configuration Menu, allowing the user to instead have manual control over these settings.
This mod makes extensive use of global variables, which are typically exposed in the Mod Configuration Menu, to alter the likelihood of certain power armor sets or enemies spawning. This is also used to allow for a fallback item to be used in the event that one of the optional patches adds a new type of set or enemy that does not normally exist in the base mod.
This works by creating a leveled list that will return all of its entries in order, but limiting the max count so that only one of the entries can actually be returned. Two entries are then added, with the first in the list pointing to another leveled list that uses a global variable to determine its chance of returning something (or that could be empty if the appropriate patches are not present).
Note that the Editor ID of leveled lists like this typically have the suffix _GATED in this mod to help flag to mod authors that these lists are used to choose between one type of list or another and should not be directly touched or injected into.
The following steps can be followed to make this trick work:
- Create a leveled list of the desired type (Item, NPC, etc)
- Set the
Use Allflag for the leveled list, and set theMax Countto the number of expected items (e.g. for a single piece of equipment or an NPC, this would be 1, for a full power armor set, this would be 6) - Decide on the two entries that will be chosen between, and decide which one should be the default
- If one of the two entries could be empty or have a chance to return nothing, it should not be the default - choose the other entry instead
- If your list returns multiple items (e.g. a power armor set) but one of the two entries will return fewer items (e.g. an incomplete set), the entry that returns an incomplete set should be the default
- If both entries will always return the same number of things, make the default whichever one would make the most sense to a user if you were to give them a percent chance of it showing up
- Add an entry for the default, setting the
Levelto 1 and keeping theChanceNoneat 0 - If the non-default entry is going to be user-configurable, or if there is a desire for patches to be able to inject other options into the non-default case, create a new leveled list for the non-default entry and set
Use Globalto the global variable that will be used to configure the chance that the default is chosen instead - Add an entry for the non-default, either directly or by adding the new leveled list that was just created, setting the
Levelto 0- Setting the Level to 0 ensures that this entry is always evaluated first because of the
Use Allflag -
ChanceNoneshould generally be set to 0, but if the chance is not user-configurable,ChanceNonecan be used instead to save on the need for another leveled list
- Setting the Level to 0 ensures that this entry is always evaluated first because of the
As an example, here is how this method is applied to allow a user to configure how likely rare types of helmets are in mixed power armor sets for Raiders:
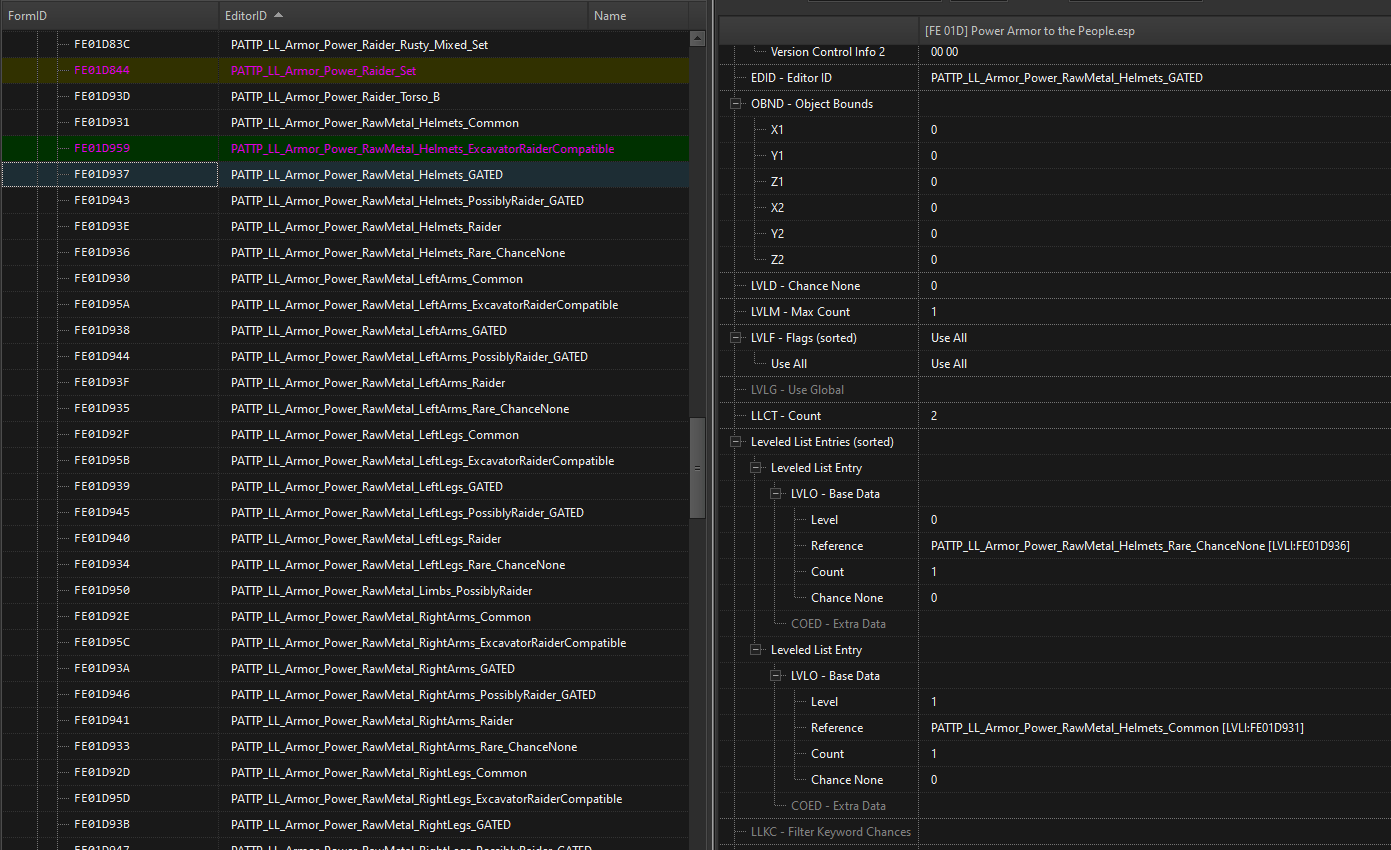
In this example, PATTP_LL_Armor_Power_RawMetal_Helmets_Common is the default entry, meaning that there is always a helmet that it can return even at level 1. PATTP_LL_Armor_Power_RawMetal_Helmets_Rare_ChanceNone is the non-default entry, meaning that it may or may not return something depending on user-configuration and player level.
Because there is a user-configurable chance, and because patches for other power armor sets can add rare helmets, the non-default entry in this case is its own leveled list:
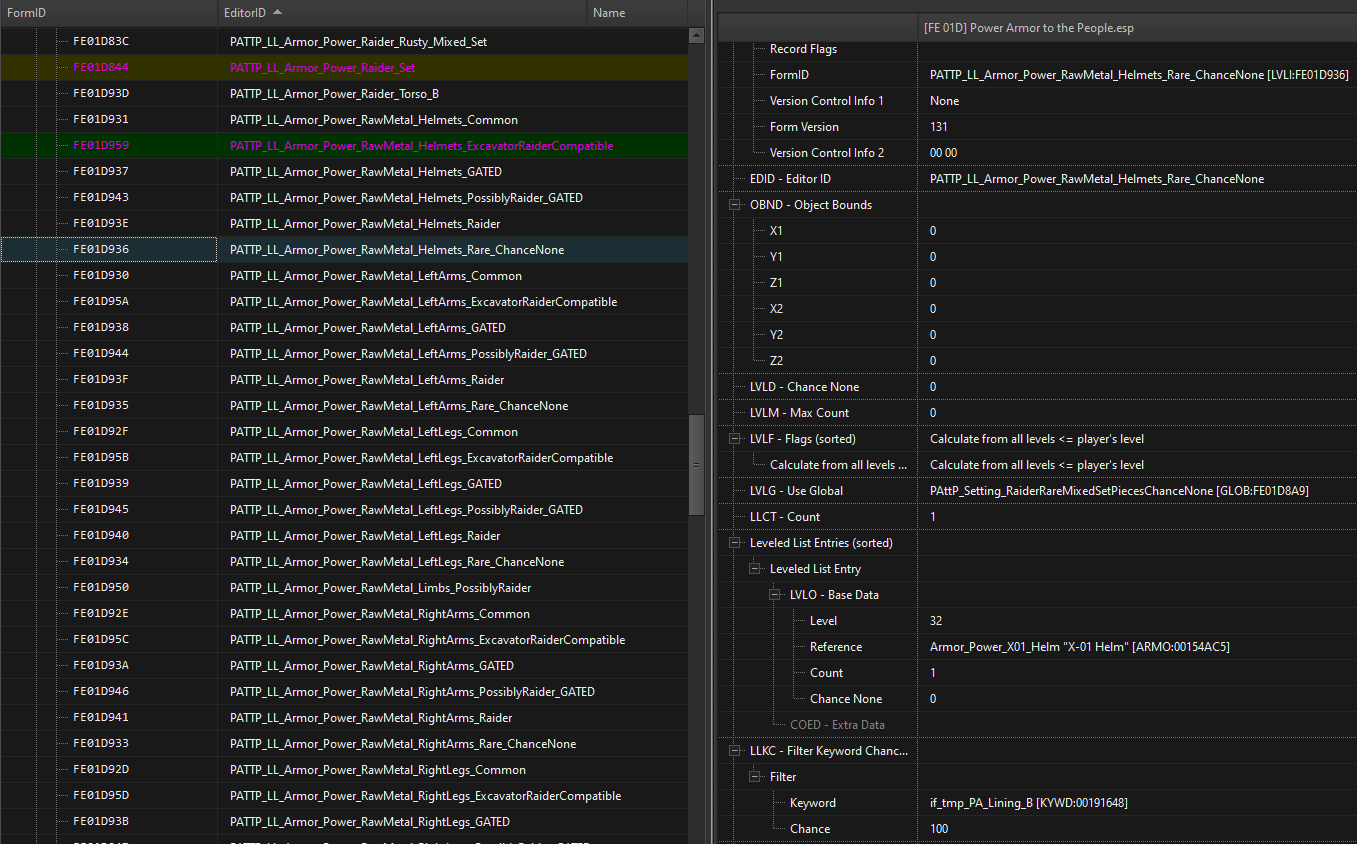
In this list, there are two reason why the non-default option could end up not returning a helmet:
- If the player is below level 32
- If
PAttP_Setting_RaiderRareMixedSetPiecesChanceNoneis set to anything besides 0
If either of these situations happens, the previous list will use the default option which, in this case, is a common helmet instead of a rare one.
Note that both of the situations above can change during the game. If a patch adds another power armor helmet at a lower level and/or the user increases the likelihood of getting a rare helmet, then the rare helmets could show up much more frequently. This demonstrates the power of this technique.
While this method does enable flexible configuration and modularity, it does have some limitations that need to be considered before applying it to a use case:
- The method really only works with two options
- Each non-default entry adds complexity because of how it changes the actual probability of the next entry, which is dependent on the order in the list and difficult to translate back to a user if the values are configurable, and the
Levelis the only reliable way to guarantee the order of the list but has gameplay implications once you go beyond using 0 or 1
- Each non-default entry adds complexity because of how it changes the actual probability of the next entry, which is dependent on the order in the list and difficult to translate back to a user if the values are configurable, and the
- Non-default options must always return the
Max Countor nothing at all- For example, if the non-default option returns a partial power armor set of 4 items, then 2 items will still be taken from the default and they could be for any armor slot
By using this method to create a gated leveled NPC and using that leveled NPC as a template for an NPC, the rate at which that NPC will become a power armored enemy can be manipulated. When using this method, the Actor that references the gated list for its templates should make sure that Inventory, Spell, and Base Data all reference the same list. If Inventory and Base Data do not use the same template, then the name of the enemy will not match whether they have power armor or not. Similarly, if the Spell template is not included, the power armored enemy won't be able to wear legendary power armor and may be missing additional perks.
There are cases where it may not be important to align these other templates. For example, if an NPC should have a unique set of perks, they don't need to use a Spell template at all and the appropriate perks can be added right to the NPC. However, in this circumstance, those perks will apply whether the NPC ends up with power armor or not. Similarly, if an NPC should have the same name regardless of whether they wear power armor, the Base Data template does not need to be added.