Section 1 ROS Setup - ika-rwth-aachen/acdc GitHub Wiki

Welcome to our first exercise for our ROS tasks that you will execute locally on your computer. We hope that you have already setup your OS and set up your coding environment. In our first exercise you will get more hands on practice with ROS, a popular software framework for robots and automated vehicles.
In this first exercise you will learn how to
- use the docker environment to build our ROS workspace
- source the build binaries and launch a sample ROS node
- stop running ROS nodes
- Contents
- Docker environment
- Start the Docker environment
- Build the Workspace
- Launch your first ROS package
- Wrap-up
- Troubleshooting
- Compilation fails with libGl.so error
Building complex code often needs many different libraries and frameworks that make our lives as software developer much easier, as we can reuse code that has already been developed by someone else. However, managing and installing code dependencies is often cumbersome and time consuming. Docker is a convenient way to place our ROS workspace into an virtual environment where all code dependencies have already been installed and configured, so that you can directly start using ROS on your machine.
If you have not downloaded our docker image yet, you should now pull (download) the image with the following command
docker pull rwthika/acdc:ros1We can start our docker environment by running the provided run.sh script which is placed in the docker directory. This script takes care of all necessary configurations to start an instance of the docker image which is called docker container. Furthermore, it mounts our whole acdc directory into the environment to the internal path /home/rosuser/ws. Mounting a directory means, that all local changes of the files are mirrored into the environment and vice versa!
Now let's open two terminals on you Linux system and navigate to the docker directory inside of the cloned acdc repository. Then start the container by running the script
${REPOSITORY}/docker$ ./ros1_run.shin the first terminal. This will start an instance of the docker environment. Then repeat the ./ros1_run.sh command in a second terminal to connect to a terminal inside the running container. You should now have a setup as in the following image.

The left terminal was used to start the container and the right terminal starts the bash terminal inside the container and can be used to execute commands. If you want you can create more terminals by opening up a another terminal and running ./ros1_run.sh again. This might become handy later if you want to open up other ROS tools like RVIZ while running a node in a different terminal.
On start up, your current directory will be catkin_workspace, hence you can directly type catkin build into the terminal to build the whole workspace
rosuser: ~/ws/catkin_workspace$ catkin buildEverything should compile successfully except some warnings. This may take a while depending on your PC. catkin build will build all packages in the src folder.
A successful build process creates the following directories inside your catkin workspace:

-
srcis unchanged and contains the source code of your packages -
develcontains the finished libraries and executable tools, as well as the importantsetup.bashscript. -
buildcontains temporary building files -
logscontains log files of the building process
ℹ️ If you cannot explain why your build process fails, it is sometimes worthwhile to clean the build artifacts before trying once again. To do so, you may use catkin clean. This command will remove all build artifacts and you can start building the workspace from scratch again.
Each terminal in which you want to use your newly built packages needs to "source" the generated setup.bash script:
rosuser: ~/ws/catkin_workspace$ source devel/setup.bashIf everything worked well, your workspace should be successfully compiled and sourced, which means you can start with executing your first ROS package. If you want to know more about what "sourcing a file" means, you may read this article.
To test if the packages were built correctly, we start a flatland simulation and a vehicle controller that we will use later in our Coding Challenge. We have prepared two launch files that help you with this task.
You may execute the first launch file using this command in the first terminal:
roslaunch racing flatland_simulation.launchNow, use a second terminal tab in the docker container and make sure that the catkin workspace is also sourced in this second terminal with source devel/setup.bash.
Then, start the vehicle controller in the second terminal:
roslaunch racing racing_controller.launchIf you see a racing cart driving through a circuit, you have installed all software and built our source code with success.
Note that you can stop the execution of a program in a terminal with the command Ctrl+C. If you execute Ctrl+C in the initial terminal where you started the container, then the whole container will shut down and all other terminals or running processes will terminate.
Congratulations, you may now proceed with the next exercise!
- You learned that we use docker as an environment where we build and execute our ROS workspace
- You learned that we can use several terminals inside the docker environment to execute several programs simultaneously
- You learned that you can use
catkin buildto build a ROS workspace - You learned that after building it is necessary to source the workspace in each terminal
- You learned that you can terminate any program in the terminal by pressing Ctrl+C
If the three yellow LiDAR-points are hardly visible (unlike in the gif), try to turn off hardware acceleration for the visualization.
echo "export LIBGL_ALWAYS_SOFTWARE=1" >> ~/.bashrcIf you receive an error similar to the terminal output below. This is may due to a misplaced file in a NVIDIA display driver. If you are running an NVIDIA graphics card this requires you to link the misplaced file manually.
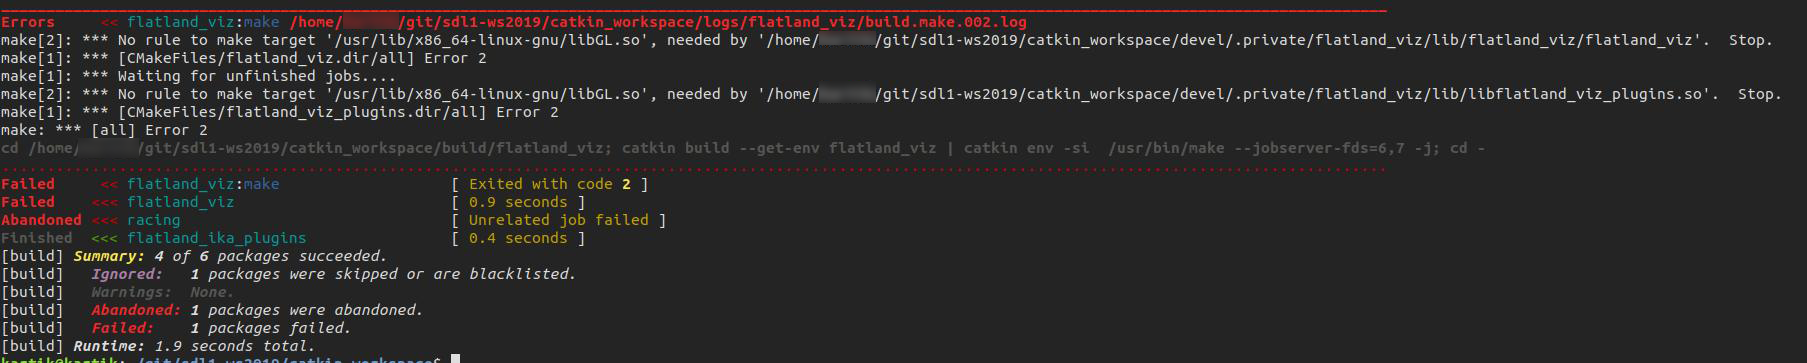
Creating the needed softlink is possible by executing the following two commands. The first will delete any existing link and the second will create a new one.
sudo rm /usr/lib/x86_64-linux-gnu/libGL.so
sudo ln -s /usr/lib/libGL.so.1 /usr/lib/x86_64-linux-gnu/libGL.so