install DSP - fcorthay/RPi-multiroom-audio GitHub Wiki
A Digital Signal Processor (DSP) allows to shape the audio sent to the loudspeakers. This includes, amongst others, to:
- adapt the frequency response of the the loudspeaker boxes
- split the audio signal into a lower frequency range for the bass driver and a higher frequency range for the tweeter
Different reasons argue for applying digital signal processing right before the amplifier soundcard.
In order to test the audio of a loudspeaker (together with its amplifier), one can inject an audio signal to it and record its output with the help of a microphone. Possible test signals are:
- a signal containing all audio frequencies such as
- a white noise
- a cardinal sine or sinc function
- a signal sweeping trough a given set of frequencies
sudo apt install -y python3-scipy
sudo apt install -y python3-matplotlib
With that, the following script builds a wav file containing the notes within a selection of octaves.
source ~/Documents/RPi-multiroom-audio/configuration.bash
$AUDIO_BASE_DIR/LoudspeakerTest/buildNoteSet.py -s 1 -e 8 -d 0.5 -i 0.1 -w -v
If mopidy is playing to the loopback device, the generated audio file can be played over it:
$AUDIO_BASE_DIR/Mopidy/control.bash pause
aplay -D dmix:Loopback,0,0 ~/Documents/RPi-multiroom-audio/LoudspeakerTest/octave-1-8.wav
$AUDIO_BASE_DIR/Mopidy/control.bash play
Before playing the generated audio file, one can start a recording:
arecord -l

microphone='Quadcast'
arecord -D plughw:$microphone --format S16_LE --duration 80 record.wav
In the repository, the scripts:
-
LoudspeakerTest/analyseOctave.bashcreates a sound file with the 12+1 (or 7+1) notes of an octave, plays it on the sound card and records the loudspeaker's output -
LoudspeakerTest/analyseAll.bashdoes this for octaves 1 to 8
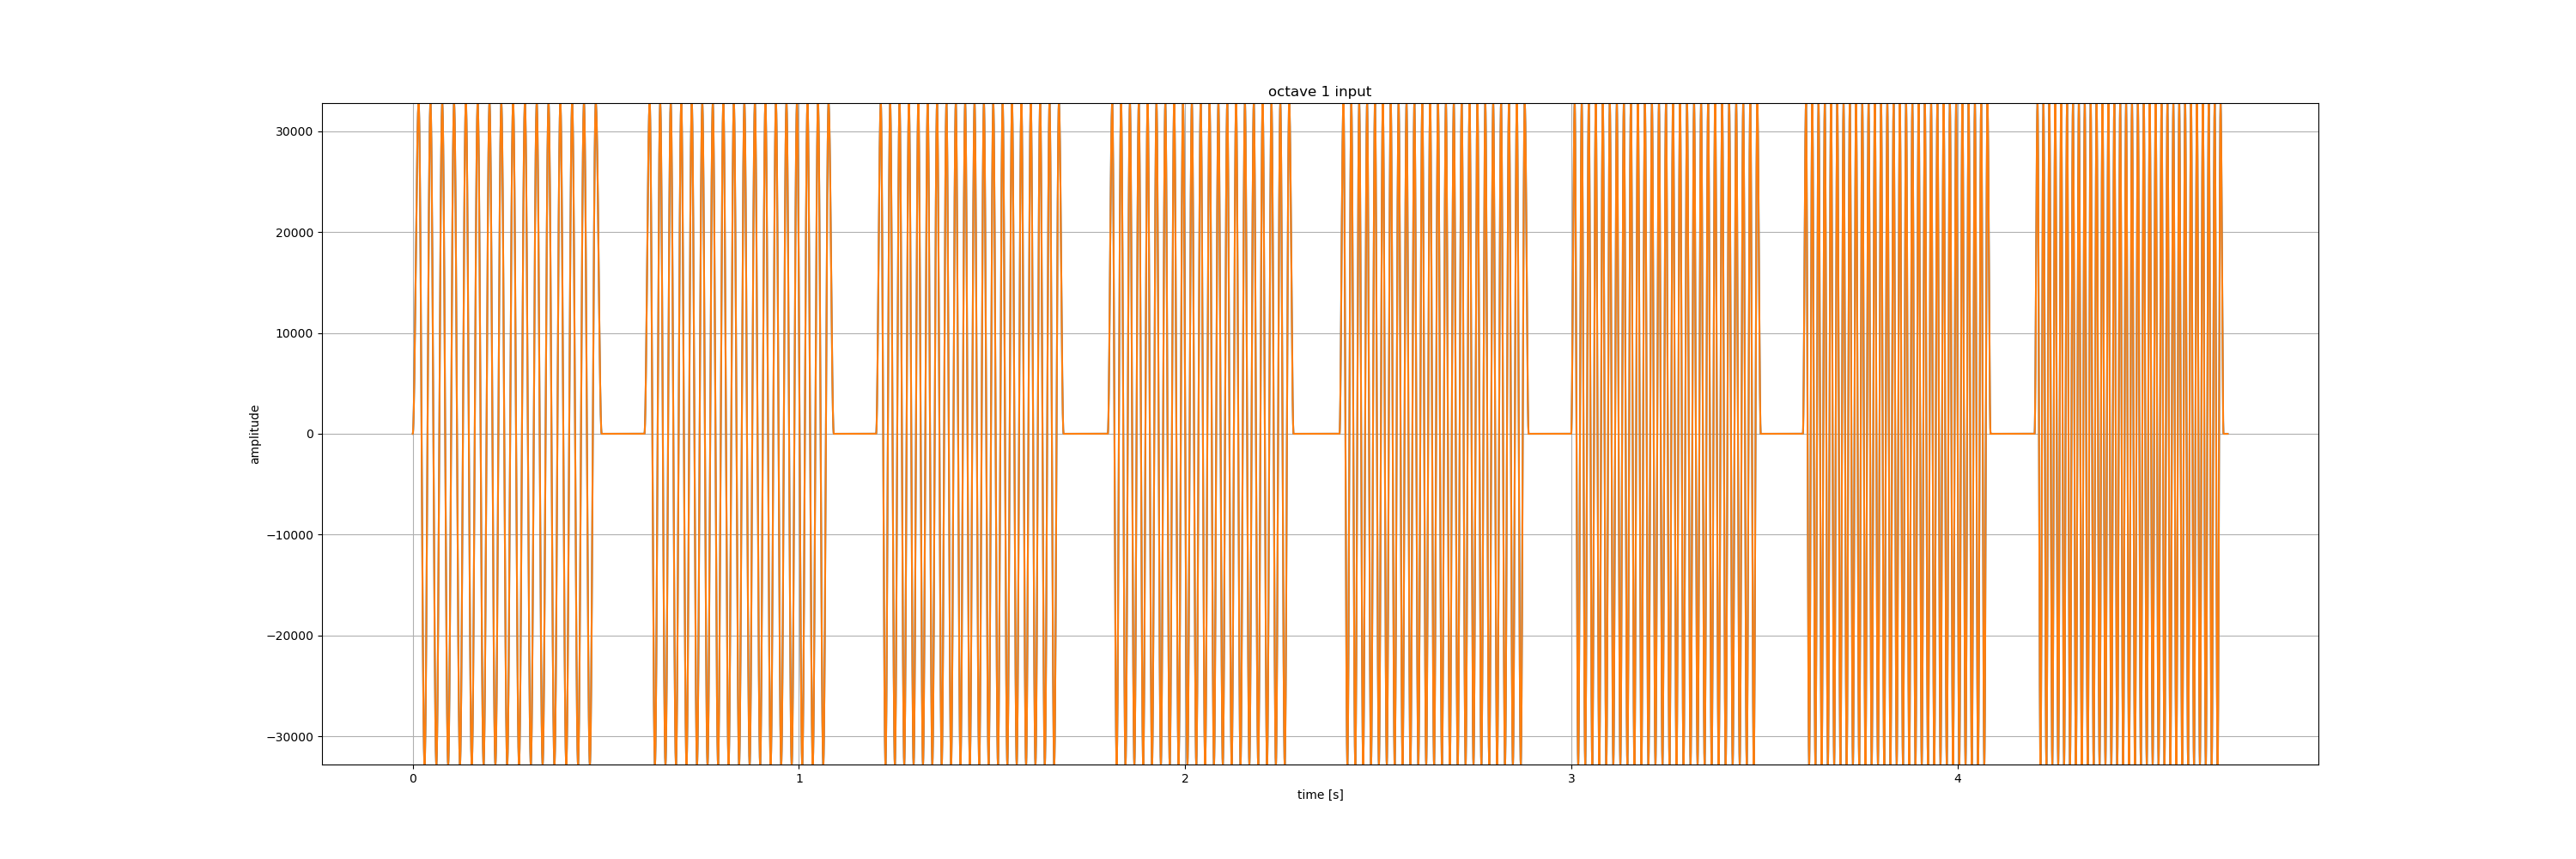
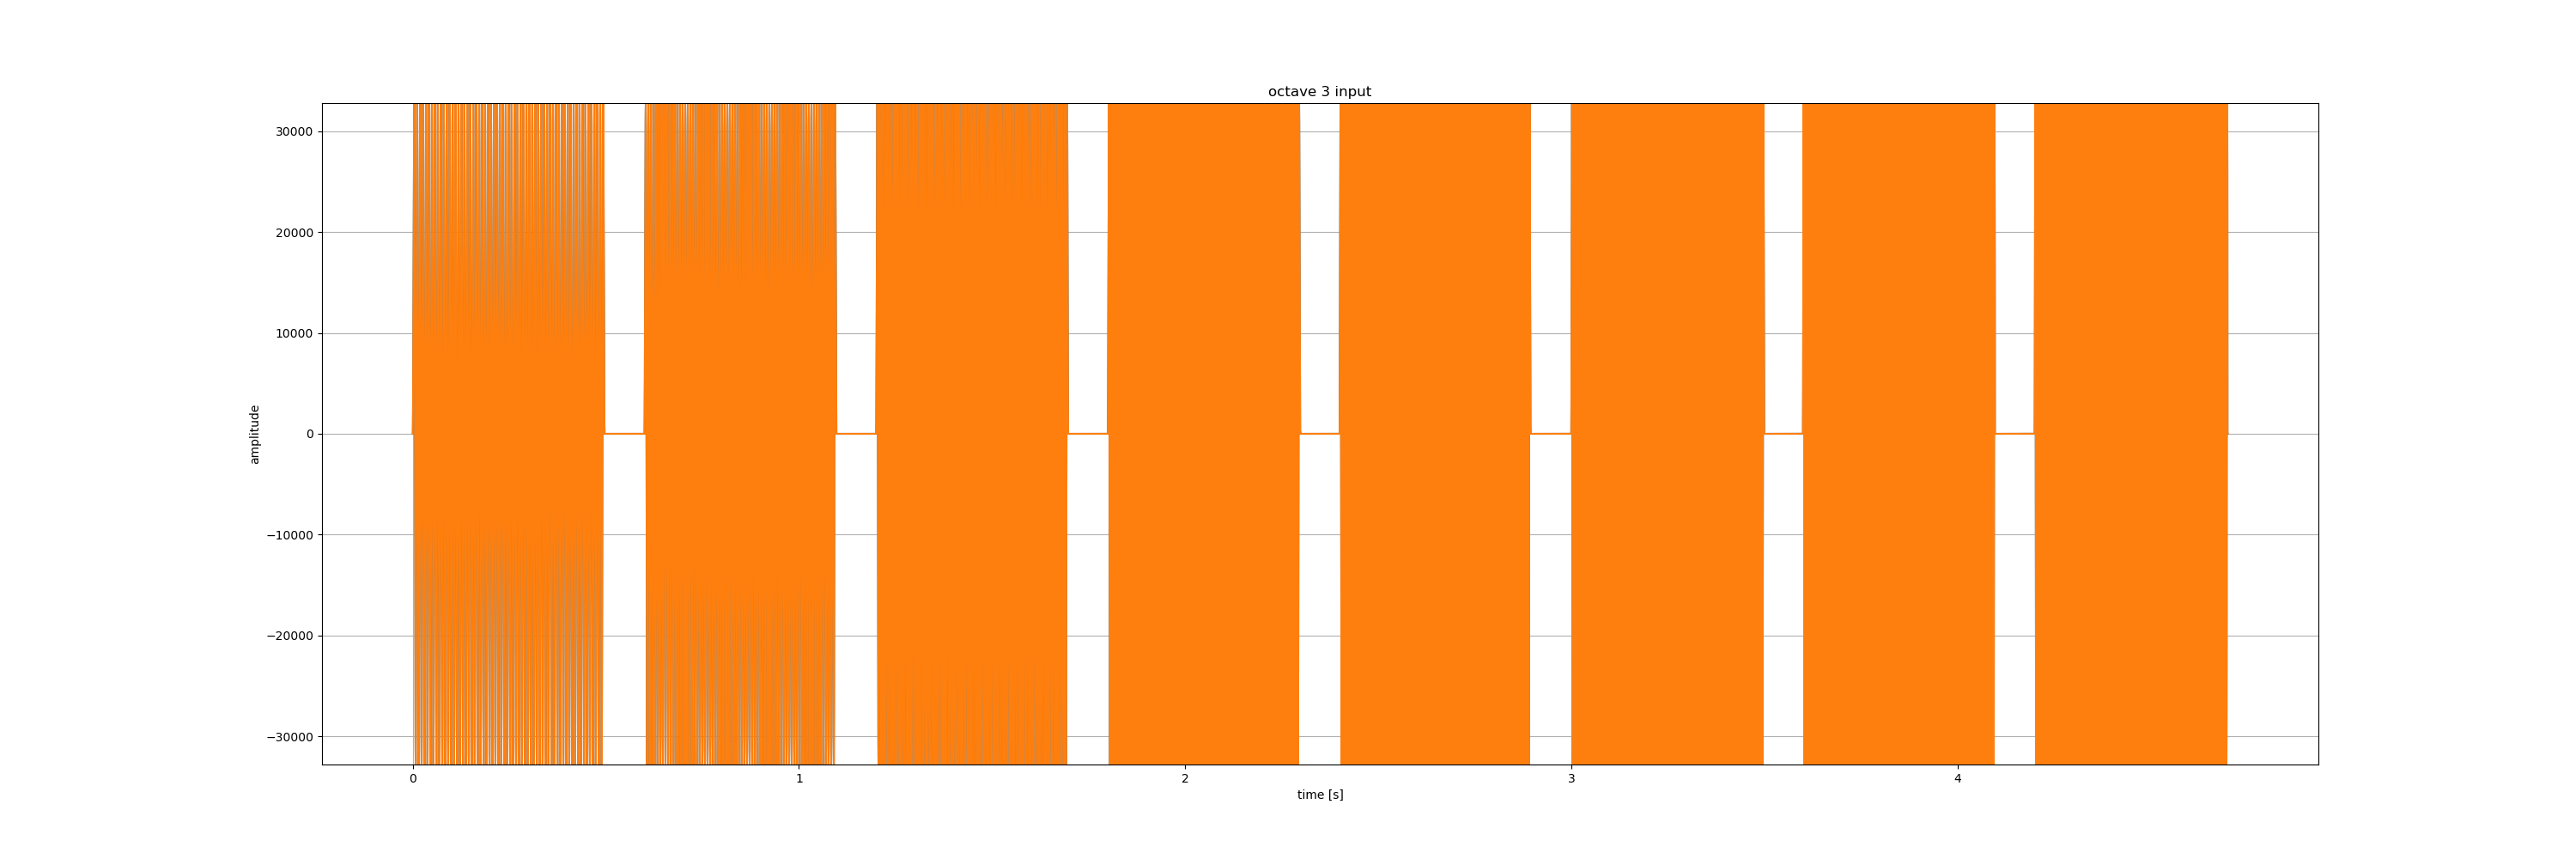
The following picture shows the sound file for octave 3:
And the next picture shows the recorded wave:
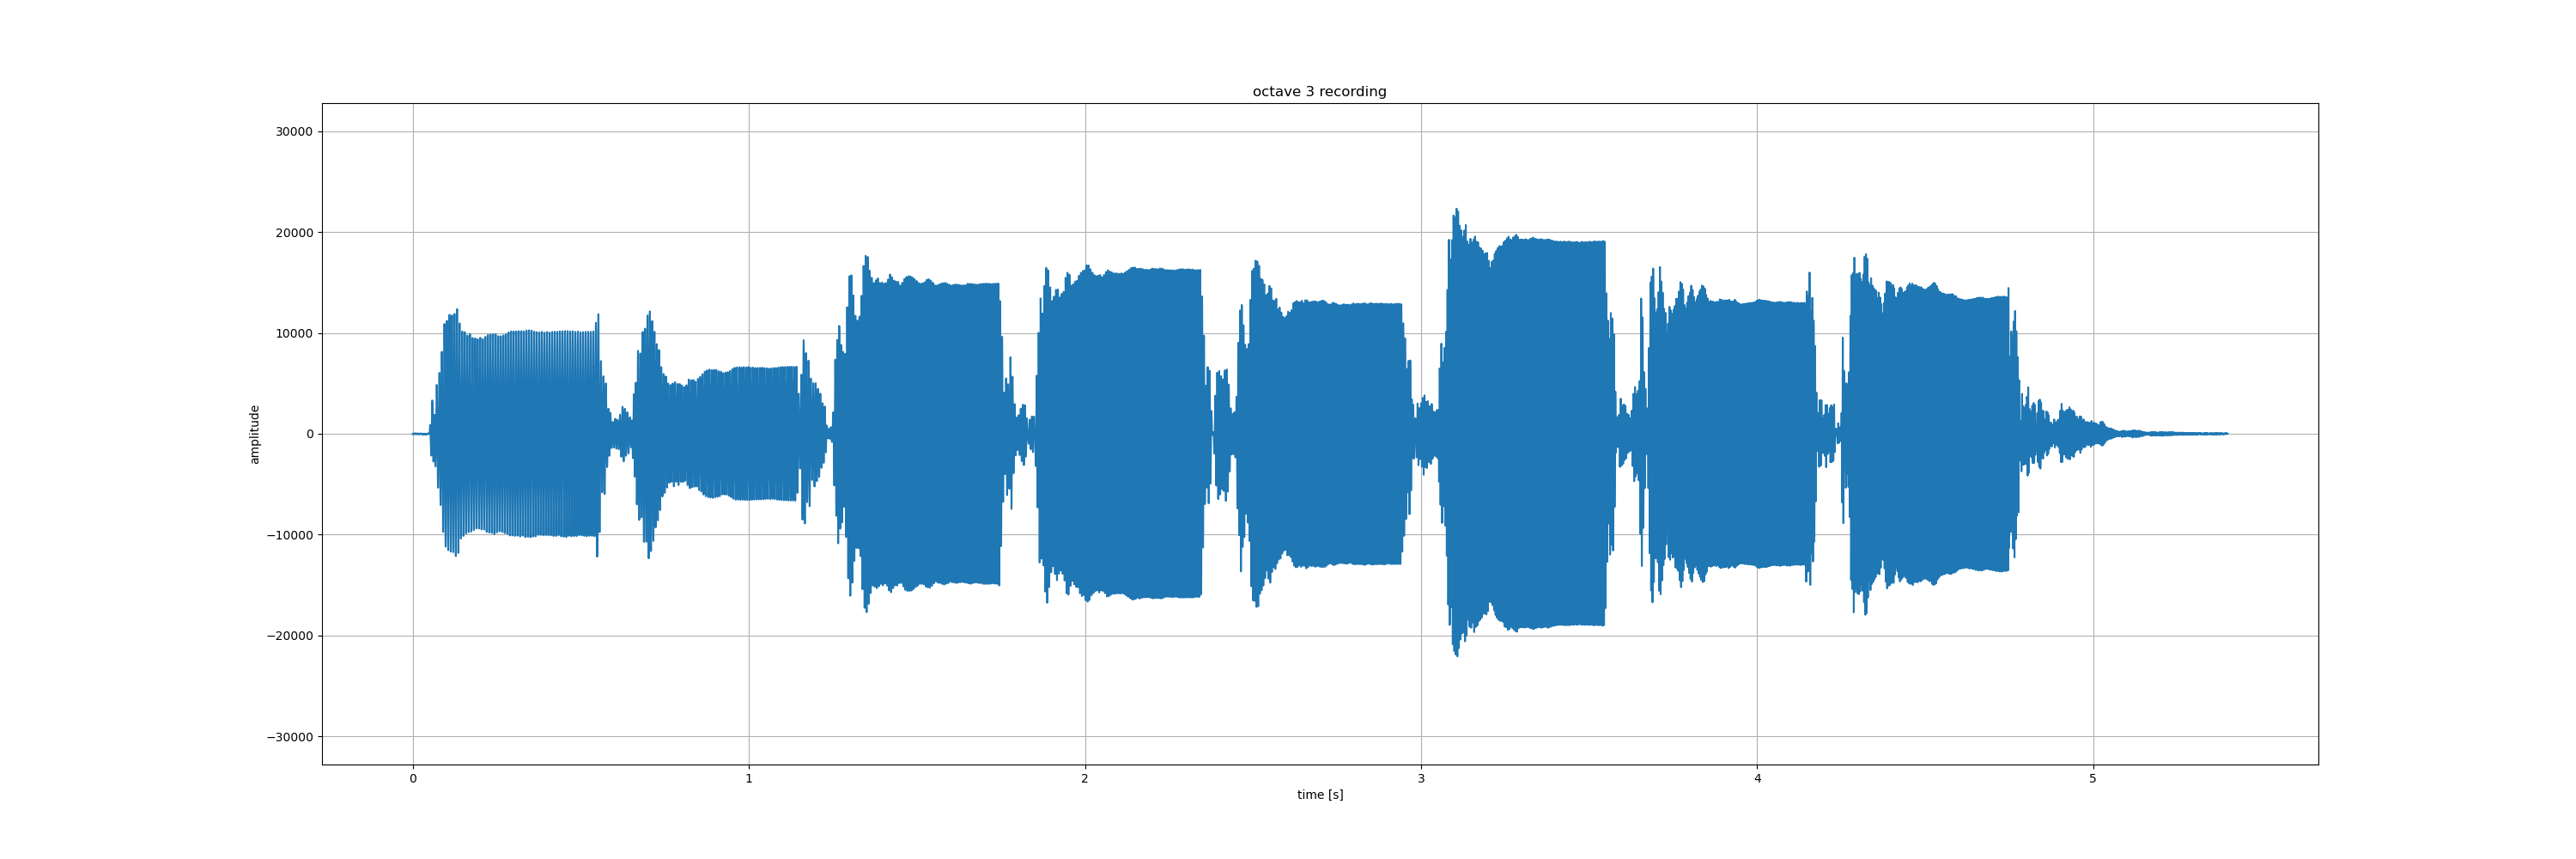
Obviously, there is a transient and then a steady-state response for each note change. Yet, the most impressive fact is to what extent the amplitudes of the different notes (here in linear scale) can differ one from another.
This is where the signal processing comes in to equalize the audio response of loudspeakers in the room where they sit.
A 2-way loudspeaker is a cabinet enclosing 2 drivers:
- the bass driver reproduces the lower frequency sounds
- the treble driver (tweeter) reproduces the higher frequencies
In a passive system, the audio signal from the amplifier is split into its low and high frequency parts with the help of an audio crossover to separately feed the bass and the treble drivers. The audio crossover is typically a passive circuit built out of resistors, capacitors and inductors. This type of circuit inserts a phase distortion and has to be adapted to the impedances of the amplifier and of the loudspeaker drivers.
An active system has filters which separate low and high frequency parts of the audio at signal level. Both filter outputs are separately amplified and fed to the loudspeaker drivers. Here the filters can be analog or digital, yet only digital filters allow to keep a linear phase in the signal path. An active 2-way loudspeaker system requires 2 amplifiers and a stereo system 4 (2 stereo) amplifiers.
The peaks in the following pictures follow the transfer functions of a passive crossover for an example loudspeaker:
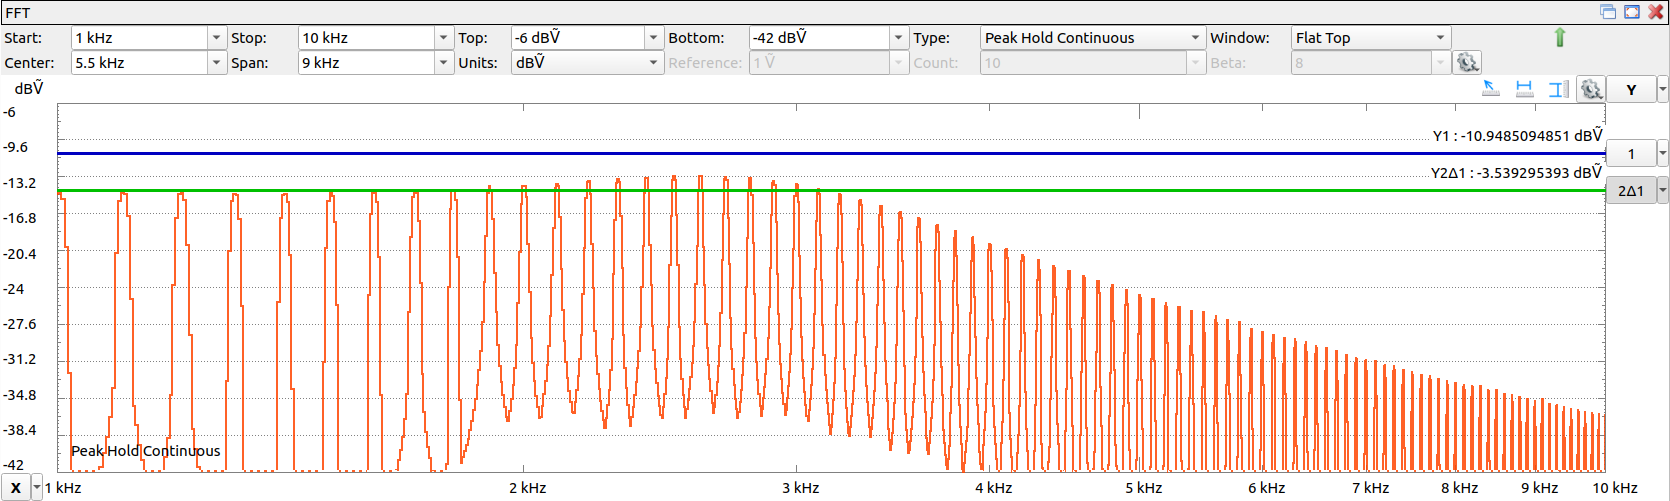
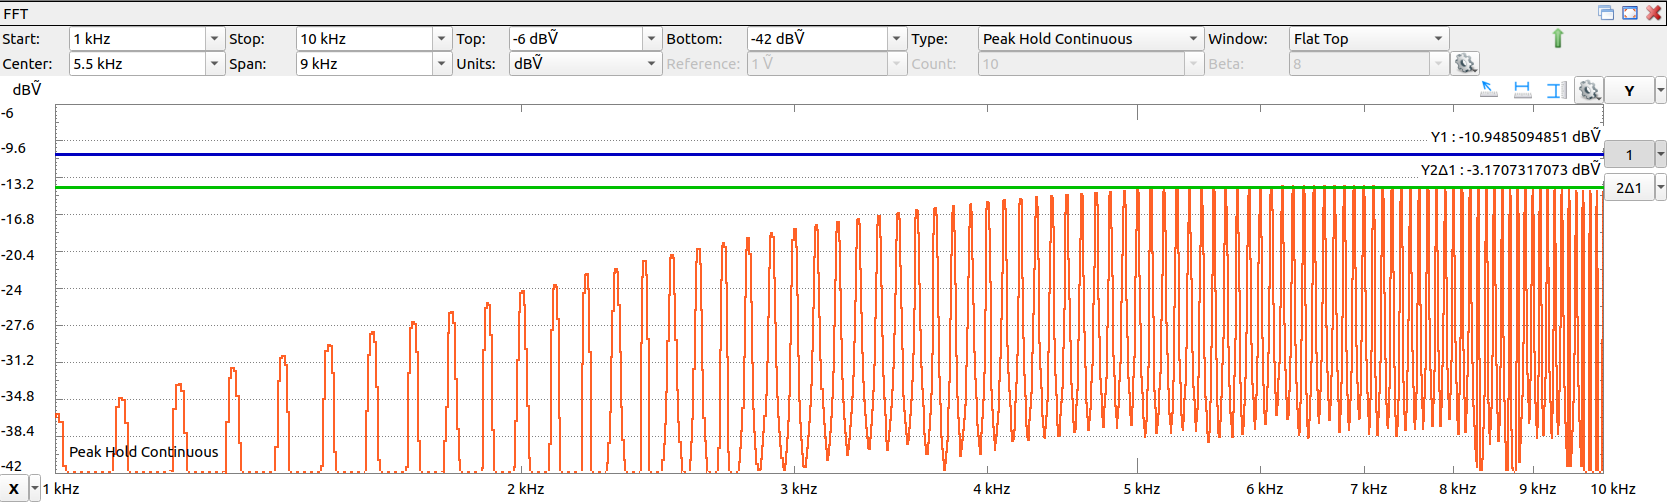
The lowpass transfer function has a cutoff frequency of about 3 kHz. The highpass transfer function has a cutoff frequency of about 4 kHz. Between these two frequencies, both the bass and the treble drivers participate to generate the sound.
For 2-ways loudspeakers, a fully digital audio path can be achieved using 2 RPi's, each with a digital stereo amplifier hat or board. For example, the RPi's could receive the same audio stream from a single audio streamer with their multiroom audio receiver. One of them would select the left audio track and split it into the low and high frequency parts with the help of DSP, and the other one would do the same on the right track. The audio system would use one enclosure per loudspeaker, each with an Ethernet input and a 4 wire loudspeaker output. A 2-ways crossover design example is provided in the wiki.
With the signal processing at the end of the chain, the audio path will be the following:
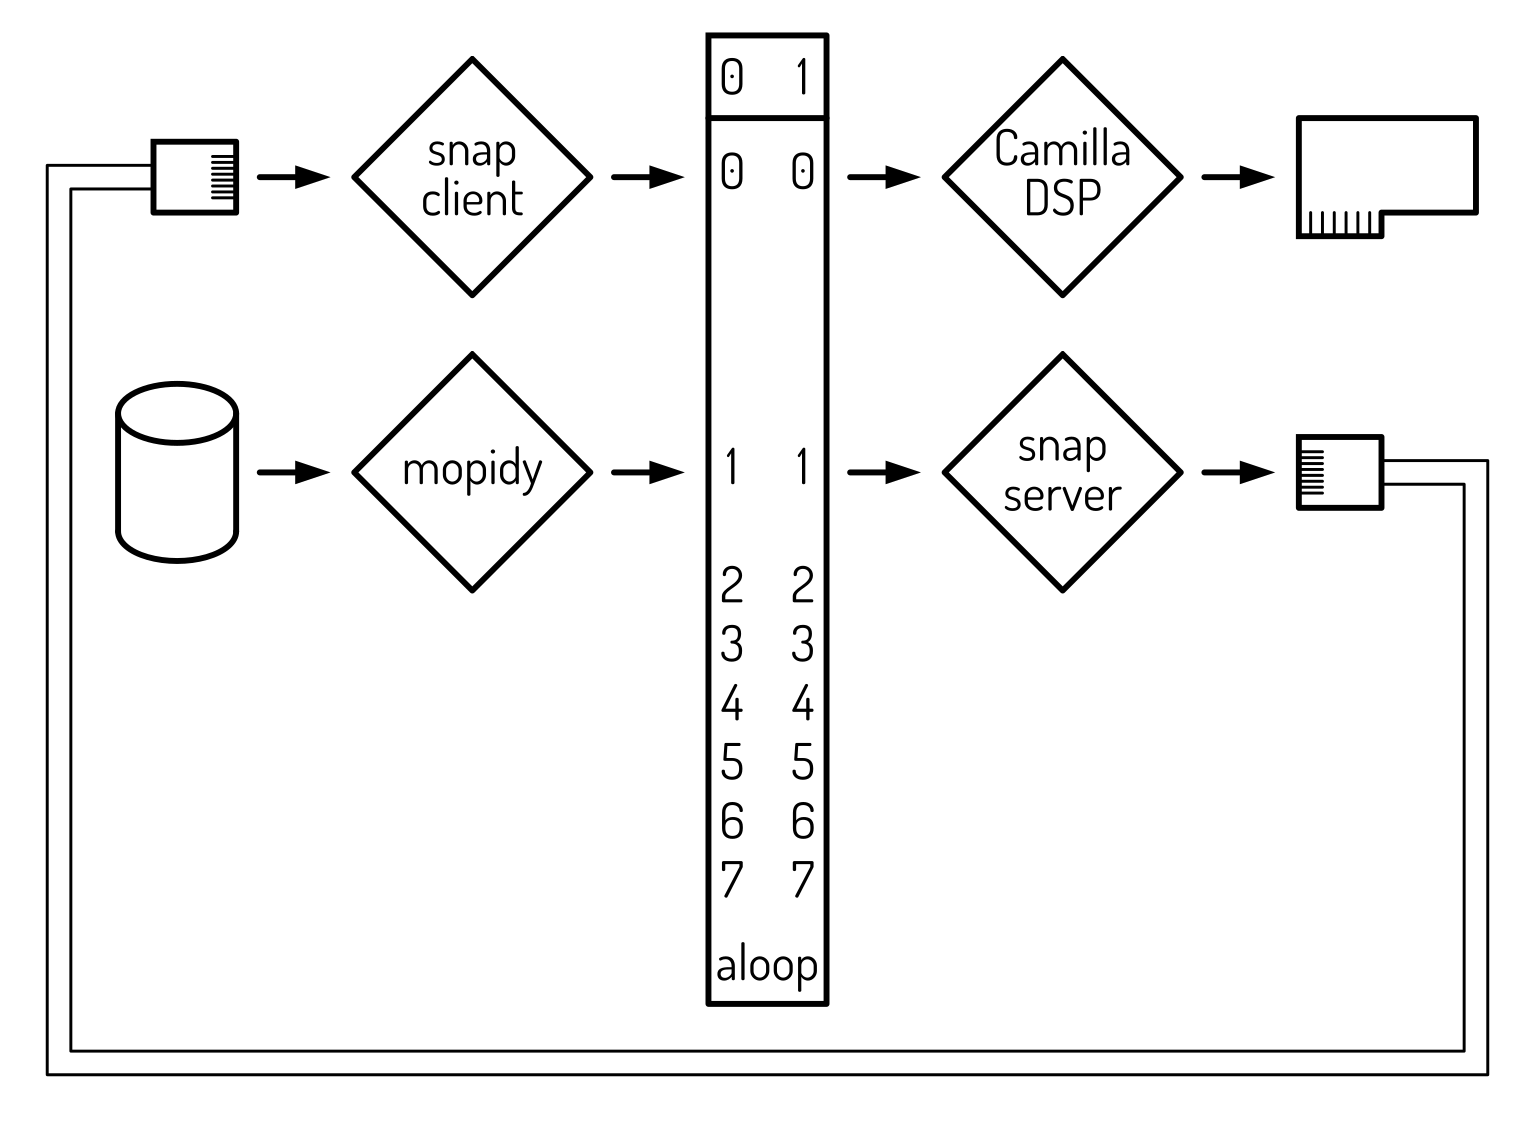
Mopidy reads music from the disk and sends it to the loopback device. Snapserver reads music from the loopback device and sends it to the Ethernet port. Snapclient reads music from the the Ethernet port and sends it to another subdevice of the loopback device. CamillaDSP reads music from the loopback device, processes it and sends it to the soundcard.
Here again, snapclient can receive music from another server. CamillaDSP is the last link in the chain and provides signal processing specific to the local amplifier/loudspeaker(s) matching. A possible configuration would be to have 2 RPi receivers, one for the left and one for the right channel, each splitting the audio for the bass and the treble of 2 loudspeakers.
In a first step, we will replace the DSP by a simple forwarding by alsaloop.
This is done in 2 steps:
1. Reroute the audio stream which was going to the soundcard and bring it to the loopback device. In the case of snapclient:
source ~/Documents/RPi-multiroom-audio/configuration.bash
sudo sed -i "s/$AMPLIFIER_SOUNDCARD/Loopback/" /etc/default/snapclient
sudo service snapclient restart
- At this point, you should have no more sound.
loopback audio to the soundcard:
alsaloop -C hw:$ALSA_LOOPBACK_PLAYBACK_DEVICE,$CAMILLADSP_LOOPBACK_SUBDEVICE -P hw:$AMPLIFIER_SOUNDCARD &
The CamillaDSP web page explains how to install the software. Here a specific guide for installing it on a RPi.
The CamillaDSP configuration directories are specified in ~/Documents/RPi-multiroom-audio/configuration.bash.
Look for the current version of the binary and adapt :
uname -m

VERSION='v3.0.1'
BINARY='camilladsp-linux-aarch64.tar.gz'
mkdir -p ~/Downloads
rm ~/Downloads/camilla*
wget https://github.com/HEnquist/camilladsp/releases/download/$VERSION/$BINARY -P ~/Downloads/
sudo tar -xvf ~/Downloads/$BINARY -C /opt/
/opt/camilladsp --help
The digital signal processing is executed on the base of a configuration file.
Sample configuration files are found in the config page of CamillaDSP. Download the configuration files to the CamillaDSP directory :
source ~/Documents/RPi-multiroom-audio/configuration.bash
mkdir -p ~/Downloads
mkdir -p $CAMILLA_CONFIGURATION_DIR
CONFIGURATION='camilladsp-config.zip'
wget -O ~/Downloads/$CONFIGURATION https://github.com/HEnquist/camilladsp-config/archive/refs/heads/master.zip
unzip ~/Downloads/$CONFIGURATION -d $CAMILLA_DIR
mv $CAMILLA_DIR/camilladsp-config-master/* $CAMILLA_CONFIGURATION_DIR
rmdir $CAMILLA_DIR/camilladsp-config-master
Have a look at how to build a config file step by step.
Edit a stereo to mono configuration file.
source ~/Documents/RPi-multiroom-audio/configuration.bash
CAMILLA_CONFIGURATION_FILE="$CAMILLA_CONFIGURATIONS_DIR/stereo2mono.yaml"
Define the devices:
cat << EOF > $CAMILLA_CONFIGURATION_FILE
---
devices:
  samplerate: 48000
  enable_rate_adjust: true
  resampler:
    type: AsyncPoly
    interpolation: Cubic
  capture_samplerate: $AUDIO_RATE
  chunksize: 2048
  silence_threshold: -60
  silence_timeout: 3.0
  capture:
    type: Alsa
    channels: 2
    device: "hw:Loopback,1,$CAMILLADSP_LOOPBACK_SUBDEVICE"
    format: S32LE
  playback:
    type: Alsa
    channels: 2
    device: "dmix:$AMPLIFIER_SOUNDCARD"
    format: S32LE

EOF
Define the signal processing elements:
cat << EOF >> $CAMILLA_CONFIGURATION_FILE
mixers:
  stereoToMono:
    channels:
      in: 2
      out: 2
    mapping:
      - dest: 0
        sources:
          - channel: 0
            gain: -6
            inverted: false
          - channel: 1
            gain: -6
            inverted: false
      - dest: 1
        sources:
          - channel: 0
            gain: -40
            inverted: false
          - channel: 1
            gain: -40
            inverted: false

EOF
Define the signal processing path:
cat << EOF >> $CAMILLA_CONFIGURATION_FILE
pipeline:
  - type: Mixer
    name: stereoToMono
EOF
Check the validity of the configuration file:
/opt/camilladsp -c $CAMILLA_CONFIGURATION_FILE
Check which service is driving the soundcard:
$AUDIO_BASE_DIR/Management/showInstallation.bash
Free the path for CamillaDSP and test it:
pkill alsaloop
/opt/camilladsp $CAMILLA_CONFIGURATION_FILE
With this, one should hear the mono sound on the right-side loudspeaker and only with a faint volume on the left.
For the time being, I have only been able to run CamillaDSP at 48 kHz, hence the resampler.
Make a copy of stereo2mono.yaml and edit it to create a passthrough:
cp $CAMILLA_CONFIGURATIONS_DIR/stereo2mono.yaml $CAMILLA_CONFIGURATIONS_DIR/passthrough.yaml
sed -i 's/stereoToMono/passthrough/g' $CAMILLA_CONFIGURATIONS_DIR/passthrough.yaml
nano $CAMILLA_CONFIGURATIONS_DIR/passthrough.yaml
Change
dest: 0 to have only channel: 0 with a gain of 0
and dest: 1 to have only channel: 1 with a gain of 0.
In order to set up CamillaDSP as a service one can base on the provided service configuration file.
The directory $CAMILLA_CONFIGURATION_DIR contains a link, camillaconfig.yaml,
which points to one of the configuration files in the subdirectory $CAMILLA_CONFIGURATIONS_DIR
where we already have the newly created stereo2mono.yaml and passthrough.yaml.
Link the configuration to the passthrough:
ln -fs $CAMILLA_CONFIGURATIONS_DIR/passthrough.yaml $CAMILLA_CONFIGURATION_DIR/camillaconfig.yaml
The provided service file has to be adapted to the present configuration:
# backup
cp $CAMILLA_CONFIGURATION_DIR/camilladsp.service $CAMILLA_CONFIGURATION_DIR/camilladsp.service.original
# ExecStart
EXEC="ExecStart=/opt/camilladsp -p $CAMILLA_CONTROL_PORT -s $CAMILLA_GUI_STATE_FILE $CAMILLA_CONFIGURATION_FILE"
EXEC=${EXEC////\\/}
sed -i "s/ExecStart=.*/$EXEC/" $CAMILLA_CONFIGURATION_DIR/camilladsp.service
# User
sed -i "s/User=.*/User=$(whoami)/" $CAMILLA_CONFIGURATION_DIR/camilladsp.service
# Group
sed -i "s/Group=.*/Group=users/" $CAMILLA_CONFIGURATION_DIR/camilladsp.service
# WantedBy
sed -i "s/WantedBy=graphical.target/WantedBy=multi-user.target/" $CAMILLA_CONFIGURATION_DIR/camilladsp.service
# copy to system
cat $CAMILLA_CONFIGURATION_DIR/camilladsp.service
sudo cp $CAMILLA_CONFIGURATION_DIR/camilladsp.service /lib/systemd/system
Test the service:
sudo systemctl daemon-reload
sudo service camilladsp start
sudo service camilladsp status | cat
Once it works, enable the service:
sudo systemctl enable camilladsp
Show the audio path:
$AUDIO_BASE_DIR/Management/showInstallation.bash
A Web-based backend allows to graphically edit CamillaDSP's configuration.
The CamillaDSP configuration directories are specified in ~/Documents/RPi-multiroom-audio/configuration.bash.
Look for the current version of the binary and adapt :
source ~/Documents/RPi-multiroom-audio/configuration.bash
VERSION='v3.0.3'
BINARY='camillagui.zip'
mkdir -p ~/Downloads
mkdir -p $CAMILLA_BACKEND_DIR
wget https://github.com/HEnquist/camillagui-backend/releases/download/$VERSION/$BINARY -P ~/Downloads/
unzip ~/Downloads/$BINARY -d $CAMILLA_BACKEND_DIR
Install the python libraries as fond in the requirements.txt :
sudo apt install -y python3-aiohttp
sudo apt install -y python3-jsonschema
sudo pip install --break-system-packages git+https://github.com/HEnquist/[email protected]
sudo pip install --break-system-packages camilladsp-plot[plot]@git+https://github.com/HEnquist/[email protected]
Make a backup of the backend configuration file and adapt the originial:
source ~/Documents/RPi-multiroom-audio/configuration.bash
mkdir -p $CAMILLA_COEFFICIENTS_DIR
mkdir -p $CAMILLA_CONFIGURATIONS_DIR
CAMILLA_GUI_CONFIGURATION_FILE="$CAMILLA_BACKEND_DIR/config/camillagui.yml"
cp $CAMILLA_GUI_CONFIGURATION_FILE $CAMILLA_GUI_CONFIGURATION_FILE.original
# camilla host
sed -i "s/camilla_host:\s.*/camilla_host: \"localhost\"/" $CAMILLA_GUI_CONFIGURATION_FILE
# port
sed -i "s/camilla_port:\s.*/camilla_port: $CAMILLA_CONTROL_PORT/" $CAMILLA_GUI_CONFIGURATION_FILE
# bind address
sed -i "s/bind_address:\s.*/bind_address: \"0.0.0.0\"/" $CAMILLA_GUI_CONFIGURATION_FILE
# port
sed -i "s/^port:\s.*/port: $CAMILLA_GUI_PORT/" $CAMILLA_GUI_CONFIGURATION_FILE
# generic path
CAMILLA_BACKEND_DIR_ESCAPED=${CAMILLA_BACKEND_DIR////\\/}
sed -i "s/~\/camilladsp/$CAMILLA_BACKEND_DIR_ESCAPED/" $CAMILLA_GUI_CONFIGURATION_FILE
# config_dir
CAMILLA_CONFIGURATIONS_DIR_ESCAPED=${CAMILLA_CONFIGURATIONS_DIR////\\/}
sed -i "s/config_dir:\s.*/config_dir: \"$CAMILLA_CONFIGURATIONS_DIR_ESCAPED\"/" $CAMILLA_GUI_CONFIGURATION_FILE
# coeff_dir
CAMILLA_COEFFICIENTS_DIR_ESCAPED=${CAMILLA_COEFFICIENTS_DIR////\\/}
sed -i "s/coeff_dir:\s.*/coeff_dir: \"$CAMILLA_COEFFICIENTS_DIR_ESCAPED\"/" $CAMILLA_GUI_CONFIGURATION_FILE
# default_config
CAMILLA_CONFIGURATION_DIR_ESCAPED=${CAMILLA_CONFIGURATION_DIR////\\/}
sed -i "s/default_config:\s.*/default_config: \"$CAMILLA_CONFIGURATION_DIR_ESCAPED\/camillaconfig.yaml\"/" $CAMILLA_GUI_CONFIGURATION_FILE
# result
cat $CAMILLA_GUI_CONFIGURATION_FILE
Start the graphical user interface:
python3 $CAMILLA_BACKEND_DIR/main.py
Open a browser and navigate to http://audioamp.local:5006 (adapt the hostname).
With this, the configurations can be graphically edited.