First Steps - enimaroah-cubic/Sb3UGS GitHub Wiki
The simplest possible 3d modification would be to open an original AssetBundle file, edit, delete or replace a mesh and save the file. But after such a test, the next step would be to make an independent mod in order to keep original files unmodified. This requires two things, a new AssetBundle file with the contents and a list entry to integrate the mod into the game. In this example we make a new neck accessory in a hard modded way, not for sideloader. But the difference is in the list entry only and the packaging. So a hard mod can be converted very easily.
A new AssetBundle file
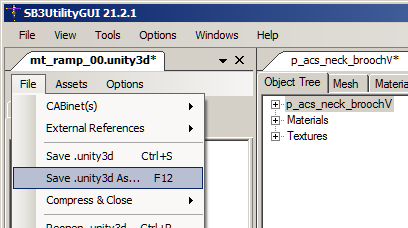
Sb3UGS has no create AssetBundle file function. Instead we open a file of the target game with minimal content, delete that content and put into the file what we need. And finally we use Save As... and give the file a new name and location.
We drag and drop that file into Sb3UGS, preferably into the File or Preview area. mt_ramp_00.unity3d is a good file to start with because it contains only a few textures.

The first texture is selected with a single left click, then the last texture is selected with a Shift-left click. All textures are deleted with Shift-Del or Remove in the file's Asset menu. One asset will always remain in the AssetBundle file and it can't be deleted: the AssetBundle asset in the MonoB & Other tab.
Orignal files can be browsed for something similar we want to create. One very important aspect is if we want to make a skinned or an unskinned mesh, because the former requires a SkinnedMeshRenderer while the latter a MeshRenderer. We make a copy of a brooch from ao_neck_00.unity3d. p_acs_neck_broochV is opened with a double click. The meshes within can be selected and deselected with Ctrl-left click which makes them shown in the Renderer window. For a fast selection they are all listed in the Mesh list tab next to the Object Tree.

We select p_acs_neck_broochV in the file. Then use Mark/Unmark for Copying in the file's Asset menu.

p_acs_neck_broochV, the marked asset is underlined.
Now we switch to our empty container file

and Paste All Marked.

The following dialog shows all currently marked assets which will get pasted into the selected file.

Every asset linked in the Animator and therefore shown in the Object Tree gets copied.
Attention! When an accessory uses a texture of the file which is referenced in the list entry but not in any material then it doesn't get copied along with that paste operation. Such unlinked resources need to be marked for copying separately if they are to be copied with the same pasting. It is possible to repeat the mark and pasting for the texture, or drag an drop it. Like for accessories these unlinked resources need to be handled for studio items and clothes as well.
The mt_ramp_00 file has the copy of Animator and we would edit and replace meshes, but that is will be explained on a different page. See Replacing Meshes
Finally we save the file as abdata\ao_neck_example.unity3d. Make sure that it is saved inside a game folder.
All those steps above using a different accessory can be seen in Making a modified Accessory standalone.
A list entry to integrate your mod into the game
The list entry for a hard mod has a list file which is an AssetBundle file like the geometry file we created before. In such a list file are TextAssets, one for each category. Be careful, the games read duplicates. For a sideloader mod we need to create a CSV file with the same columns and the same category number which is the number enclosed in square brackets in the title - 124 in the following example:

This original list file has many categories and many items in each list. We delete all TextAssets we don't need like the textures in the geometry file, and all entries in the neck list.

Then we Save As... the file with a new name but in the same location.
For a hard mod it is required to use a unique ID across all original IDs for this category. The filenames are free to choose, but the partial geometry filepath must match with the MainAB column in the list entry as MainData must match the Animator. In the geometry files this Animator was purple. Like the black ones, they both started in Unity editor as prefabs and got assigned to that AssetBundle. In Sb3UGS both are named and listed in the Animator tab - the black one with an Animator asset and the purple one without. For this reason purple Animators are also called virtual Animators. The explanation will come in a page for animations.
Debugging mods
- In case of zipmods, see Introduction to zipmod format and How to create a simple zipmod
a) No compression of the zipmod
b) Folder structure in the zipmod. List files inabdata\listorabdata\studio\inforespectively, AssetBundle files in subfolders ofabdata - List files
a) have the correct columns for their respective categories. Do not reuse a list file of a different category!
b) Studio items don't need an extra group or category - hijack an existing group and category! Only the listItem_XX_{group}_{category} file will remain.
c) Paths are case-sensitive! Check columns like MainAB, MatAB, etc. to match exactly the path in the zipmod. - AB checks
a) LZ4 High compressed
b) Names of prefabs/Animators match with the list columnMainData
c) Meshes in the prefab/Animators on the LayersCHARA(A) orMAP(B)
d) Meshes correctly parented: accessories parented by N_move, clothes byn_{top|bot}_{a|b|c}
e) MonoBehaviours: ChaAccessoryComponent/CmpAccessory, ChaClothesComponent/CmpClothes, etc.- Fields
rendCheckVisible,rendNormal,rendAlphahave the renderers - Fields for optional parts
objOpt#and choices of sleevesobjSleeves#referenceGameObjectsnotTransforms - No
PathID=0entries in arrays
- Fields