Replacing Meshes - enimaroah-cubic/Sb3UGS GitHub Wiki
One of the most important functions for modding games is the replacement of meshes. Depending on the 3d editor used there are obstacles to take. Not every file format available for exchange can transport all required information. The replacement function in Sb3UGS can help to fill such gaps by using existing information from the mesh already present.
The focus here is on skinned meshes. A skinned mesh is deformed in the game depending on the movements (usually rotation) of joints. Example: you model a whole arm in one piece (one submesh), but want it to be bent at the elbow, hand and fingers. Where ever a mesh bends one bone ends and another begins. Therefore other programs like Maya let you handle joints, and indeed bones in Sb3UGS are inaccurately named.
Vertices follow the movement of up to four joints. How much they follow a specific joint is defined by a weight. And as just said, the vertex can store four weights.
All used joints are collected in a list which is attached to the mesh, the bonelist. This bonelist has two aspects. For one, it names all frames of the skeleton which are used as joints. The second aspect is stored as a matrix which defines a translation, rotation and scaling. This matrix can be computed from the joint's frame matrix. And if all matrices were computed then you would see the mesh in its Bind Pose. If a bone matrix would always be computed, then it would not have to be stored and transported separately. Storing this matrix with an offset leads indeed to a modified pose - the Rest Pose. The Rest Pose is added to all applied animations!
Order of Replacement and Merging
Each submesh needs a material, and if the names of the material of the imported submesh can be found in the destination file then they are automatically assigned to the submesh. Same goes for the textures and the material's texture slots. So always begin with merging the imported textures, then the imported materials. Skinned meshes require their skeleton. Therefore, if not already present in the destination file, begin with merging the ImportedFrames - skeleton and mesh parents. A later replacement of the mesh will automatically find the mesh parent. Any missing bone frame will let the replacement fail.
Mesh Replacement Dialog - after dragging an ImportedMesh into the Object Tree's Blue Area
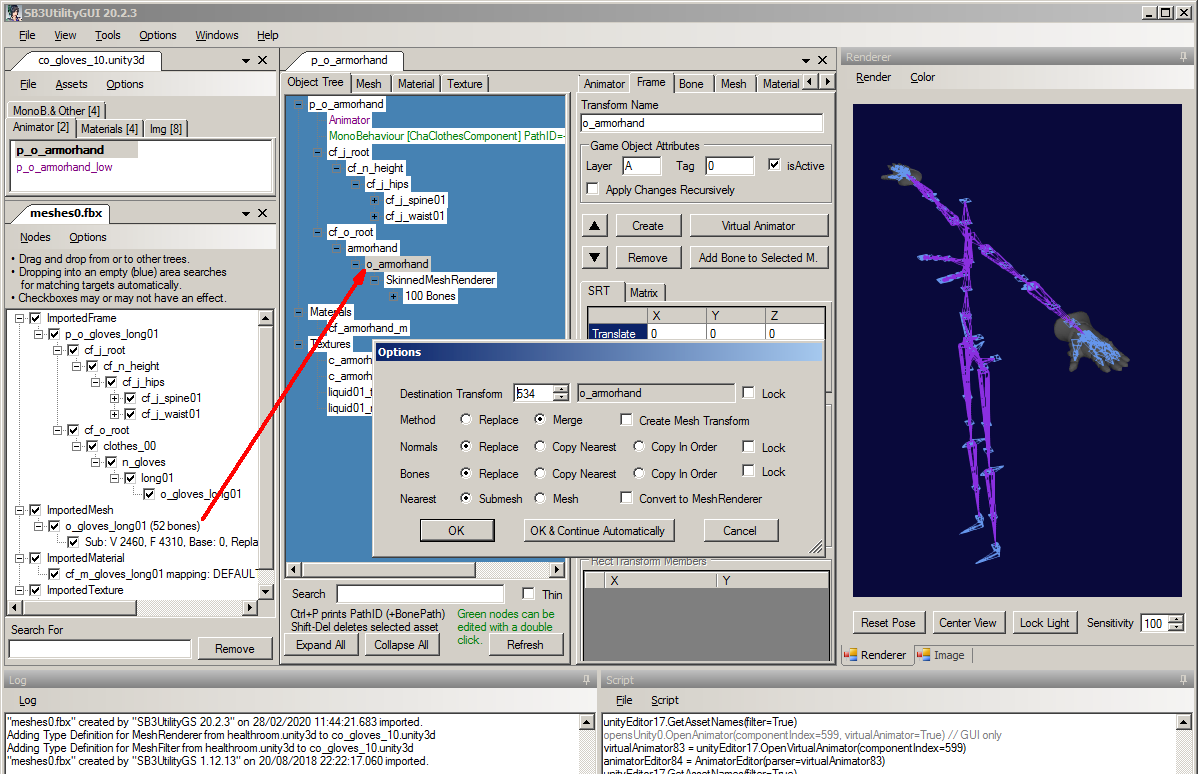
The first option in the replacement dialog is the destination parent frame. This frame should already parent a mesh, the destination mesh. The new mesh from the workspace will be filled with game specific information from the destination mesh. If no mesh is present in that frame a new mesh with defaults is created.
The Replace method will replace any existing bonelist - none of the bones of the destination mesh will be present in the result. With this method no submesh of the destination mesh will be present in the result, regardless of replacement options of the submesh in the workspace.

Merge will retain all destination bones and merges the bones from the imported mesh into the result. The destination submeshes will remain in the result, except when they are replaced from imported submeshes with checked Replace Original Submesh option.
The imported mesh may not contain normals, tangents or bone weights (MQO files). The Normals and Bones options are changed to Copy Nearest. Replace would copy normals, tangents and bone information along with the vertex position. So Replace can only be used if you have that information in the imported file (FBX files). Copy In Order copies the information like Nearest, but not based on the distance of vertices, but instead just one by one, from the first imported vertex to the first destination vertex, second to second, and so on.
The bottom option Nearest either limits the search for nearest vertices to the destination submesh or expands the search to all submeshes. The latter can be very slow and unnecessary, if the imported submesh and its destination submesh are very close to each other and cover the same or nearly the same space in 3d.
Normals
Imported meshes bring their normals except in MQO format or if you explicitly exclude them from export in your 3d editor. Sb3UGS will let FBXSdk create them (tangents as well). And afterwards you can have Sb3UGS average them (soft edges). This averaging might not always be wanted and you can switch it off:
This operation can not be reverted afterwards in the workspace. But you can create every mesh's normals and tangents in the Mesh editor.
Creating normals in the Mesh editor considers adjacent meshes where "adjacent" means the vertices with a distance closer than the (positive) threshold.
See also Regular and Custom Normals in Blendshapes
Double Replacement
The destination mesh can have more vertices than supported from the game temporarily before saving the file. The Copy Nearest and Copy in Order options can make use of these vertices. A mesh can be skinned that way. The first replacement brings a skinned high poly version into the file. The second replacement uses the skin weights for a low poly version which comes unskinned.