Creating a Cloud SQL Database - dteck/Mediawiki-GCP-CR GitHub Wiki
Getting Started
The underlying code that runs the wiki relies on a Structured Query Language (SQL) database to store all of the text that is displayed on its pages. This is also where it stores the relationships and links between pages. At its simplest implementation the database lives inside of the container with the wiki code. However since we want this to be able to scale the number of running containers up and down we need to have this database live externally from the Docker container. That way it can be shared by multiple resources at once and will not lose data when scaling.
Navigate to Cloud SQL
On the top left of the screen there are three horizontal white lines. This is generally known as a "Hamburger" menu. Clicking on this will fly out a list of Google Cloud Resources that you can set up inside of your project. To start we will want to set up a SQL server. So we need to scroll down this list until we find the “Databases” section and the item “SQL”.
Creating An Instance
Choosing a Database Engine
Google offers more than one type of relational database so we will need to choose which of these we would like to create. For our example we will choose MySQL. MediaWiki was written with MariaDB in mind but is compatible with MySQL with no other modifications needed. It is possible to configure MediaWiki to use PostgreSQL but it requires recompiling the PHP backend and is beyond the scope of this walkthrough. A starting point for this can be found here: How to compile PHP with PostgreSQL support
Enabling APIs
Google by default keeps access to Application Programming Interfaces (APIs) disabled. This is meant to prevent any accidental use of those services which may cost money. But when you attempt to start up a resource it may ask you to enable APIs associated with it. This will happen many times during our set up if your project has not had them enabled already. It is nothing to worry about it is just Google trying to keep your account as secure as possible.
Basic Instance Information
Starting Configuration
Instance Region and Zone
We will need to select the Region and Zone Availability we want for our database. Here we want to keep the region as close to our intended users as possible. For my purposes Iowa makes the most sense. Keep in mind that you will want to use the same region for all of the resources we set up. Putting resources in different regions will add latency as well as additional data transfer costs. But if your service needs to handle failure it may be a good idea to have it be Multi-zonal. This means there will be more than one copy of it in a region so if a datacenter fails traffic for your service will be directed to another datacenter in the same region.
Machine Type
For our machine type we have a few choices Shared Core, Lightweight, Standard, and High Memory. I am going with "Shared core" as I expect light and intermittent use of this database. so the shared core will burst up to a full vCPU when needed but not hold that core when it doesn't need it. That will allow us to save money as we are not using the resource all the time. An important consideration is that you should pick a machine type that will have enough ram to hold your largest tables. Again in my case 600mb should be more than enough to hold my wiki tables.
You can read more about the different types of machines available here: Machine Types
Storage Types and Capacity
Now we need to choose the type of storage we want to use for our database. The options are for Solid state drives (SSD) and Hard Disk Drives (HDD). The solid state drives are faster with higher throughput but also cost more per hour. In my case I am not worried about the slightly slower read and write speeds so I will go with Hard disk drives to lower my costs.
We also need to select a storage size. I recommend starting at the lowest value (10GB) and then enabling the Automatic Storage Increase option. this will automatically add more storage space (and cost) if your database reaches the size limits of the storage drives.
Connections
With the machine specifications set we need to make sure we can access the database. We will want to make sure that the option for Public IP is selected and then use the ADD NETWORK option to authorize CIDR range "0.0.0.0/0" to access our database. NOTE: This will allow any computer on the internet to attempt to connect to our database. However, they would still need to know the Username and Password to access it. This configuration is not secure but is necessary while setting up our wiki. Once we have completed the wiki installation we will come back and secure this by removing the public access. See the page on Securing Cloud SQL
Backups
Speaking of risk management we now need to select if we would like our database to be backed up, and if so when and where. I have selected to have the database backed up up automatically between 2 and 6 am and I have the backups being stored in a single region that is the same as where I have my database. If you want to be more secure you can have the backups stored in a separate region so that the chances of a disaster destroying your data is minimized. I am also limiting the number of backups to keep to 7.
Maintenance
Like the backups you can schedule when you would like Google to perform system maintenance. I am choosing sundays between 12 and 1 am which is next to our backup windows. I do not have any prefernce on what order Google performs the updates so I set this to "any".
Instance Overview
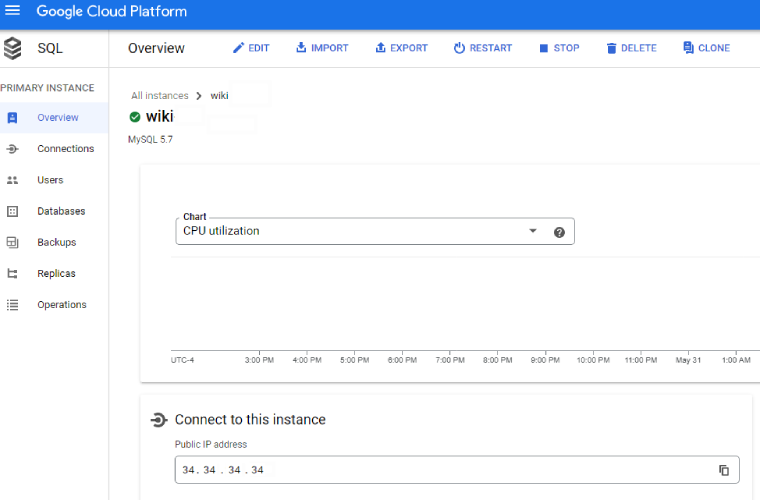
Once we have completed the above settings we can create our instance. Google will take several minutes to configure and start your database server It will have a loading indicator, but when that is done you will be shown a page similar to the one here. This is the overview page for your MySQL instance. It will tell you things like the current CPU/Ram usage, number of requests per second, your system configuration, your IP addresses, etc. For the moment our setup of the MySQL database is complete. You will need to know the Username (default is "root"), the Password you created when setting up the database, and the Public IP which is shown on your overview page. We will use these things later when installing the wiki.