LCR Drivetrain Troubleshooting - directedmachines/customer-support GitHub Wiki
- Safety
- Overview
- Symptoms
- Root Cause Discovery
- Switch State
- Software
- Electro-Mechanical
- Chain Reduction Diagnosis
- Motor Terminal Repair
- Motor Replacement
- L Bracket Replacement
- Electrical
Whenever working on the Reductions, always start by Engaging the Estop, and Turn Off the Motor Power Switch (Large Yellow Switch on side of LCR frame)
This page describes the diagnostic process for the drive train (wheel motors) plus mitigation / correction guidance.
Schematic and naming conventions for the differential drive on an LCR:
Drive train failure will manifest in the following ways
- LCR turns in place, even if instructed to translate forward
- LCR does not move at all, no motion in reduction chains visible
- LCR drive train makes loud noises (generally popping noises)
- LCR drives erratically, has a strong bias for one side
- Manual UI Drive Disabled indicator turns RED, even after toggling it off
The drive train can fail due to one of three major components:
- Switch State (E-Stop, Motor Disconnect)
- Software
- High Current Electronics (Faulty E-Stop circuit, Motor Controllers, Battery and Cabling)
- Data connections / USB
- Electro-Mechanical (Motors, Reductions)
The first step is to determine which of the components is causing the failure.
If there is no motion in the drive motors please check:
- E-Stop State - Manual UI will indicate if E-Stop is enabled. Release E-stop id safe to do so and re-enable Drive.
- Motor Disconnect Switch - Verify Rotary switch on left side of LCR is in ON position
Please read the first use guide if you have not done so: it is required reading before operating an LCR.
It is possible an E-Stop button or wiring is damaged or loose, causing the motor controllers to enter E-Stop state, even when buttons are released.
- Drive staying in Disabled state, even if user attempts to enable, in Manual UI.
- Red LED lights on motor controllers (HCE Tray must be opened to observe), stay on, or flicker
- Clicking noises when you wiggle e-stop wire harness or terminator diodes, or, connectors into MCs
If any of the above are observed, diagnose the e-stop circuit making sure all connectors are secure, tightly crimped, no signs of corrosion visible
Always use Manual UI to narrow drive train failure, since you have direct control.
- Load Manual UI. If Manual UI does not load, or, WiFi signal is not found, read (Electronics Troubleshooting)[LCR-Electronics-Troubleshooting)
- Check for warnings (yellow text) or errors (red text). If you see the "obstacles ignored" warning, that is ok (see below). If you see anything else, read Manual UI Troubleshooting
- Disable Obstacle Avoidance in Manual UI Settings
- Using the UI joystick, carefully attempt to drive the robot forward. Check for any new warnings. If the robot does not move, proceed to next section
The drive train uses chain reductions to connect the motor output shaft to the driven wheel shaft. A chain can occasionally break (master link comes off, or chain link is damaged) decoupling motor from wheels
Before doing any drive train diagnostics:
- Turn OFF motor disconnect switch on side of robot
- Press E-Stop
If robot turns only left or only right when attempting to drive straight forward, one of the chains is broken on the side that is not rotating.
Any of the chains can break, usually it is just a master link that has fallen off and can be re-inserted.
This can indicate misalignment. Another Potential sign of misalignment is loud popping noises.
Helpful Instructions for repairing a popped chain Linked Here
Click to View
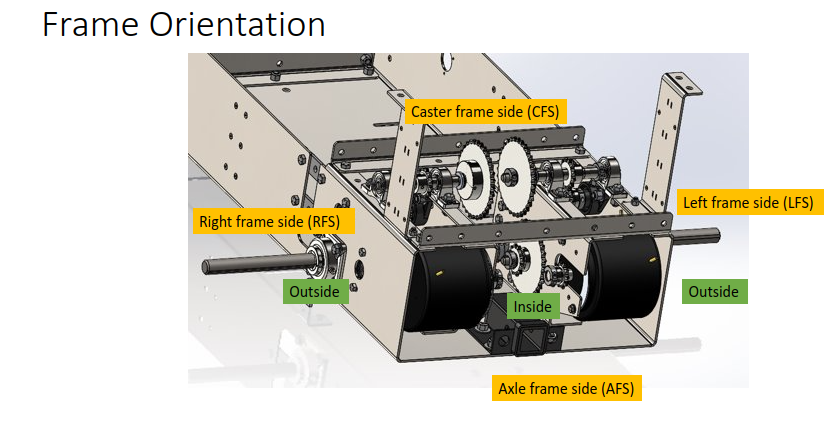
Here are images of the primary 50-2 chain with a bent / broken link, causing it to fall off the Shaft 1 (wheel 1.25" shaft) to Shaft 2
-
Note exposed sprockets, indicating a chain has fallen off
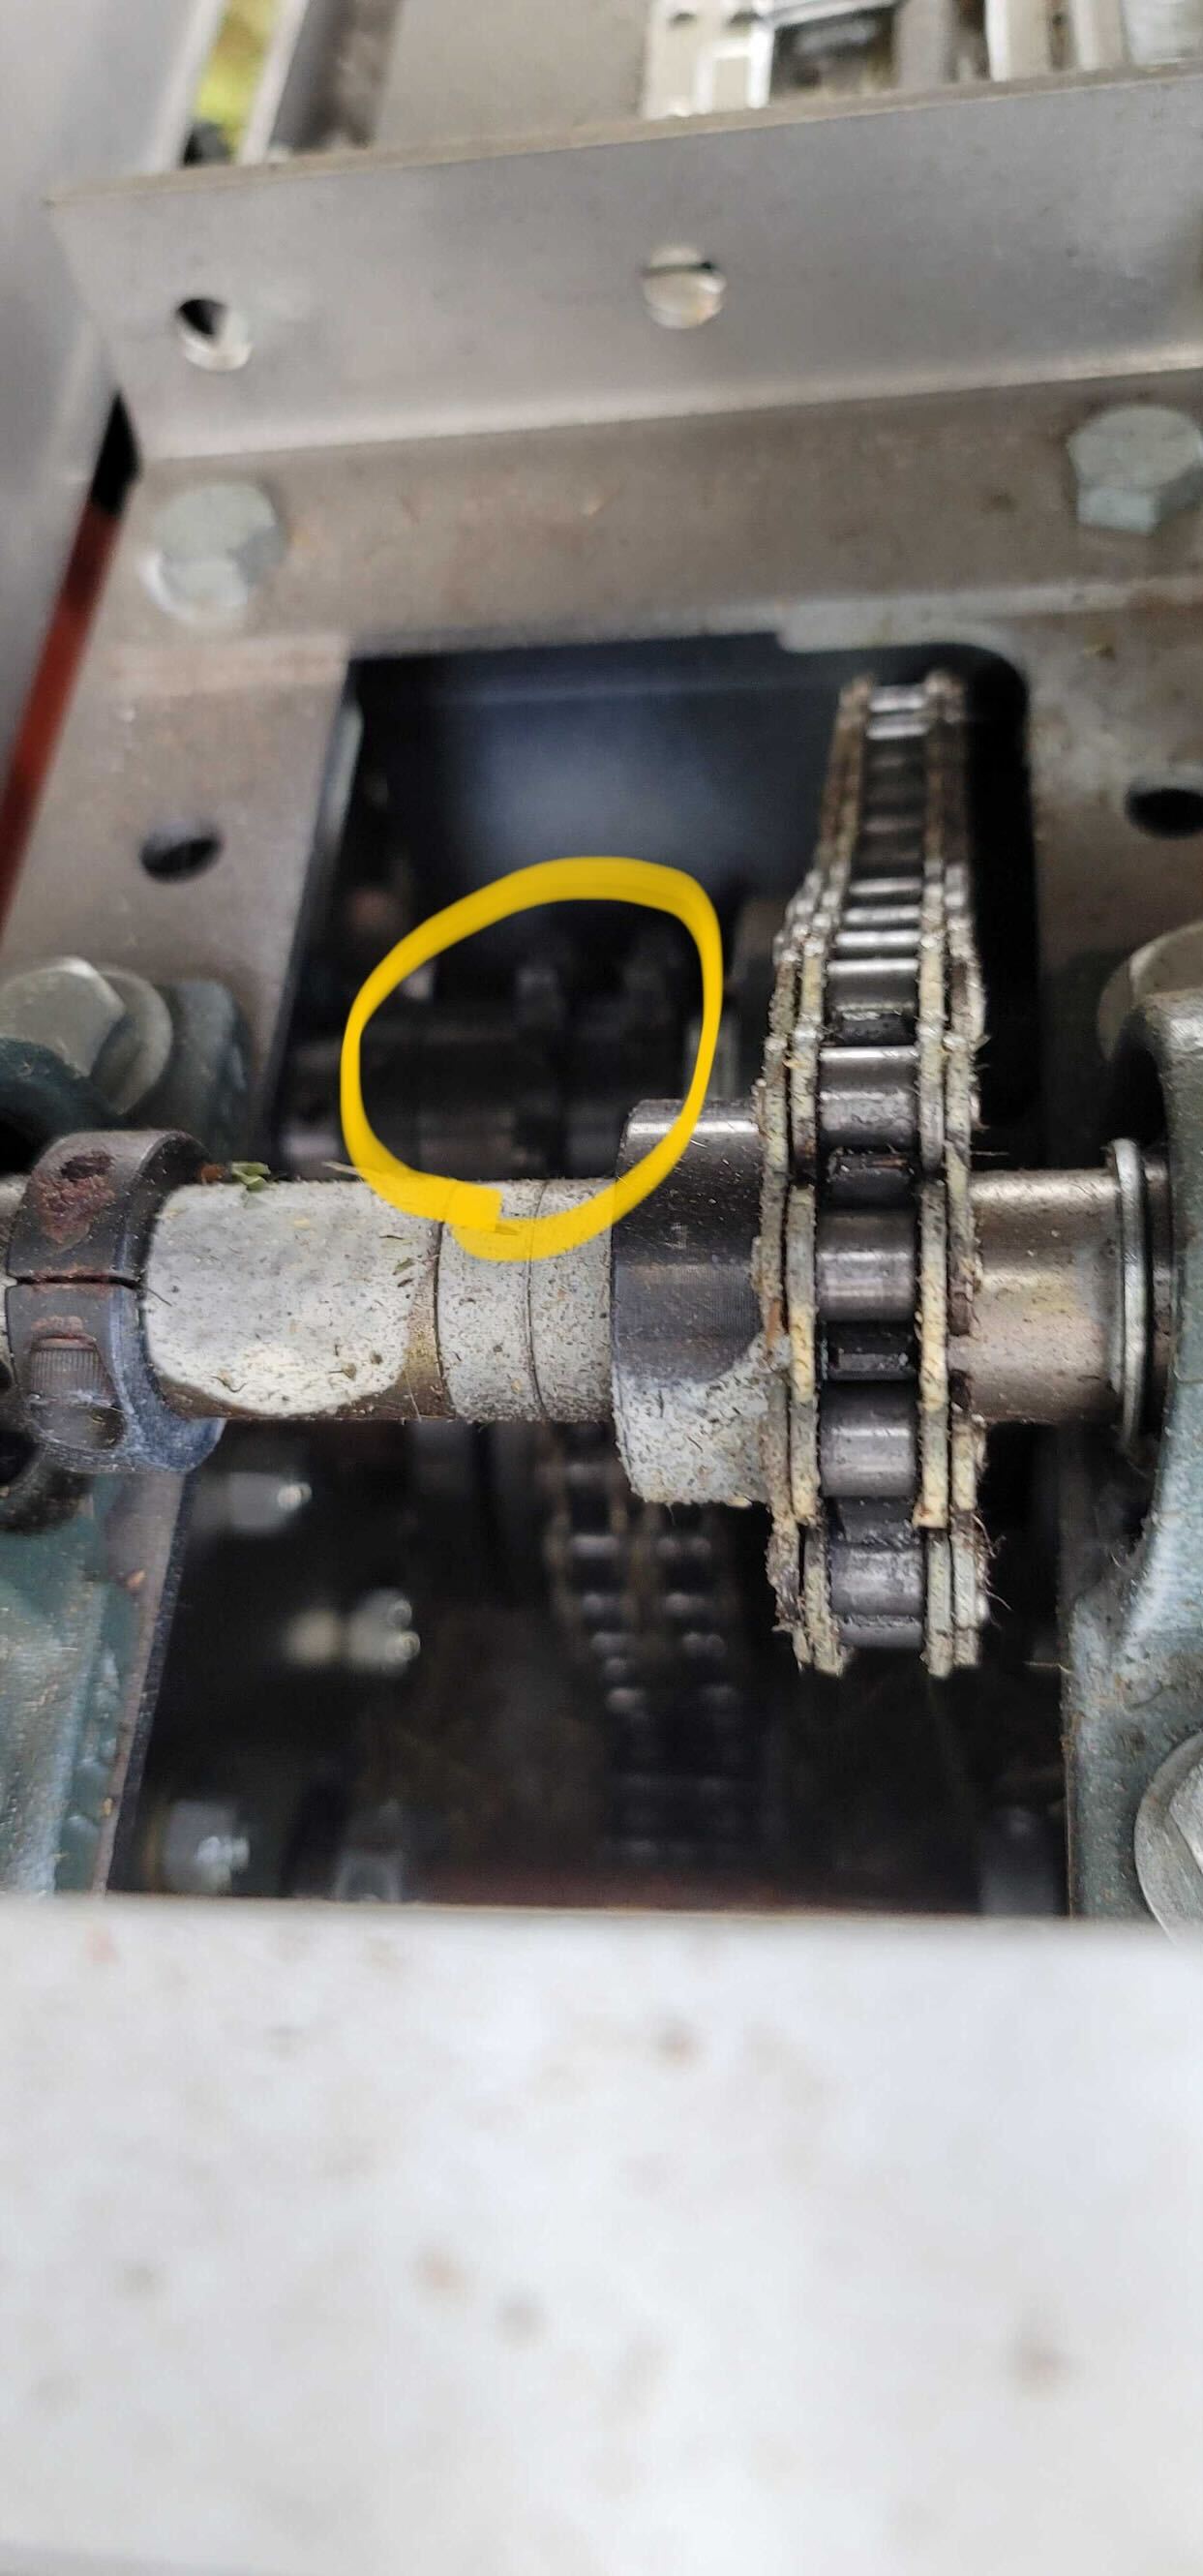
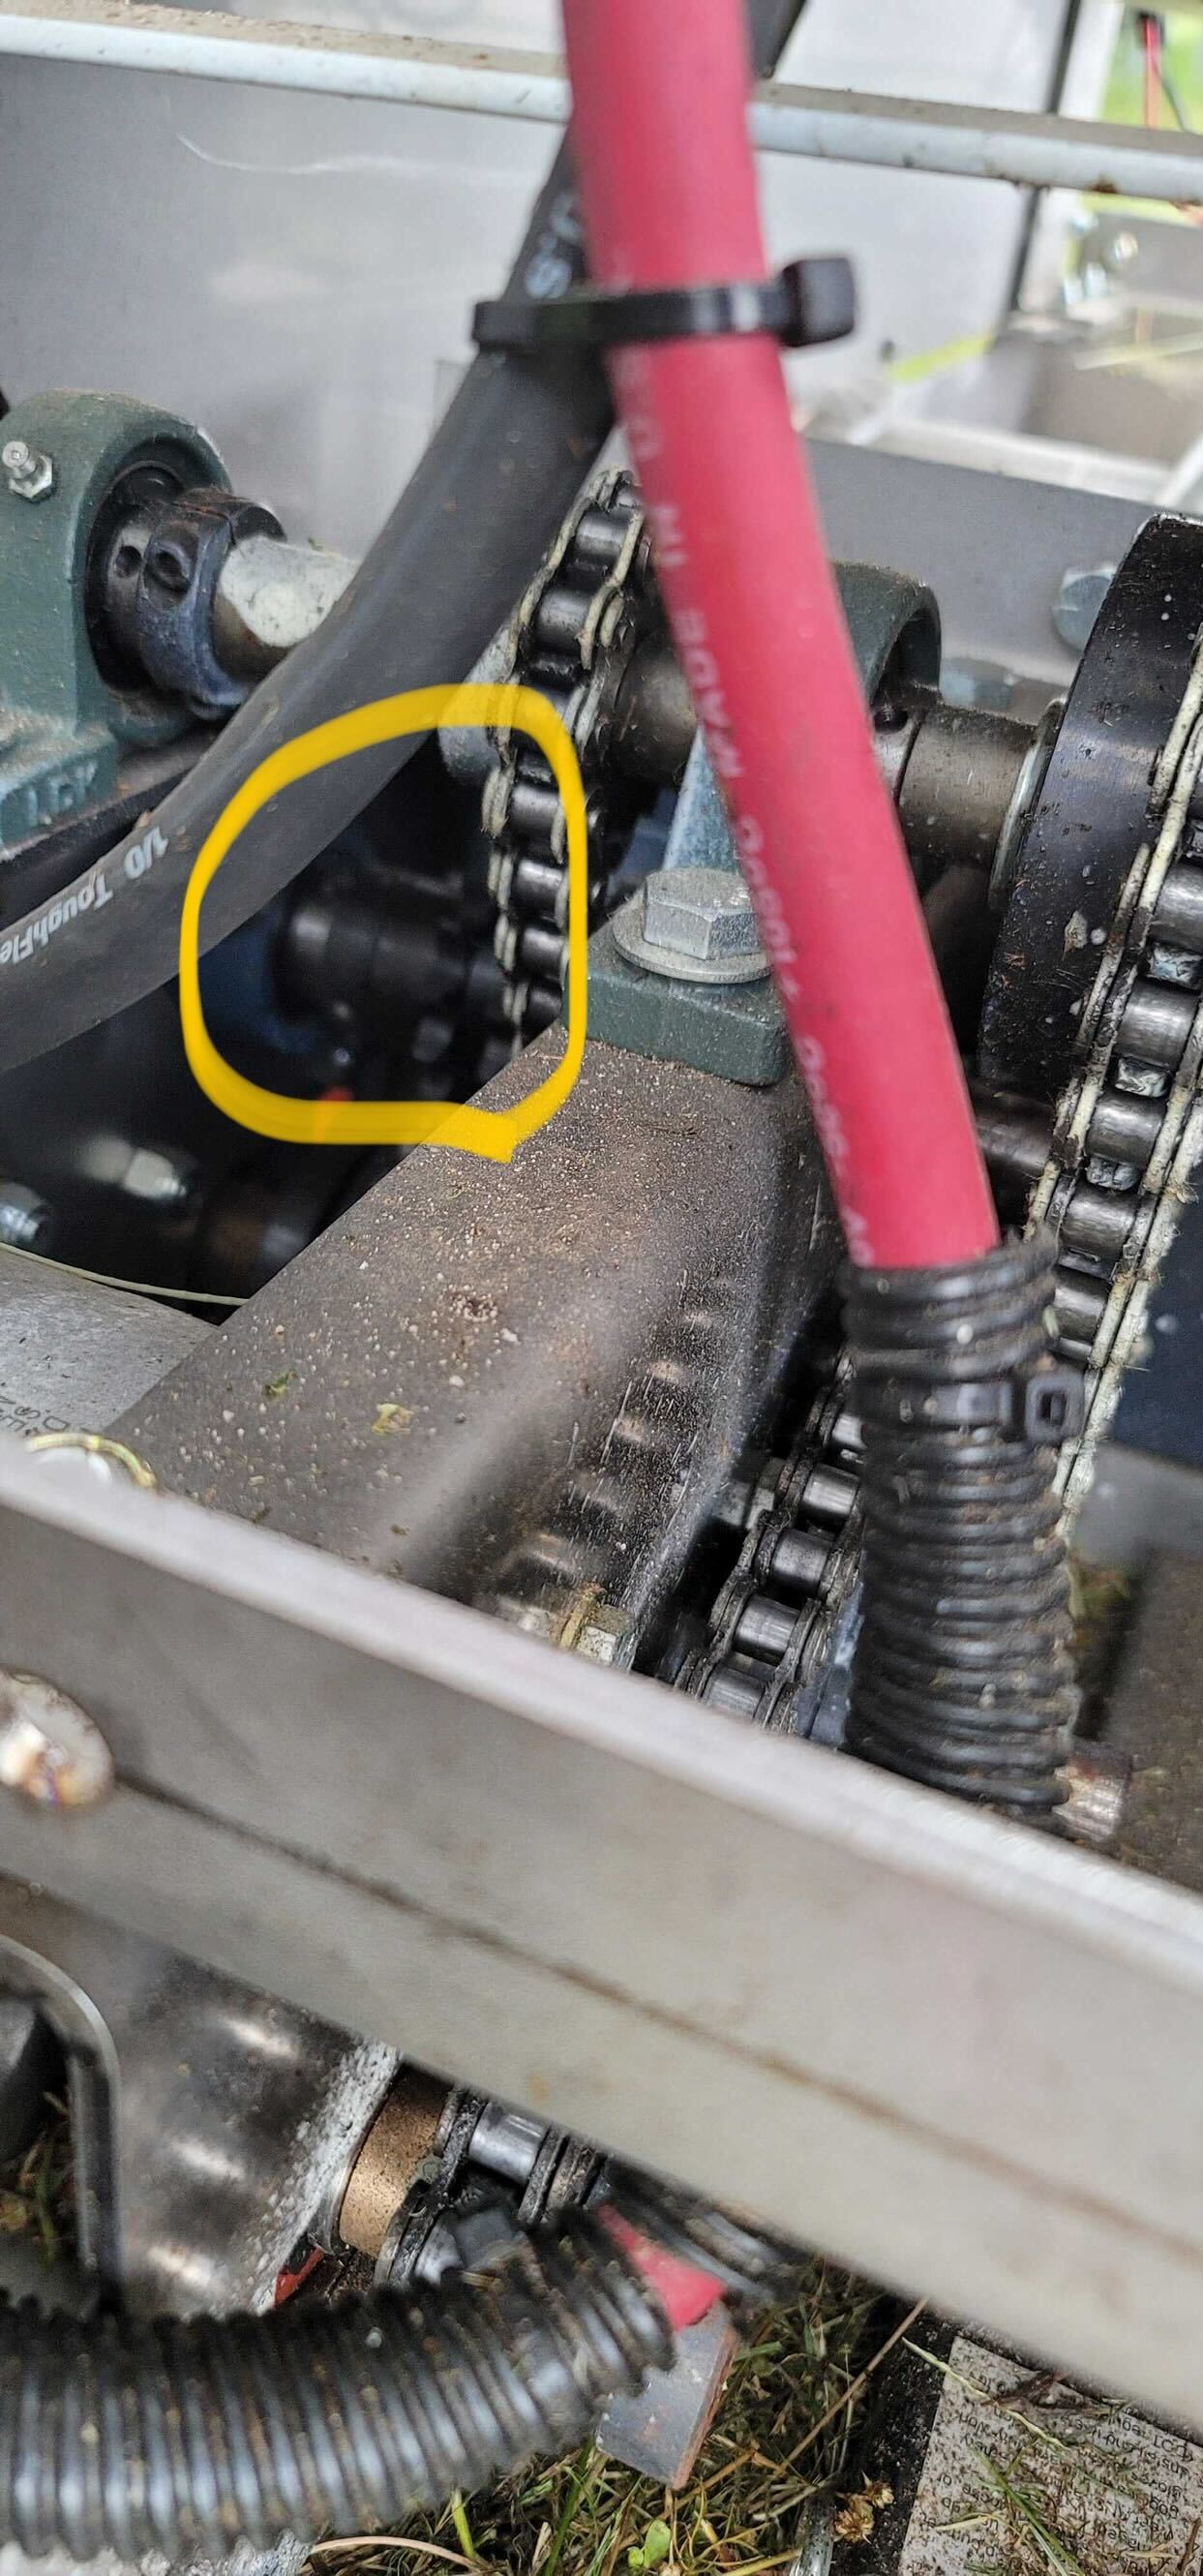

-
Note the damaged chain link

Click to View
In the event shaft 2 has walked out of alignment and requires re-alignment, follow the below steps
- Turn OFF motor disconnect switch on side of the LCR
- Press E-Stop
- Remove 3PT Hitch from the LCR
- Jack up the LCR and place jack stands to support the LCR
- Remove track on the affected side (note this is may not be necessary)
- Loosen shaft collar set screws
- Gently hammer shaft 2 back into place
- Use loctite and tighten shaft collar set screws to torque spec
- Re-install track & test run at low speeds to ensure proper operation
If motor terminal breaks: follow Motor Terminal Repair Instructions
ME1602 / ME0909 Motor Replacement Linked Here
If LCR has reduction access covers on the bottom, these can be used to access the nut holding the L brackets on. Follow attached PPT on how to complete this upgrade without having to remove reductions or batteries. PPT linked here
The drive (and AUX) motors are connected to the DM Motor controllers inside the high current electronics tray (HCE tray). The following will cause drive train problems or complete lack of motion:
- Disconnected Motor: A high-power cable has come loose either inside the HCE tray or between the tray and the motor leads, or the motor itself is damaged
- Battery is too low - In this case Manual UI would have indicated a Low Power warning and battery indicator would show a depleted state
- Motor controller is overheating or reaching fault state due to over current - check email alerts for the robot.
- The motor controller firmware or the USB driver is in a bad state or MC is damaged
Before doing any electrical diagnostics:
- Turn motor disconnect switch on side of robot to "OFF"
- Press E-Stop
The Manual UI or Autonomous Ground Task (AGT) may indicate the following warning:
"LEFT|RIGHT|AUX Motor disconnected, check wiring or motor brushes" This is a cue that the motor disconnect switch is set to "OFF", we have a loose connection, or a motor with damaged brushes Check the following wiring points:
- Ensure the motor disconnect switch on the side of the robot is set to "ON"
- HCE Tray, between motor controller MOT+ / MOT- (check those terminals and tighten if loose) or BATT+ / BATT- and the bus bars
- HCE Tray, 175A Anderson connector to tray side plate, check that terminals (silver blades) are secure inside the connection case, crimps are not loose
- Motor leads (check left and right motors) to 175 Anderson - make sure lugs are secure on motor terminal studs
- Perform a continuity test with a multimeter to make sure each motor lead all the way to motor controller MOT+ and MOT- is connected. This might require two people to do safely
- Perform a continuity test between BATT+ on motor controllers (check all of the motor controllers) and battery bus bar
A motor disconnect alert can also be caused by a dirty / clogged motor:

- Remove the motor from the LCR and pull off the motor vent cover
- Thoroughly clean out the motor, taking care not to lose any of its internal parts
- Replace the motor vent cover and test continuity between the motor frame and motor leads. There should not be continuity
- Replace the motor in the LCR and test
If the above findings do not produce positive results, indications may lead to a burnt motor
- Swap the left and right motor Anderson connectors to test functional motor with faulted motor input
- Run a telemetry report, searching for drive (left or right) motor Amps, and analyze the time series for any notable current spikes or further indications of a burnt motor such as prolonged over current
- A 'rescue panel' is likely necessary until motor replacement arrives if the motor is verified inoperable
See Troubleshooting: 300 Amp Motor Controllers for detailed 300A MC debugging.