Image processing (Vite) - chung-leong/zigar GitHub Wiki
JavaScript | PHP
In this example we're going to build a web app that resize an image and apply a filter on it.
First, we'll create the basic skeleton:
npm create vite@latest> [email protected] npx
> create-vite
│
◇ Project name:
│ image
│
◇ Select a framework:
│ React
│
◇ Select a variant:
│ JavaScript
│
◇ Which linter to use?
│ Oxlint
│
◇ Install with npm and start now?
│ No
│
◇ Scaffolding project in /home/cleong/zigar/rollup-plugin-zigar/demos/vite/image...
│
└ Done. Now run:
cd image
npm install
npm install --save-dev rollup-plugin-zigar
mkdir zig img
Add the plugin in vite.config.js:
import react from '@vitejs/plugin-react';
import zigar from 'rollup-plugin-zigar';
import { defineConfig } from 'vite';

// https://vite.dev/config/
export default defineConfig({
  plugins: [react(), zigar()],
})
Replace the code in App.jsx with the following:
import { useCallback, useEffect, useRef, useState } from 'react';
import SampleImage from '../img/sample.png';
import './App.css';

function App() {
  const srcCanvasRef = useRef();
  const dstCanvasRef = useRef();
  const fileInputRef = useRef();
  const [ bitmap, setBitmap ] = useState();
  const [ size, setSize ] = useState(0.8);

  const onOpenClick = useCallback(() => {
    fileInputRef.current.click();
  }, []);
  const onFileChange = useCallback(async (evt) => {
    const [ file ] = evt.target.files;
    if (file) {
      const bitmap = await createImageBitmap(file);
      setBitmap(bitmap);
    }
  }, []);
  const onSizeChange = useCallback((evt) => {
    setSize(evt.target.value);
  }, [])
  useEffect(() => {
    // load initial sample image
    (async () => {
      const img = new Image();
      img.src = SampleImage;
      await img.decode();
      const bitmap = await createImageBitmap(img);
      setBitmap(bitmap);
    })();
  }, [ SampleImage ]);
  useEffect(() => {
    // update bitmap after user has selected a different one
    if (bitmap) {
      const srcCanvas = srcCanvasRef.current;
      srcCanvas.width = bitmap.width;
      srcCanvas.height = bitmap.height;
      const ctx = srcCanvas.getContext('2d', { willReadFrequently: true });
      ctx.drawImage(bitmap, 0, 0);
    }
  }, [ bitmap ]);
  useEffect(() => {
    // update the result when the bitmap or size parameter changes
    if (bitmap) {
      const srcCanvas = srcCanvasRef.current;
      const dstCanvas = dstCanvasRef.current;
      const srcCTX = srcCanvas.getContext('2d', { willReadFrequently: true });
      const srcImageData = srcCTX.getImageData(0, 0, srcCanvas.width, srcCanvas.height);
      const dstImageData = srcImageData;
      dstCanvas.width = dstImageData.width;
      dstCanvas.height = dstImageData.height;
      const dstCTX = dstCanvas.getContext('2d');
      dstCTX.putImageData(dstImageData, 0, 0);
    }
  }, [ bitmap, size ]);
  return (
    <div className="App">
      <div className="nav">
        <span className="button" onClick={onOpenClick}>Open</span>
        <input ref={fileInputRef} type="file" className="hidden" accept="image/*" onChange={onFileChange}/>
      </div>
      <div className="contents">
        <div className="pane align-right">
          <canvas ref={srcCanvasRef}></canvas>
        </div>
        <div className="pane align-left">
          <canvas ref={dstCanvasRef}></canvas>
          <div className="controls">
            Size: <input type="range" min={0.1} max={2} step={0.001} value={size} onChange={onSizeChange}/>
          </div>
        </div>
      </div>
    </div>
  )
}

export default App
Basically, we have two
HTML canvases in our app. We
load the initial image with the first useEffect hook, placing the resulting bitmap into the
state variable bitmap:
  useEffect(() => {
    // load initial sample image
    (async () => {
      const img = new Image();
      img.src = SampleImage;
      await img.decode();
      const bitmap = await createImageBitmap(img);
      setBitmap(bitmap);
    })();
  }, [ SampleImage ]);
The async iife is necessary here, as useEffect doesn't expect a promise from the callback
function. We need to put SampleImage in the dependencies array because it can change due to
Vite's Hot Module Replace (HMR) feature. We want the image to reload when sample.png is changed.
The second useEffect hook, activated when bitmap changes, draws the bitmap on the first canvas:
  useEffect(() => {
    // update bitmap after user has selected a different one
    if (bitmap) {
      const srcCanvas = srcCanvasRef.current;
      srcCanvas.width = bitmap.width;
      srcCanvas.height = bitmap.height;
      const ctx = srcCanvas.getContext('2d', { willReadFrequently: true });
      ctx.drawImage(bitmap, 0, 0);
    }
  }, [ bitmap ]);
The third useEffect hook then obtains an
ImageData object from the first
canvas and draws it on the second canvas:
  useEffect(() => {
    // update the result when the bitmap or size parameter changes
    if (bitmap) {
      const srcCanvas = srcCanvasRef.current;
      const dstCanvas = dstCanvasRef.current;
      const srcCTX = srcCanvas.getContext('2d', { willReadFrequently: true });
      const srcImageData = srcCTX.getImageData(0, 0, srcCanvas.width, srcCanvas.height);
      const dstImageData = srcImageData;
      dstCanvas.width = dstImageData.width;
      dstCanvas.height = dstImageData.height;
      const dstCTX = dstCanvas.getContext('2d');
      dstCTX.putImageData(dstImageData, 0, 0);
    }
  }, [ bitmap, size ]);
We need a new index.css:
:root {
  font-family: Inter, system-ui, Avenir, Helvetica, Arial, sans-serif;
  line-height: 1.5;
  font-weight: 400;

  color-scheme: light dark;
  color: rgba(255, 255, 255, 0.87);
  background-color: #242424;

  font-synthesis: none;
  text-rendering: optimizeLegibility;
  -webkit-font-smoothing: antialiased;
  -moz-osx-font-smoothing: grayscale;
}

body {
  margin: 0;
  display: flex;
  flex-direction: column;
  place-items: center;
  min-width: 320px;
  min-height: 100vh;
}
And App.css:
#root {
  flex: 1 1 100%;
  width: 100%;
}

.App {
  display: flex;
  position: relative;
  flex-direction: column;
  width: 100%;
  height: 100%;
}

.App .nav {
  position: fixed;
  width: 100%;
  color: #000000;
  background-color: #999999;
  font-weight: bold;
  flex: 0 0 auto;
  padding: 2px 2px 1px 2px;
}

.App .nav .button {
  padding: 2px;
  cursor: pointer;
}

.App .nav .button:hover {
  color: #ffffff;
  background-color: #000000;
  padding: 2px 10px 2px 10px;
}

.App .contents {
  display: flex;
  width: 100%;
  margin-top: 2em;
}

.App .contents .pane {
  flex: 1 1 50%;
  padding: 5px 5px 5px 5px;
}

.App .contents .pane CANVAS {
  border: 1px dotted rgba(255, 255, 255, 0.10);
  max-width: 100%;
  max-height: 90vh;
}

.App .contents .pane .controls INPUT {
  vertical-align: middle;
  width: 50%;
}

@media screen and (max-width: 600px) {
  .App .contents {
    flex-direction: column;
  }

  .App .contents .pane {
    padding: 1px 2px 1px 2px;
  }

  .App .contents .pane .controls {
    padding-left: 4px;
  }
}

.hidden {
  position: absolute;
  visibility: hidden;
  z-index: -1;
}

.align-left {
  text-align: left;
}

.align-right {
  text-align: right;
}
Finally, download the following image into img as sample.png (or choose an image of your own):

With everything in place, we can start Vite in dev mode:
npm run devYou should see the following in the browser:
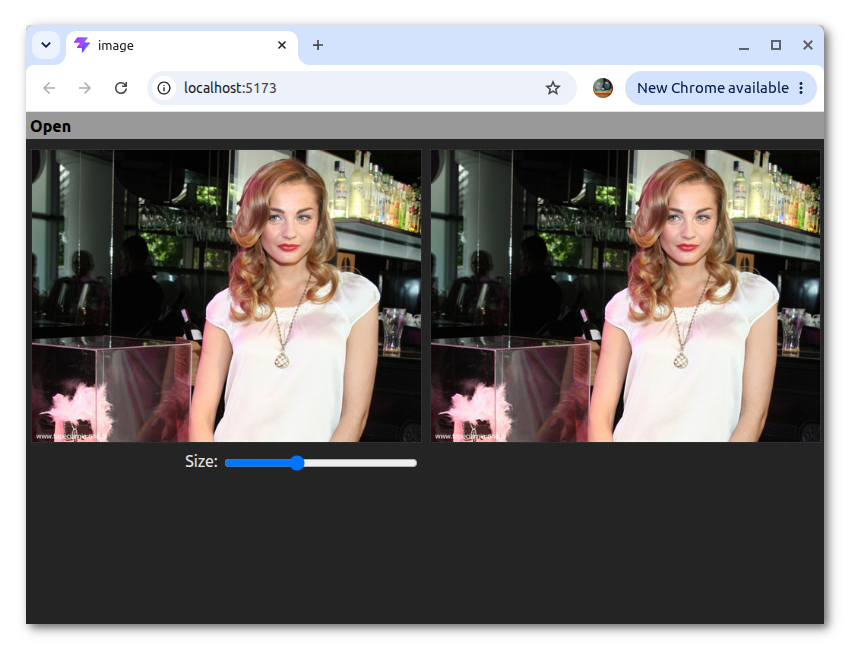
Nothing will happen when you move the slider, as we haven't incorporated our Zig code yet. We'll proceed with doing so now that we see that the basic code for our app is working.
In the sub-directory zig, create process.zig:
const std = @import("std");

const zigar = @import("zigar");

pub fn scale(image_in: zigar.image.Any(.ro), image_out: zigar.image.Any(.rw)) void {
    const Pixel = @Vector(4, f32);
    inline for (zigar.image.formats) |tag| {
        if (image_in == tag and image_out == tag) {
            const in = image_in.getField(tag);
            const out = image_out.getField(tag);
            const x_adv: f32 = in.getWidthAsFloat() / out.getWidthAsFloat();
            const y_adv: f32 = in.getHeightAsFloat() / out.getHeightAsFloat();
            var coord: @Vector(2, f32) = undefined;
            coord[1] = 0.5;
            for (0..out.getHeight()) |y| {
                coord[0] = 0.5;
                for (0..out.getWidth()) |x| {
                    const pixel = in.sampleLinear(Pixel, coord);
                    out.setPixel(Pixel, x, y, pixel);
                    coord[0] += x_adv;
                }
                coord[1] += y_adv;
            }
        }
    }
}
The code above is a function that enlarges or shrinks an image. zigar.image.Any is a parametric union type that can accommodate either a PHP GD image or a JavaScript ImageData object. An inline loop is used here to generate different binaries for different formats from the same source code.
When the compilation target is WebAssembly, GD support is absent. zigar.image.formats would only
have a single entry.
In App.jsx, import the function:
import { scale } from '../zig/process.zig';In the last useEffect hook, replace this line:
const dstImageData = srcImageData;With this:
      const dstImageData = new ImageData(srcCanvas.width * size, srcCanvas.height * size);
      scale(srcImageData, dstImageData);
After the change, moving the slide now actually resizes the image:
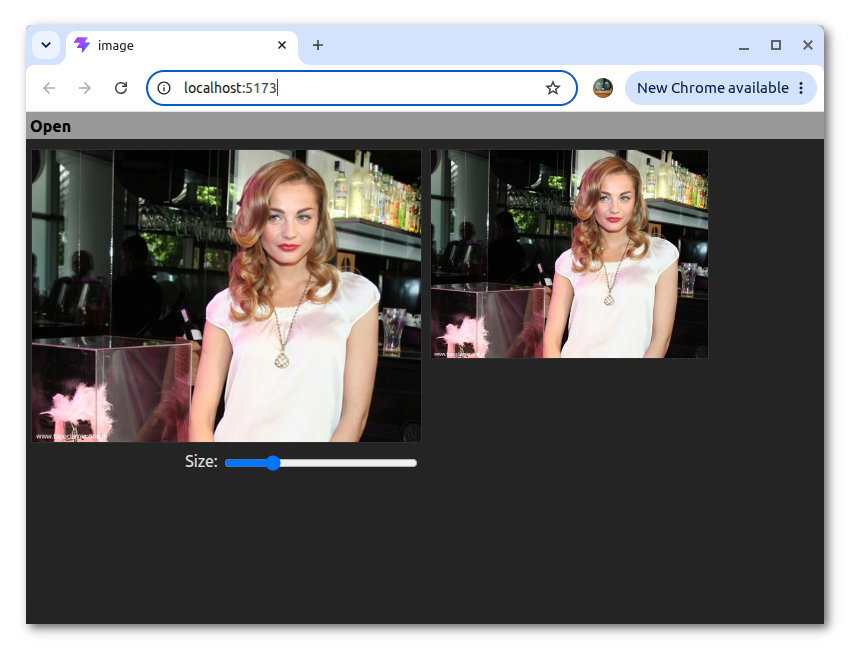
In this section, we're going create a function that apply a sepia effect on an image. In the
process.zig, append the following code:
pub fn sepia(image_in: zigar.image.Any(.ro), image_out: zigar.image.Any(.rw), intensity: f32) void {
    const Pixel = @Vector(4, f32);
    inline for (zigar.image.formats) |tag| {
        if (image_in == tag and image_out == tag) {
            const in = image_in.getField(tag);
            const out = image_out.getField(tag);
            var coord: @Vector(2, f32) = undefined;
            coord[1] = 0.5;
            for (0..out.getHeight()) |y| {
                coord[0] = 0.5;
                for (0..out.getWidth()) |x| {
                    const yiq_matrix: [4]@Vector(4, f32) = .{
                        .{ 0.299, 0.596, 0.212, 0.0 },
                        .{ 0.587, -0.275, -0.523, 0.0 },
                        .{ 0.114, -0.321, 0.311, 0.0 },
                        .{ 0.0, 0.0, 0.0, 1.0 },
                    };
                    const inverse_yiq: [4]@Vector(4, f32) = .{
                        .{ 1.0, 1.0, 1.0, 0.0 },
                        .{ 0.956, -0.272, -1.1, 0.0 },
                        .{ 0.621, -0.647, 1.7, 0.0 },
                        .{ 0.0, 0.0, 0.0, 1.0 },
                    };
                    const rgba_color = in.sampleNearest(@Vector(4, f32), coord);
                    var yiqa_color = @"M * V"(yiq_matrix, rgba_color);
                    yiqa_color[1] = intensity;
                    yiqa_color[2] = 0.0;
                    const pixel = @"M * V"(inverse_yiq, yiqa_color);
                    out.setPixel(Pixel, x, y, pixel);
                    coord[0] += 1;
                }
                coord[1] += 1;
            }
        }
    }
}

fn @"M * V"(m1: anytype, v2: anytype) @TypeOf(v2) {
    const ar = @typeInfo(@TypeOf(m1)).array;
    var t1: @TypeOf(m1) = undefined;
    inline for (m1, 0..) |column, c| {
        inline for (0..ar.len) |r| {
            t1[r][c] = column[r];
        }
    }
    var result: @TypeOf(v2) = undefined;
    inline for (t1, 0..) |column, c| {
        result[c] = @reduce(.Add, column * v2);
    }
    return result;
}
The working principle of the filter is quite simple. We transform each pixel of the image from RGB color space into YIQ, the color space used for NTSC broadcast. Acting like an old television set, we toss away the chromatic components (I and Q). Then we add a yellowish tint by assigning a specific value to I.

As you can see in the picture above depicting the YIQ color space at Y = 0.5, the I channel represents the reddish orange color:
The @"M * V" function might look odd to you. Zig allows identifiers to contain whitespaces and
special characters using the @"..." escape sequence. We're taking advantage of that here to
clearly indicate what the function does, namely multipling a matrix with a vector.
Loops are unrolled using the inline keyword to enhance performance.
In App.jsx, import the new function:
import { scale, sepia } from '../zig/process.zig';In the component itself, add a state variable controlling the intensity of the effect:
const [ intensity, setIntensity ] = useState(0.3);And a change handler:
  const onIntensityChange = useCallback((evt) => {
    setIntensity(parseFloat(evt.target.value));
  }, [])
Scroll down to the JSX portion and add another slider:
          <div className="controls">
            Intensity: <input type="range" min={0} max={1} step={0.0001} value={intensity} onChange={onIntensityChange}/>
          </div>
Scroll up to the last useEffect hook and add a call to sepia() like so:
  useEffect(() => {
    // update the result when the bitmap or size parameter changes
    if (bitmap) {
      const srcCanvas = srcCanvasRef.current;
      const dstCanvas = dstCanvasRef.current;
      const srcCTX = srcCanvas.getContext('2d', { willReadFrequently: true });
      const srcImageData = srcCTX.getImageData(0, 0, srcCanvas.width, srcCanvas.height);
      const resizedImageData = new ImageData(srcCanvas.width * size, srcCanvas.height * size);
      scale(srcImageData, resizedImageData);
      const dstImageData = new ImageData(resizedImageData.width, resizedImageData.height);
      sepia(resizedImageData, dstImageData, intensity);
      dstCanvas.width = dstImageData.width;
      dstCanvas.height = dstImageData.height;
      const dstCTX = dstCanvas.getContext('2d');
      dstCTX.putImageData(dstImageData, 0, 0);
    }
  }, [ bitmap, size, intensity ]);
And here's the result:
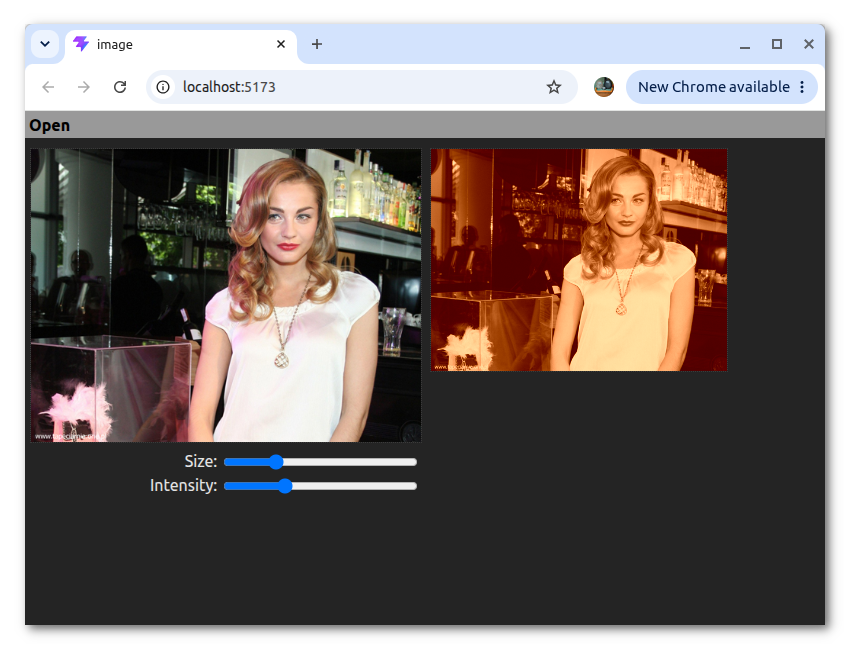
In a real application you'd probably perform both operations in Zig instead of sending the intermediate result to JavaScript. This is just a demo.
Simply run the build script:
npm run build
After which you can preview the production build of the app:
npm run preview
Without the overhead of Zig runtime safety, the app should be much snappier. It should be noted
that nothing stops you from adding optimize: 'ReleaseSmall' to the plugin options so you would
get full performance from WASM code even during development.
You can find the complete source code for this example here.
You can see the code in action here.
A major advantage of using Zig for a task like image processing is that the same code can be deployed both on the browser and on the server. After a user has made some changes to an image on the frontend, the backend can apply the exact same effect using the same code. Consult the Node version of this example to learn how to do it.
The image filter employed for this example is very rudimentary. Check out pb2zig's project page to see more advanced code.
That's it for now. I hope this tutorial is enough to get you started with using Zigar.