Updates for Advanced Users - betrusted-io/betrusted-wiki GitHub Wiki
WARNING applying an update incorrectly will wipe all your secret data. If you are applying a SoC update be sure to stage your update and then use Precursor itself to provision your existing secrets into the updated files. Do not do the "factory reset" path.
There are two methods for doing an update:
Releases can be found here:
- Bleeding-edge binaries. Use at your own risk.
- "Stable" releases. Testing was involved, but probably not enough.
See technical details for insight into how updates work: there are two FPGAs inside Precursor, each with different update paths.
If you have a pre-release unit, you will want to use the Failsafe method to update your device. This is because neither the FPGA nor the firmware image have stabilized sufficiently for USB updates to be reliable. The "failsafe" method is exactly the method used in the factory to provision a blank device, and can recover a Precursor from almost any software misconfiguration.
You'll want to run update_xous.sh.
- Assumes you've already initialized root keys
- Assumes you've already got the debug cable hooked up, and your Raspberry Pi configured
- Assumes you know how to stage the firmware objects for updating
Confused? read on.
- Precursor device
- "Debug cable" (the brownish-yellow, 5cm long flexible printed circuit (FPC))
- Raspberry Pi Debug HAT (the lavender-colored circuit board with a 40-pin header on the bottom)
- Associated standoffs and screws (nylon hardware in the kit)
- Raspberry Pi (not included)
Furthermore, these instructions assume you have not previously installed the anti-tamper RF shield over the trusted domain. If you have permanently installed the anti-tamper shield, well -- it was designed to make it impossible for you to install a debug cable.
Install a debug cable instructional reference video
Remove the six screws on the bezel of the Precursor device using a T3 torx screwdriver. If you received a standard package from Crowd Supply, an appropriate screwdriver can be found inside the box.
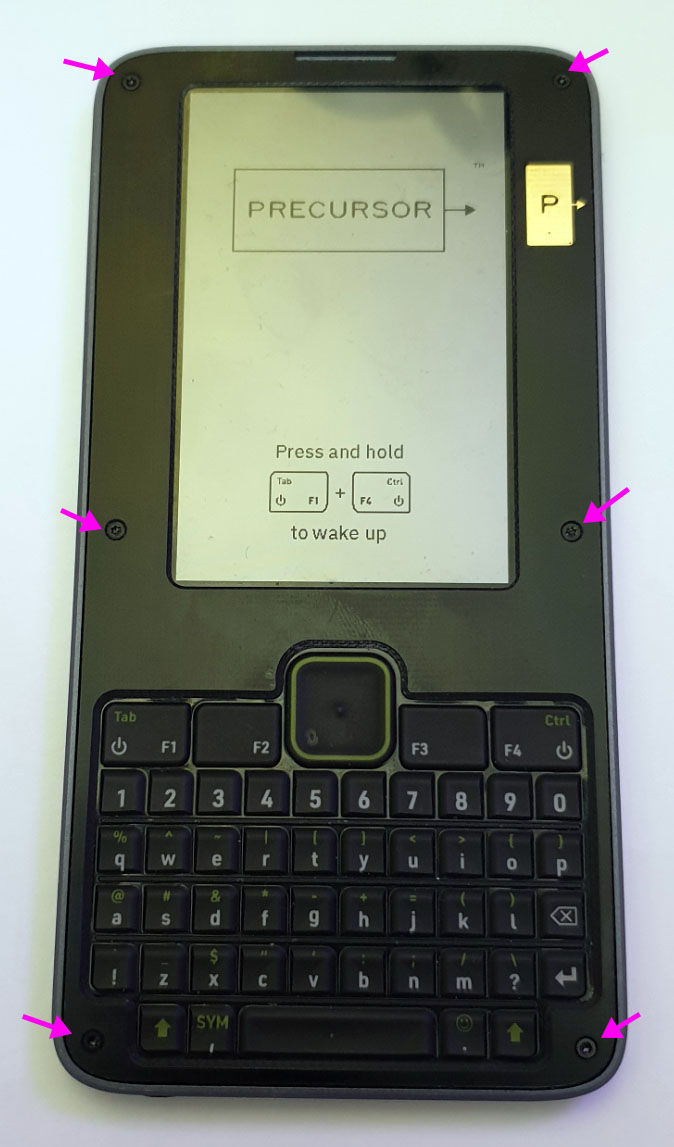
There is an antenna cable on the right-hand side of the bezel, so you will want to open the device and lay the bezel to the right hand side.
Remove the three screws that hold down the keyboard PCB plus overlay. The location of the three screws are indicated in the image below.
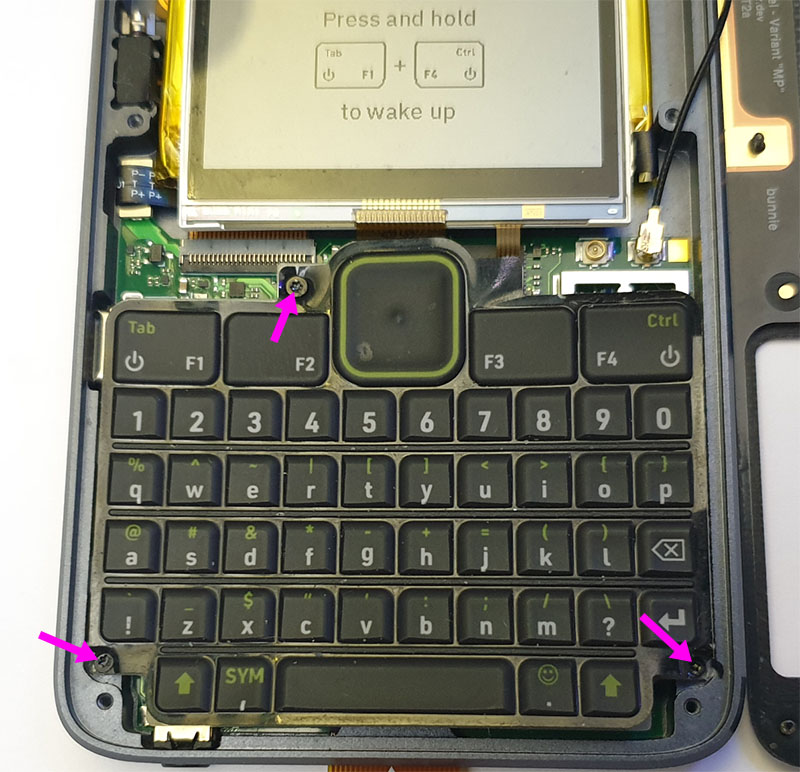
Once the screws are undone, lift the PCB out of the case by prying up from underneath the "F1" key on the top left, near the USB-C connector. This will cause a vertical header on the left hand side of the keyboard which to snap apart, thus freeing the keyboard.
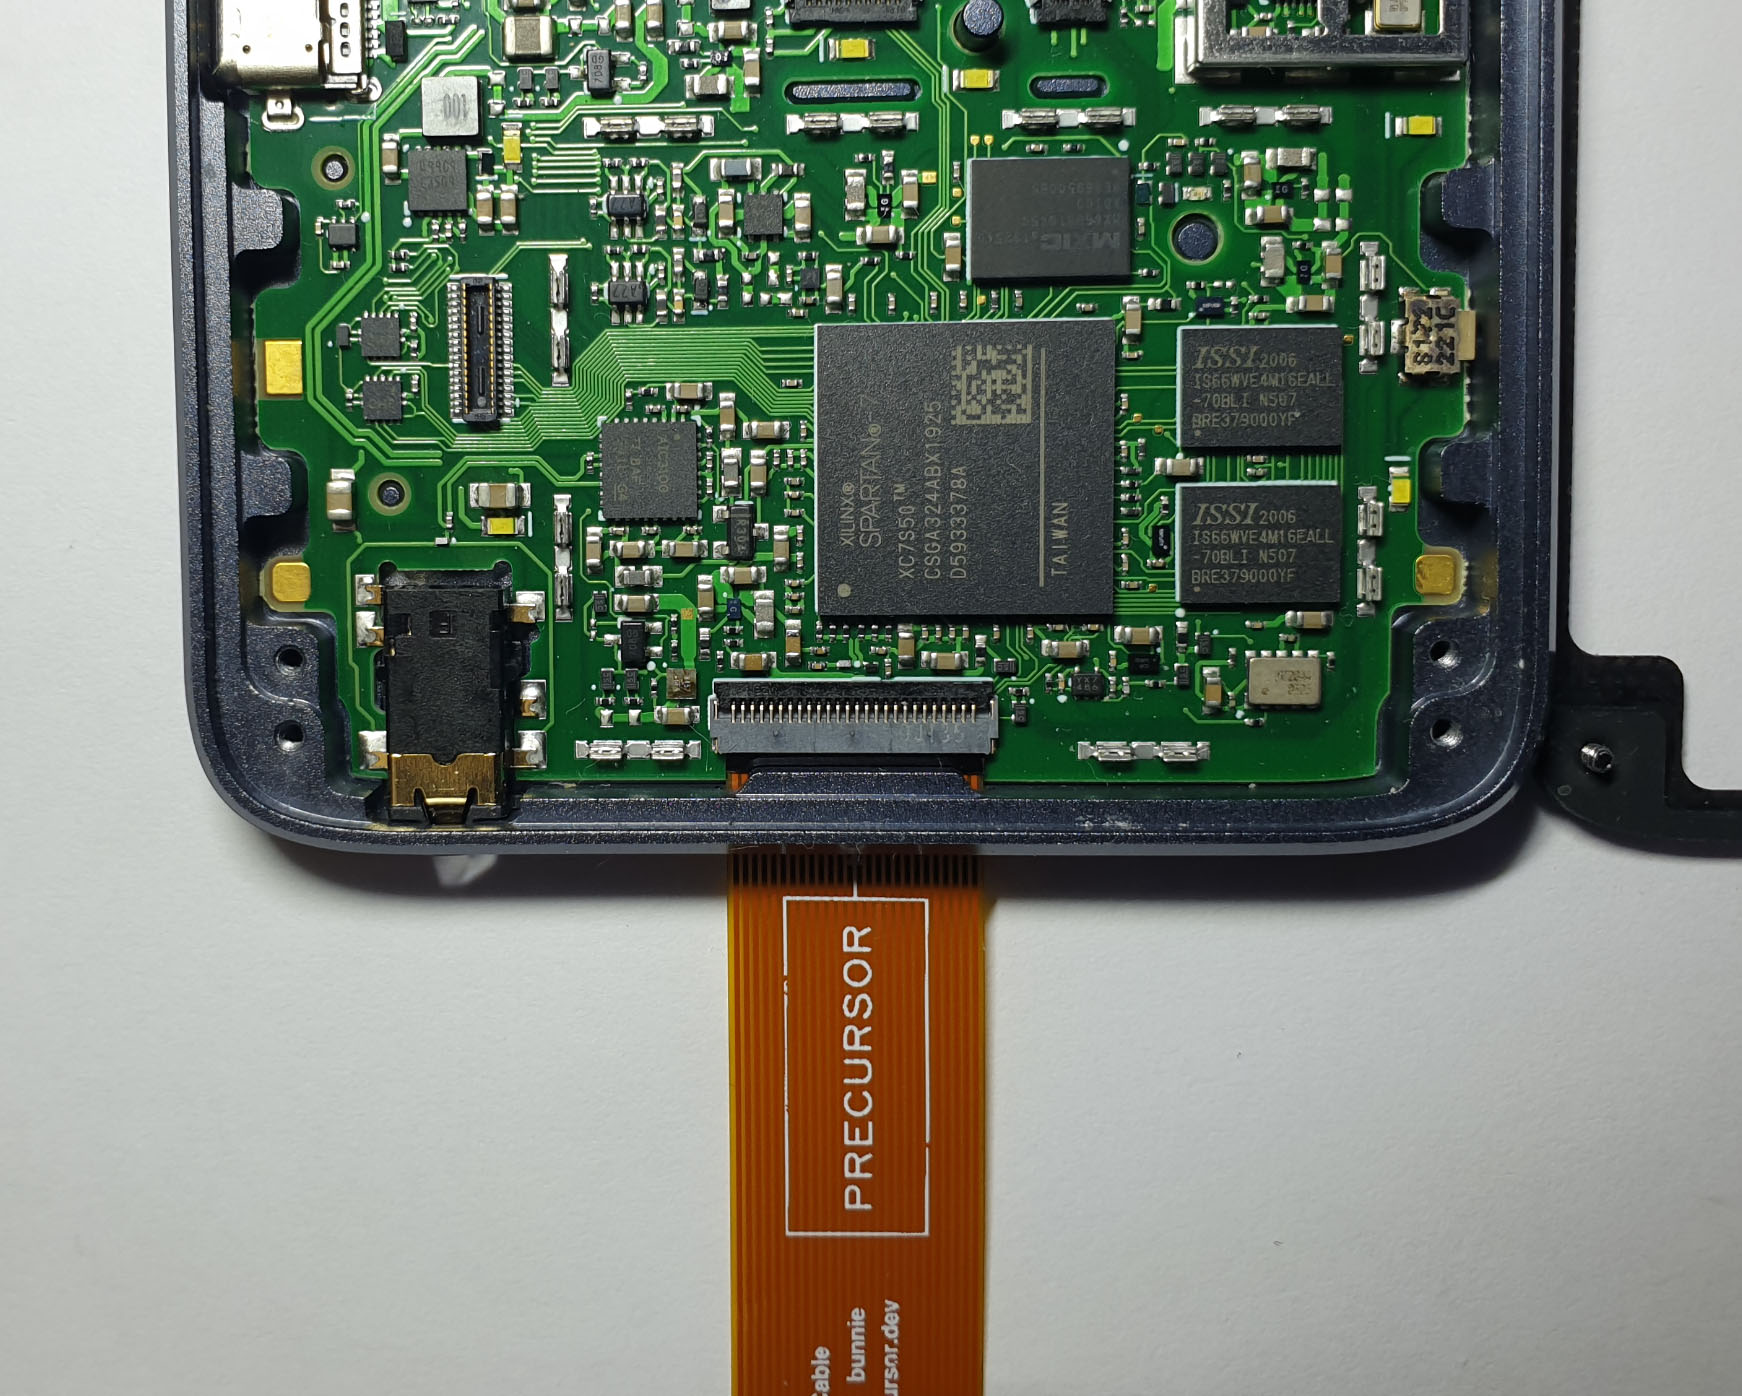
There is a connector for the debug FPC that sits on the bottom edge of the Precursor.
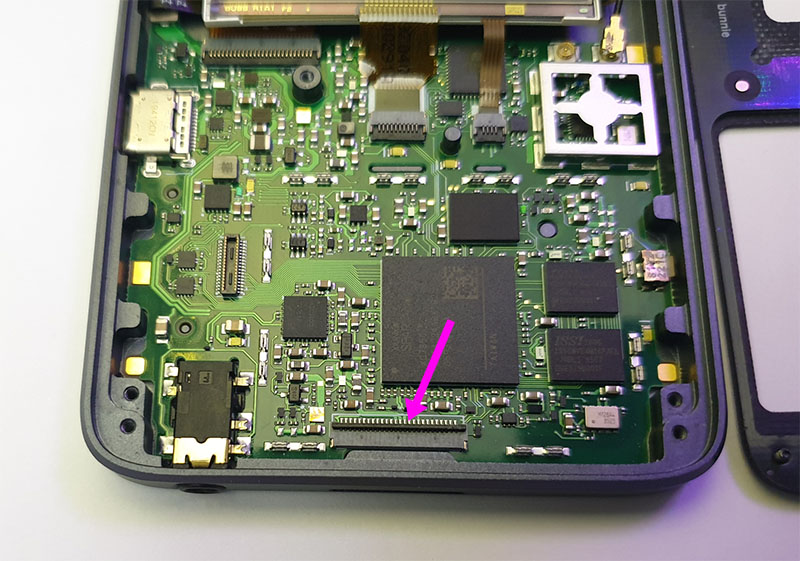
There is a small, thin dark brown plastic piece on the rear edge of the connector. Flip the piece up using your fingernail or a similar non-conductive, somewhat pointed implement like a toothpick or a bamboo chopstick cut to a chisel tip.
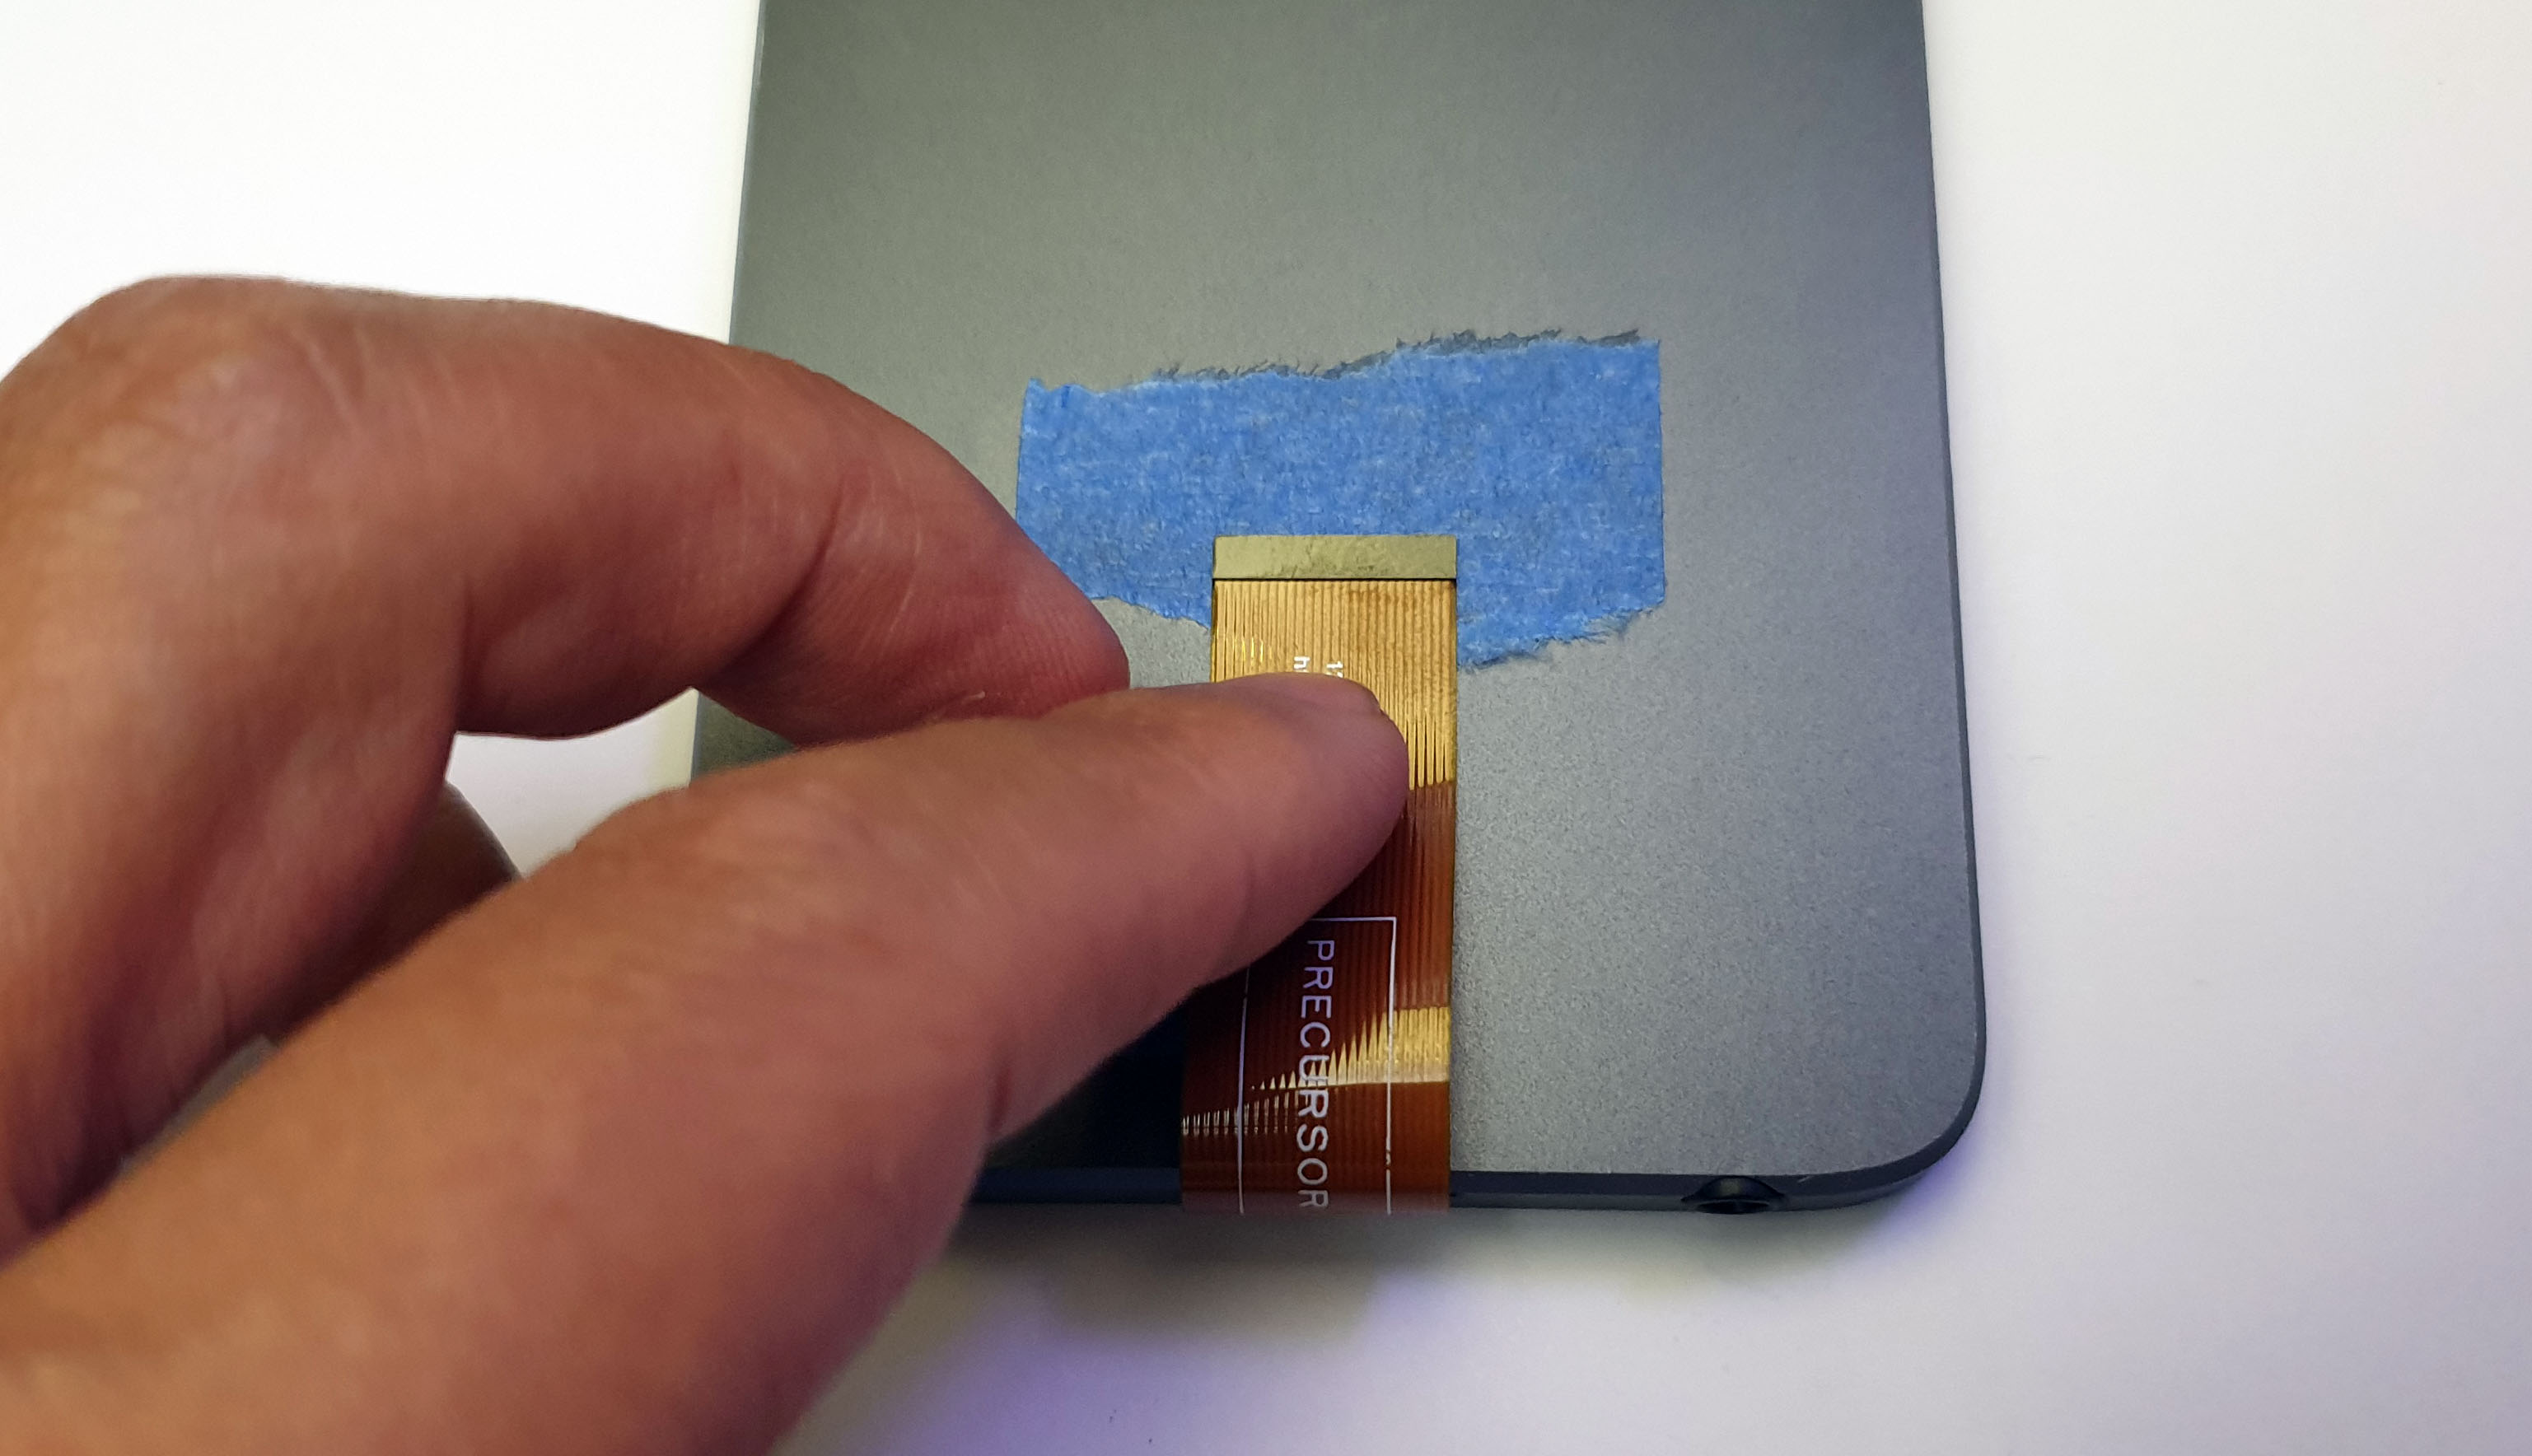
Insert the Debug FPC cable such that the conductors are facing down, and the Precursor logo is facing up with the arrow pointed into the device. The cable should be square with the body of the connector: the biggest mistake you can make is to have the cable inserted off-square, which would cause adjacent pins to short out.
Note the depth of cable insertion, and the squareness of the cable's orientation relative to the connector body.
Flip the dark brown tab on the back side of the FPC connector down again, to lock the cable in place. This is done by pressing down with your finger.
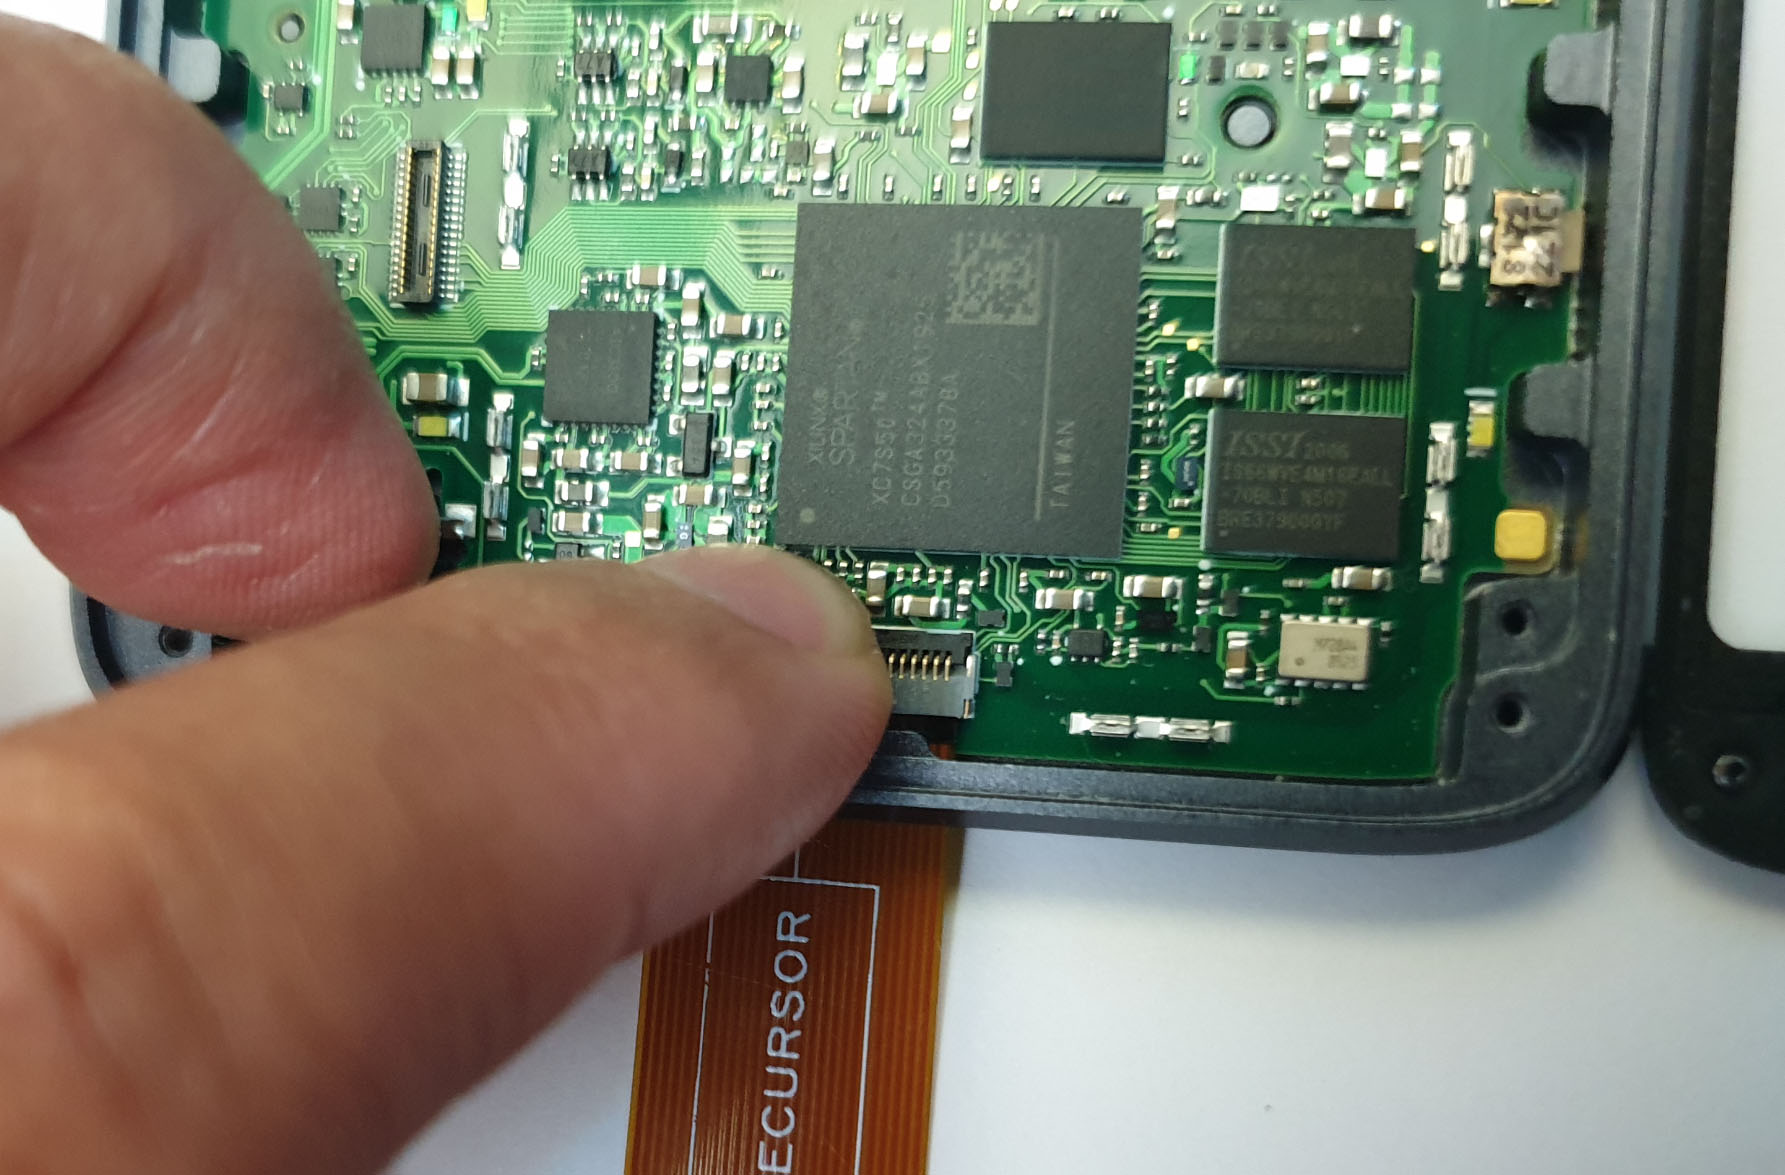
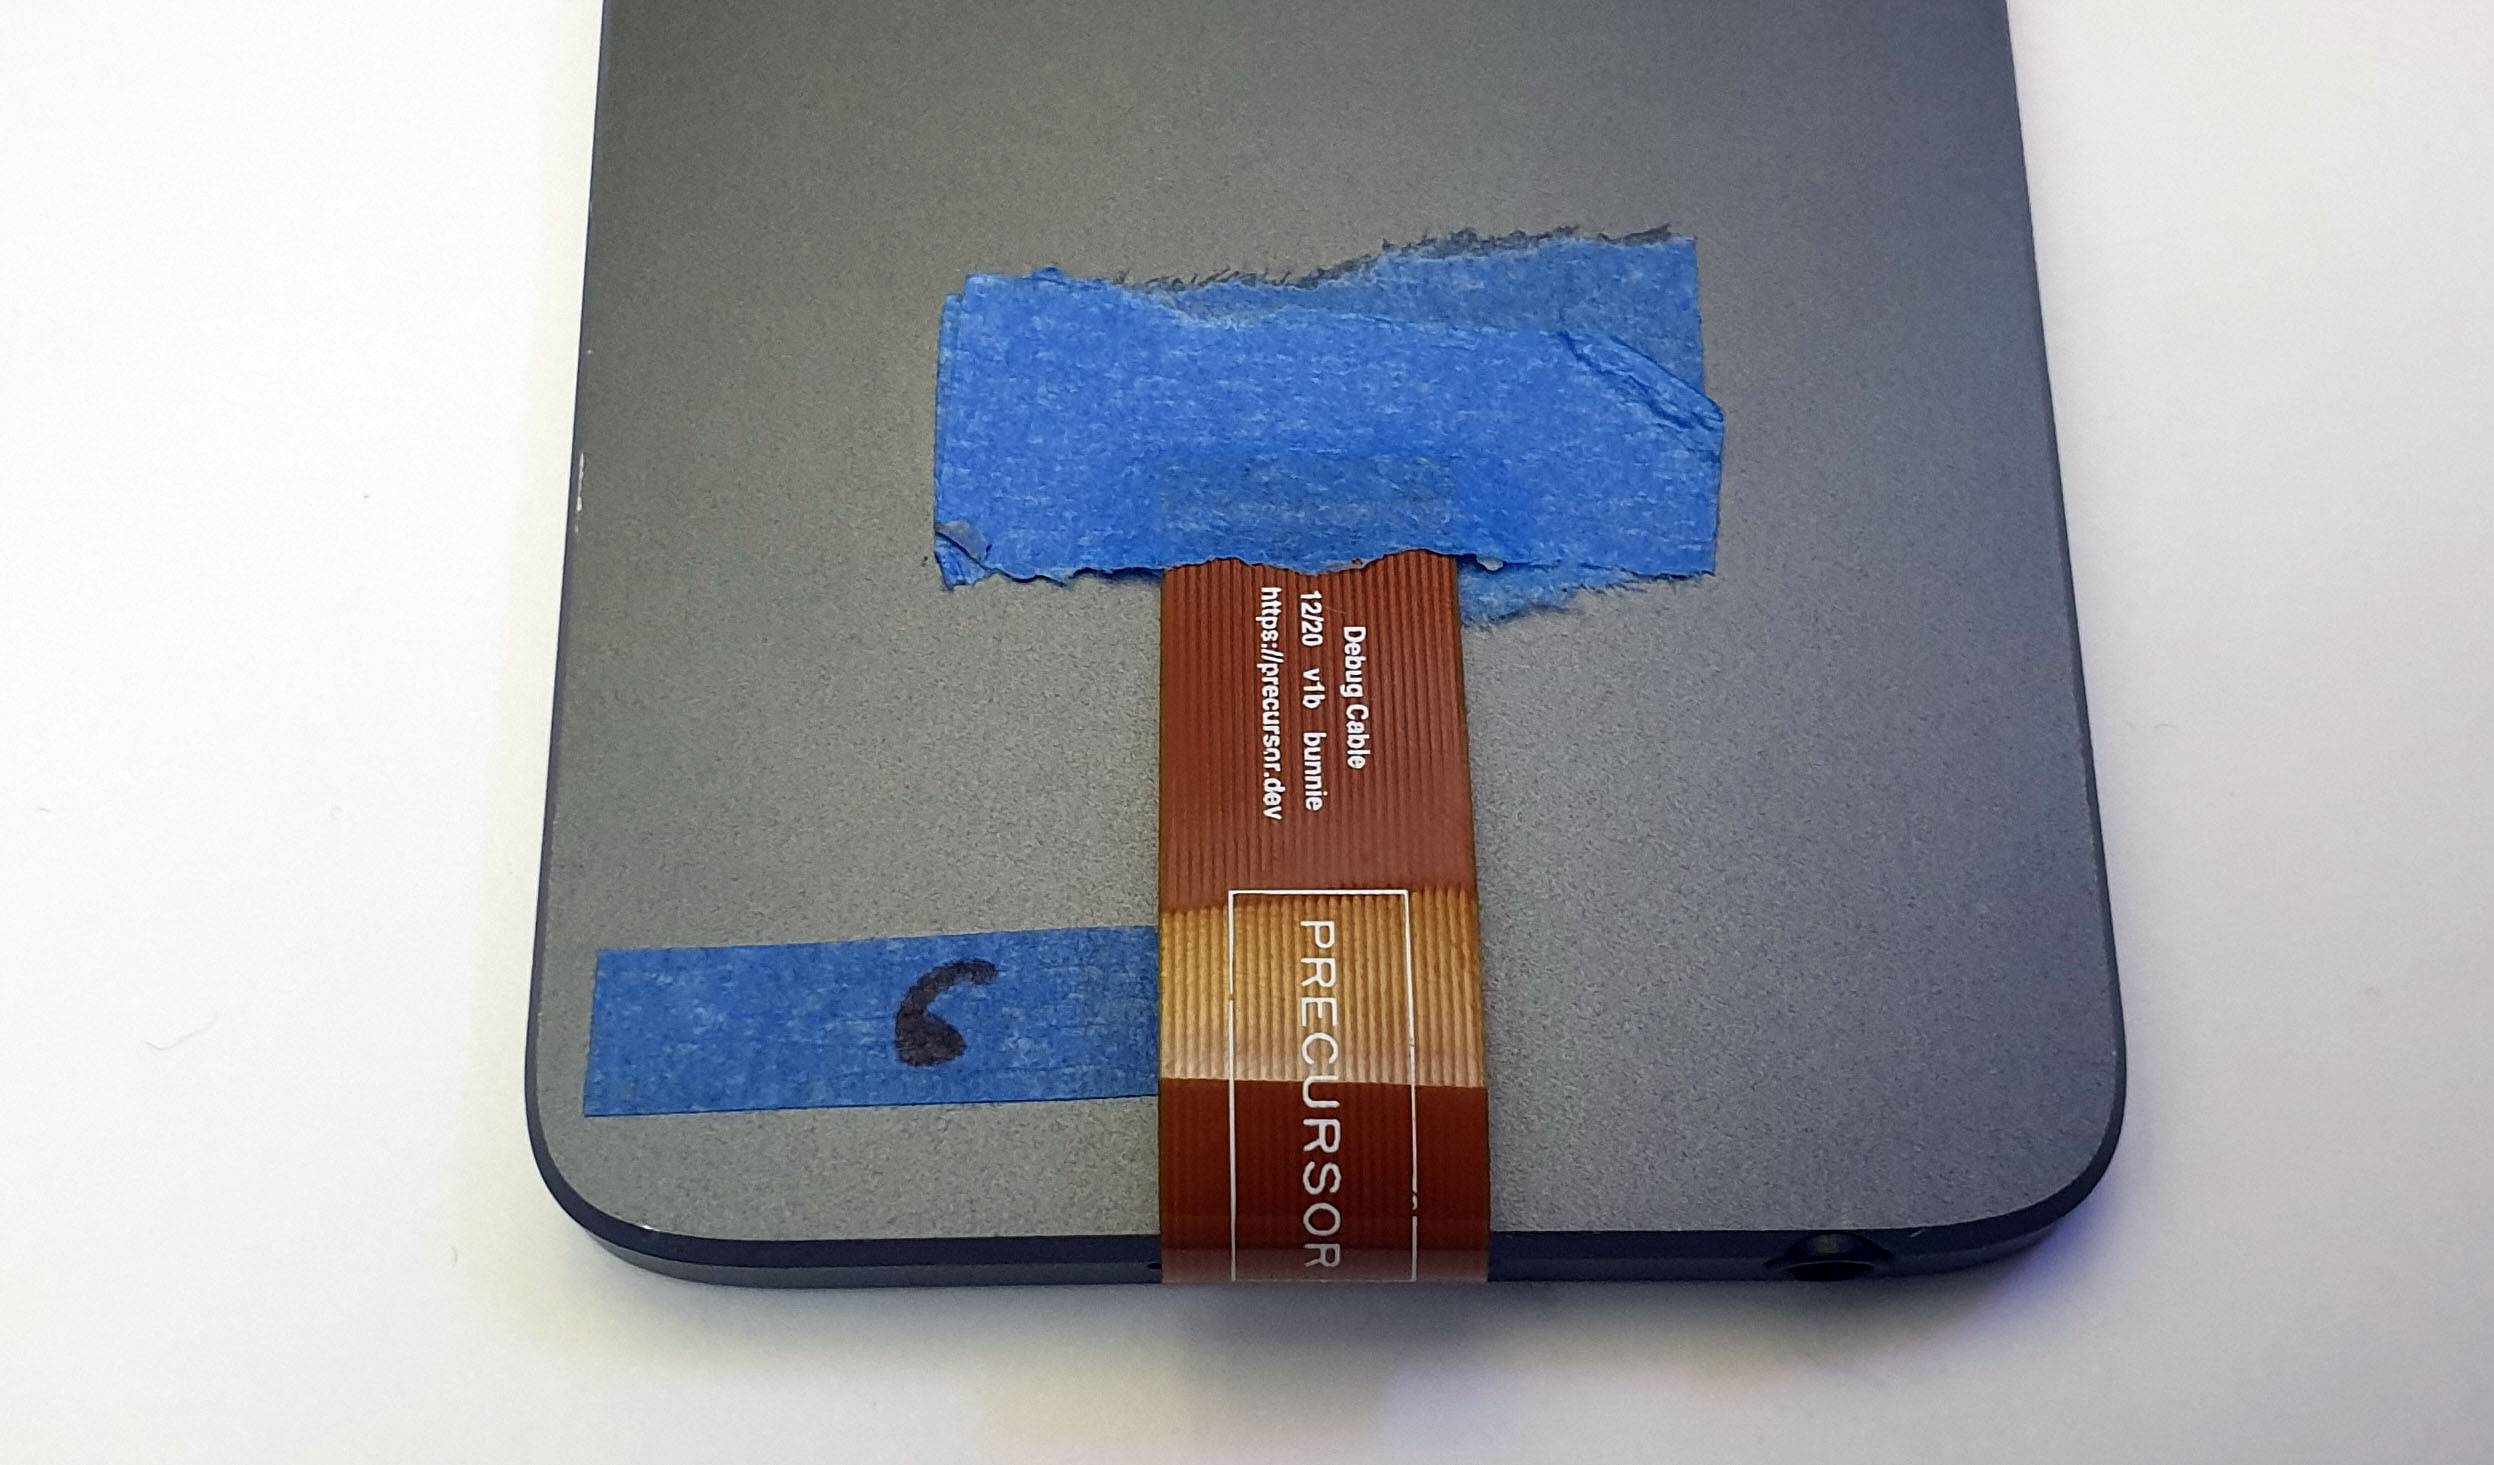
Above is an image of a properly inserted and latched FPC debug cable.
Before reassembling the device you might wish to inspect your motherboard while you have the case open (if you have not done so already).
Follow the disassembly instructions in reverse order:
- Attach the keyboard PCB
- Add the three keyboard PCB screws
- Flip the bezel over
- Add the six bezel screws
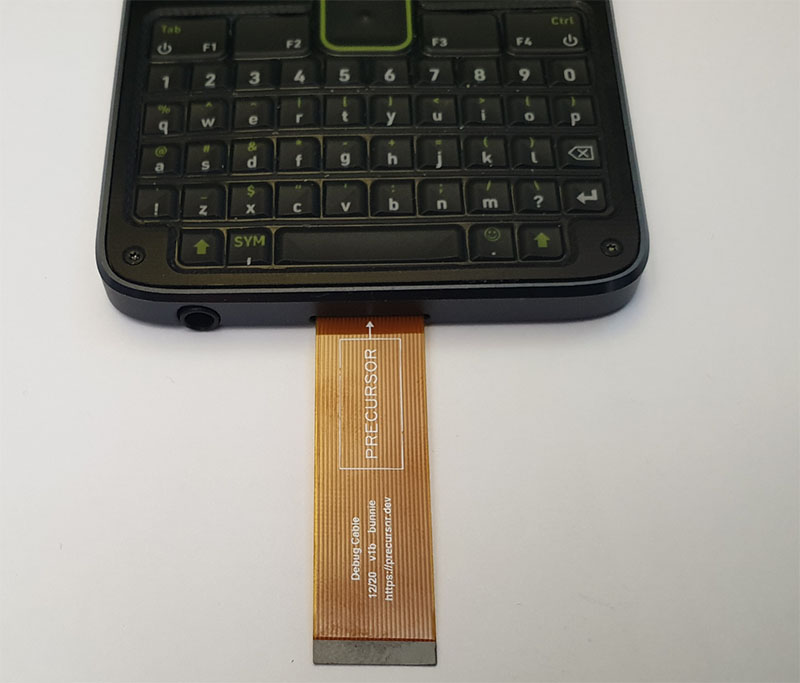
Above is what the cable will look like, once it is installed.
Attach the Debug HAT to the Raspberry Pi as shown below. The image below assumes you have a Model B, if you have a Model A, check the pin 1 alignment.
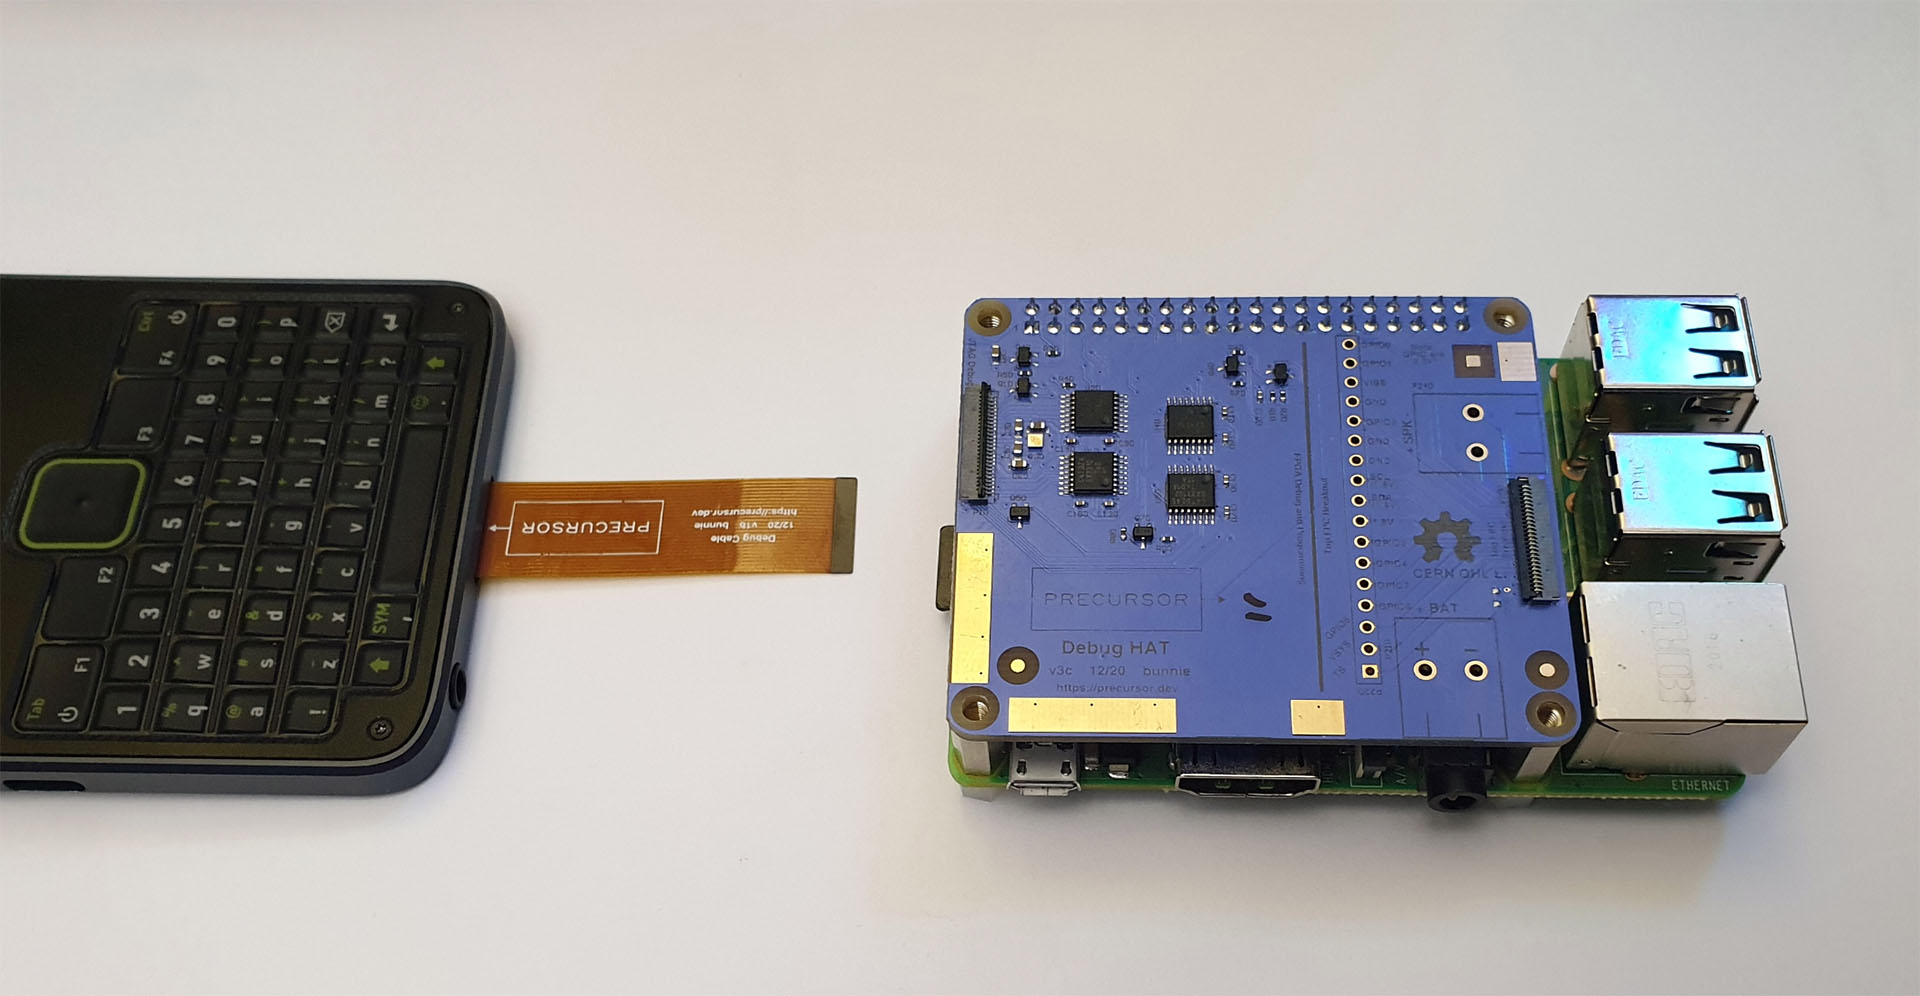
If you purchased your device via Crowd Supply, some mounting hardware for the Pi HAT is included, consisting of nylon screws and standoffs. It's recommended you use the mounting kit to at least prop up the far edge of the Debug HAT, to relieve strain on the connectors.
Attach the Precursor to the FPC connector labelled "JTAG Debug" on the Pi HAT, as shown below. This connector is the same type as used on the inside of the Precursor device, so likewise, you will need to:
- Flip open the dark brown tab on the FPC connector using your fingernail or similar implement
- Insert the debug cable squarely. It helps to lay the Precursor device flat on the table next to the HAT to assist with squaring the cable; if it is off to an angle you will need to hold the cable in place for the next step.
- Press down on the dark brown tab on the FPC connector.
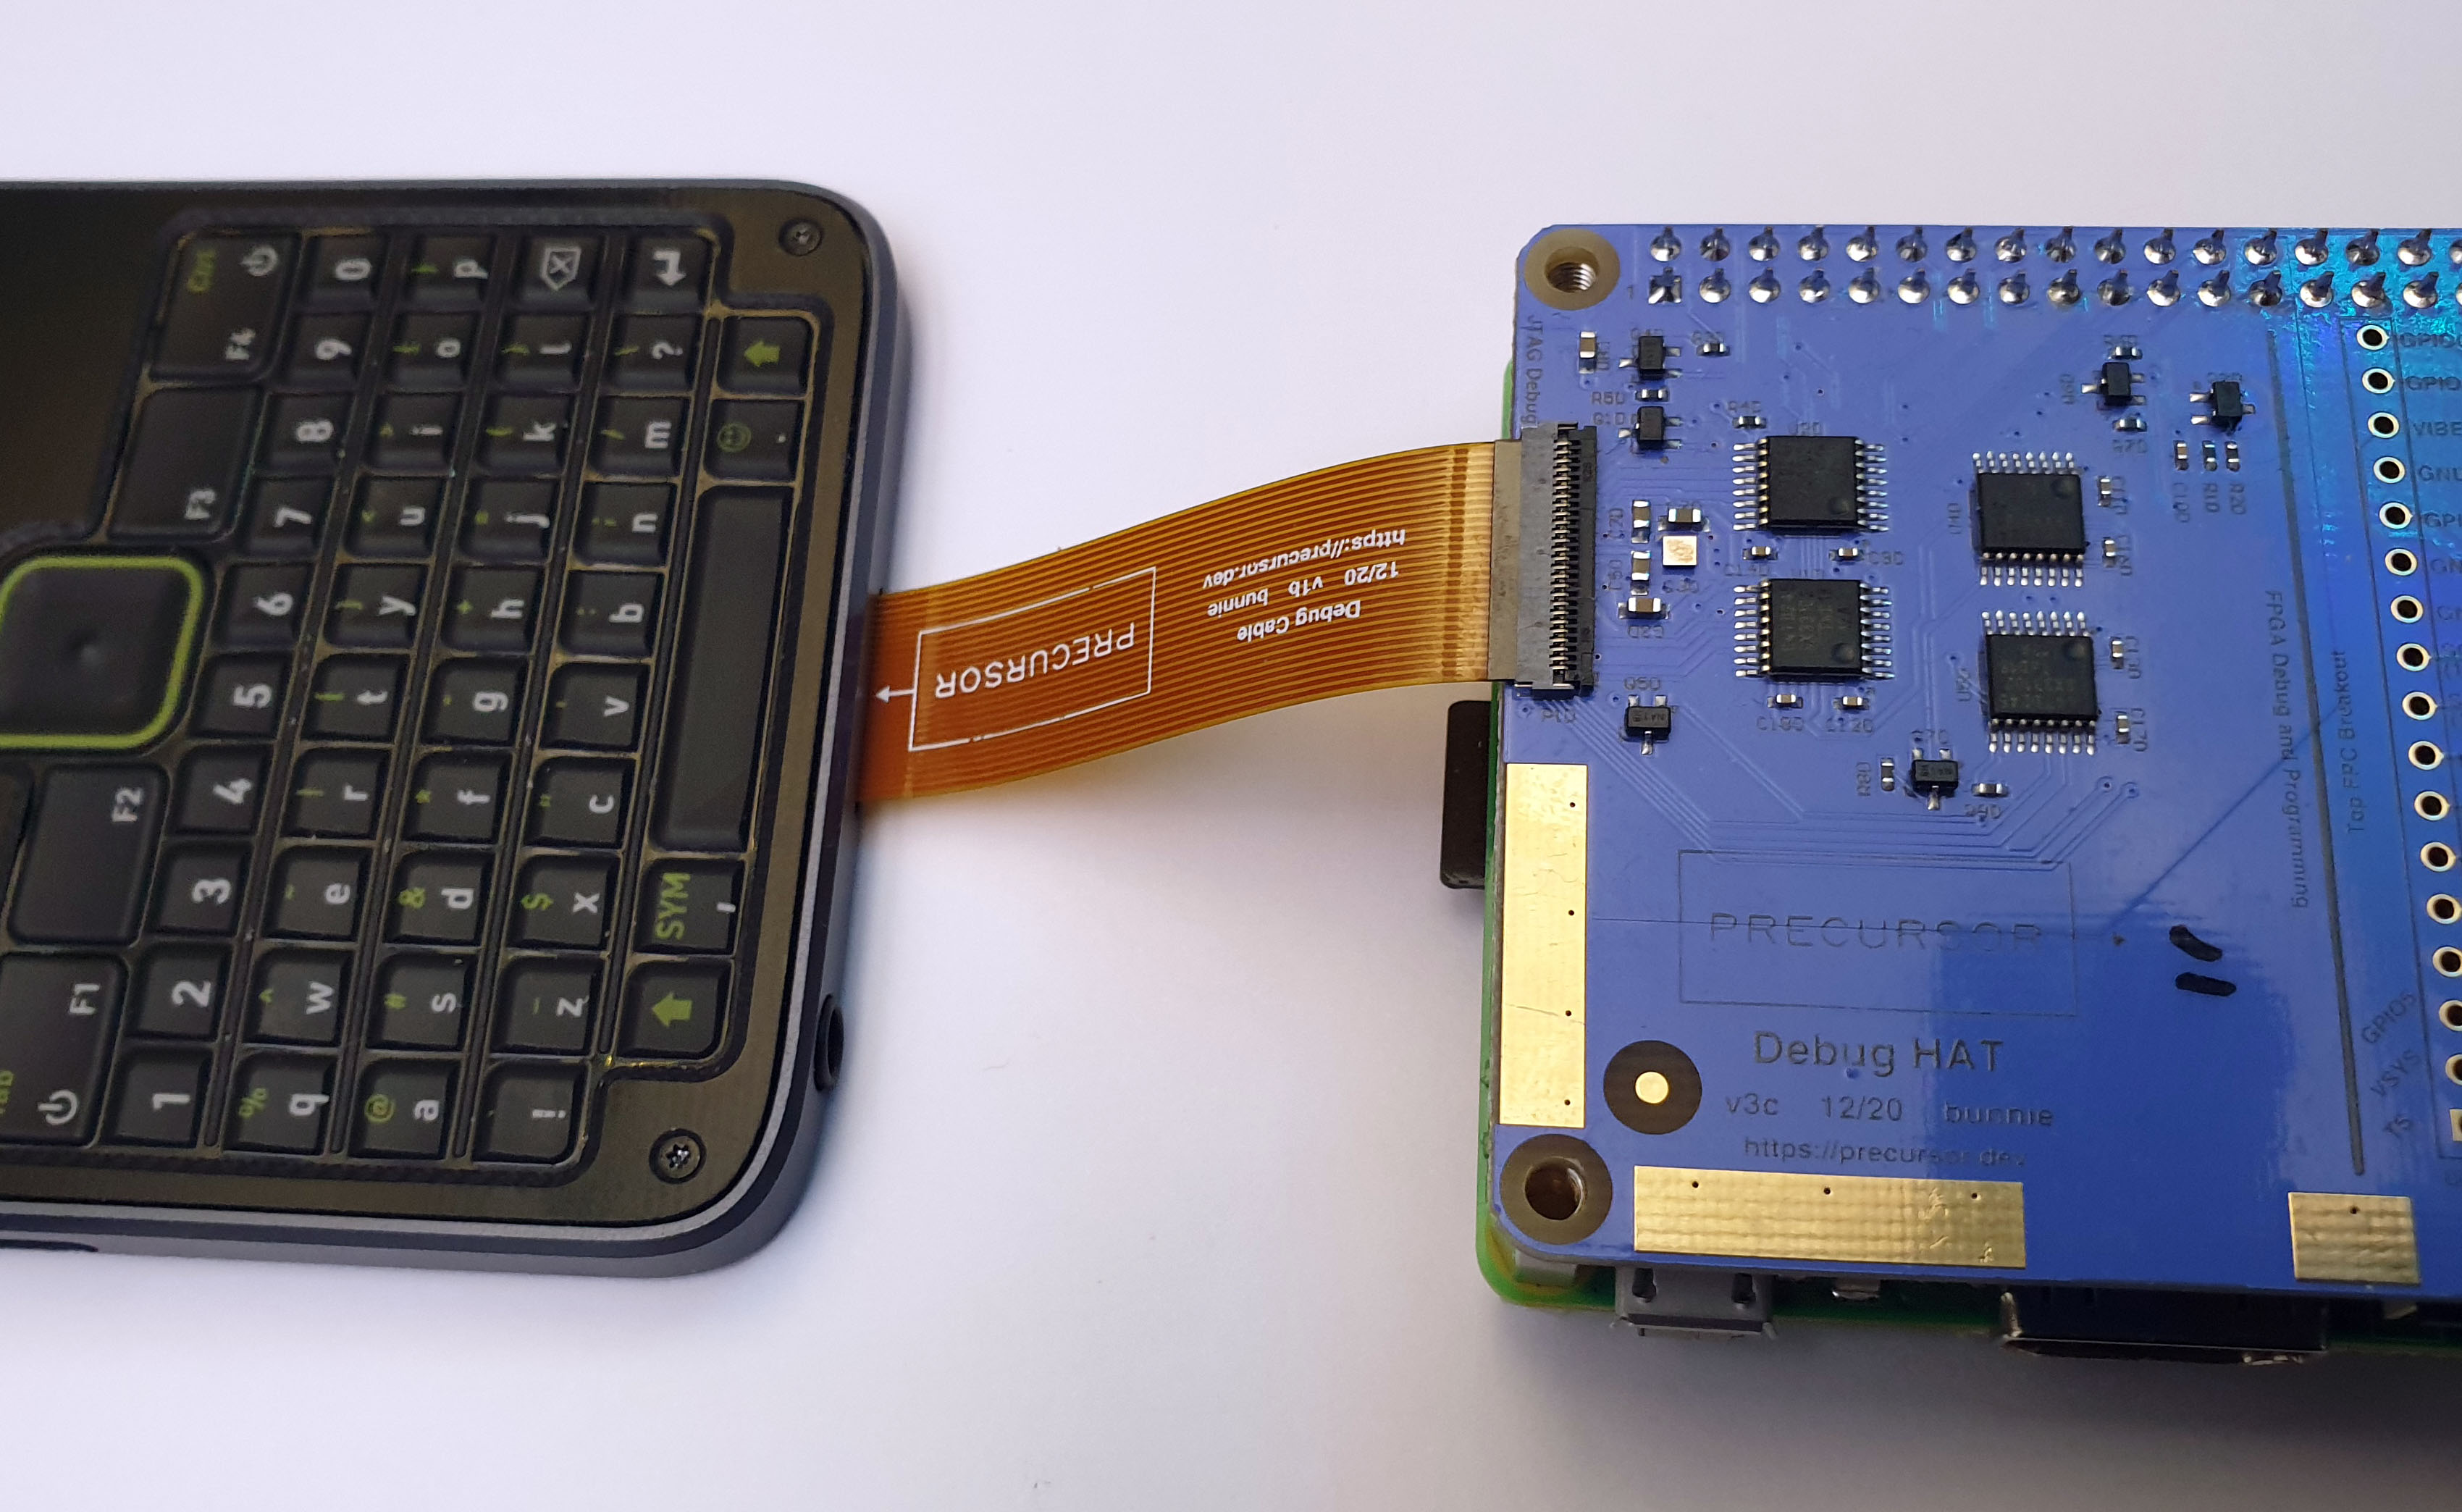
Above shows the finally assembled cable into the HAT.
Provisioning is done by through scripts contained inside the https://github.com/betrusted-io/betrusted-scripts repository. The README for the page documents how to use these commands, but as a quick preview, you will need to:
- Recursively clone
betrusted-scripts(check the README for details). You will also need to clone and buildfomu-flashif you plan to update the EC. - Make sure your desired firmware update artifacts are in
../precursorsrelative to thebetrusted-scriptsrepository. You can fetch the bleeding-edge image withfetch_ci_images.sh, or the latest stable release withfetch_stable_images.sh - Power on the Precursor device
- Run the corresponding update scripts, based on your desired task:
-
update_xous.shif you're flashing Xous firmware, but want to keep your root keys. This will require a manual step to "install gateware update" after boot, to pull in your root keys. -
provision_xous.shif you want to start from a factory-clean state with no root keys -
config_up5k.shif you want to update the EC -
wfx_image.shif you want to update the WF200 firmware
If you're running a 64-bit kernel on your Raspberry 4, the default build of fomu-flash will fail with Unable to initialize GPIO. As a quick remedy, you can use a workaround.
If you need to carry around your Precursor device with the cable installed, you can do this by taping the cable to the back of the device.
First, add a piece of non-conductive tape to the back of your device, roughly where the exposed metal ends of the cable will touch the back of the device when folded over.
Second, add a second piece of tape to hold the cable in place. This double-tape sandwich both products the conductive ends of the cable while ensuring there is no chance of accidental shorts against the metal back side of the case.
Note that if you have UART key injection turned on, you can get spurious characters showing up on your screen due to stray electrical fields interacting with the length of the cable. This feature can be disabled in software.
Precursor supports firmware updates over USB, assuming you have not spoiled the base FPGA and firmware images (if you have, see the "Failsafe Method"). This method is preferred for end users.
NOTE: most of the tools mentioned here have been moved to the tools/legacy, to avoid confusion with the latest recommendations now in the primary Updating page.
I just got my device and want the fastest path:
⚠️ Be sure to use a good, firmly engaged USB cable. USB failures during factory reset may leave the device in a state where the "failsafe" update method is mandatory.- Run
sudo pip3 install pyusb progressbar2 pycryptodometo get the python dependencies. - From the
tools/legacydirectory in the xous-core repository, runfactory_reset.sh -s(on Linux/macOS) orfactory_reset.ps1(on Windows). This will wipe all keys and stored data.- You may specify a locale with an additional argument of
-l LOCALE(on Linux) or simplyLOCALE(on Windows).LOCALEmay be one ofen,ja,zh,fr, anden-tts.
- You may specify a locale with an additional argument of
- Then, on the Precursor device, run
ecup auto. This will update the EC. Failure to do this will lead to problems with the connection manager.
I have been using my device and don't want to lose data: (this updates your device to the latest stable release)
- Run
update_ci.sh -s(on Linux) orupdate_release.ps1(on Windows).- You may specify a locale with an additional argument of
-l LOCALE(on Linux) or simplyLOCALE(on Windows).LOCALEmay be one ofen,ja,zh, anden-tts. - Assumes you've already initialized your root keys
- You will need to run "Install gateware update" from the main menu on the Precursor device to overlay your existing root keys into the update.
- You will need to run
ecup autoas well, if there is an EC update in the latest release. If you're not sure, it doesn't hurt to run it. - This will pull the latest "stable" CI binaries and stage them on your Precursor device over USB.
- You may need to set up Python dependencies and udev rules
- You may specify a locale with an additional argument of
I would like to try the latest CI build, I don't mind losing data:
- Run
update_ci.sh -b -l en(or see above for other locale options) - After the script finishes it will instruct you to
- insert a paper clip into the lower right hand corner
- run
install gateware updatefrom the root menu - finally, run
ecup auto
Trouble running the script? Can't figure out a dependency? Running Windows? Need to update the EC? Read on.
The SoC FPGA can be updated directly by USB, while the EC FPGA requires a two-stage update which is mediated by the SoC FPGA.
There are two components to the SoC FPGA: the gateware, and the firmware. The gateware is the FPGA bitstream itself. Re-imaging this can radically reshape the capabilities of your device, and also brick it if you do it wrong.
The good news is that the gateware is not "execute in place" (XIP), so a botched gateware update will not take hold until your next cold boot (e.g. pushing paperclip into the hole on the right hand side, issuing a cold boot command, or the battery dying altogether). Since the USB update process is coordinated entirely by hardware inside the FPGA, so long as the firmware hasn't crashed the Wishbone bus controller, you can redo a botched firmware update. Note that if your device is not responding over USB, it's more likely that you need to unplug and replug it back in to re-enumerate, rather than do a cold boot!
Maintainer's note: this is a mirror of the README.md file found in betrusted-ec. This is not the main copy and may be stale.
usb_update.py is the script for copying firmware packages from a host onto a Precursor device. It can be found in the tools directory of both the betrusted-ec and xous-core repos.
-
sudo pip3 install pyusb progressbar2 pycryptodome(you needpyusbandprogressbar2in the sudo environment) - you probably need to run as
sudo:sudo python3 ./usb_update.py [args]to access the USB port; add the appropriate command line arguments
In order to get xtask to work (it calls usb_update.py) you will need to add a udev rule. Under
Ubuntu 18.04LTS, it looks something like this:
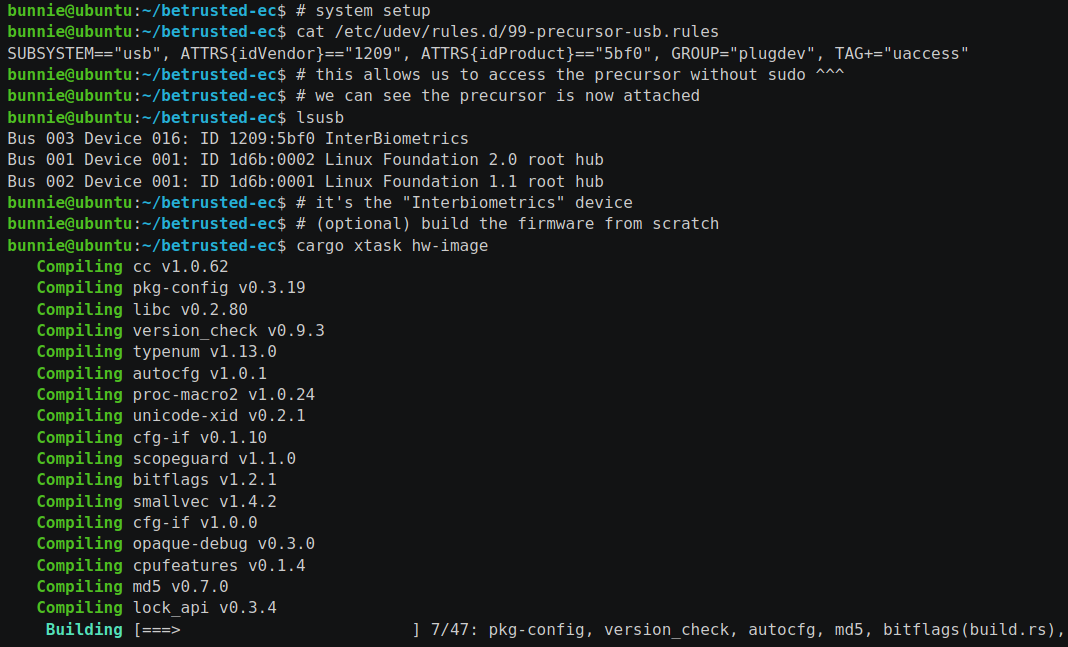
- Add a file called
99-precursor-usb.rulesto /etc/udev/rules.d/ with the following content as a single line terminated by a carriage return:SUBSYSTEM=="usb", ATTRS{idVendor}=="1209", ATTRS{idProduct}=="5bf0", GROUP="plugdev", TAG+="uaccess" - Run
sudo udevadm control --reload-rules - If the device was plugged in, you'll have to unplug it and plug it back in again for the new rules to take effect.
We would appreciate any improvements/suggestions for alternate Linux distros. udev rules seem very distro-specific and change with time.
If you are using a Raspberry Pi, the following script to install a udev rule has been tested to work on Rasbpian:
mkdir -p /home/pi/code
cd /home/pi/code
sudo apt update
sudo apt install python3-venv python3-wheel libusb-1.0-0
python3 -m venv venv
source venv/bin/activate
pip3 install pyusb progressbar2 pycryptodome
cat <<EOF | sudo tee /etc/udev/rules.d/50-precursor.rules
ATTR{idVendor}=="1209", ATTR{idProduct}=="5bf0", SYMLINK+="precursor%k", MODE="660", GROUP="plugdev"
EOF
If you log out and log back in again, you will need to activate the venv before running the updating script:
source venv/bin/activate  # use this to enter the venv
python3 ./usb_update.py ...
deactivate  # use this to leave the venv
- You will need to install python3 from the Windows App store if you don't already have it
- Run
pip3 install pyusb progressbar2 pycryptodomefrom a Powershell - use zadig to remap
Precursor pvt2's Windows driver tolibusb-win32 - Run
python3 .\usb_update.py [args]from a Powershell; elevated privs are not necessary after usingzadig.
Users have reported trouble navigating the Zadig UI. Here is a guide:
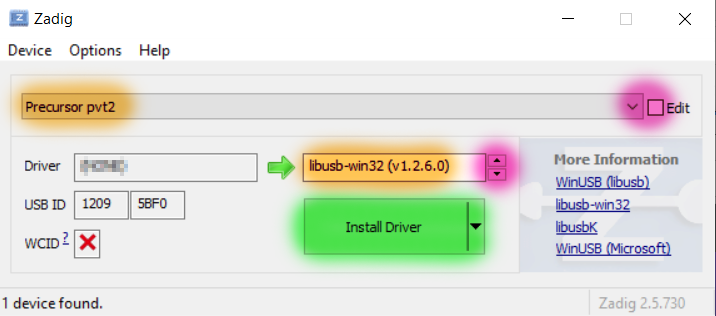
- Select "Precursor pvt2" from the large pull-down box. Click the "Edit" checkbox if the menu is blank or unselectable.
- Select the driver to be "libusb-win32", using the red highlighted arrows, as shown in the right text box. You can ignore the text in the left box.
- Click the "Install Driver" (or "Reinstall driver") button (highlighted in green) once these settings are made. This step can take several minutes.
Follow the Linux instructions. Tested factory_reset.sh on macOS Monterey 12.3 with Python from Homebrew without issue.
Systems using an AMD Ryzen chipset run about 5x slower than others (e.g. Raspberry Pi, Intel chipsets). This holds true across Linux/Windows OS. The effect has been confirmed on both B450 and B550 Socket AM4 motherboards. It seems to be linked with full-speed packet rates being throttled on AMD motherboards by the chipset, but TBD. Write speed is ~8.5kiB/s on AMD, vs ~44kiB/s on Raspberry Pi.
update_ci.sh (or update_ci.ps1/update_release.ps1 on Windows) is a shell script that (a) checks the CI server for either the latest bleeding-edge or the latest stable release, and (b) stages the most typical artifacts you need to update the device. You must pass it the argument of -s or -b, for stable or bleeding-edge, to select which release train you want to try, and afterwards you need to run install gateware update from the menu to get the SOC data to take hold (assuming you've provisioned the root keys). If the EC has changed as well in the latest update, you should run ecup auto to update all the EC artifacts.
You may also pass an optional argument of -l LOCALE (on Linux) or just LOCALE (on Windows) to specify which language you prefer for the OS UX. Note that LOCALE support is extremely Beta right now, so there will be some rough edges.
For a more fine-grained, command-line oriented update, usb_update.py is what you want.
The updater encodes the offsets of every binary location in the script. When these locations shift, then the updater script should no longer be used for a given Precursor revision.
usage: usb_update.py [-h] [--soc [SoC gateware file]] [-s [SoC gateware file for staging]] [-l [loader file]] [-k [kernel file]] [-e [EC gateware package]] [-w [WF200 firmware package]] [--audiotest [Test audio clip]]
                     [--peek ADDR] [--poke ADDR DATA] [--check-poke] [--config] [-i IMAGEFILE ADDR] [--verify] [--force] [--bounce]

Update/upload to a Precursor device running Xous 0.8/0.9

optional arguments:
  -h, --help            show this help message and exit
  --soc [SoC gateware file]
                        'Factory Reset' the SoC gateware. Note: this will overwrite any secret keys stored in your device!
  -s [SoC gateware file], --staging [SoC gateware file for staging]
                        Stage an update to apply
  -l [loader file], --loader [loader file]
                        Loader
  -k [kernel file], --kernel [kernel file]
                        Kernel
  -e [EC gateware package], --ec [EC gateware package]
                        EC gateware
  -w [WF200 firmware package], --wf200 [WF200 firmware package]
                        WF200 firmware
  --audiotest [Test audio clip]
                        Test audio clip (must be 8kHz WAV)
  --peek ADDR           Inspect an address
  --poke ADDR DATA      Write to an address
  --check-poke          Read data before and after the poke
  --config              Print the descriptor
  -i IMAGEFILE ADDR, --image IMAGEFILE ADDR
                        Manually specify an image and address. Offset is relative to bottom of flash.
  --verify              Readback verification. May fail for large files due to WDT timeout.
  --force               Ignore gitrev version on SoC and try to burn an image anyways
  --bounce              cycle the device through a reset
You can try reading the csr.csv descriptor out of the ROM to see if usb_update.py is working correctly.
Part of it is located at 0x20277008, and it's always 0x2d2d2d2d (this is part of a ---- ASCII text header),
as follows:
% python3 ./usb_update.py --peek 0x20277008
0x2d2d2d2d
NB: Trivial readout via USB of the gateware is blocked by the USB core now, for security reasons.
Linux users can use lsusb to see a device with an entry similar to Bus 003 Device 071: ID 1209:5bf0 InterBiometrics to confirm it's plugged in and working correctly.
- Clone the xous-core repo. Change into the repository's root directory.
- Install
usb_update.pyby following the instructions above. - [Optional] build Xous from scratch by running
cargo xtask app-image. - Plug your device into your computer via USB.
- Load your firmware by changing to the
toolsdirectory and runningpython3 ./usb_update.py -s <path to soc_csr.bin>, along withpython3 ./usb_update.py -l <path to loader>and 'python3 ./usb_update.py -k. Loader and kernel paths are printed at the end of thecargo xtask app-image` with a message like "Signed image at " - Apply your gateware update by selecting
Force Gateware Updatefrom the root menu of your Precursor device, and follow the on-screen instructions. If you only have the option toInitialize Root Keys, then you have not set any passwords, and you should use the "factory reset" path below. - Sign your updated kernel and loader by selecting the
Sign Xous updateoption from the main menu. This protects your update from further modification by signing with a key that is only known to your device.
- Clone the xous-core repo. Change into the repository's root directory.
- Install
usb_update.pyby following the instructions above. - [Optional] build Xous from scratch by running
cargo xtask app-image. - Plug your device into your computer via USB.
- Load your firmware by changing to the
toolsdirectory and runningpython3 ./usb_update.py -s <path to soc_csr.bin>, along withpython3 ./usb_update.py -l <path to loader>and 'python3 ./usb_update.py -k. Loader and kernel paths are printed at the end of thecargo xtask app-image` with a message like "Signed image at " - Insert a paperclip into the hole on the right hand side of your device to load the flashed gateware, or do a coldboot by entering
sleep coldbootin theshellchatapplication.
EC Updates are done by Xous. However, the firmware itself needs to be staged into the Precursor device so that Xous may perform the update.
Therefore updates are a two-stage process. We refer to the host-to-Precursor copy as "staging", and the SoC-to-EC update as "updating".
- Clone the xous-core repo. Change into the repository's root directory.
- Install
usb_update.pyby following the instructions above. - [Optional] build Xous from scratch by running
cargo xtask app-image. - Plug your device into your computer via USB.
- Stage the new firmware by running
python3 ./usb_update.py -e <path to EC>and/orpython3 ./usb_update.py -w <path to wf200 blob>. -
On the Precursor device (not the host), select the
Force EC Updatemenu item.
Note that the EC is not XIP for either gateware or firmware, and so the reset is mandatory for any changes to show up. Also note that if you crash either the fw or gw update for the EC, you may not be able to update it again, and you'll have to fall back to the Failsafe Method to recover your device.
Click on the image below for a demo of what staging a firmware element might look like on an Ubuntu system:
Watch the video below for how the actual firmware update happens on the Precursor device once the objects have been staged via USB:
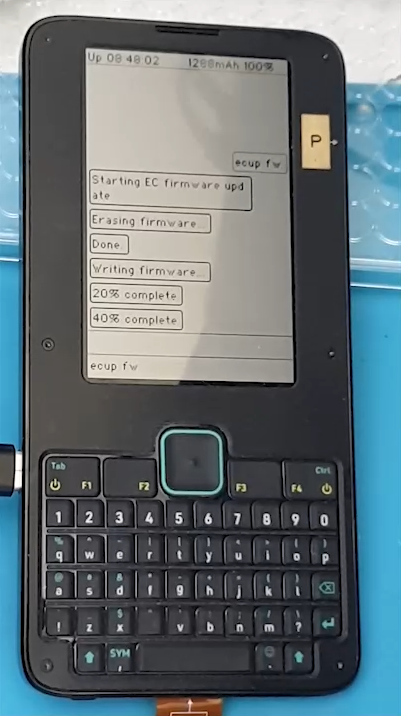
Note near the end of the video above, there is a brief glitch in the status bar, due to the EC reloading. This is normal; the glitch should last about 1-2 seconds.
If the firmware update was unsuccessful, instead of a brief glitch, you would get a different number in the status bar.
- Gateware broken: something like "65536 -1%" prints in the status bar, as an unconfigured EC would just float the data line high and the SoC would interpret all 1's.
- Firmware broken: something like "56797" might print on the status bar. This is 0xDDDD, which is the value sent by the SPI engine on the EC if the firmware doesn't load a response value in time.
In either case, you will have to plug in the debug cable and use the "Failsafe" method outlined on this page, because we rely upon a functional EC to update itself.