v1.3 3. Ground Station - alanbjohnston/CubeSatSim GitHub Wiki
The Ground Station for the CubeSatSim is used to receive the radio transmissions so you can listen to them and decode telemetry.
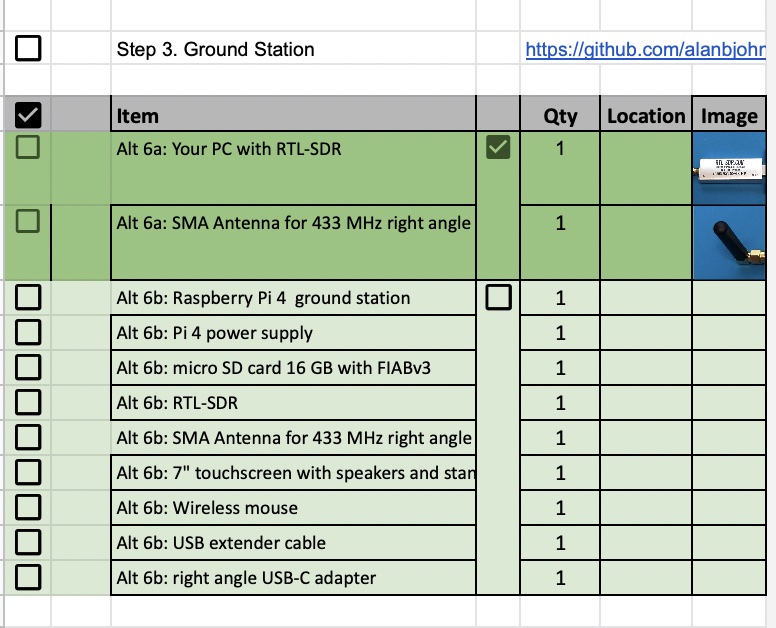
Checklist
The BOM has a sheet "By Steps" which lists the parts needed for each step in order. http://cubesatsim.org/bom If you have a Google account, you can make a copy of this spreadsheet ("File" then "Make a Copy") and check off each part as you install it.
For example, here is the checklist for this step:
The Ground Station for the CubeSatSim utilizes FoxTelem, the open source AMSAT telemetry decoding software by Chris Thompson, G0KLA/AC2CZ which you can download here https://www.amsat.org/foxtelem-software-for-windows-mac-linux/

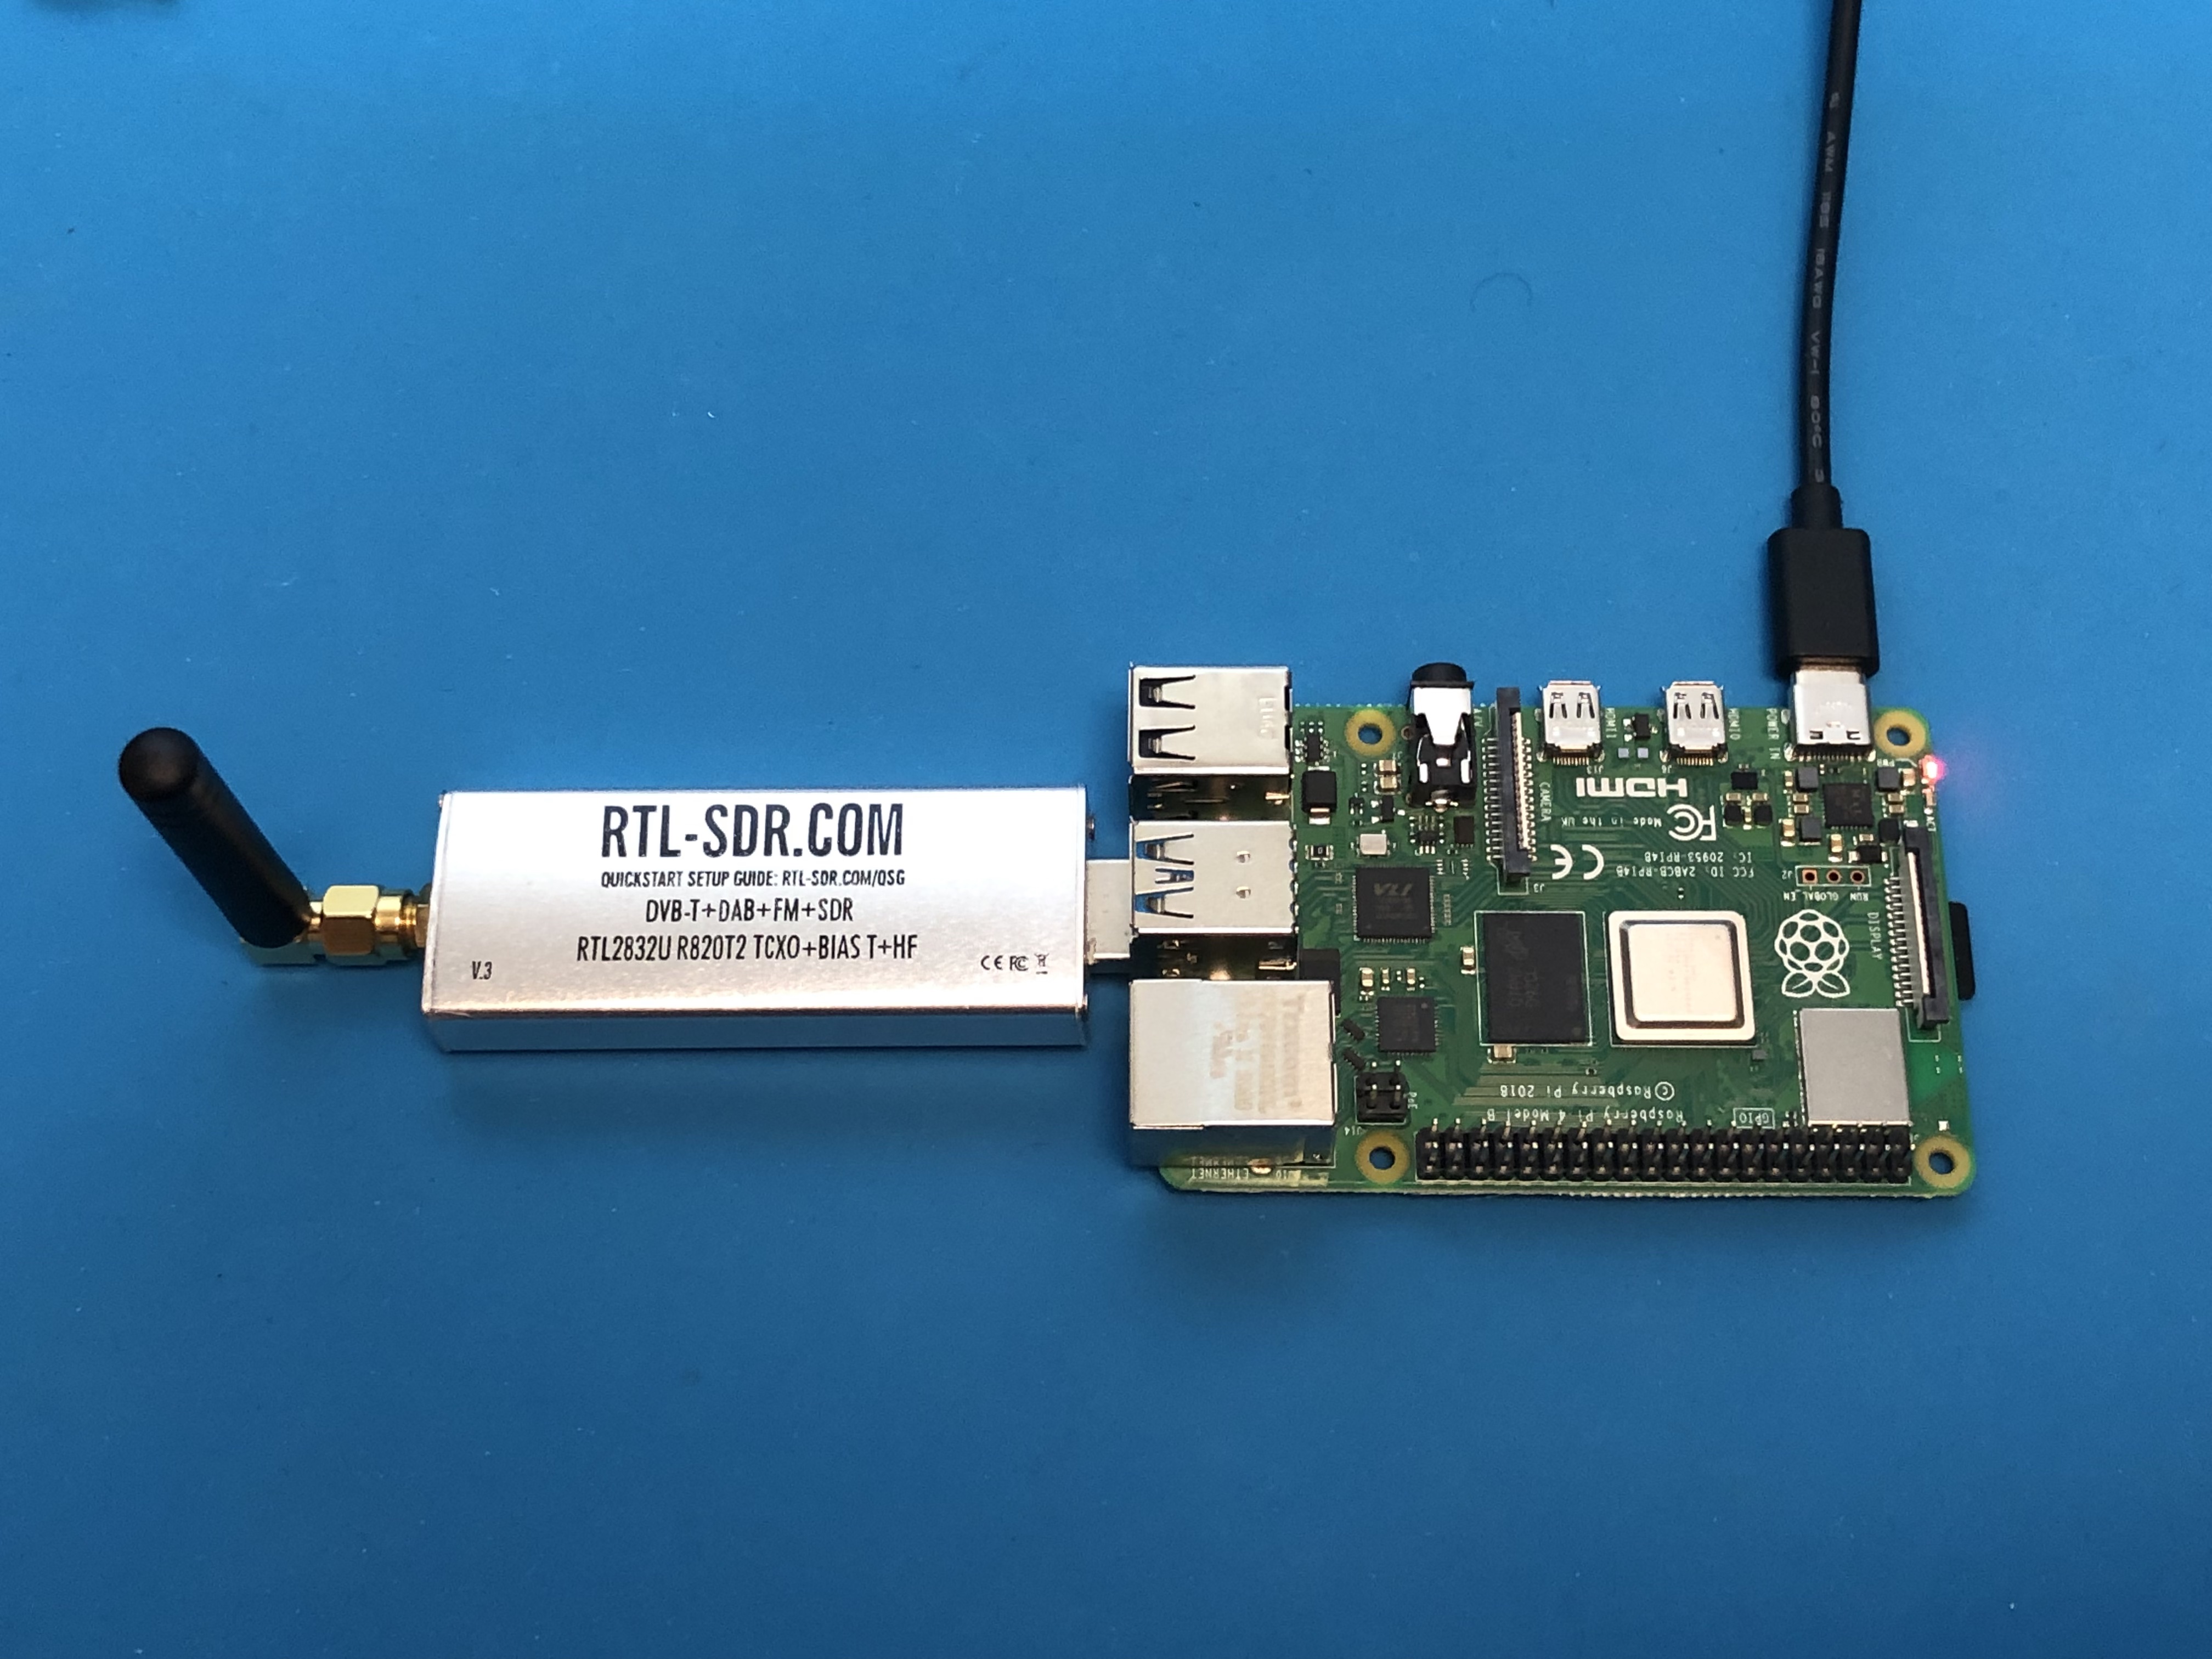
You will need an SDR such as the RTL-SDR. I recommend this one https://www.amazon.com/gp/product/B0129EBDS2. You will need a 433 MHz antenna such as https://www.digikey.com/en/products/detail/rf-solutions/ANT-STUBR-433SM/5845732. Or, you can order an RTL-SDR with a telescopic dipole antenna.
For the CubeSat Simulator Lite, older versions of the CubeSatSim (vB3 and older) or the current version running in AFSK 1200 bps APRS telemetry mode, these are the Ground Station instructions.
The simplest way to get a fully functional Ground Station is to use a Raspberry Pi 3B or 4B with an RTL-SDR dongle and download the SD card image as described in the next section.
Besides FoxTelem, the ARISS Radio Pi image also has OpenWebRX, CubicSDR, QSSTV, and Gpredict
3.1 Raspberry Pi Ground Station
Video
Here is a video of how to get the Raspberry Pi Ground Station up and running: https://youtu.be/l1o9LD_2hlU
Here is a playlist of videos on how to use all the software: https://youtube.com/playlist?list=PL-pgyk1pc4_OBQOov45FaBZXXWYZh_oLN
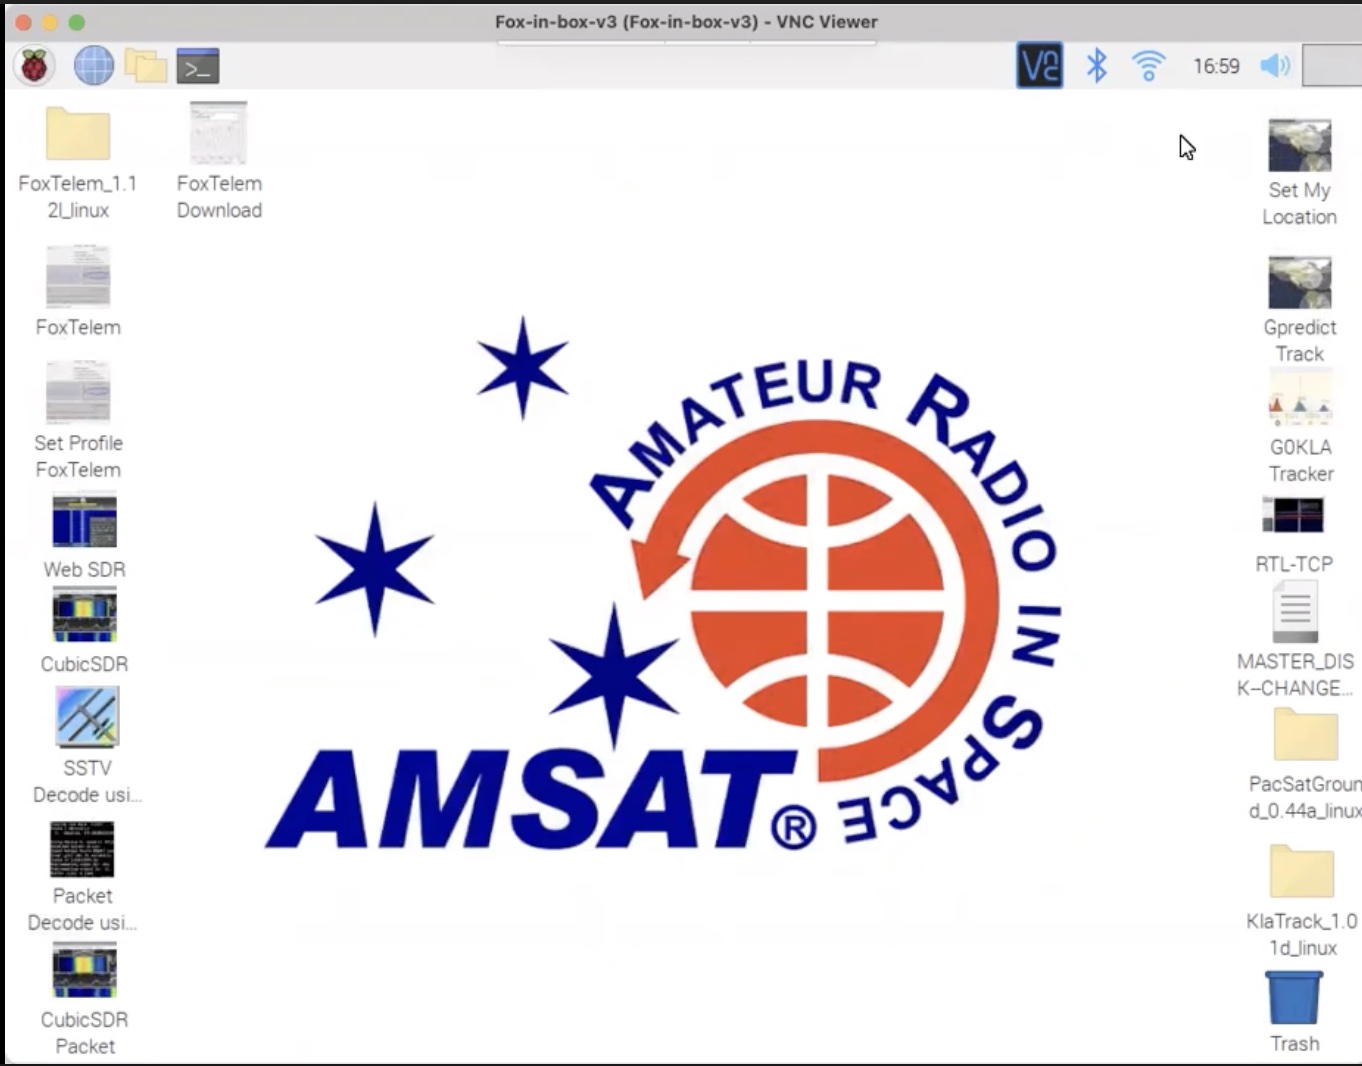
Fox-in-a-Box v3 Image
You can write a pre-built Raspberry Pi Ground Station disk image to your SD card. Your Pi 3B or 4B would then boot up immediately running FoxTelem software. This image is based on the ARISS Radio Pi. It has FoxTelem to decode FSK and BPSK telemetry, and also QSSTV to decode SSTV. The Web SDR using OpenWebRX Web will decode the AFSK telemetry by selecting Digital/Packet demodulation.
You will need a micro SD card with at least 16GB of capacity and a micro SD card writer and free software such as balenaEtcher: https://www.balena.io/etcher/ You will need to have administrator privileges on your computer in order to do this.
Download the disk image here using your web browser: https://cubesatsim.org/download/Fox-in-box-v3.iso.gz
Run balenaEtcher and select the Flash from File option, then select the image file you downloaded.
Insert your micro SD card - the card will be erased in the process of writing. Click on Select Target and select your SD card writer.
Then select Flash to begin writing. You will need to input your administrator password, then the write will begin. It will take a while.
You can then insert the micro SD card in your Pi 3B or 4B, plug in your RTL-SDR dongle, and it will boot. You should see this Pi Desktop:
This video shows the basic operation of the Pi Ground Station: https://www.youtube.com/watch?v=68ULJdP5OZw
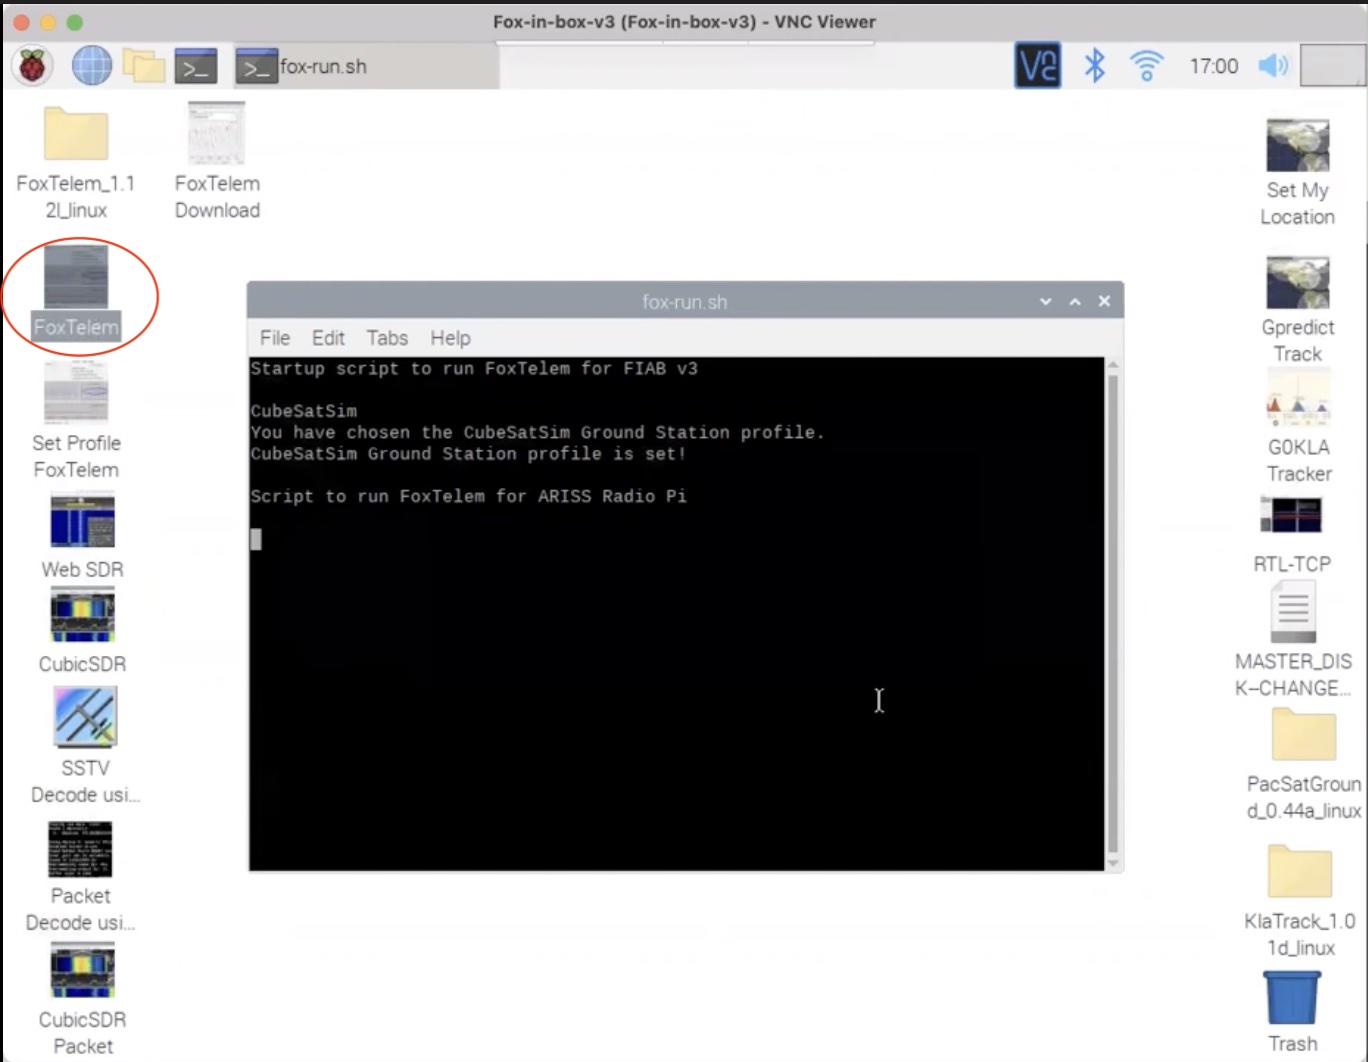
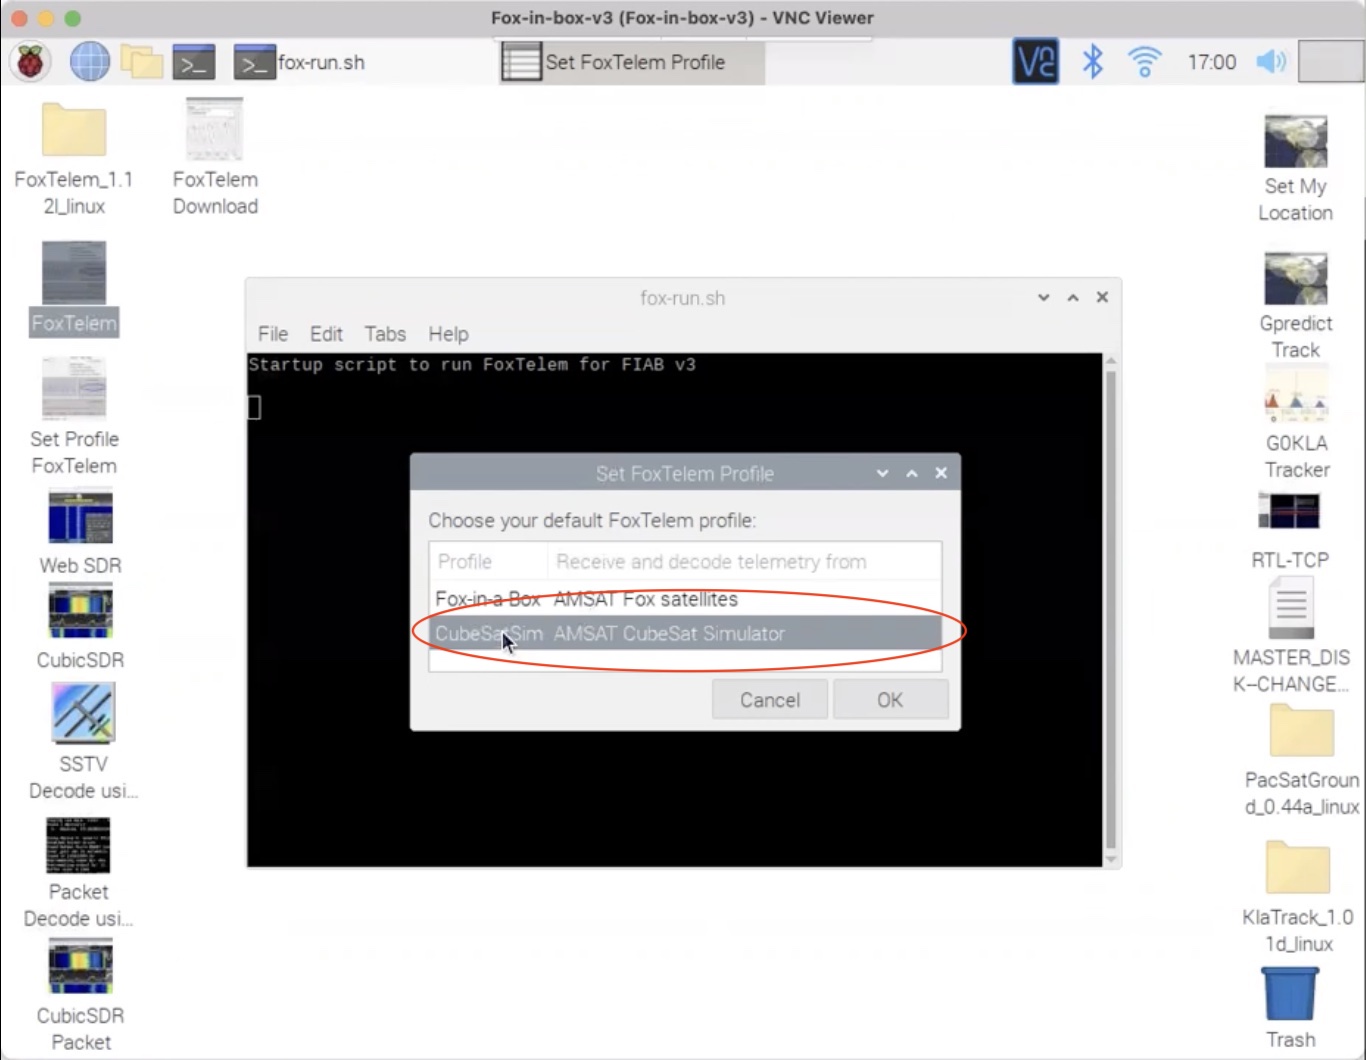
Double click on the FoxTelem icon on the Desktop (2nd from the top on the left - circled in red below) and a script will start to run:
The first time you run FoxTelem, you will be prompted to choose your profile - select CubeSatSim AMSAT CubeSat Simulator, shown circled in red here:
From now, on, The when you boot up your Pi, it will auto run FoxTelem. FoxTelem will open and be in the mode you were running when last quit the program. If you are running it for the first time, it might look like this:
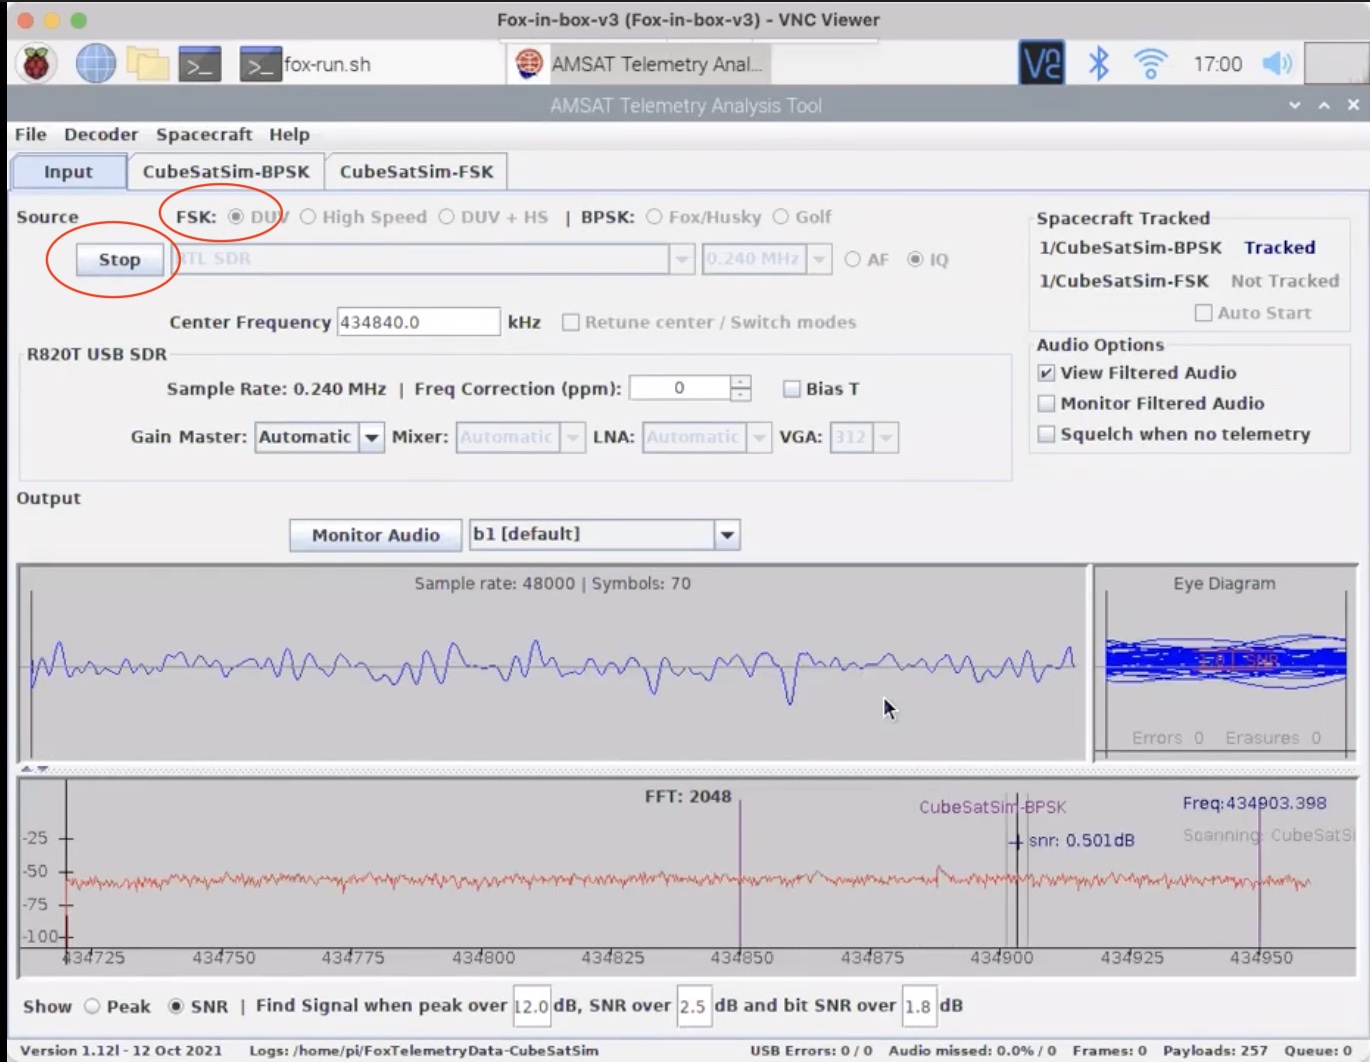
If it doesn't, you might have to click on the FSK DUV radio button or the Start button, circled in red in the image above. This image shows no signal being transmitted by the CubeSatSim. If the CubeSatSim just powered up, it might be transmitting the CW ID, in which case you might see this:
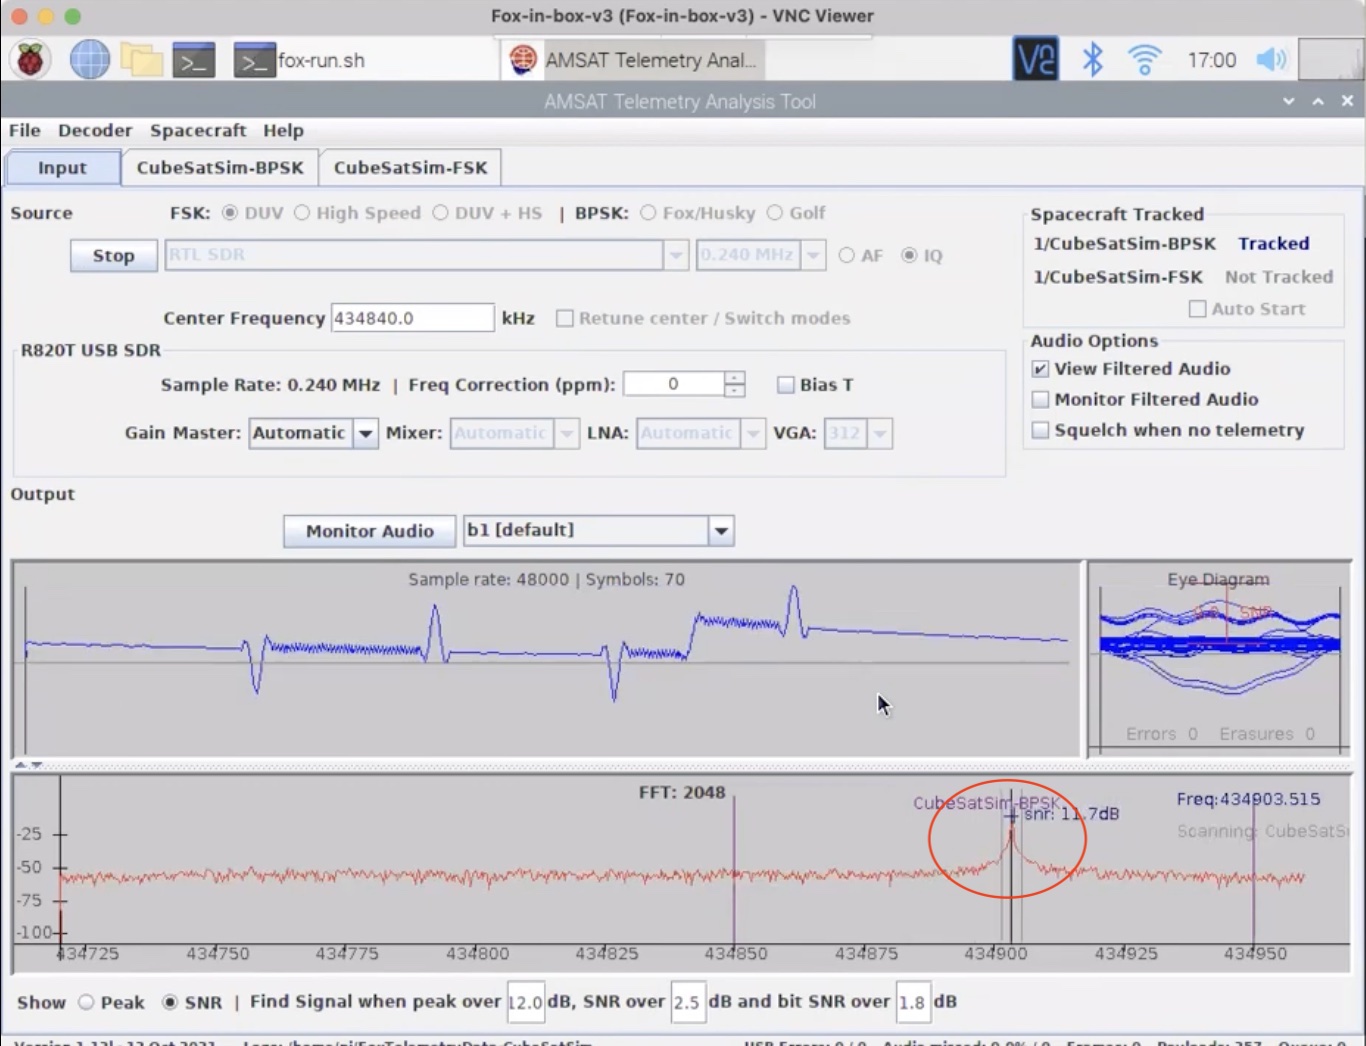
In the FFT window at the bottom of the screen, you can see a peak indicating a transmitted signal from the CubeSatSim, which is circled in red in the above image. Within 30 seconds, if the CubeSatSim is transmitting in FSK mode (mode 2), you should see this:
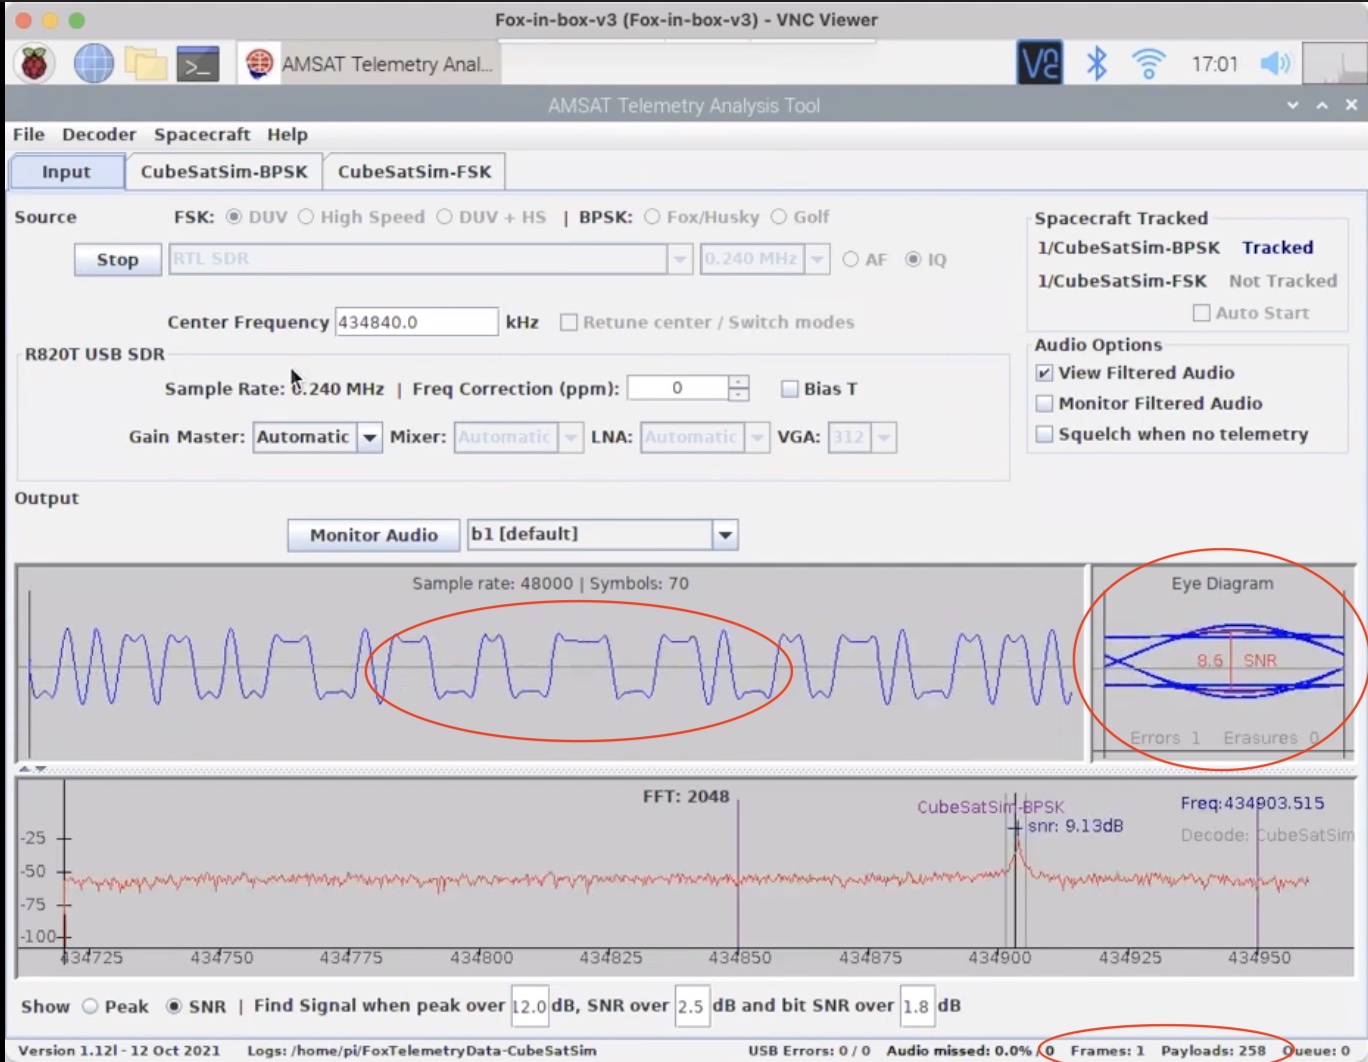
In this image, the digital waveform and the eye diagram are circled in red. At the bottom right of the screen, you should see the Payloads and Frame counts increasing every 4 seconds or so.
To see the telemetry data, click on the CubeSatSim-FSK tab and the Health tab, circled in red here:

At the top right, the Telemetry Payloads Decoded count should be increasing. If this data isn't changing, make sure the Current radio box at the bottom is selected, indicating that you are seeing live data.
If you change the CubeSatSim to BPSK mode (mode 3), you can decode that telemetry in FoxTelem by clicking on the Input tab, then clicking the Stop button, then the BPSK: Fox/Husky radio button, then the Start button. If the CubeSatSim is transmitting in BPSK mode, you should see:
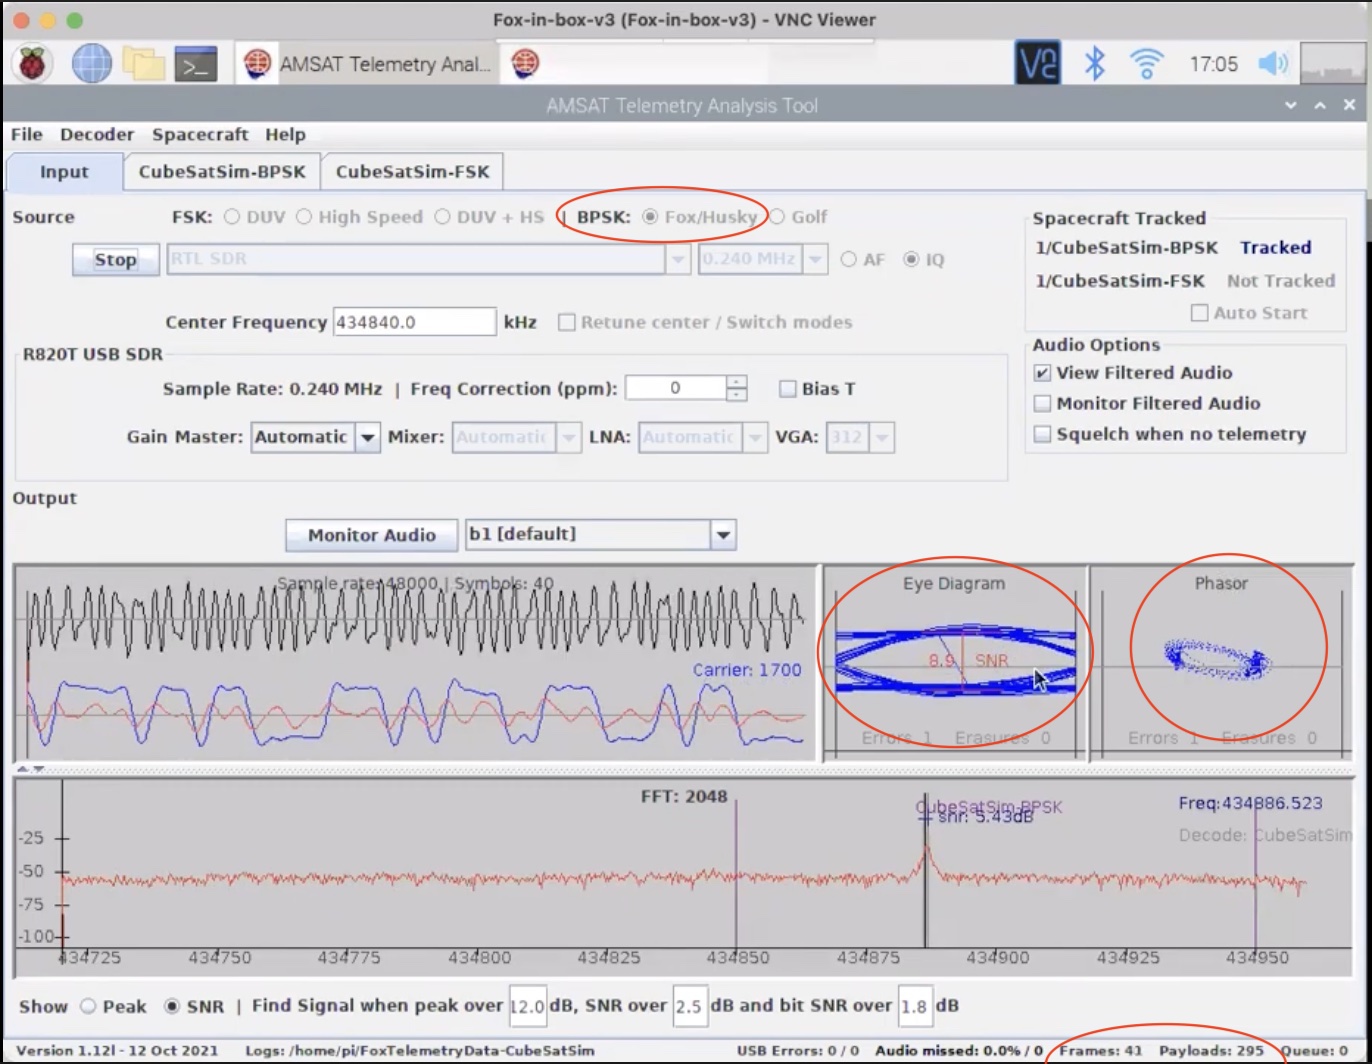
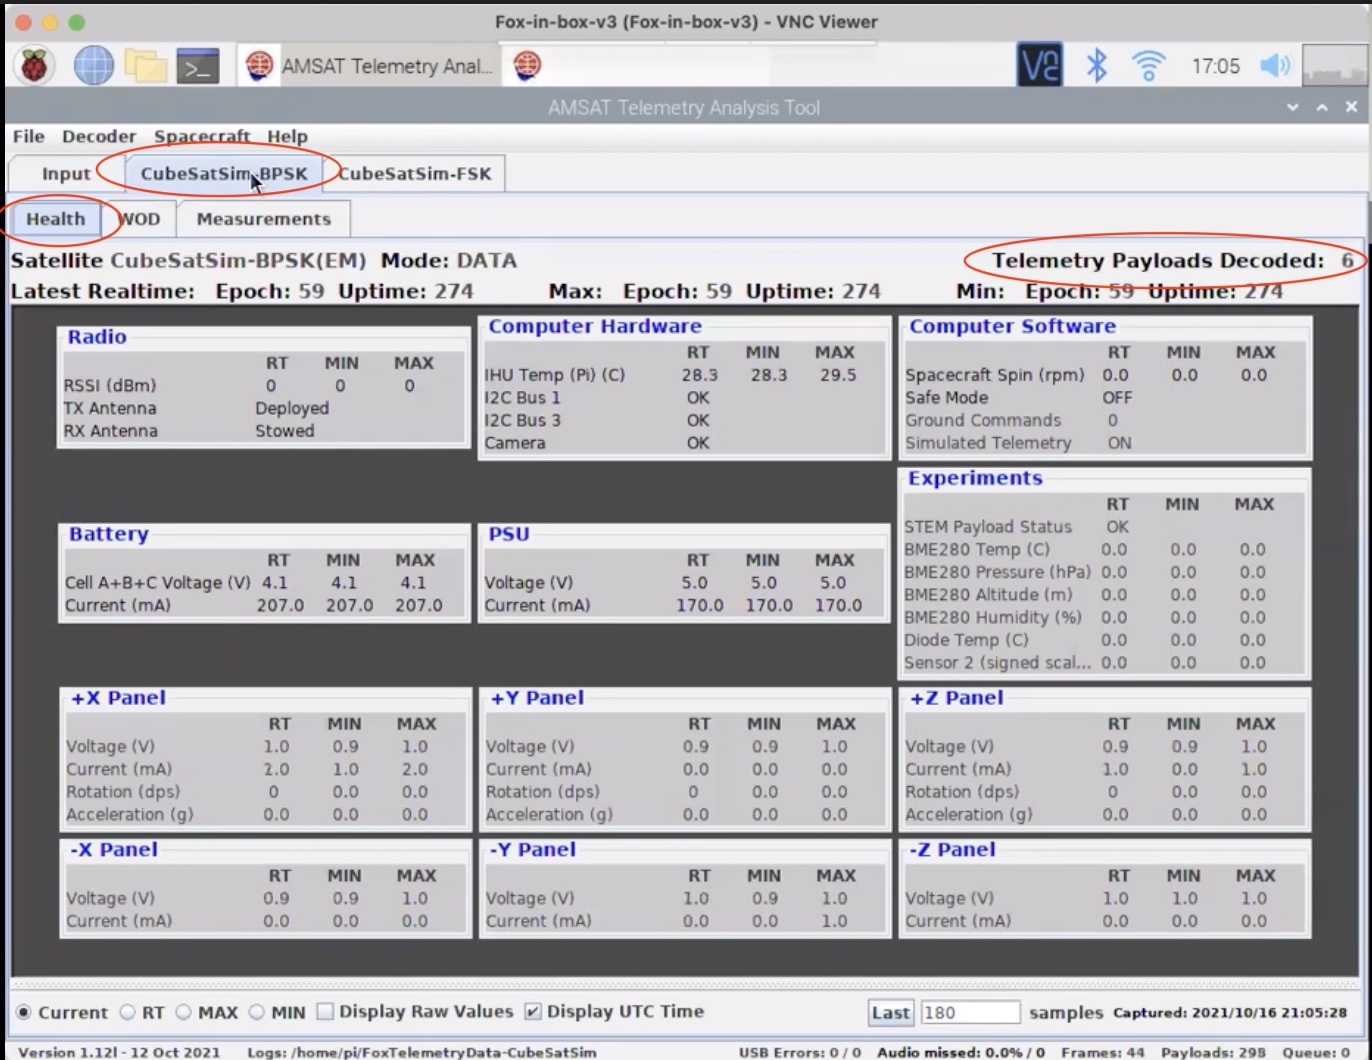
You will see a Phasor and Eye Diagram as shown here, and the Frame and Packet counts will increase. To see the telemetry data, click on the CubeSatSim-BPSK tab and you should see data:
3.1 PC Ground Station
If you are using an RTL-SDR dongle, I'd recommend first installing SDR# (pronounced SDR Sharp) so you can test your RTL-SDR. Then install FoxTelem.
Here are the instructions: https://rtl-sdr.com/qsg
I'd also recommend SDR++ as an SDR as well: https://github.com/AlexandreRouma/SDRPlusPlus/releases
You can also install FoxTelem on your computer and use it as your Ground Station.
For more detailed instructions and activities, see the AMSAT Journal article http://cubesatsim.org/content/CubeSatSimPaper6.pdf
Go to https://www.amsat.org/foxtelem-software-for-windows-mac-linux/ and download the highest version number of FoxTelem for your OS (Windows, Mac, or Linux - for Raspberry Pi). Follow the install instructions and run that version of FoxTelem. You may have to update your version of Java – follow the prompts to do so.
When FoxTelem runs for the first time, a box saying “Welcome to the Amsat Fox Telemetry Analysis Tool” will pop up. Select Continue to choose the default location for your directory. Select Yes a number of times to install the spacecraft files. In a minute, the FoxTelem application will load.
You should see a CubeSatSim-FSK tab and a CubeSatSim-BPSK tab - this is because we use different Fox ids for the two different telemetry modes. The FSK mode emulates Fox-1A, 1B, 1C, and 1D telemetry, while the BPSK mode emulates Fox-1E and HuskySat-1 telemetry.
To test FoxTelem, download this WAV file and save:
In the Input tab, under FSK select the DUV option. On the audio source, select the AF option. Next, click on the “Select audio source here the press start” drop down menu and select "Load Wav File". A file menu will open and you should select the WAV file you downloaded earlier, then click on the Start button. You should get several Frames and Payloads decoded (as shown at the bottom of the window). Select the CubeSatSim-FSK tab and you should see telemetry data displayed. You can click on a value to get a graph.
If you have an RTL-SDR USB dongle plugged in, you can receive live telemetry from your CubeSatSim. In the Input tab, select "RTL SDR" with FSK DUV and IQ selected. Under Settings click the box next to Find Signal for automatic tuning.
Set the Center Frequency as 434840 and then click Start. NOTE: The CubeSatSim transmits telemetry at 434.9 MHz (+/- 15 kHz) but with an SDR you don’t want to tune to this exact frequency. Drag the bottom of the FoxTelem window down and the FFT spectrum plot window will appear, or go under the Decoder menu and check the Show FFT option. You should see a telemetry signal from your CubeSat Simulator in the spectrum at the bottom of the screen.
Click on the signal in the FFT window so it is centered, and if your CubeSatSim is transmitting DUV FSK telemetry, you should see the Frames and Payloads counts increment in the bottom right corner of window.
Click on the CubeSatSim-FSK tab.
At the top right, you should see Telemetry Payloads Decoded showing the number of payloads you have decoded.
Click on the Computer Temperature value to see a real-time graph.
The time axis shows the Uptime, the time in seconds since the Raspberry Pi was last rebooted, and the Resets, a count of the number of times the software has been run on the Pi.
In the Input tab, click Stop. Click yes to the popup asking if you want to Stop decoding while pass in progress.
Select BPSK Fox/Husky then click Start.
To decode BPSK frames, the CubeSatSim will need to be in the BPSK mode.
Watch for Frames and Payloads counts to increase in bottom left corner of window.
Click on the CubeSatSim-BPSK tab and you will see telemetry.
Click on the value to see a real-time graph.
The next step is to continue building the STEM Payload board.
Back to the CubeSat Simulator Wiki Home