msa options settings - ajtruckle/meeting-schedule-assistant-support GitHub Wiki

Use this dialogue to setup how Meeting Schedule Assistant will behave. It determines what information gets displayed on the schedules and how the schedule dates get calculated. All of these options also get saved with the schedules.
 Learn more about the available Options by looking through the rest of this help topic. Or, as an alternative, click on the option you are interested in on the screenshot above.
You can select from several report modes.

This determines what dates get generated on the reports. The default mode is Meeting, so each row in the report represents one meeting. In Weekly mode, each row in the report represents one week.

Use the dropdown list to choose which day is the first day of the week. The default is Monday.
The days of the week listed are determined from the language you have selected. It is important to set these to the correct days, as they are used to calculate the right dates to show on the schedule that gets created.
Customize how dates appear in the report:
- Use Custom Date – Enable this to define a specific date format.
- Sample – Shows a live preview.
- User Defined – Becomes active when custom formatting is enabled.
📅 Note: For more information on date formatting options, see the Custom Date Formats help topic.
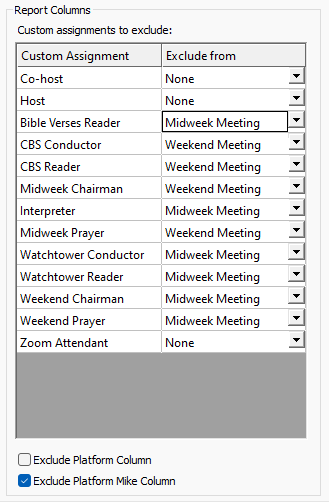
If you never have to deal with the Platform or Platform Mike assignments, then they can be excluded from the schedule by setting these options.These options are checked by default.
 All the custom assignments that you have added into the program through the Custom Assignments manager are also listed here. All the custom assignments that you have added into the program through the Custom Assignments manager are also listed here. |
|---|
You can exclude these assignments from any of the meetings on the schedule by using the dropdown list.

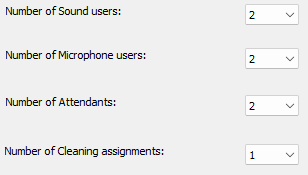
Use these dropdown lists to select how many microphone users, sound users, attendant users and cleaning assignments you need.

You can choose from:
- 0 to 4 sound users
- 0 to 6 microphone users
- 0 to 4 attendants
- 0 to 2 cleaning assignments
This seems to be adequate for most congregations needs.
These setting determine how many columns are displayed on the schedule for the Microphone, Sound, Attendant and Cleaning assignments. The default settings are 2 microphone users, 1 sound user, 1 attendant and 1 cleaning.
Set this option if you want to have your notes shown by default for every new schedule you produce.

Meeting Schedule Assistant uses online help documentation by default. This is to keep the setup file size down. However this does mean that you will need a connection to the internet for using the help system.

Set this option if you prefer to make the help documentation available offline. The application will download a setup from the website and install the documentation (which is in CHM format).
Context help is provided through tooltips. These can be switched off using this option. They are displayed by default.

 Tooltips are of limited use. Many new features do not have them. This was to keep the amount of translations to a minimum.
These hold their own copy of the programs settings. They are designed to help you to quickly customise how Meeting Schedule Assistant behaves. These are also included when you perform a backup or restore of the Meeting Schedule Assistant settings.

You must select a schedule type from the dropdown list (the default is always listed first) before you will be able to load it. Once it has been loaded, it becomes the active schedule type. All changes made to the program will be associated with this schedule type.
You must enter a description for the new schedule type before it can be saved. Saving a new schedule type will make it active. All changes made to the program will be associated with this schedule type. You are not allowed to duplicate a schedule type description.
Press this button to delete the currently selected schedule type from the program. Note that you are not allowed to delete the default schedule type. You are asked to confirm your actions because this operation can't be undone.
Meeting Schedule Assistant is available as both 32 bit and 64 bit versions.

The software uses two types of files:
- MWB — Meeting Workbook Schedule (used by the Meeting Editor)
- SRR — Assignments Rota (used by the Assignments Editor)
If you decide to start using the other bit edition then you can click this button to update the file associations.
 Make sure you press the OK button to save your changes to the application settings. They will be retained until you adjust them again.