4.2.1 Custom box with Autodock4Zn - Valdes-Tresanco-MS/AMDock-win GitHub Wiki
Some applications and plugins have been designed for helping researchers in performing molecular docking run under a uniform and user-friendly graphical interface. These applications have been mainly focused on Autodock Vina, Autodock or both. To our knowledge, the Autodock4Zn force field has not been incorporated in any of those applications. Therefore, we present a tutorial for Autodock4Zn in AMDock, although this procedure is valid for the rest of the docking engines included in AMDock. “Custom Box” is the simplest option since the box specifications (i.e. location and dimensions) are defined by the user. This tutorial is based on a previous one available here. In the Autodock4Zn tutorial the authors selected as a study case the human farnesyltransferase (hFTase) complexed with the inhibitor L-778,123 (PDB ID: 1S63).
Receptor (hFTase.pdbqt) and ligand (L-778_123.pdb) files are available in Installation_path/Doc/Tutorials/I_Simple_Docking/Custom_Box folder. The crystal structure of the complex (complex.pdb) is available as well for comparison purposes. Let’s begin!
- Open AMDock program
- Select Autodock4Zn
hFTase is a Zn-metalloenzyme. Autodock4Zn includes a specialized potential describing the interactions for zinc-coordinating ligands.
- Set the Project Name (default Docking_Project)
- Set the Location for the Project and push the button "Create Project"
- Check that “Simple Docking” checkbox is selected (It is checked by default)
- Choose the receptor file (Installation_path/Doc/Tutorials/I_Simple_Docking/Custom_Box/hFTase.pdbqt)
In this case, we are using a .pdbqt file for the receptor. That means AMDock will no perform any change in your file if you use a .pdbqt file. The receptor file we are using contains a “ligand” which is important for the receptor function and the ligand binding. You can check later what happens if this cofactor is removed from the structure.
- Choose the ligand file (Installation_path/Doc/Tutorials/ I_Simple_Docking/Custom_Box/L-778_123.pdb)
The ligand structure already contains the hydrogen atoms. That way, AMDock will do only the merge of the non-polar hydrogens. If the ligand structure doesn’t contain any hydrogen, you can use OpenBabel or AutodockTools for adding the hydrogens. To do so, go to the Configuration tab, check the box “Ligand Protonation” and choose the method for ligand protonation.
- Press “Prepare Input” button
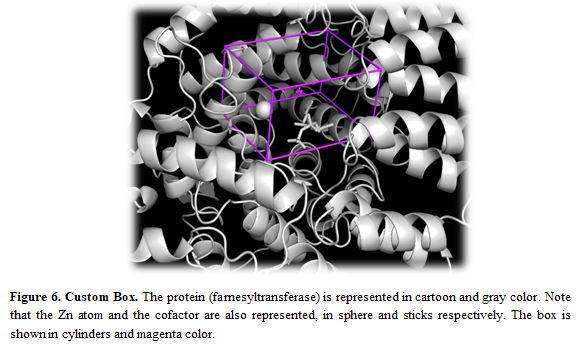
- Then, for defining a search space, press “Box” and set the box center (x = 18; y = 134; z =-1) and size (15; 11; 19)
Autodock4Zn is based on Autodock4. In AutoDock4, the search space size is specified by "grid points" (0.375 Angstroms). In the Autodock4Zn tutorial, the box sizes are 40, 30, and 50 npts. The AutoDock Vina box sizes are given in Angstroms instead. Because both programs are included in the AMDock environment, we decided to standardize the space size definition. AMDock defines the search space size in Angstroms. Thus, a box with npts = 40, 30, 50 in Autodock4Zn tutorial, corresponds to a box with the following dimensions in Å units: 15Å x 11Å x 19Å. These dimensions have been calculated by multiplying npts x 0.375Å.
Note: A warning message will pop up since AMDock estimates automatically an “ideal” size for the box based on ligand’s radius of gyration (see Optimal Box Size 1.1). We can dismiss the message in this case since we know in advance the box dimensions.
- Press “Define Search Space” button
Once the search space is defined, you can see the box in the receptor by pressing the button “Show in PyMOL”
Note: If you want to modify the box, you can use the AMDdock plugin in PyMOL. More details about this procedure here.
- Press the “Run” button
- When docking run ends, the “Results Analysis” tab will appear automatically. There, you will observe a summarizing table with Binding Energies, Estimated Ki values, and Ligand Efficiencies.
The number of poses and energies can vary since this is docking engine dependent.
- In the results table, just the first pose is selected. Press the button “Show in PyMOL” in the bottom left corner to visualize the complex.
If you want to see all the predicted poses, just select all the poses in the result table and press “Show in PyMOL”
- The crystal structure can be superposed on the predicted structure. Press “Open” in the upper left corner in PyMOL and find the X-ray structure (Installation_path/Doc/Tutorials/I_Simple_Docking/Custom_Box/complex.pdb)

- A detailed report of the entire process can be seen on the right side of the screen, which allows for tracking all the results from different programs and algorithms. This log file can be saved in case an error occurred and sent to the developers.