inference of ai model dnns with the dnndk package - UviDTE-FPSoC/Zynq7000-dnn-inference GitHub Wiki
This section is dedicated to port model-zoo repository pre-trained models to ZedBoard. The coverage of the section includes the optimization process, compilation and application creation. All the models downloaded from this repository have already been frozen, therefore there is no need to use the DNNDK v3.1 package freeze tool. Here there is a link to the Xilinx model-zoo repository, source of all the models used in this section.
As a quick reminder, all models in this page are quantized to 8-bit integers, as the DPU IP block where the DNN are executed on the ZedBoard uses 8-bit signed integers to represent its variables. In to use the quantization too, you have to activate the Conda DECENT environment. Moreover, the image pre-processing established for each of the models is indicated in the README.md file included in the archives downloaded from the AI Model-Zoo repository. The calibration and evaluation of all the models is done with images from the ImageNet validation dataset LSVRC2012.
The images used within the ZedBoard are a set of 500 images from the ImageNet, what enables us to be able to check in the codes if the predictions of the network are accurate compared with the actual result of the algorithm. A file with these set of test images is created in section Prepare test dataset for target board in the DNNDK v3.1 package workflow page.
The file .dcf file is needed for the compilation of the applications. There is a copy of this file here, compatible with the PetaLinux project created in this wiki. If this file was to be corrupted, there is a copy of the .hwh file needed to create the .dcf with the DLet tool here.
- Caffe DNN models
- TensorFlow DNN models
This section gives a walk through some of the state of the art neural networks with the Caffe framework.
The first step to create an application for the Caffe inceptionv1 model is to download the pre-trained model here. The name of this model in the repository is cf_inceptionv1_imagenet_224_224_3.16G_1.1. This name indicates that the model uses the TensorFlow framework, cf, the name of the network itself, inceptionv1, the dataset it was trained with, imagenet, the size of the images it was trained with, 224x224, the computation of the model (how many GPOS per image), 3.16G and the version of Vitis-AI the network was trained for, v1.1.
All the scripts, python and c++ needed to execute the cf_Inceptionv1 application are included in the repository. You can check the folder with this link.
In this application the target device is a ZedBoard, therefore we are using the DNNDK v3.1 rather than Vitis-AI v1.1, which won't be a problem at all. (Vitis-AI v1.1 is the last Xilinx release for AI inference, but isn't compatible with arm32 processors). It is important to use this same exact pre-processing in the quantization and evaluation parts, as its the pre-processing implemented when training the DNNs. If you use a different pre-processing, the accuracy of your results will most likely drop.
The quantization has not been performed as the DECENT tool generates an error with the Caffe model in our host machine. The .zip file downloaded in the AI Model-Zoo repository contains an already quantized model that is going to be used.
The compilation process is performed with the DNNC tool, for which we create the dnnc_ZedBoard.sh script.
When creating a ZedBoard application it is important to make sure the CPU Arch selected is arm32, otherwise the DPU model won't work. It is also important to specify where is your board .dcf file located. If you are using the Petalinux Xilinx image for ZedBoard, that can be downloaded here, you'll find this file in the <dnndk_package_v3.1_directory>/host_x86/dcf/ZedBoard.dcf. If you are using the custom project created in this guide, you can generate the .dcf file with the DLet tool as explained in section DLet, in the page DNNDK v3.1 package workflow.
Compiling Network inception_v1
DNNDK      : 3.1
Board Name : ZedBoard
DCF file   : ../../dcf/custom_zedboard.dcf
CPU Arch   : arm32
DNNC Mode  : debug
dnnc version v3.00
DPU Target : v1.4.0
Build Label: Aug  9 2019 05:23:25
Copyright @2019 Xilinx Inc. All Rights Reserved.

[DNNC][Warning] layer [loss3_loss3] (type: Softmax) is not supported in DPU, deploy it in CPU instead.

DNNC Kernel topology "inception_v1_kernel_graph.jpg" for network "inception_v1"
DNNC kernel list info for network "inception_v1"
                               Kernel ID : Name
                                       0 : inception_v1_0
                                       1 : inception_v1_1

                             Kernel Name : inception_v1_0
--------------------------------------------------------------------------------
                             Kernel Type : DPUKernel
                               Code Size : 0.28MB
                              Param Size : 6.67MB
                           Workload MACs : 3165.34MOPS
                         IO Memory Space : 0.76MB
                              Mean Value : 104, 117, 123,
                              Node Count : 76
                            Tensor Count : 110
                    Input Node(s)(H*W*C)
                         conv1_7x7_s2(0) : 224*224*3
                   Output Node(s)(H*W*C)
                     loss3_classifier(0) : 1*1*1000


                             Kernel Name : inception_v1_1
--------------------------------------------------------------------------------
                             Kernel Type : CPUKernel
                    Input Node(s)(H*W*C)
                             loss3_loss3 : 1*1*1000
                   Output Node(s)(H*W*C)
                             loss3_loss3 : 1*1*1000
With this output we now know the name of the input and output boundary nodes of the DPU (conv1_7x7_s2 and loss3_classifier respectively), which we need to communicate the ZedBoard's CPU with the DPU, the name of the DPU kernel(inception_v1_0) and the layers that are not supported by the DPU which have to be included in the CPU kernel (squeeze and softmax layer).
The application workflow follows the indications at Application Workflow in the page DNNDK v3.1 package workflow. Once the main workflow is created, the timer to measure inference execution and the management of a file to save the results has to be added.
The workflow of the main application is the same as the one of the tf_Inceptionv1 model. This model has two main differences:
- Image pre-processing
The pre-processing of the images is indicated in the README.md file of the model. For cf_inceptionv1, the images are going to be resized to 256 by their smalles size, maintaing the aspect ratio (the other size has to be resized with the same proportion than the other size). A centre crop is then performed to the input size of this network, 224x224. The last step is to apply a mean value substraction to each layer of the BGR layers. The mean values are indicated in the README.md.
- Evaluation of the results in the ZedBoard
The function used to print the top 5 predictions is now used to obtain the metrics for the precision. The code is very simple, and uses two counters, one for the top1 metric and another one for the top5, that are incremented for each iteration if the predictions have the correct solution as the top answer or in the top5 answers.
The code for the ZedBoard application can be found here. In the case you don't want to use images with the application, you can randomly create the inputs of the deep neural network. An example application can be seen here.
Once the application has been programmed, and the kernel of the DPU is ready, you still need to perform the DPU Hybrid Compilation, introduced in the DNNDK v3.1 package workflow. The easiest way to do this is to create a folder for the network's application, and inside it create a folder named model with the DPU kernel inside, a folder named source, with the C++ code inside, and a makefile to compile the application in the ZedBoard. A copy of this folder is available in the code section of the repository, here.
The hybrid compilation is done at the board. Enter the directory that contains the folder with the network's application with the makefile and open a terminal. Execute the following commands.
$ sudo scp -r ./Caffe_Inception_v1 [email protected]:~/xilinx-dnndk-v3.1/ZedBoard/DNNs
To execute the previous command, you have to previously establish a SSH connection with the board as explained in the subsection SSH connection of section Software Installation.
Now, enter the copied folder in the ZedBoard through the SSH connection to the board and compile the application.
# cd Caffe_Inception_v1

# make
A file is now created with the name of the network. To execute it, type in the following command:
./inception_v1
The evaluation of the ZedBoard are shown in the following table, where they are compared with the theoretical values of the model provided by Xilinx.
| Accuracy | ImageNet metrics | ZedBoard metrics |
|---|---|---|
| Top1 | 70.304 | 41.1178 |
| Top5 | 89.7117 | 65.4691 |
The first step to create an application for the Caffe inceptionv1 model is to download the pre-trained model here. The name of this model in the repository is cf_inceptionv3_imagenet_299_299_11.4G_1.1. This name indicates that the model uses the TensorFlow framework, cf, the name of the network itself, inceptionv3, the dataset it was trained with, imagenet, the size of the images it was trained with, 299x299, the computation of the model (how many GPOS per image), 11.4G and the version of Vitis-AI the network was trained for, v1.1.
All the scripts, python and c++ needed to execute the cf_Inceptionv1 application are included in the repository. You can check the folder with this link.
In this application the target device is a ZedBoard, therefore we are using the DNNDK v3.1 rather than Vitis-AI v1.1, which won't be a problem at all. (Vitis-AI v1.1 is the last Xilinx release for AI inference, but isn't compatible with arm32 processors). It is important to use this same exact pre-processing in the quantization and evaluation parts, as its the pre-processing implemented when training the DNNs. If you use a different pre-processing, the accuracy of your results will most likely drop.
The quantization has not been performed as the DECENT tool generates an error with the Caffe model in our host machine. The .zip file downloaded in the AI Model-Zoo repository contains an already quantized model that is going to be used.
The compilation process is performed with the DNNC tool, for which we create the dnnc_ZedBoard.sh script.
When creating a ZedBoard application it is important to make sure the CPU Arch selected is arm32, otherwise the DPU model won't work. It is also important to specify where is your board .dcf file located. If you are using the Petalinux Xilinx image for ZedBoard, that can be downloaded here, you'll find this file in the <dnndk_package_v3.1_directory>/host_x86/dcf/ZedBoard.dcf. If you are using the custom project created in this guide, you can generate the .dcf file with the DLet tool as explained in section DLet, in the page DNNDK v3.1 package workflow.
Compiling Network inception_v3
DNNDK      : 3.1
Board Name : ZedBoard
DCF file   : ../../dcf/custom_zedboard.dcf
CPU Arch   : arm32
DNNC Mode  : debug
dnnc version v3.00
DPU Target : v1.4.0
Build Label: Aug  9 2019 05:23:25
Copyright @2019 Xilinx Inc. All Rights Reserved.

[DNNC][Warning] layer [prob] (type: Softmax) is not supported in DPU, deploy it in CPU instead.

DNNC Kernel topology "inception_v3_kernel_graph.jpg" for network "inception_v3"
DNNC kernel list info for network "inception_v3"
                               Kernel ID : Name
                                       0 : inception_v3_0
                                       1 : inception_v3_1

                             Kernel Name : inception_v3_0
--------------------------------------------------------------------------------
                             Kernel Type : DPUKernel
                               Code Size : 0.61MB
                              Param Size : 22.71MB
                           Workload MACs : 11426.43MOPS
                         IO Memory Space : 1.60MB
                              Mean Value : 104, 117, 123,
                              Node Count : 117
                            Tensor Count : 133
                    Input Node(s)(H*W*C)
                         conv1_3x3_s2(0) : 299*299*3
                   Output Node(s)(H*W*C)
                           classifier(0) : 1*1*1000


                             Kernel Name : inception_v3_1
--------------------------------------------------------------------------------
                             Kernel Type : CPUKernel
                    Input Node(s)(H*W*C)
                                    prob : 1*1*1000
                   Output Node(s)(H*W*C)
                                    prob : 1*1*1000
With this output we now know the name of the input and output boundary nodes of the DPU (conv1_3x3_s2 and classifier respectively), which we need to communicate the ZedBoard's CPU with the DPU, the name of the DPU kernel(inception_v3_0) and the layers that are not supported by the DPU which have to be included in the CPU kernel (softmax layer).
The application workflow follows the indications at Application Workflow in the page DNNDK v3.1 package workflow. Once the main workflow is created, the timer to measure inference execution and the management of a file to save the results has to be added.
The workflow of the main application is the same as the one of the tf_Inceptionv1 model. This model has two main differences:
- Image pre-processing
The pre-processing of the images is indicated in the README.md file of the model. For cf_inceptionv3, the images are going to be resized to 320 by their smalles size, maintaing the aspect ratio (the other size has to be resized with the same proportion than the other size). A centre crop is then performed to the input size of this network, 299x299. The last step is to apply a mean value substraction to each layer of the BGR layers. The mean values are indicated in the README.md.
- Evaluation of the results in the ZedBoard
The function used to print the top 5 predictions is now used to obtain the metrics for the precision. The code is very simple, and uses two counters, one for the top1 metric and another one for the top5, that are incremented for each iteration if the predictions have the correct solution as the top answer or in the top5 answers.
The code for the ZedBoard application can be found here. In the case you don't want to use images with the application, you can randomly create the inputs of the deep neural network. An example application can be seen here.
Once the application has been programmed, and the kernel of the DPU is ready, you still need to perform the DPU Hybrid Compilation, introduced in the DNNDK v3.1 package workflow. The easiest way to do this is to create a folder for the network's application, and inside it create a folder named model with the DPU kernel inside, a folder named source, with the C++ code inside, and a makefile to compile the application in the ZedBoard. A copy of this folder is available in the code section of the repository, here.
The hybrid compilation is done at the board. Enter the directory that contains the folder with the network's application with the makefile and open a terminal. Execute the following commands.
$ sudo scp -r ./Caffe_Inception_v3 [email protected]:~/xilinx-dnndk-v3.1/ZedBoard/DNNs
To execute the previous command, you have to previously establish a SSH connection with the board as explained in the subsection SSH connection of section Software Installation.
Now, enter the copied folder in the ZedBoard through the SSH connection to the board and compile the application.
# cd Caffe_Inception_v3

# make
A file is now created with the name of the network. To execute it, type in the following command:
./inception_v3
The evaluation of the ZedBoard are shown in the following table, where they are compared with the theoretical values of the model provided by Xilinx.
| Accuracy | ImageNet metrics | ZedBoard metrics |
|---|---|---|
| Top1 | 70.304 | 59.68 |
| Top5 | 89.7117 | 81.24 |
The first step to create an application for the Caffe mobilenetv2 model is to download the pre-trained model here. The name of this model in the repository is cf_mobilenetv2_imagenet_224_224_0.59G_1.1. This name indicates that the model uses the TensorFlow framework, cf, the name of the network itself, mobilenetv2, the dataset it was trained with, imagenet, the size of the images it was trained with, 224x224, the computation of the model (how many GPOS per image), 0.59G and the version of Vitis-AI the network was trained for, v1.1.
All the scripts, python and C++ needed to execute the cf_Mobilenetv2 application are included in the repository. You can check the folder with this link.
The quantization has not been performed as the DECENT tool generates an error with the Caffe model in our host machine. The .zip file downloaded in the AI Model-Zoo repository contains an already quantized model that is going to be used.
The compilation process is performed with the DNNC tool, for which we create the following script.
When creating a ZedBoard application it is important to make sure the CPU Arch selected is arm32, otherwise the DPU model won't work. It is also important to specify where is your board .dcf file located. If you are using the custom project created in this guide, you can generate the .dcf file with the DLet tool as explained in section DLet, in the page DNNDK v3.1 package workflow.
There is an additional step to take care of, as the cf_Mobilenetv2 model has a bug reported in the hackster.io page. In order to compile the quantized model, enter the following directory and delete the softmax layer shown below of the deploy.prototxt file.
$ cd <model-zoo_cf_mobilenetv2_download_directory>/quantized

$ atom deploy.prototxt
Delete the following lines at the bottom of the file:
layer {
   name: "prob"
   type: "Softmax"
   bottom: "417"
   top: "prob"
}
Proceed now to execute the compilation script, sh dnnc_ZedBoard.sh.
Compiling Network mobilenet_v2
DNNDK      : 3.1
Board Name : ZedBoard
DCF file   : ../../dcf/custom_zedboard.dcf
CPU Arch   : arm32
DNNC Mode  : debug
dnnc version v3.00
DPU Target : v1.4.0
Build Label: Aug  9 2019 05:23:25
Copyright @2019 Xilinx Inc. All Rights Reserved.


DNNC Kernel topology "mobilenet_v2_kernel_graph.jpg" for network "mobilenet_v2"
DNNC kernel list info for network "mobilenet_v2"
                               Kernel ID : Name
                                       0 : mobilenet_v2

                             Kernel Name : mobilenet_v2
--------------------------------------------------------------------------------
                             Kernel Type : DPUKernel
                               Code Size : 0.32MB
                              Param Size : 3.33MB
                           Workload MACs : 601.55MOPS
                         IO Memory Space : 0.79MB
                              Mean Value : 104, 117, 123,
                              Node Count : 36
                            Tensor Count : 37
                    Input Node(s)(H*W*C)
                                  263(0) : 224*224*3
                   Output Node(s)(H*W*C)
                                  417(0) : 1*1*1000
With this output we now know the name of the input and output boundary nodes of the DPU (263 and 417 respectively), which we need to communicate the ZedBoard's CPU with the DPU, the name of the DPU kernel(mobilenet_v2) and in this case there is no CPU kernel reported. This is not true though as we deleted the Softmax layer from the quantized model in order to compile, so now this layer has to be implemented in the CPU.
The application workflow follows the indications at Application Workflow in the page DNNDK v3.1 package workflow. Once the main workflow is created, the timer to measure inference execution and the management of a file to save the results has to be added.
The workflow of the main application is the same as the one of the cf_Inceptionv1 model. This model has one main difference:
- Image pre-processing
The pre-processing of the images is indicated in the README.md file of the model. For cf_inceptionv1, the images are going to be resized to 256 by their smalles size, maintaining the aspect ratio (the other size has to be resized with the same proportion than the other size). A center crop is then performed to the input size of this network, 224x224. A mean value subtraction to each layer of the BGR layers is applied, as the mean values are indicated in the README.md. The last step is to scale the image to 0.00390625. For this model this last scale has not been performed as it modifies the size of the input image. Due to this, the model is not accurate when evaluated on the board.
A copy of the application's code is available in the code section.
If you prefer to skip the image pre-processing, you can use this script to enter random input data into the model.
Once the application has been programmed, and the kernel of the DPU is ready, you still need to perform the DPU Hybrid Compilation, introduced in the DNNDK v3.1 package workflow. The easiest way to do this is to create a folder for the network's application, and inside it create a folder named model with the DPU kernel inside, a folder named source, with the C++ code inside, and a makefile to compile the application in the ZedBoard. There is a copy of this folder here.
The hybrid compilation is done at the board. Enter the directory that contains the folder with the network's application with the makefile and open a terminal. Execute the following commands.
$ sudo scp -r ./Caffe_Mobilenetv2 [email protected]:~/xilinx-dnndk-v3.1/ZedBoard/DNNs
To execute the previous command, you have to previously establish a SSH connection with the board as explained in the subsection SSH connection of section Software Installation.
Now, enter the copied folder in the ZedBoard through the SSH connection to the board and compile the application.
# cd Caffe_Mobilenetv2

# make
A file is now created with the name of the network. To execute it, type in the following command:
./mobilenet_v2
The evaluation of the ZedBoard are shown in the following table, where they are compared with the theoretical values of the model provided by Xilinx.
| Accuracy | ImageNet metrics | ZedBoard metrics |
|---|---|---|
| Top1 | 65.27 | 0 |
| Top5 | 86.43 | 0 |
The reason for this poor result is that there is one pre-processing operation that is not takin place. This operation is to scale the image to 0.00390625. Scaling the image to this size would mean that the images aren't the size of the input tensor, so it isn't possible to make the application work by doing this. Without the operation though, the results aren't good either.
This section gives a walk through by some of the state of the art neural networks with the TensorFlow framework. From all the models exposed in this section, the tf_inceptionv1 is the only one that has all the details and indications to be implemented. The rest of the models have a simplified explanation to avoid repetition, as the process is very similar for all of them.
All the applications in this section have a function that calculates the top1 and top5 accuracy metrics when running the models in the ZedBoard. These values are not specified as the TensorFlow models tried out in this section have a huge drop in accuracy. In the case of the tf_Mobilenet networks, this is due to the fact that the DNNDK v3.1 package doesn't include fine-tuning with quantization calibration, and for this reason the 8-bit have no accuracy when tested on the host.
On the other hand, all of the TensorFlow models include a normalization function, between the values [-1, 1] that we think is the source of the accuracy drop when executing the models in the board. The tf_Inception models are quantized to 8-bits, and their evaluation in the host is good. To evaluate these models in the host, the same image pre-processing that is later on used in the board is implemented. This pre-procesing includes a normalization function that uses floating points to represent the image pixels. When emulating this pre-procesing in the board, accuracy is lost. We believe the problem is that the input values have to be 8-bit filexed points and not floating points, as the DPU works with 8-bit signed integers. The problem here is that normalizing with floating point enables you to have pixel values in the range [-1, 1], while if you use 8-bit signed integers, the pixel values can only be -1, 0 or 1. By doing this a lot of image information is lost, therefore accuracy drops.
The first step to create an application for the TensorFlow inceptionv1 model is to download the pre-trained model here. The name of this model in the repository is tf_inceptionv1_imagenet_224_224_3G_1.1. This name indicates that the model uses the TensorFlow framework, tf, the name of the network itself, inceptionv1, the dataset it was trained with, imagenet, the size of the images it was trained with, 224x224, the computation of the model (how many GPOS per image), 3G and the version of Vitis-AI the network was trained for, v1.1.
All the scripts, python and c++ needes to execute the tf_Inceptionv1 application are included in the repository. You can access the folder throught this link.
In this application the target device is a ZedBoard, therefore we are using the DNNDK v3.1 rather than Vitis-AI v1.1, which won't be a problem at all. (Vitis-AI v1.1 is the last Xilinx release for AI inference, but isn't compatible with arm32 processors). It is important to use this same exact pre-processing in the quantization and evaluation parts, as its the pre-processing implemented when training the DNNs. If you use a different pre-processing, the accuracy of your results will most likely drop.
The quantization of the model requires two main steps. First of all, the pre-processing of the calibration images, due to the fact that they are not pre-processed in the frozen graph. To do this task, we create two python scripts, one with the operations that are going to take place, inception_v1_input_fn.py, and another one with the definition of the functions, inception_v1_preprocessing.py.
The pre-processing of the images is indicated in the README.md file of the model. For tf_inceptionv1, the images are going to be croppped from the central region to an 87.5% of the image, and resized with the cv2.resize function from OpenCV. This operation makes sure all input images are 224x224 pixels. Afterwards, bgr2rgb function is implemented, as the images are loaded in the BGR format by OpenCV, but the DNN model requires them as RGB. The last step is to apply normalization to make sure all the image layer values of the image's pixels are in the -1 to 1 range.
Once the pre-processing script is ready, a quantization script is going to be created, decent_q.sh. It is important to make sure the input and output node names are correctly indicated. To check these names, enter the inception_v1 directory created with the downloaded archive from the model-zoo repository, enter the float folder and execute the following command.
cd float

decent_q inspect --input_frozen_graph inception_v1_inference.pb
One possibility for both the input and the output node is found.
Op types used: 297 Const, 231 Identity, 58 Conv2D, 57 FusedBatchNorm, 57 Relu, 13 MaxPool, 9 ConcatV2, 2 Reshape, 1 AvgPool, 1 BiasAdd, 1 Placeholder, 1 Shape, 1 Softmax, 1 Squeeze

Found 1 possible inputs: (name=input, type=float(1), shape=[?,224,224,3])
Found 1 possible outputs: (name=InceptionV1/Logits/Predictions/Reshape_1, op=Reshape)
With this information, create the quantization script, making sure you input the correct image sizes, node names and frozen graph input. Afterwards, run the quantization script, sh decent_q.sh, which should print this output if properly executed.
INFO: Checking Float Graph...
INFO: Float Graph Check Done.
INFO: Calibrating for 100 iterations...
100% (100 of 100) |######################| Elapsed Time: 0:00:39 Time:  0:00:39
INFO: Calibration Done.
INFO: Generating Deploy Model...
[DEPLOY WARNING] Node InceptionV1/Logits/Predictions/Reshape_1(Type: Reshape) is not quantized and cannot be deployed to DPU,because it has unquantized input node: InceptionV1/Logits/Predictions/Softmax. Please deploy it on CPU.
INFO: Deploy Model Generated.
********************* Quantization Summary *********************
INFO: Output:
  quantize_eval_model: ./quantize_results/quantize_eval_model.pb
  deploy_model: ./quantize_results/deploy_model.pb
Once the quantization model has been correctly created, we are going to evaluate both the frozen and quantized models and compare the loss in accuracy. To do this we use the evaluation script from subsection Output and Evaluation at page DNNDK v3.1 package workflow. The inception_v1_input_fn.py script includes a function to perform the image pre-processing of the evaluation script. You are now ready to call the evaluation of the frozen graph with the following script. The evaluation is performed with 2500 images.
sh evaluate_frozen_graph.sh
The result should be the following.
Start Evaluation for 50 Batches...
100% (50 of 50) |#############################################| Elapsed Time: 0:03:09 Time:  0:03:09
Accuracy: Top1: 0.6992000031471253, Top5: 0.896399998664856
Now, repeat the same process for the quantization model with the following script.
sh evaluate_quantized_graph.sh
The result of the evaluation should be similar to this one.
Start Evaluation for 50 Batches...
100% (50 of 50) |########################| Elapsed Time: 0:02:55 Time:  0:02:55
Accuracy: Top1: 0.6816000032424927, Top5: 0.887999997138977
| Accuracy | Frozen Graph | Quantized Graph |
|---|---|---|
| Top1 | 0.6992 | 0.6816 |
| Top5 | 0.8964 | 0.8880 |
The compilation process is performed with the DNNC tool, for which we create the following script.
When creating a ZedBoard application it is important to make sure the CPU Arch selected is arm32, otherwise the DPU model won't work. It is also important to specify where is your board .dcf file located. If you are using the custom project created in this guide, you can generate the .dcf file with the DLet tool as explained in section DLet, in the page DNNDK v3.1 package workflow.
Execute the compilation script, sh dnnc_ZedBoard.sh.
Compiling Network inception_v1
DNNDK      : 3.1
Board Name : ZedBoard
DCF file   : ../dcf/custom_zedboard.dcf
CPU Arch   : arm32
DNNC Mode  : debug
dnnc version v3.00
DPU Target : v1.4.0
Build Label: Aug  9 2019 05:23:25
Copyright @2019 Xilinx Inc. All Rights Reserved.

[DNNC][Warning] layer [InceptionV1_Logits_SpatialSqueeze] (type: Squeeze) is not supported in DPU, deploy it in CPU instead.
[DNNC][Warning] layer [InceptionV1_Logits_Predictions_Softmax] (type: Softmax) is not supported in DPU, deploy it in CPU instead.

DNNC Kernel topology "inception_v1_kernel_graph.jpg" for network "inception_v1"
DNNC kernel list info for network "inception_v1"
                               Kernel ID : Name
                                       0 : inception_v1_0
                                       1 : inception_v1_1

                             Kernel Name : inception_v1_0
--------------------------------------------------------------------------------
                             Kernel Type : DPUKernel
                               Code Size : 0.27MB
                              Param Size : 6.31MB
                           Workload MACs : 2996.75MOPS
                         IO Memory Space : 0.76MB
                              Mean Value : 0, 0, 0,
                              Node Count : 76
                            Tensor Count : 110
                    Input Node(s)(H*W*C)
InceptionV1_InceptionV1_Conv2d_1a_7x7_Conv2D(0) : 224*224*3
                   Output Node(s)(H*W*C)
InceptionV1_Logits_Conv2d_0c_1x1_Conv2D(0) : 1*1*1001


                             Kernel Name : inception_v1_1
--------------------------------------------------------------------------------
                             Kernel Type : CPUKernel
                    Input Node(s)(H*W*C)
       InceptionV1_Logits_SpatialSqueeze : 1*1*1001
                   Output Node(s)(H*W*C)
  InceptionV1_Logits_Predictions_Softmax : 1*1*1001
With this output we now know the name of the input and output boundary nodes of the DPU (InceptionV1_InceptionV1_Conv2d_1a_7x7_Conv2D and InceptionV1_Logits_Conv2d_0c_1x1_Conv2D respectively), which we need to communicate the ZedBoard's CPU with the DPU, the name of the DPU kernel(inception_v1_0) and the layers that are not supported by the DPU which have to be included in the CPU kernel (squeeze and softmax layer).
The application workflow follows the indications at Application Workflow in the page DNNDK v3.1 package workflow. Once the main workflow is created, the timer to measure inference execution and the management of a file to save the results has to be added.
- Application main workflow.
Äll the necessary functions needed to run the DPU for one image and establish its communication with the CPU will be explained. The actual code can be found at the end of this section. All the include libraries are indicated with the code.
The code for managing the DPU kernels and tasks is programmed in the main function. An example of the structure of this function can be found in DNNDK User Guide, page 51.
-
DPUKernelis a custom datatype to create a pointer for the DPU kernel. -
DPUTaskis a custom datatype to create a pointer for the DPU task. -
dpuOpen()function that attaches and opens the DPU device before the utilization of DPU resources. -
dpuLoadKernel()loads a DPU kernel for the specified neural network from hybrid CPU+DPU binary executable into DPU memory space, including Kernel’s DPU instructions, weight and bias. The function has an argument, which is the name of the DPU kernel outputted by the DNNC compiler. In this case the name would beinception_v1_0. The API outputs a pointer to the loaded DPU kernel if successful. -
dpuCreateTask()instantiates a DPU task from DPU Kernel and allocates corresponding DPU memory buffer. It takes a pointer to the kernel as a parameter. It is possible to indicate the mode of the task between the normal mode, which is default, profiling mode, that outputs performance information layer by layer, or dump mode, which dumps raw data for the DPU task. This last two modes are only available if the DNNC tool compiled the model in debug mode. -
dpuDestroyTask()destroys the DPU task and releases its resources. It takes the pointer of the task as an argument. Returns a 0 on success or negative value in failure. -
dpuDestroyKernel()destroys the DPU kernel and releases its resources. Takes as an argument the pointer to the kernel. Returns a 0 if success. -
dpuClose()detaches and closes the DPU device file.
Once the task has been created, a function is created to run image pre-processing, post-processing, DPU non-supported layers and inference.
- runDNN
It is the void function where the images are prepared for the neural network and the inference is actually ran. This function is going to call several others that are the ones responsible for performing pre-processing, post-processing and execution of the DPU non-suported layers. An argument containing a pointer to the created task is needed by this function.
-
LoadImageNamesSolutionsis a void function that takes as argument a string with the path, where a file with the names of the inference images and the solution label are found. It takes two vectors as arguments, which are going to contain the image names and the solutions separately. The solutions are needed in order to evaluate the accuracy of the models when executed in the ZedBoard.
To open the file, an fstream object is used. fstream is a datatype that represents the file stream generally, and has the capabilities of both ofstream and ifstream, which means it can create files, write information to files, and read information from files. Using this datatype with the getline() function, the whole .txt file can be read.
The getline() function enables reading the file one line at a time. Each line contains both the name of an image and its solution. In order to separate them into two different vectors, the line is copied into a C-format string variable (a 0 terminated char). This variable can be used with the strtok() function, which returns each word of the string variable separately, enabling to copy them into the image names or the solution vectors.
-
LoadWords()is a void function used to obtain the name of all the possible labels in the images directory, where there is a .txt file containing this information. The function has a similar shape to the previous one, but in this case the line only contains the name of each class.
In this application, once the pre-processing is done, we need to start inference on the DPU. Before this, remember that for this model the softmax layer has to be programed for the CPU, therefore, it is necessary to know how many channels are output by the output node of the DPU kernel.
-
dpuGetOutputTensorCannel()is the function that enables counting this number. It gets the total number of output tensor for the DPU task. It's arguments are a pointer to the DPU task and the output boundary node name. This name was previously obtained when running the DNNC tool. In this case, the name of the node isInceptionV1_Logits_Conv2d_0c_1x1_Conv2D.
Once we know the number, create an array of float datatype with enough memory allocated.
Finally, to run inference of all the images in your images directory, create a loop where you need to follow this process.
-
Load and do the pre-processing of the image with
OpenCV. -
Load the pre-processed image into the DPU with the API
dpuSetInputImage2(). The image can be loaded to the DPU without specifying its mean value. Its arguments are a pointer to the DPU task, the name of the input node and the image itself as a Mat object. The Mat datatype can be used with the OpenCV library. -
Run inference on the DPU. This operation is executed with the API
dpuRunTask(), and its only argument is a pointer to the DPU task. -
It can be interesting to obtain the execution time in micro-seconds at the DPU. Use the
dpuGetTaskProfile()API. This function gets the time value after the running of the task. It's only argument is the DPU task pointer.
Once the task has been run, we need to get the output tensor to obtain the results. This task can be done at the same time the squeeze layer is executed.
-
Calculate spatial squeeze layer. The spatial squeeze layer deletes all the dimensions of a tensor that are equal to one. The output tensor of a ImageNet DNN is always [1, 1, 1, 1001]. In order to just leave the last dimension, the API
dpuGetOutputTensorInHWCFP32can be used, obtaining the output tensor result that can be used by the CPU in (HeightWidthChannel) format and with a datatype of float32. Its arguments are a pointer to the DPU task, a pointer to the DPU output node name, the start address of CPU memory block for storing output Tensor's data, the size of the output in bytes and the index of a single output tensor for the Node, with a default value of 0. The best way of indicating the CPU memory address block is creating a float pointer to an array with as many cells as channels the output tensor has. The number of channels were previously obtained with the APIdpuGetOutputTensorCannel(). -
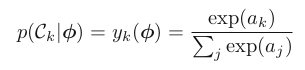
Calculate the softmax layer in the DPU, as there is no support for it in the DPU. This function should get the output Tensor array obtained in the previous step, including the size of the array and a new pointer to an array where it is possible to retrieve the solution of the layer. In this function it is necessary to operate the softmax function, which can be retrieved from the book Pattern Recognition and Machine Learning, page 2.9, section 4.3.4, ecuation 4.104. The equation itself is the following, considering
yis the output array with the size of the Tensor channels,ais the data with the tensor information obtained from the DPU,kis the current cell number andjis the total number of channels.
- Finally, create a function that shows you the top results of the cells and obtains the metrics of the top1 and top5 accuracy in the board. This can easily be done in a loop, retrieving the values of the cells with the highest predictions using a vector filled with objects of the class pair, which allows saving the cell values with their cell index. Once all this pairs are in a vector, the function
pairs.top()allows returning in a loop the 5 top predictions. These predictions are compared with the correct solution for the image, incrementing the top1 counter when the top prediction is the correct solution, or incrementing the top5 counter when the solution is in one of the five most provable predictions. This counters are divided by the total number of images used in the inference iterations, obtaining the top1 and top5 metrics.
- Timer to measure DPU and CPU execution time.
In order to measure the execution time of DPU and CPU, the C++ chrono library is going to be used. Its documentation can be found here.
- std::chrono::time_point: it is a clock class object. In this case we are going to use the high_resolution_clock.
- std::chrono::high_resolution_clock: it's the clock with the shortest tick period, and therefore, the highest precission.
Two time point objects of the high_resolution_clock are used to store the time at which the operations that want to be measured started and finished executing.
- std::chrono::duration: sn arithmetic type used as the type for the internal count of a clock. It represents the time in seconds.
- std::chrono::high_resolution_clock::now(): returns a std::chrono::time_point representing the current time.
With the now() function it is possible to store the starting and finishing times of the timer, and then we can substract their values to obain the elapsed time value in seconds.
std::chrono::time_point<std::chrono::high_resolution_clock> start, end;
std::chrono::duration<double> elapsed_seconds;
start = std::chrono::high_resolution_clock::now();

//////////////////////////////////////////////////////
/* OPTERATIONS FOR WHICH EXECUTION TIME IS MEASURED */
//////////////////////////////////////////////////////

end = std::chrono::high_resolution_clock::now();
elapsed_seconds = end - start;
- Writing results to a
.txtfile.
In order to manage .txt files we are going to use the std::ofstream class. The documentation for this class can be found here.
The idea is to write the timed values of each inference iteration into a text file that can be later handeled by any software to create graphic results. In order to do this, we are going to explain the datatypes and functions that should be used to later show a simple example of how the final application could be programmed.
-
std::ofstream: output stream class to operate on files. Objects of this class maintain a filebuf object as their internal stream buffer, which performs input/output operations on the file they are associated with (if any).
-
std::ofstream::ofstream: constructor of the ofstream class,
ofstream();orexplicit ofstream (const char* filename, ios_base::openmode mode = ios_base::out);. The default constructor only creates astd::ofstreamobject without any parameters filled. With the second option, a the name of the file has to be passed to the constructor, which will create the file if it doesn't exit. The open mode default is set toios_base::out, which opens the file to be written onto, erasing any previous content.ios_base::inopens the file in read mode andios_base::appopens the file in append mode, which enables to add lines at the bottom of the file. -
std::ofstream::open: function that opens the file identified by the filename, associating it to the stream object,
void open (const char* filename, ios_base::openmode mode = ios_base::out);. The open mode specifies what the file has been opened for, being its defaultios_base::out. -
std::ofstream::close: function that closes the file currently associated with the object, disasociating it from the stream,
void close(). The function doesn't delete the object itself, therefore trying to create a newstd::ofstreamwith the same name will result in triggering an error when compiling. -
std::ofstream::operator<<: this operator is an insertion operator, which enables writing or appending lines to the file the stream object is associated with.
In the example code, the operation will be inserted in a for loop(), as this is how it will be used for the DNN inference.
int main(void) {
  /* Create file to store a  counter */
    ofstream fs("counter_output.txt");  // The file is opened in write mode, erasing any previous content of the file if it existed
    fs.close(); // The file now closed, as we will be opening it in a different mode and inside the loop.

    for (int i = 0; i<100; i = i + 1) {
      /* Write results to file */
        fs.open("counter_output.txt", std::fstream::out | std::fstream::app); //The file is opened in write or append mode, depending if there is any content in it.
        if(!fs)   // Check if the file exists
        {
            cerr<<"Cannot open the output file."<<std::endl;
        } else{
            fs << "Counter value: " << i << ";\n";    // Write the counter value, adding a ';' at the end of the number and a carriage return character '\n'
            fs.close();
        }
    }
}
A copy that implements all of this functionalities can be found in this link.
If you don't want to use actual images to calculate the execution time of the inference, you can use random inputs for the DNN as performed in this script.
Once the application has been programed, and the kernel of the DPU is ready, you still need to perform the DPU Hybrid Compilation, introduced in the DNNDK v3.1 package workflow. The easiest way to do this is to create a folder for the network's application, and inside it create a folder named model with the DPU kernel inside, a folder named source, with the C++ code inside, and a makefile to complile the application in the ZedBoard. There is a copy of the folder here.
The hybrid compilation is done at the board. Enter the directory that contains the folder with the network's application with the makefile and open a terminal. Execute the following commands.
$ sudo scp -r ./ZedBoard_Inception_v1 [email protected]:~/xilinx-dnndk-v3.1/ZedBoard/DNNs
To execute the previous command, you have to previously establish a SSH conection with the board as explained in the subsection SSH connection of section Software Installation.
Now, enter the copied folder in the ZedBoard through the SSH connection to the board and compile the application.
# cd ZedBoard_Inception_v1

# make
A file is now created wiht the name of the network. To execute it, type in the following command:
./inception_v1
The first step to create an application for the TensorFlow tf_Inceptionv3 model is to donwload the pre-trained model here. The name of this model in the repository is tf_inceptionv3_imagenet_299_299_11.45G_1.1. This name indicates that the model uses the TensorFlow framework, tf, the name of the network itself, inceptionv4, the dataset it was trained with, imagenet, the size of the images it was trained with, 299x299, the computation of the model (how many GPOS per image), 11.45G and the version of Vitis-AI the network was trained for, v1.1.
All the scripts, python and c++ needes to execute the tf_Inceptionv3 application are included in the repository. This files can be found in the following link.
The quantization of the model requires two main steps. First of all, the pre-processing of the calibration images, performed with two python scripts, one with the operations that are going to take place (inception_v3_input_fn.py), and another one with the definition of the functions (inception_v3_preprocessing.py).
The image pre-processing is indicated in the model's README.md file. For tf_inceptionv3, the images are going to be cropped from the central region to an 87.5% of the image and resized with the cv2.resize function from OpenCV. This operation makes sure all input images are 299x299 pixels. Afterwards, bgr2rgb function is implemented, as the images are loaded in the BGR format by OpenCV, but the DNN requires them to be in RGB format. The last step is to apply normalization to make sure all the image layer values are in the -1 to 1 range.
Once the pre-processing script is ready, quantization is performed with the decent_q.sh. It is important to make sure the input and ouput node names are correctly indicated. To check these names, enter the tf_Inception_v3 directory from the archive downloaded at the model-zoo repository, enter the float folder and execute the following command.
cd float

decent_q inspect --input_frozen_graph inception_v3.pb
One possibility for both the input and the output node is found.
Found 1 possible inputs: (name=input, type=float(1), shape=[?,299,299,3])
Found 1 possible outputs: (name=InceptionV3/Predictions/Reshape_1, op=Reshape)
With this information, create the quantization script and run it, sh decent_q.sh. The expected output is now shown:
INFO: Checking Float Graph...
INFO: Float Graph Check Done.
INFO: Calibrating for 100 iterations...
100% (100 of 100) |######################| Elapsed Time: 0:01:21 Time:  0:01:21
INFO: Calibration Done.
INFO: Generating Deploy Model...
[DEPLOY WARNING] Node InceptionV3/Predictions/Reshape_1(Type: Reshape) is not quantized and cannot be deployed to DPU,because it has unquantized input node: InceptionV3/Predictions/Softmax. Please deploy it on CPU.
INFO: Deploy Model Generated.
********************* Quantization Summary *********************
INFO: Output:
  quantize_eval_model: ./quantize_results/quantize_eval_model.pb
  deploy_model: ./quantize_results/deploy_model.pb
Once the quantization model has been correctly created, we are going to evaluate both the frozen and quantized models and compare the loss in accuracy. For this task we use the evaluation script from section Output and Evaluation in the page DNNDK v3.1 package workflow. Copy the code to a python script in your tf_inception_v3 model directory, and make sure the input_fn.py script call within the code has the correct name, which in this case should be inception_v3_input_fn.py, rather than inception_v1_input_fn.py. Now, add to the beggining of your inception_v3_input_fn.py the code to execute the image pre-processing during evaluation.
You are now ready to call the evaluation of the frozen graph with the following script for 2500 images. Execute sh evaluate_flozen_graph.sh:
Start Evaluation for 50 Batches...
100% (50 of 50) |########################| Elapsed Time: 0:04:30 Time:  0:04:30
Accuracy: Top1: 0.7744000005722046, Top5: 0.9311999988555908
Now, repeat the same proccess for the quantization model with this script. Execute sh evaluate_quantized_graph.sh:
Start Evaluation for 50 Batches...
100% (50 of 50) |########################| Elapsed Time: 0:02:13 Time:  0:02:13
Accuracy: Top1: 0.7775999999046326, Top5: 0.921199996471405
The following table shows a comparison of the evaluations performad in the host machine of the frozen and quantized models.
| Accuracy | Frozen Graph | Quantized Graph |
|---|---|---|
| Top1 | 0.7744 | 0.7776 |
| Top5 | 0.9312 | 0.9212 |
The compilation process is performed with the DNNC tool, for which the dnnc_ZedBoard.sh script has to be created. Its result is now shown.
Compiling Network inception_v3
DNNDK      : 3.1
Board Name : ZedBoard
DCF file   : ../dcf/custom_zedboard.dcf
CPU Arch   : arm32
DNNC Mode  : debug
dnnc version v3.00
DPU Target : v1.4.0
Build Label: Aug  9 2019 05:23:25
Copyright @2019 Xilinx Inc. All Rights Reserved.

[DNNC][Warning] layer [InceptionV3_Logits_SpatialSqueeze] (type: Squeeze) is not supported in DPU, deploy it in CPU instead.
[DNNC][Warning] layer [InceptionV3_Predictions_Softmax] (type: Softmax) is not supported in DPU, deploy it in CPU instead.

DNNC Kernel topology "inception_v3_kernel_graph.jpg" for network "inception_v3"
DNNC kernel list info for network "inception_v3"
                               Kernel ID : Name
                                       0 : inception_v3_0
                                       1 : inception_v3_1

                             Kernel Name : inception_v3_0
--------------------------------------------------------------------------------
                             Kernel Type : DPUKernel
                               Code Size : 0.61MB
                              Param Size : 22.72MB
                           Workload MACs : 11426.44MOPS
                         IO Memory Space : 1.67MB
                              Mean Value : 0, 0, 0,
                              Node Count : 121
                            Tensor Count : 131
                    Input Node(s)(H*W*C)
InceptionV3_InceptionV3_Conv2d_1a_3x3_Conv2D(0) : 299*299*3
                   Output Node(s)(H*W*C)
InceptionV3_Logits_Conv2d_1c_1x1_Conv2D(0) : 1*1*1001


                             Kernel Name : inception_v3_1
--------------------------------------------------------------------------------
                             Kernel Type : CPUKernel
                    Input Node(s)(H*W*C)
       InceptionV3_Logits_SpatialSqueeze : 1*1*1001
                   Output Node(s)(H*W*C)
         InceptionV3_Predictions_Softmax : 1*1*1001
With this output we now know the name of the input and output boundary nodes of the DPU (InceptionV3_InceptionV3_Conv2d_1a_3x3_Conv2D and InceptionV3_Logits_Conv2d_1c_1x1_Conv2D respecively), which we need to comunicate the ZedBoard's CPU with the DPU, the name of the DPU kernel(inception_v3_0) and the layers that are not supported by the DPU which have to be included in the CPU kernel (squeeze and softmax layer).
The application is created using the same APIs and functions than the tf_Inceptionv1 application. A copy of the code is available in this link.
To measure execution time with random inputs, use this other code.
Once the application has been programed, and the kernel of the DPU is ready, you still need to perform the DPU Hybrid Compilation, introduced in the DNNDK v3.1 package workflow. The easiest way to do this is to create a folder for the network's application, and inside it create a folder named model with the DPU kernel inside, a folder named souce, with the C++ code inside, and a makefile to complile the application in the ZedBoard. There is a copy of this folder here.
The hybrid compilation is done at the board. Enter the directory that contains the folder with the network's application with the makefile and open a terminal. Execute the following commands.
sudo scp -r ./ZedBoard_Inception_v3 [email protected]:~/xilinx-dnndk-v3.1/ZedBoard/samples
To execute the previous command, you have to previously establish a SSH conection with the board as explained in the subsection SSH connection of section Software Installation.
Now, enter the copied folder in the ZedBoard through the SSH connection to the board and compile the application.
# cd ZedBoard_Inception_v3

# make
A file is now created wiht the name of the network. To execute it, type in the following command:
./inception_v3
The first step to create an application for the TensorFlow mobilenet_v1_1.0 model is to download the pre-trained model here. The name of this model in the repository is tf_mobilenetv1_1.0_imagenet_224_224_1.14G_1.1. This name indicates that the model uses the TensorFlow framework, tf, the name of the network itself, mobilenetv1_1.0, the dataset it was trained with, imagenet, the size of the images it was trained with, 224x224, the computation of the model (how many GPOS per image), 1.14G and the version of Vitis-AI the network was trained for, v1.1.
In this application the target device is a ZedBoard, therefore we are using the DNNDK v3.1 rather than Vitis-AI v1.1, which won't be a problem at all.
A copy of all the scripts used in this application can be found in this link.
Quantization of tf_Mobilenetv1
The quantization of the model requires pre-processing for the calibration images. This task is done with the script mobilenet_v1_input_fn.py, which calls all the required operations, and the script mobilenet_v1_preprocessing.py, which defines the functions used in the previous script.
The pre-processing is indicated in the README.md file of the model. For tf_Mobilenetv1, the images are going to be crop from the central region to an 87.5% of the image and resized with the cv2.resize function from OpenCV. This operation makes sure all input images are 224x224 pixels. Afterwards, bgr2rgb function is implemented, as the images are loaded in the BGR format by OpenCV. The last step is to apply normalization is applied to convert the images to RGB format and to make sure all the image layer values are in the -1 to 1 range.
Once the pre-processing script is ready, a quantization script is going to be created, decent_q.sh. It is important to make sure the input and ouput node names are correctly indicated. To check these names, enter the tf_Mobilenetv1 directory from the archive downloaded at the model-zoo repository, enter the float folder and execute the following command.
cd float

decent_q inspect --input_frozen_graph mobilenet_v1_1.0_224.pb
One possibility for both the input and the output node is found.
Found 1 possible inputs: (name=input, type=float(1), shape=[?,224,224,3])
Found 1 possible outputs: (name=MobilenetV1/Predictions/Reshape_1, op=Reshape)
Create the quantization script, making sure you input the correct image sizes, node names and frozen graph input. Run the quantization script, sh decent_q.sh, which should print this output if properly executed.
INFO: Checking Float Graph...
INFO: Float Graph Check Done.
INFO: Calibrating for 100 iterations...
100% (100 of 100) |###########################################| Elapsed Time: 0:00:43 Time:  0:00:43
INFO: Calibration Done.
INFO: Generating Deploy Model...
[DEPLOY WARNING] Node MobilenetV1/Predictions/Reshape_1(Type: Reshape) is not quantized and cannot be deployed to DPU,because it has unquantized input node: MobilenetV1/Predictions/Softmax. Please deploy it on CPU.
INFO: Deploy Model Generated.
********************* Quantization Summary *********************
INFO: Output:
  quantize_eval_model: ./quantize_results/quantize_eval_model.pb
  deploy_model: ./quantize_results/deploy_model.pb
Once the quantization model has been correctly created, we are going to evaluate both the frozen and quantized models and compare the loss in accuracy. To do this we use the evaluation script from section Output and Evaluation in the page DNNDK v3.1 package workflow. Copy the code to a python script in your tf_Mobilenetv1 model directory, and make sure the input_fn.py script call within the code has the correct name, which in this case should be mobilenet_v1_input_fn.py, rather than inception_v1_input_fn.py. Now, add to the beggining of your mobilenet_v1_input_fn.py the image pre-processing tasks.
You are now ready to call the evaluation of the frozen graph script with sh evaluate_frozen_graph.sh. The result should be the following.
Start Evaluation for 50 Batches...
100% (50 of 50) |#############################################| Elapsed Time: 0:02:24 Time:  0:02:24
Accuracy: Top1: 0.731599998474121, Top5: 0.9023999965190888
Now, repeat the same proccess for the quantization model script, sh evaluate_quantized_graph.sh.
Start Evaluation for 50 Batches...
100% (50 of 50) |#############################################| Elapsed Time: 0:02:38 Time:  0:02:38
Accuracy: Top1: 0.013999999687075614, Top5: 0.06199999935925007
The results after quantization to 8-bits are poor. Therefore, we now try to quantize to higher bit width, 12-bits. The decent_q tool should be called with the following parameters.
decent_q quantize \
  --input_frozen_graph ./float/mobilenet_v1_1.0_224.pb \
  --input_nodes input \
  --input_shapes ?,224,224,3 \
  --output_nodes MobilenetV1/Predictions/Reshape_1 \
  --input_fn mobilenet_v1_input_fn.calib_input \
  --weight_bit 12 \
  --activation_bit 12 \
  --method 1 \
  --gpu 0 \
  --calib_iter 100 \
The results after evaluation would be the following:
Start Evaluation for 50 Batches...
100% (50 of 50) |#############################################| Elapsed Time: 0:04:04 Time:  0:04:04
Accuracy: Top1: 0.708200001001358, Top5: 0.8971999943256378
| Accuracy | Frozen Graph | Quantized Graph 8-bits | Quantized Graph 12-bits |
|---|---|---|---|
| Top1 | 0.7316 | 0.0144 | 0.7082 |
| Top5 | 0.9024 | 0.0624 | 0.8972 |
The reason for the high drop in accuracy is that the weights lose too much information when quantizing to 8-bits. A solution to this problem is going to be provided in future relesases of Vitis-AI, enabling fine tunning when quantizing the models. As the DPU IP block uses 8-bit signed integers to represent its variables, the 16-bit accurate model cannot be used for the measurements of time.
Compilation of tf_Mobilenetv1
The compilation process is performed with the DNNC tool, running the dnnc_ZedBoard.sh script with sh dnnc_ZedBoard.sh.
Compiling Network mobilenet_v1
DNNDK      : 3.1
Board Name : ZedBoard
DCF file   : ../dcf/custom_zedboard.dcf
CPU Arch   : arm32
DNNC Mode  : debug
dnnc version v3.00
DPU Target : v1.4.0
Build Label: Aug  9 2019 05:23:25
Copyright @2019 Xilinx Inc. All Rights Reserved.

[DNNC][Warning] layer [MobilenetV1_Logits_SpatialSqueeze] (type: Squeeze) is not supported in DPU, deploy it in CPU instead.
[DNNC][Warning] layer [MobilenetV1_Predictions_Softmax] (type: Softmax) is not supported in DPU, deploy it in CPU instead.

DNNC Kernel topology "mobilenet_v1_kernel_graph.jpg" for network "mobilenet_v1"
DNNC kernel list info for network "mobilenet_v1"
                               Kernel ID : Name
                                       0 : mobilenet_v1_0
                                       1 : mobilenet_v1_1

                             Kernel Name : mobilenet_v1_0
--------------------------------------------------------------------------------
                             Kernel Type : DPUKernel
                               Code Size : 0.22MB
                              Param Size : 4.03MB
                           Workload MACs : 1137.48MOPS
                         IO Memory Space : 0.72MB
                              Mean Value : 0, 0, 0,
                              Node Count : 15
                            Tensor Count : 16
                    Input Node(s)(H*W*C)
MobilenetV1_MobilenetV1_Conv2d_0_Conv2D(0) : 224*224*3
                   Output Node(s)(H*W*C)
MobilenetV1_Logits_Conv2d_1c_1x1_Conv2D(0) : 1*1*1001


                             Kernel Name : mobilenet_v1_1
--------------------------------------------------------------------------------
                             Kernel Type : CPUKernel
                    Input Node(s)(H*W*C)
       MobilenetV1_Logits_SpatialSqueeze : 1*1*1001
                   Output Node(s)(H*W*C)
         MobilenetV1_Predictions_Softmax : 1*1*1001
With this output we now know the name of the input and output boundary nodes of the DPU (MobilenetV1_MobilenetV1_Conv2d_0_Conv2D and MobilenetV1_Logits_Conv2d_1c_1x1_Conv2D respecively), which we need to comunicate the ZedBoard's CPU with the DPU, the name of the DPU kernel(mobilenet_v1_0) and the layers that are not supported by the DPU which have to be included in the CPU kernel (squeeze and softmax layer).
The application is created using the same APIs and functions than the tf_Inceptionv1 application. A copy of the code is available in this link.
If you want to execute the DNN with random inputs, use this script.
Once the application has been programed, and the kernel of the DPU is ready, you still need to perform the DPU Hybrid Compilation, introduced in the DNNDK v3.1 package workflow. The easiest way to do this is to create a folder for the network's application, and inside it create a folder named model with the DPU kernel inside, a folder named souce, with the C++ code inside, and a makefile to complile the application in the ZedBoard. There is a copy of athe folder here.
The hybrid compilation is done at the board. Enter the directory that contains the folder with the network's application with the makefile and open a terminal. Execute the following commands.
sudo scp -r ./ZedBoard_Mobilenetv1 [email protected]:~/xilinx-dnndk-v3.1/ZedBoard/samples
To execute the previous command, you have to previously establish a SSH conection with the board as explained in the subsection SSH connection of section Software Installation.
Now, enter the copied folder in the ZedBoard through the SSH connection to the board and compile the application.
# cd ZedBoard_Mobilenetv1

# make
A file is now created wiht the name of the network. To execute it, type in the following command:
./mobilenet_v1
Five execution time results for tf_mobilenetv1_1.0:
DPU Task Execution time: 19458us

DPU Task Execution time: 19459us

DPU Task Execution time: 19457us

DPU Task Execution time: 19458us

DPU Task Execution time: 19465us
The first step to create an application for the TensorFlow mobilenet_v1_1.4 model is to donwload the pre-trained model here. The name of this model in the repository is tf_mobilenetv2_1.4_imagenet_224_224_1.16G_1.1. This name indicates that the model uses the TensorFlow framework, tf, the name of the network itself, mobilenetv2_1.4, the dataset it was trained with, imagenet, the size of the images it was trained with, 224x224, the computation of the model (how many GPOS per image), 1.16G and the version of Vitis-AI the network was trained for, v1.1.
A copy of all the scripts used in this sub-section is available in this link.
The quantization of the model requires pre-processing for the calibration images. This task is done with the script mobilenet_v2_input_fn.py, which calls all the required operations, and the script mobilenet_v2_preprocessing.py, which defines the functions used in the previous script.
The pre-processing is indicated in the README.md file of the model. For tf_Mobilenetv2, the images are going to be crop from the central region to an 87.5% of the image and resized with the cv2.resize function from OpenCV. This operation makes sure all input images are 224x224 pixels. Afterwards, bgr2rgb function is implemented, as the images are loaded in the BGR format by OpenCV, but the DNN model requies them to have the RGB format. The last step is to apply normalization to make sure all the image pixel values are in the -1 to 1 range.
Once the pre-processing script is ready, a quantization script is going to be created, decent_q.sh. It is important to make sure the input and ouput node names are correctly indicated. To check these names, enter the tf_Mobilenetv2 directory from the archive downloaded at the model-zoo repository, enter the float folder and execute the following command.
$ cd float

$ decent_q inspect --input_frozen_graph mobilenet_v2_1.4_224.pb
One possibility for both the input and the output node is found.
Found 1 possible inputs: (name=input, type=float(1), shape=[?,224,224,3])
Found 1 possible outputs: (name=MobilenetV2/Predictions/Reshape_1, op=Reshape)
With this information, create the quantization script, making sure you input the correct image sizes, node names and frozen graph input. Run the quantization script, sh decent_q.sh, which should print this output if properly executed.
INFO: Checking Float Graph...
INFO: Float Graph Check Done.
INFO: Calibrating for 100 iterations...
100% (100 of 100) |######################| Elapsed Time: 0:01:36 Time:  0:01:36
INFO: Calibration Done.
INFO: Generating Deploy Model...
[DEPLOY WARNING] Node MobilenetV2/Predictions/Reshape_1(Type: Reshape) is not quantized and cannot be deployed to DPU,because it has unquantized input node: MobilenetV2/Predictions/Softmax. Please deploy it on CPU.
INFO: Deploy Model Generated.
********************* Quantization Summary *********************
INFO: Output:
  quantize_eval_model: ./quantize_results/quantize_eval_model.pb
  deploy_model: ./quantize_results/deploy_model.pb
Once the quantization model has been correctly created, we are going to evaluate both the frozen and quantized models and compare the loss in accuracy. To do this we use the evaluation script from section Output and Evaluation in the page DNNDK v3.1 package workflow. Copy the code to a python script in your tf_Mobilenetv2 model directory, and make sure the input_fn.py script call within the code has the correct name, which in this case should be mobilenet_v1_input_fn.py, rather than inception_v1_input_fn.py. Now, add to the beggining of your mobilenet_v2_input_fn.py the image pre-processing tasks for evaluation.
You are now ready to call the evaluation of the frozen graph with the following script, sh evaluate_frozen_graph.sh:
Start Evaluation for 50 Batches...
100% (50 of 50) |#############################################| Elapsed Time: 0:02:29 Time:  0:02:29
Accuracy: Top1: 0.6772000014781951, Top5: 0.8895999991893768
Now, repeat the same proccess for the quantization model script, sh evaluate_quantized_graph.sh:
Start Evaluation for 50 Batches...
100% (50 of 50) |#############################################| Elapsed Time: 0:03:08 Time:  0:03:08
Accuracy: Top1: 0.04439999930560589, Top5: 0.10119999915361405

Just like for tf_Mobilenetv1, there is a considerable drop in accuracy. This time, it is neccesary to quantize to 16-bits in order to avoid a significant loss in accuracy. Check section [Compilation of tf_Mobilenetv1](#compilation-of-tf_mobilenetv1) to see how to quantize to 12 or 16-bits.
| Accuracy | Frozen Graph | Quantized Graph 8-bits | Quantized Graph 12-bits | Quantized Graph 16-bits |
|---|---|---|---|---|
| Top1 | 0.6772 | 0.0444 | 0.6460 | 0.6760 |
| Top5 | 0.8896 | 0.1012 | 0.8604 | 0.8896 |
The drop in accuracy is again an issue due to the loss of too much information with 8-bits quantization. Future releases of Vitis-AI will include fine-tuning for the quantization tool, which will enable quantizing to 8-bits without accuracy loss. As the DPU IP block uses 8-bit signed integers to represent its variables, the 16-bit accurate model cannot be used for the measurements of time.
The compilation process is performed with the DNNC tool, running the dnnc_ZedBoard.sh script with the command sh dnnc_ZedBoard.sh.
Compiling Network mobilenet_v2
DNNDK      : 3.1
Board Name : ZedBoard
DCF file   : ../dcf/custom_zedboard.dcf
CPU Arch   : arm32
DNNC Mode  : debug
dnnc version v3.00
DPU Target : v1.4.0
Build Label: Aug  9 2019 05:23:25
Copyright @2019 Xilinx Inc. All Rights Reserved.

[DNNC][Warning] layer [MobilenetV2_Logits_Squeeze] (type: Squeeze) is not supported in DPU, deploy it in CPU instead.
[DNNC][Warning] layer [MobilenetV2_Predictions_Softmax] (type: Softmax) is not supported in DPU, deploy it in CPU instead.

DNNC Kernel topology "mobilenet_v2_kernel_graph.jpg" for network "mobilenet_v2"
DNNC kernel list info for network "mobilenet_v2"
                               Kernel ID : Name
                                       0 : mobilenet_v2_0
                                       1 : mobilenet_v2_1

                             Kernel Name : mobilenet_v2_0
--------------------------------------------------------------------------------
                             Kernel Type : DPUKernel
                               Code Size : 0.48MB
                              Param Size : 5.80MB
                           Workload MACs : 1164.40MOPS
                         IO Memory Space : 1.10MB
                              Mean Value : 0, 0, 0,
                              Node Count : 36
                            Tensor Count : 37
                    Input Node(s)(H*W*C)
              MobilenetV2_Conv_Conv2D(0) : 224*224*3
                   Output Node(s)(H*W*C)
MobilenetV2_Logits_Conv2d_1c_1x1_Conv2D(0) : 1*1*1001


                             Kernel Name : mobilenet_v2_1
--------------------------------------------------------------------------------
                             Kernel Type : CPUKernel
                    Input Node(s)(H*W*C)
              MobilenetV2_Logits_Squeeze : 1*1*1001
                   Output Node(s)(H*W*C)
         MobilenetV2_Predictions_Softmax : 1*1*1001
With this output we now know the name of the input and output boundary nodes of the DPU (MobilenetV2_Conv_Conv2D and MobilenetV2_Logits_Conv2d_1c_1x1_Conv2D respecively), which we need to comunicate the ZedBoard's CPU with the DPU, the name of the DPU kernel(mobilenet_v2_0) and the layers that are not supported by the DPU which have to be included in the CPU kernel (squeeze and softmax layer).
The application is created using the same APIs and functions than the tf_Inceptionv1 application. A copy of the code is available in this link.
If you want to execute the DNN model with random inputs, use this other script.
Once the application has been programed, and the kernel of the DPU is ready, you still need to perform the DPU Hybrid Compilation, introduced in the DNNDK v3.1 package workflow. The easiest way to do this is to create a folder for the network's application, and inside it create a folder named model with the DPU kernel inside, a folder named souce, with the C++ code inside, and a makefile to complile the application in the ZedBoard. There is a copy of the folder here.
The hybrid compilation is done at the board. Enter the directory that contains the folder with the network's application with the makefile and open a terminal. Execute the following commands.
sudo scp -r ./ZedBoard_Mobilenetv2 [email protected]:~/xilinx-dnndk-v3.1/ZedBoard/samples
To execute the previous command, you have to previously establish a SSH conection with the board as explained in the subsection SSH connection of section Software Installation.
Now, enter the copied folder in the ZedBoard through the SSH connection to the board and compile the application.
# cd ZedBoard_Mobilenetv2

# make
A file is now created wiht the name of the network. To execute it, type in the following command:
./mobilenet_v2
Five execution time results for tf_mobilenet2_1.4:
  DPU Task Execution time: 27727us

  DPU Task Execution time: 27731us

  DPU Task Execution time: 27728us

  DPU Task Execution time: 27734us

  DPU Task Execution time: 27731us