Installation and Setup - TheThinkingHome/device_sentinel GitHub Wiki
Installation and Setup
Installing

- Open HACS > Custom repositories.
- Paste
https://github.com/TheThinkingHome/device_sentinel, choose Integration, and click Add. - Download Device Sentinel, then Restart Home Assistant.
- Go to Settings > Devices and Services > Add Integration and search for Device Sentinel.
Device Sentinel requires Home Assistant 2026.5 or newer.
If you are reading this, you have already installed Device Sentinel and added it to Home Assistant. From the moment you clicked "Submit," Device Sentinel started quietly watching the devices in Home Assistant.
Now you make it yours. Device Sentinel is built to monitor physical hardware, but Home Assistant integrations don't always declare their virtual devices or helper entities correctly. Right now, it's observing everything to help you build a pristine system.
The goal of this guide is to help you shape your setup so that Device Sentinel interrupts you only when something needs your attention.
What to Expect: The First Two Weeks
Device Sentinel doesn't force a one-size-fits-all timeout on your home. Instead, it learns the unique reporting rhythm of every individual device. That learning takes a little time, so you'll want to expect a bit of initial activity during your first two weeks. How Device Sentinel Learns explains how it learns what normal looks like for each of your devices.
Week One: The Noise and the Purge
Right now, the integration is in observation mode, recording the longest gaps between reports to establish a solid baseline.
During this first week, you might see alerts for things you don't actually care about, or items that aren't physical hardware at all, like ping trackers, mobile companion apps, or wall tablets permanently plugged into power. This is entirely normal.
Your main goal in Week One is simply to clear out this noise using the Exclusions and Muting screen. If it isn't physical hardware that can fail in your house, exclude it. If you don't care if it goes quiet, mute it.
While you are at it, open the Recommendations tab on the dashboard. Its cards list the devices with no power source set, no type set and no area. Power and type can be set right on the card; a device with no area is one click from its page. A low battery warning can then name the battery to buy, and the Battery Trends, Classification and Devices tabs can be narrowed to one type.
Week Two: Freeze Detection Arms
By the start of week two (day 7), Device Sentinel has gathered enough history to start Freeze Detection for your devices. If a device goes silent past its newly learned window, Device Sentinel reports it frozen.
You might encounter a few false positives this week as the system encounters unusual gaps for the first time. Don't worry, the learning process is ongoing, and when devices recover, their windows adjust automatically.
Your focus in Week Two is to continue muting naturally intermittent devices (like a car sensor that leaves the driveway) or gently adjusting your Freeze Detection sliders if a specific class of devices feels too sensitive.
By the end of your second week (day 14), the rhythms have settled into place. From that point on, if Device Sentinel tells you a device is frozen, you can trust it completely. From day 28, a second way of learning the rhythm joins in, one that a single bad day can't stretch, and Device Sentinel judges each device by whichever of the two is shorter. Freeze Detection explains both.
Configuring Your System
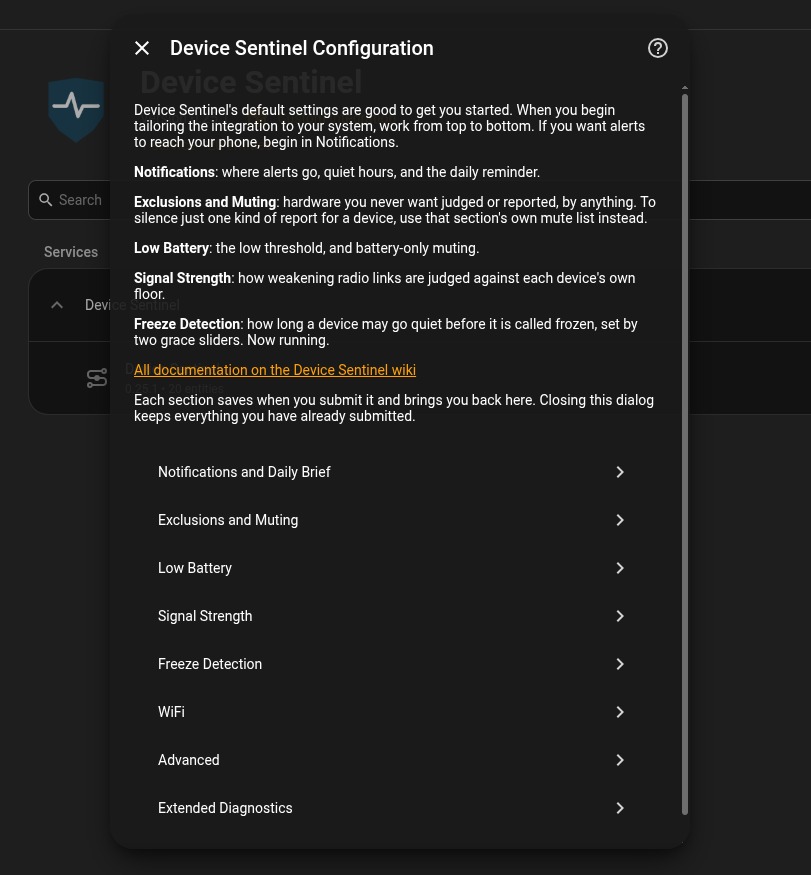
The configuration menu is designed to flow smoothly from top to bottom.
1. The Three Enable Buttons
Before tweaking any sliders, navigate to the main Device Sentinel integration page in Home Assistant (where you see your main device card and its entities). The Device Page covers everything you'll find there.
The same three buttons sit across the top of the dashboard.
Many integrations ship their diagnostic entities, like battery levels, signal strengths, and last-seen timestamps, disabled by default. Device Sentinel can't monitor what it can't see. If it finds any switched off, it also raises a Repair card that turns them all on at once. Three buttons turn these on for every watched device at once:
- Enable Battery: Turns on battery percentage sensors for your watched hardware, making low and falling battery tracking possible.
- Enable Signals: Turns on signal strength entities so you can monitor your radio mesh.
- Enable Last Seen (the important one): Turns on the
last_seenentity wherever supported. This is the single most effective action you can take for fast, reliable freeze detection.
Why Last Seen matters: Freeze detection looks for state changes. A door sensor might only change state (open/close) twice a day, and its battery might only drop 1% a week. If those are your only enabled entities, Device Sentinel learns that a 12-hour silence is normal. If the sensor dies right after you close the door, you won't hear about it for half a day. With last_seen enabled, the device updates every time the coordinator checks in (often every few minutes). Device Sentinel learns this short interval instead, catching a freeze in minutes rather than hours.
Go ahead and press all three buttons now.
2. Notifications and Daily Brief
This screen controls who hears about a problem, and when. It splits your notifications into instant alerts and your daily summary.
A quick tip: Skip High-Priority targets for now.
Until you've cleared out the initial noise during your first two weeks, you don't need instant pushes for every detail. Even after your system is fully tuned, ask yourself if an alert is necessary at 3:00 AM. For everyday peace of mind, the Daily Brief and the dashboard are more than enough. Reserve high-priority alerts strictly for mission-critical setups like vacation home security or water leak detectors.
Set your schedule:
Instead of relying on instant interruptions, lean into Quiet Hours and the Daily Brief.
- Set your Quiet Hours (for example, from 10:00 PM to 7:00 AM).
- Set your Daily Brief to publish right at the end of your quiet hours (e.g., 7:00 AM).
The Daily Brief covers the preceding 24 hours, keeping overnight network events neatly bundled together in one readable report.
Links in Reports:
Device names in the daily brief can open their page on the Device Sentinel dashboard, which saves hunting for a sensor called "Temperature & Humidity" when you have nine of them. The choice is None, Internal URL or External URL, and each one shows the address it would use.
Default is "None". The brief is emailed and can be forwarded, so a link carries your house's address with it. Keep this in mind when setting this.
3. Exclusions and Muting
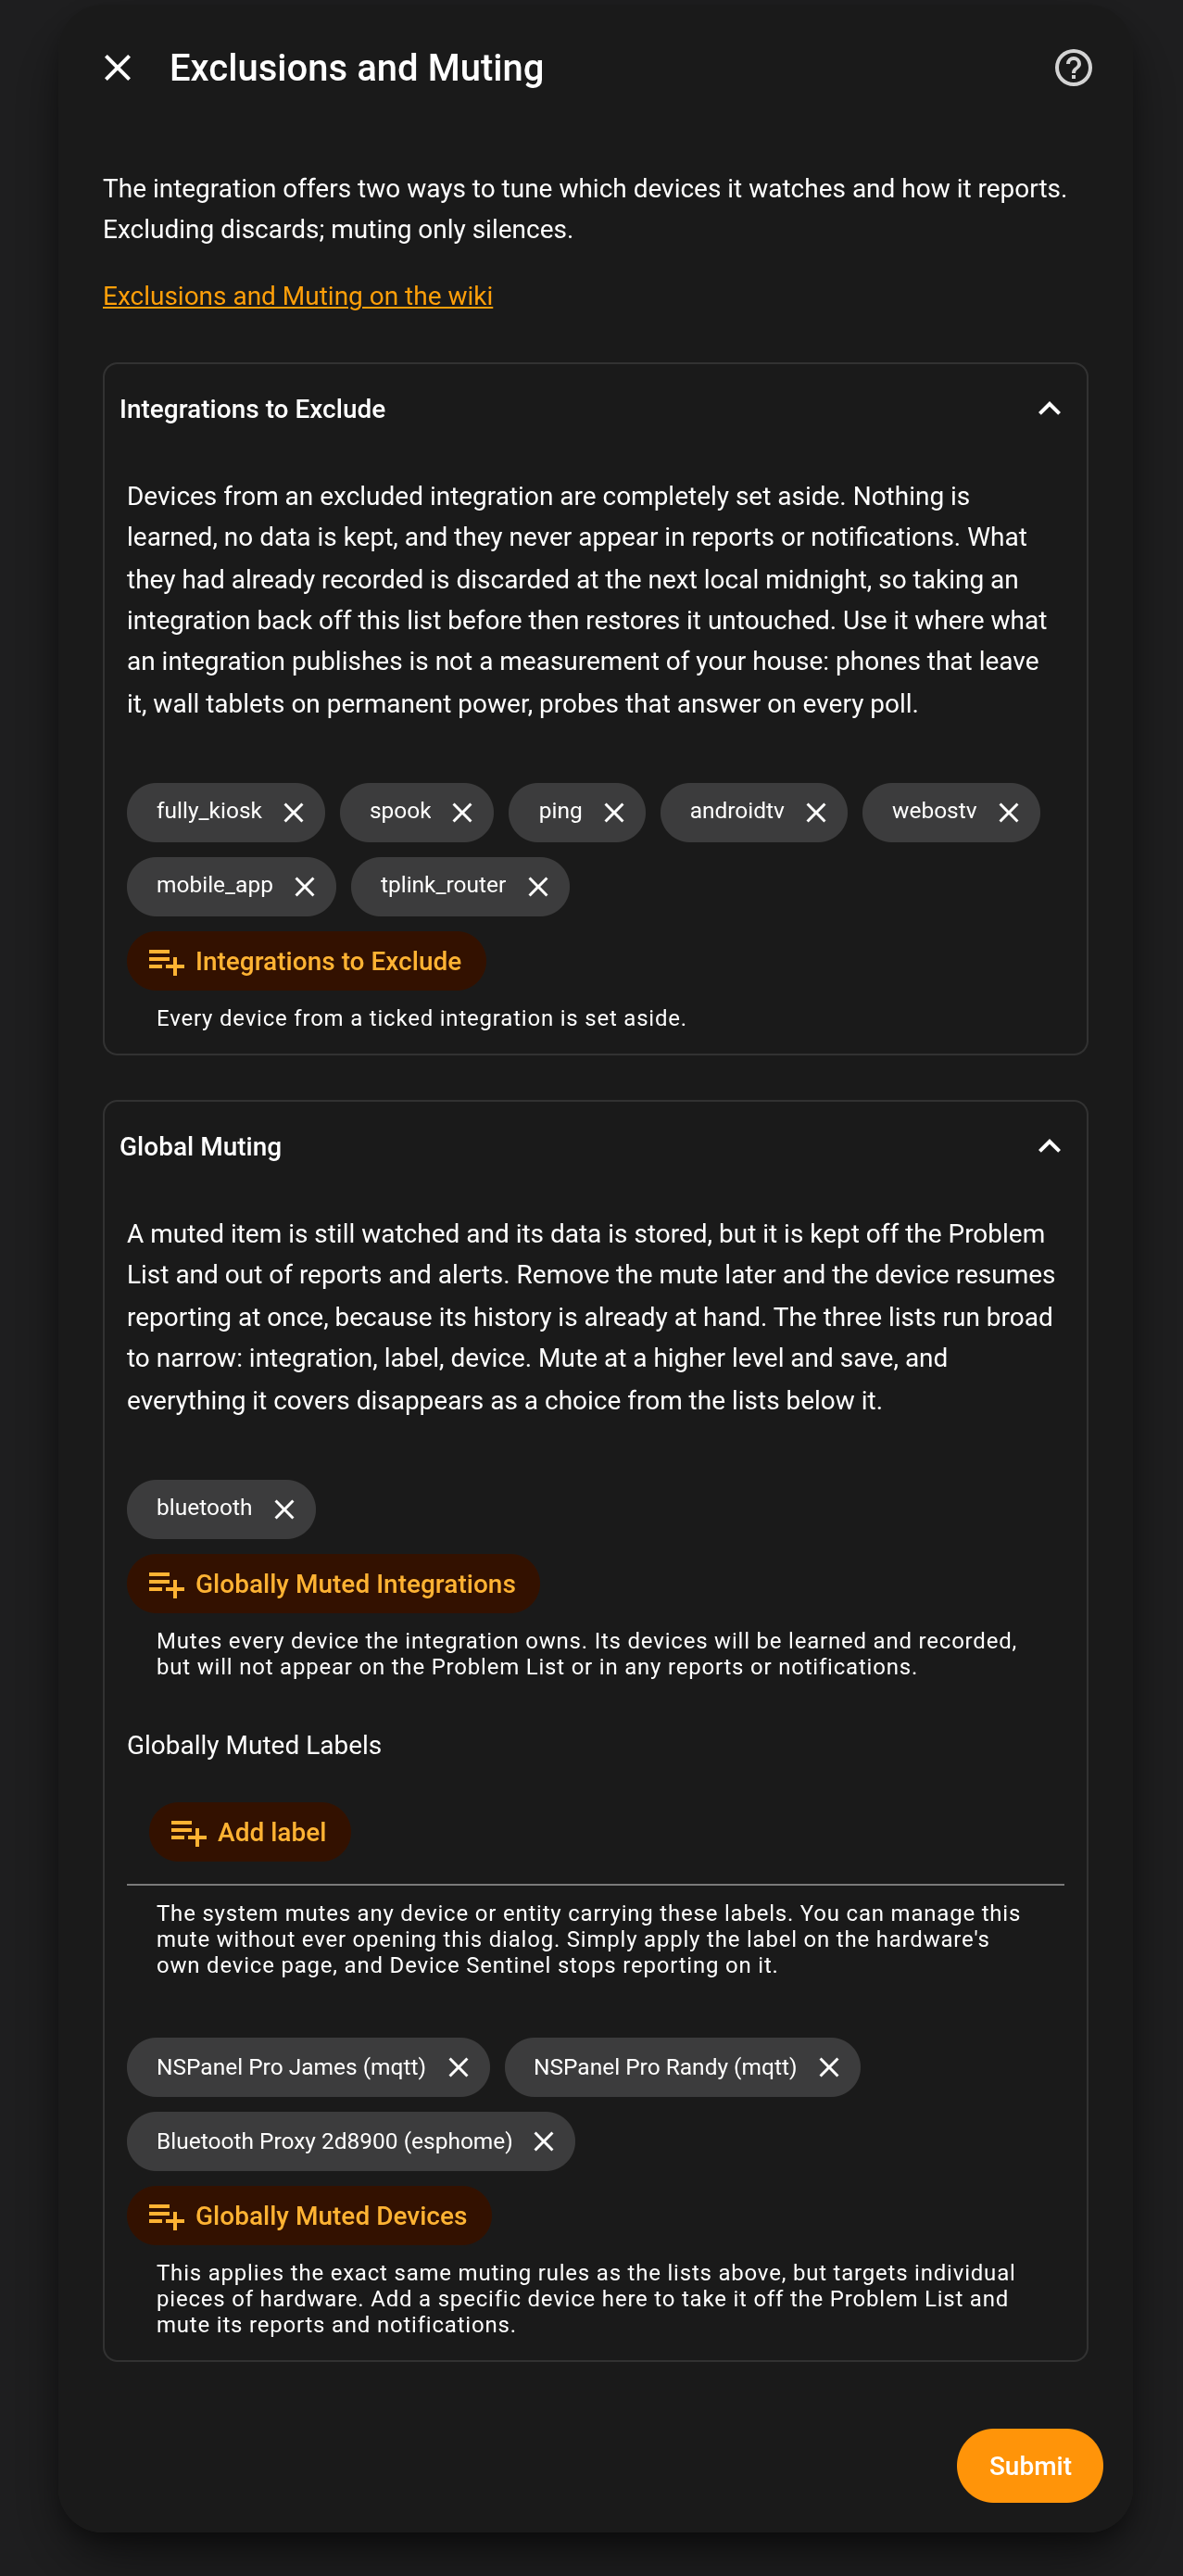
This screen is your primary tool for a clean, quiet dashboard. It offers two distinct approaches, and understanding the difference is key: Excluding discards data. Muting silences alerts.
When to Exclude:
An excluded integration is entirely ignored: its devices are never watched and never recorded. Use this for software integrations (spook, ping), mobile app trackers that leave the house, or misbehaving smart TV integrations that report unavailable instead of off when powered down.
When to Mute: A muted device is silenced from your reports and alerts, but it is still watched and tracked in the background. Device Sentinel keeps recording its history so that if you ever unmute it down the road, its data is waiting with zero relearning required.
4. Low Battery
Device Sentinel evaluates batteries on two fronts: a flat percentage threshold and a predictive falling trend.
While you can adjust the flat Low Battery threshold (defaulting at 15%), the Days Till Empty Warning is the one that saves you. Lithium coin cells (like CR2032s) hold near-full voltage for most of their life and then drop fast. Device Sentinel compares each week's average level with the week before, catches the fall early, and warns you while there's still time to buy a replacement.
5. Signal Strength
Signal monitoring is experimental. Weak links are recorded and shown on the dashboard's Signal Trends tab, and they don't send phone alerts. The one exception is a link stuck at a rail value, a false reading rather than a weak one, which does notify.
6. Freeze Detection
This screen lets you tune the grace periods added to your devices' learned rhythms using the Delta Low (fast devices) and Delta High (slow devices) sliders.
Leave these alone during Week 1 and let the system learn. If a specific class of devices feels too sensitive during Week 2, you can gently adjust these to be more forgiving.
7. WiFi
When your Wi-Fi network drops, dozens of smart plugs can go quiet simultaneously. Device Sentinel detects the network outage and reports it as a single incident rather than dozens of individual device faults.
It accomplishes this either by listening directly to your server's wireless adapter or by reading supported router integrations (like UniFi or TP-Link). Either path works on its own.
8. Advanced
Most users can leave these settings at their defaults. Four are worth knowing about:
- Storage Write Interval: How often routine data moves from memory to disk. Set it to 30 to 60 minutes if Home Assistant runs on an SD card, to maximize its lifespan. On an SSD, leave it at 15 or drop it to 5.
- How Much History to Keep: 30 days on an SD card keeps the footprint small. 90 days is the default and is enough to watch a battery decay across a season. Lowering it takes effect at the next midnight, so a mistake can be undone before anything is lost.
- Maintenance Window in Minutes: How long Maintenance Mode stays open once you press the button. It defaults to 10 minutes; raise it if your repairs usually take longer.
- Data Trim: At the foot of the screen, the pickers that erase a device's or an integration's learned history. Use them when support asks, or when you know a record has gone wrong and you want it to start over. A backup is written first, and if that backup cannot be written, nothing is deleted.
9. Extended Diagnostics
If you'd like to help improve support for emerging hardware or routers, this screen lists whatever it finds on your system that support is still being built for. A house with no Z-Wave is never asked about Z-Wave.
Contributing takes four steps:
- Tick the hardware you would like supported.
- Let it run for about 48 hours, so the readings cover normal behavior rather than one moment.
- Download your diagnostics: Settings > Devices and Services > Device Sentinel, the three-dot menu, Download diagnostics. For Z-Wave, Matter, Philips Hue, SmartThings, Tuya or Lutron Caséta, also attach
stack_probe.mdfrom theconfig/device_sentinelfolder. - Open an issue on the repository, attach the file, and say what you would like built.
Nothing is transmitted anywhere. The readings sit in a file on your own system, and they reach anybody else only if you attach that file yourself.