HOW TO Configure HWiNFO - SilverAzide/Gadgets GitHub Wiki
HOW TO: Configure HWiNFO
Using HWiNFO with Rainmeter skins requires installing and configuring HWiNFO. No plug-ins are required. Initial HWiNFO configuration is much more complex than CoreTemp, so read the following instructions carefully.
Some Things to Keep in Mind
- Most computer processors today are hyperthreaded, which means each "physical core" can run two "threads" of execution, so each core appears as if it were two cores. In other words, one hyperthreaded physical core acts as two "logical cores". If you had an 8-core/16-thread CPU, or 2 4-core/8-thread CPUs, Windows sees these as 16 individual processor cores — 16 "logical cores" — in your PC. Some newer processors have hybrid CPUs, with a mix of hyperthreaded performance cores ("p-cores") and single-threaded low-power efficiency cores ("e-cores").
- While Windows — and therefore Rainmeter and the Gadgets — sees "logical cores", HWiNFO sees "physical cores" (and "physical CPUs" if you have a dual-socket motherboard). You will need to map your physical CPU hardware to the logical cores seen by Windows.
- AMD hardware is different in several important ways from Intel and nVidia hardware. You will need to pay particular attention to how AMD CPU temperatures are reported, and how AMD GPU memory is handled.
- On most laptops, the GPU fan is controlled by a sensor on the motherboard, not on the GPU itself.
- HWiNFO may be unable to see fans in newer Dell laptops. Dell uses proprietary fan controllers and does not make this information public, preventing third-party developers from being able to create tools to see them or control their behavior.
- Your PC may not have all the sensors needed for the Gadgets, or the sensors may have different names that those in this guide. Hardware from different manufactures will appear differently in HWiNFO, which is why HWiNFO is continually being updated as new hardware comes out.
Install HWiNFO
The Gadgets require HWiNFO 7.02 or later. Please note that you do not need the HWiNFO Pro edition; the free edition will work fine.
:thumbsup: The HWiNFO author has worked closely with the Rainmeter community and has been very supportive of keeping HWiNFO free for Rainmeter users. I encourage everyone who can afford it to make at least a one-time purchase of the program to show your appreciation for the author's efforts.
- Download HWiNFO here.
- Install the application and run it.
Configure HWiNFO Settings
Once HWiNFO is installed, the next step is to configure the HWiNFO settings.
- When launching HWiNFO the first time, the Welcome splash screen will appear.
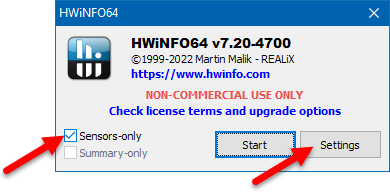
- For the best user experience, check the Sensors-only option.
- Click the Settings button to open the Settings window.
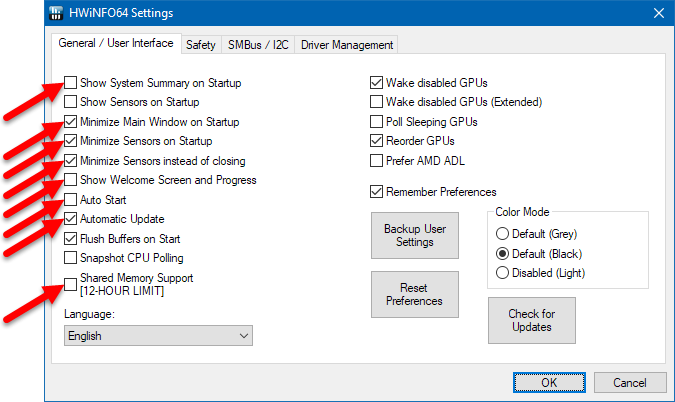
- Unlike previous versions of HWiNFO, you do not need to enable the Shared Memory Support option. You do need to enable this option if you use other Rainmeter skins that require it.
- If you would like HWiNFO to start automatically when you log into Windows, check the Auto Start option.
- If your computer has multiple GPUs, you may need to check one or both of the Wake disabled GPUs options and the Poll Sleeping GPUs options if HWiNFO cannot find your GPU when it is inactive.
- Click OK to save your changes.
- From the Welcome screen click Start to run HWiNFO.
Configure Sensor Settings
After configuring the HWiNFO settings, the next step is to configure the Sensor settings.
-
Right-click the HWiNFO tray icon and select the Sensors option.

-
At the bottom of the Sensor Status screen, click the Configure Sensors button
 .
. -
On the General tab, in the Polling Period section, change the Global option to
1000milliseconds and click the Set button.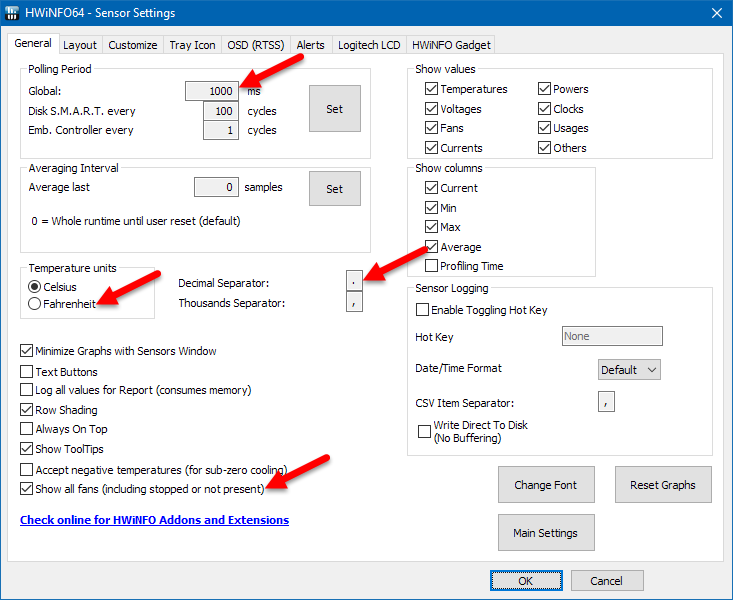
-
If you want temperatures in Fahrenheit, change the Temperature Units setting to Fahrenheit.
-
Check the Show all fans (including stopped or not present) option. Normally, HWiNFO will only show fans that are running (or have run since the program was started). This can make configuration of your Gadgets difficult, especially for laptops where the fans do not run all the time.
-
For users in locales where the period character (".") is not used as the numeric decimal separator, you must change the Decimal Separator option to a period ("."). This is due to an unfortunate limitation in Rainmeter, which does not properly convert numeric values which use other numeric formats. The thousands separator value should be changed to a comma or an empty string (""). These changes will affect the appearance of the numeric values in the HWiNFO Sensors window.
-
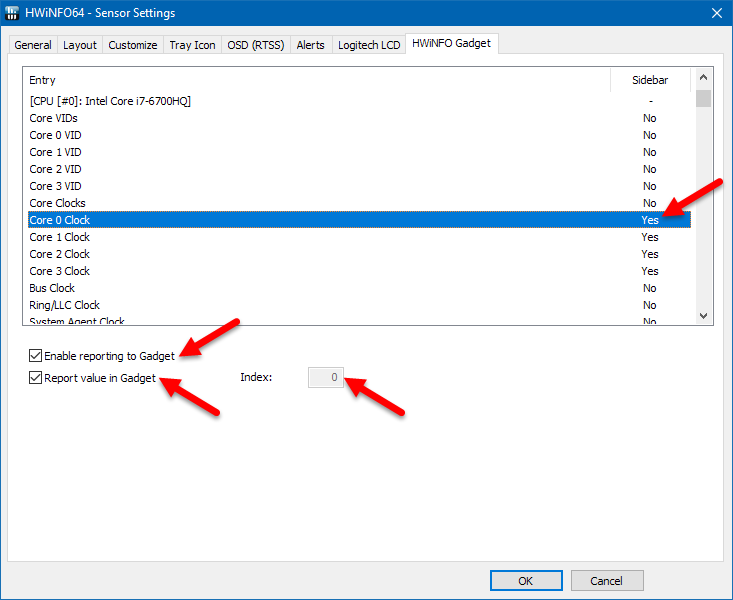
Select the HWiNFO Gadget tab.
-
Check the Enable reporting to Gadget option.
NOTE: To be clear, this tab and this option are in reference to the HWiNFO Windows Sidebar Gadget, not the Rainmeter-based Gadgets. Rainmeter skins can take advantage of HWiNFO's Sidebar Gadget configuration to allow using HWiNFO without the need to use the "Shared Memory Support" feature, and thus not require using the HWiNFO Pro edition of the application.
-
An "Entry" can be selected for monitoring by selecting the item in the list and checking the Report value in Gadget option. (Control-click or shift-click to select multiple entries.) Select the following entries (the actual names may differ depending on your hardware):
- All
Core Clockclock frequency entries (one per physical core) from the CPU sensor; - All
Coretemperature entries (one per physical core for Intel CPUs, one per CPU die or per CCD/"chiplet" for AMD CPUs) from the CPU's DTS (Digital Thermal Sensor) sensor; - The
Core 0 Distance to TjMaxtemperature entry, if available; - The
Core Max(maximum of all cores) temperature entry for Intel CPUs, or for AMD CPUs if available. Otherwise, select theCPU(Tdie)orCPU (Tctl/Tdie)entry for AMD CPUs, if available; - The
CPUfan RPM entry on the motherboard sensor; - The
GPU Temperatureentry on the GPU sensor(s); - The
GPU Thermal Limitentry on the GPU sensor(s), if available; - The
GPU Clockentry on the GPU sensor(s); - The
GPU Memory Clockentry on the GPU sensor(s); - The
GPU Core Load(orGPU Usage) percentage entry on the GPU sensor(s); - The
GPU Memory Usagepercentage entry on the GPU sensor(s), if available; - The
GPU Memory Allocated(orGPU Memory Usage) entry in megabytes on the GPU sensor(s); - The
GPU Memory Availableentry in megabytes on the GPU sensor(s), if available; - The
GPU Fan Usagepercentage on the GPU sensor(s) for up to 4 fans per GPU, if available; - The
GPUfan RPM entry on the GPU sensor(s) or on the motherboard sensor, whichever is available, for up to 4 fan sensors per GPU (leave all values blank to disable fan monitoring); - The
GPU Core Voltageentry or any 6 additional sensor entries per GPU.
If you want to use the UPS Meter, select the following entries (the actual names may differ depending on your hardware):
- The
AC Powerentry on the UPS sensor (a Yes/No value); - The
Charge Levelpercentage entry on the UPS sensor; - The
Estimated Runtime(in minutes) entry on the UPS sensor; - The
Battery Voltageentry on the UPS sensor; - The
UPS Loadwattage entry on the UPS sensor; - The
UPS Loadpercentage entry on the UPS sensor.
If you want to use the HWiNFO Meter, select any additional entries that you wish to monitor. The HWiNFO Meter will show the sensor names as defined by HWiNFO; if you wish to change or shorten the names to make them more readable, right-click the sensor entry in the Sensors window and select the Rename option, or press
F2.If you use other skins that use HWiNFO, enable every sensor entry needed by all skins you use. It is not recommended to enable every entry in the list for reporting, as this will noticeably impact your system performance.
- All
-
As entries are selected for reporting, you may notice they are assigned an Index number. This index is the key to mapping your Gadget configuration to the sensor entries in HWiNFO. It is important to note that if you later add or remove entries for reporting, the index values may change and the list of indexes may be reordered. If this occurs, your Gadgets will need to be reconfigured to reference the proper indexes.
-
Click OK on the Sensor Settings dialog.
-
On the Sensors dialog, click the Close and Save Changes button
 to minimize the window.
OK, What's Next?
The configuration of HWiNFO is complete at this point. The final step is to configure your Gadgets to work with your HWiNFO settings.
- HOW TO: Configure the All CPU Meter to show core temperatures
- HOW TO: Configure the All CPU Meter to show fan usage
- HOW TO: Configure the GPU Meter
- HOW TO: Configure the UPS Meter
Tips on using HWiNFO with Rainmeter can be found here. For more information on HWiNFO, see the HWiNFO website.