ZG SWTOR Materials Tools - SWTOR-Slicers/WikiPedia GitHub Wiki
(Back to ZG SWTOR Tools Add-on's index)
This section groups all tools related to SWTOR materials stuff. Some of them have equivalents in the Shader Editor.
| 3D Viewer version | Shader Editor version |
|---|---|
 |
 |
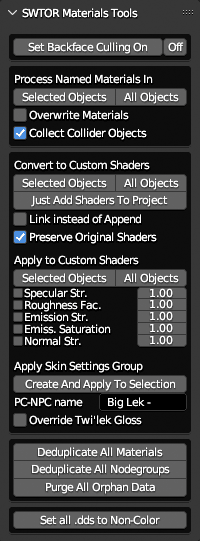
- Set Backface Culling On/Off.
- Process Named Materials.
- Customizable SWTOR Shaders tools.
- Deduplicate Scene's Materials and Nodegroups.
- Set all .dds to Non-Color.
Set Backface Culling On/Off.

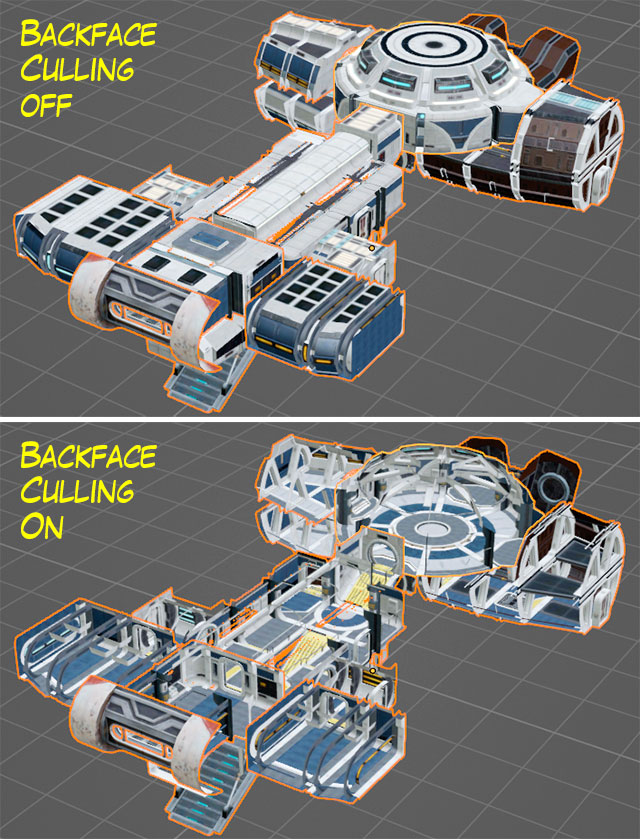
It sets all the materials in the selected objects' Backface Culling setting to on or off (the setting is fully reversible). Many SWTOR objects, especially floors, walls, and ceilings of spaceships and some buildings, are single-sided by nature, which ought to make their sides facing away from the camera invisible. Blender, by default, renders single-sided objects as double-sided unless Backface Culling is enabled.
Requirements.
-
Use Eevee in the 3D viewport for the effect to be visible, either while in Viewport Shading mode or as a final renderer. Cycles enforces double-sidedness, no matter if we tick the Material Properties Inspector's Backface Culling checkbox. If the intention is to do the final render through Cycles, a dual 3D Viewer setup, one in Material Preview mode (Eevee) and the other displaying the Render Preview might be the best way to finetune lighting and texturing.
-
It doesn't depend on the materials being SWTOR ones: this setting works in any material able to take advantage of it.
The usefulness of this tool becomes apparent when having to deal with interior scenes such as rooms and passageways, where we have to place models (characters, furniture, props.) while having the walls and ceilings occluding our view. There are cumbersome solutions to that, such as hiding polygons, playing with the camera clipping settings, or using a booleaning object to "eat" walls or ceilings away. This is simpler and faster. Also, it doesn't affect the rendering when placing the camera inside, as in there the one-sided objects are facing the camera in the intended manner.
When assembling multi-object locations, it's typical that some materials are shared between several objects. That can lead to unselected objects showing the effects of this tool as if they would have been included in the selection. This is an expected behavior. The only way to avoid this would be to isolate the material we don't want to be affected by converting it into an independent duplicate.
Process Named Materials.
Requirements.
- Selecting a "resources" folder in this Add-on's preferences settings.
- An enabled SWTOR .gr2 Add-on:
Introduction.
This tool processes all the materials detected in a selection of objects or in all objects in a scene (that is, it reads their materials' names, looks for .mat material definition files with matching names inside an extracted SWTOR assets stash, and parses them), locating their texture maps and linking them to the relevant SWTOR shaders. It's quite speedy, as all the material definition files are centralized in a single folder at resources\art\shaders\materials.
If used from the Shader Editor, it acts on the material being edited at that moment.
It processes the basic SWTOR shaders (Uber, Creature, Garment, SkinB, HairC and Eyes) plus a few extra ones typical in environmental objects such as EmissiveOnly (glass, holograms), AnimatedUV (animated computer screens, holograms, and others), etc. The list is growing, given that the recently created Area Assembler Add-on produces lots of objects with special shader needs.
(You can see the way it works internaly by reading this guide)
Typically, smallish settings such as a player character's spaceship will be processed instantly, but some sets of objects, such as whole game areas or even whole worlds, can easily have thousands of materials, and Blender might become unresponsive while processing them. Its progress can be followed in Blender's Console output, which will show the objects and materials being processed. Some error messages are prone to appear in the console, due to the tool's current limitations: those are expected, and the tool is meant to discard them.
If a selected object's material is shared with objects that haven't been selected (and that's very typical in architectural objects like spaceships or buildings) they'll show those processed materials, too, as if they would have been included in the selection. This is their expected behavior. If needed, the way to avoid this would be to isolate the material we don't want to be processed by changing its name to one that doesn't exist in SWTOR's shaders folder.
If a SWTOR object imported into Blender shows materials with generic names (such as "default", "01 chestSkinB", etc.) that don't exist in the shaders folder, we can rename those materials with ones that do exist in that folder, to have them processed. For example, it's typical for creature-type models such as Akk Dogs to have several material variants (.mat files), which is why the objects use generic names on import.
Limitations.
The information in the material definition files has its limitations: it covers the basic texture maps, but not the recoloring information necessary to produce color variations in armors, dye applications, player character skin colors, complexion textures, etc. That means that Uber and Creature materials will be fully realized, but everything else will be a partial solution at best, better solved through tools like the Character Assembler (TORCommunity.com's Character Designer has access to a database of SWTOR data that provides the missing information so that the Character Assembler can fill those gaps. We can also use Jedipedia's File Viewer to locate what's missing).
Still, sometimes having the textures at hand and fiddling with the shader's palette controls can produce usable results that are better than nothing at all.
Options.
-
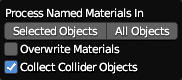
Overwrite Materials (off by default): overwrites already present objects's materials, which allows for regenerating materials that might have lost texture maps, or to apply better versions if they happen to have been advanced in new releases of our tools.
-
Collect Collider Objects (on by default): adds all objects with an "Util_collision_hidden" material type or texture map to a Collection named "Collider Objects". Those are normally invisible objects used by the game engine as barriers, typically a nuisance we rather isolate and delete.
Shader Editor version.

There is a Shader Editor's Sidebar version that processes the material present in the editor in the same manner. It assumes one wants to overwrite the material if it was a SWTOR one already. It won't collect it as a collider if it is such.
Customizable SWTOR Shaders tools.
Introduction.
As convenient as our modern, smart SWTOR shaders for Blender are, especially for the novice (no dangling texture map nodes, not having to manually adjust Material or texture map images' settings, no risk of overwriting template materials), they are a little harder to customize than the previous, now Legacy ones. Both versions, being generated programmatically (the .gr2 Add-ons' code produce them on the fly while importing SWTOR object files), are harder to customize in a reusable manner, too: most modifications can be done once applied to objects, but those modifications have to be redone or copied (if feasible) between projects.
So, what we've done here is two things:
-
We've "dumbed down" the modern shaders: no smarts, the texture map nodes are back to dangling from the SWTOR Shader nodegroups (so allowing to interpose color correction nodes and stuff as usual), no automatic adjustment of texture map images and materials' settings (although the converter tool has that sorted).
-
Instead of having an Add-on code generate the shaders on the fly, the shaders are stored in a .blend file, and the Add-on replaces the normal modern shaders with these dumb ones, placing the involved texture maps' nodes alongside and linking them correctly.
This Add-on comes with such a file inside already, preselected, but we can select an external one, even alternate between several external ones and the internal file.
What are the advantages to this?
-
The most important one is that any modifications to these SWTOR shaders "library" files can be tried and saved quickly just by tinkering with them. What's more: if we choose to have the Add-on replace the modern shaders in a given object with these dumb ones by linking to them instead of appending them, any improvement done to the shaders in the future will become available to older projects using linked shaders automatically. And if we need to do a per-project custom work, we can always convert a linked shader into a permanent one (with Blender's Make Local option).
-
These customizable shaders can coexist with the modern, automated ones. What's more: one can keep both in a given material and alternate linking them to the Material Output node for comparison sake (or by putting a Mix Shader in-between) or as a backup of sorts.
-
We can even maintain several differentiated SWTOR shader library files at once, to try different approaches without compromising previous projects. As the data on where each linked shader comes from is stored in the Blender projects using them, we can keep several library files with different names and just set the one we want to link to or append from in any given moment in the Add-on's preference settings. Some care would be needed, such as not moving those library files around or we will have to reconnect them, and maybe keeping a sensible naming scheme. Just the usual)
-
Finally: this setup makes comparing notes extremely easy, just by sharing our library .blend files between fellow hobbyists.
So, how does this work on a practical level? The available tools are:
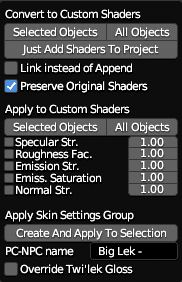
Convert to Custom Shaders.
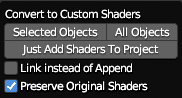
Requirements.
- Selecting a custom SWTOR shaders-holding .blend file in this Add-on's preferences settings (the Add-on includes and uses an Internal one by default).
- An enabled latest version of the SWTOR .gr2 Add-on (only needed at the very moment this tool is being used, but typically there's no reason to ever disable it).
It goes through either all the materials or only those in a selection of objects, detects the presence of the modern SWTOR shaders, and inserts the customizable versions with the same settings plus the needed texture map nodes.
Options.
-
Link instead of Append: Append adds a fully modifiable copy of the shaders. Link, instead, inserts instances of the shaders stored in the library .blend project. We can adjust their settings normally, but we won't be able to modify the nodes inside their nodegroups. There are ways to edit both the library and the working project at once, by using two instances of Blender, each opening each file, and saving-and-reverting the working project every time we save a change in the library one.
This option is automatically disabled when editing a library file, in which case it wouldn't make sense to use linking.
-
Preserve Original Shaders: it doesn't delete the original modern shaders, simply pushing them aside inside the material, unlinked. If anything were to go wrong sometime further on in our experimentations, we can always unlink the customizable ones and relink the originals. This option is on by default.
The Just Add Shaders To Project is only needed if we want to add the shaders to a Blender project without actually converting any SWTOR material. It simply adds them to the currently open Blender project: they'll become available through the add > Group submenu (the ones in the add > SWTOR submenu are the usual modern shaders, instead). This tool is disabled if we happen to be editing the .blend file we selected as a library in the Add-on's preference settings, to avoid accidental duplications or loopbacks. Its options are:
(these screenshots might not reflect all the extra features, as they are constantly evolving)
We can regenerate the customizable shader in a material by deleting it and its texture maps and Converting the material again, as long as the original shader still exists in it. That's why preserving them is on by default.
About the included custom shaders.
Inside this Add-on's .zip file there is a sample .blend file holding just the customizable shaders. It can be copied, stored outside the Add-on wherever we want to and/or renamed however we want to (we should decide a stable location for it and its derivatives, as moving it somewhere else after being applied in linked mode would lead to having to tell each Blender project using it where it was been moved to).
(Technically, we could do modifications directly in the .blend file inside the Add-on, but then we risk overwriting and losing them when installing some update to the Add-on)
The only rule for the Convert to Custom SWTOR Shaders tool not to fail is to keep the names of the shaders intact. These are:
- SWTOR - Uber
- SWTOR - Creature
- SWTOR - Garment
- SWTOR - SkinB
- SWTOR - Eye
- SWTOR - HairC
All the auxiliary custom shaders inside their nodegroups have been renamed by adding a "SW Aux - " prefix (e.g.: "SW Aux - ManipulateHSL"). Such renaming helps us avoid conflicts with the original .gr2 Add-on's own shaders, as we might want to modify the auxiliary shaders, too. Strictly speaking, in the case of these auxiliary shaders, they only need to have different names to the originals. it's in the main ones' case where we need to keep the names stated above.
These shader library Blender projects don't need to be kept empty of objects and texture maps. Actually, the most convenient thing to do would be to populate them with objects representative of the shaders' usage, so that we can try stuff on them. Say, some ship interiors for the Uber shader; some animals for the Creature one; Player Characters of diverse species for SkinB, HairC and Eye, some armor sets for the Garment shader… We haven't pre-populated the downloadable sample project in this repository because of both copyright-related reasons and file sizes.
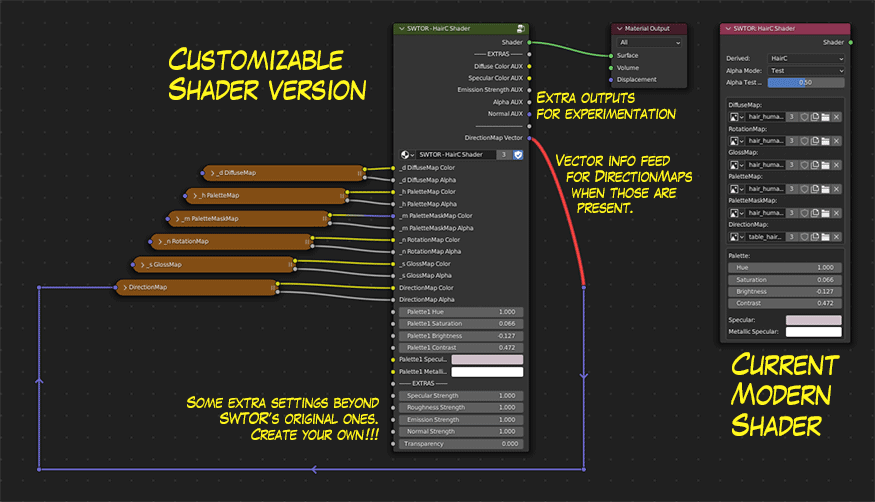
Custom Shader Extras.
Just as a first example of adding custom stuff to the shaders, the ones included in the .blend file come with a few extras already, not just in their inputs and settings but in their outputs, too. They are rather tentative and far from perfect, mostly a suggestion of what can be done.
(these screenshots might not reflect all the extra features, as they are constantly evolving)
Extra Inputs, in most shaders:
-
Direction Map: a DirectionMap provides with a kind of colorful anisotropic (directional) gloss that is applied to hairs, the skin and fur of some species (such as Cathar and Nautolan) and creatures, and even in weapons. As it requires feeding them some vector information calculations, the shaders able to use it output such vector data as an auxiliar output to be linked to these texture map nodes' vector inputs. This Add-on's converter tool does that for us.
It's been tested in hairs and creatures so far. TORCommunity.com's Character Designer doesn't annotate the DirectionMap data in the paths.json file it saves inside the character's .zip file, but when collecting the assets it copies in each material subfolder a .mat file that has the DirectionMap's filepath. By opening it with any text editor we can read that data and locate them. They are stored in
resources\art\lookuptables.(I should point out that this way of doing things, this pseudo-circular linking, is a little dubious, Blender-wise. In fact, Blender is complaining by thickening the returning link and painting it orange. It's not a true circular relationship, though: the mapping calculations as such don't feed the shading ones, and it simply does work. Still, we might end up having to bring the calculations outside, which would make the material's node arrangement rather messier)
-
Specular and Roughness strength: All shaders have them. They try to simulate the Principled BSDF shader's settings of the same name, but don't work in exactly the same way.
The .gr2 Add-on's modern shaders, instead of using Blender's Glossy shader or the Principled BSDF one (save in one specific case) to produce glossiness, replicate the way SWTOR calculates it and adds it to the diffuse color before feeding it to a diffuse shader (which is one of the reasons baking textures with them presents some problems).
As I don't fully understand how it works yet and whether producing a PBR specular/roughness-like through it is doable or not while keeping it identical with default values, what I've done is something that looks like such functionality by using the roughness strength input to both feed Blender's Glossy BSDF shader's roughness input and crossfade its results with the original SWTOR shading system.
So, instead of the standard roughness range between 0 and 1, here 1 means SWTOR's "natural" results. Most of these extras assume that 1 means default SWTOR-like.
As for the specular strength input, it just multiplies the SWTOR-type specular by it, 1 being the game's original look.
In the case of the Garment Shader (used for dresses and armor), there are separate specular/roughness inputs for each dyeable area (corresponding to the Palette1 and Palette2 sets of standard inputs) and also for the non-dyeable ones, as sometimes that's an interesting thing to have.
-
Emission Strength: for turning glowy bits such as control panels, spaceship windows, armor lights and others far brighter than in the game. In the Eye Shader it only affects species with glowy eyes like the Chiss.
-
Normal Strength: raised above 1.0, it emphasizes objects's surface relief, if in a somewhat wonky way. It doesn't work terribly great on solid surface objects, but in characters it provides a very striking "League of Legends: Arcane" look (which in the series was achieved through hand-painted textures), so, we suspect it's going to be a favorite.
In the case of the Garment Shader (used for dresses and armor), there are separate Normal Strength inputs for each dyeable area and also for the non-dyeable ones.
-
Transparency: this is a global material transparency factor, unrelated to any opacity map in the material. Its main mission is to allow us to invisibilize a part of an object, such as the feet of a Player Character that has been turned into a single mesh and happens to be poking through its boots.
-
Rim Light: a fake rim light simulation, kind of experimental. Not as pretty and effective as the one in SWTOR, but still useful to help separate objects from background clutter or too similar lighting conditions. Its XYZ Location settings attempts to provide some directionality, but it isn't ideal. Most definitely a work in progress.
A few additional, shader-specific inputs:
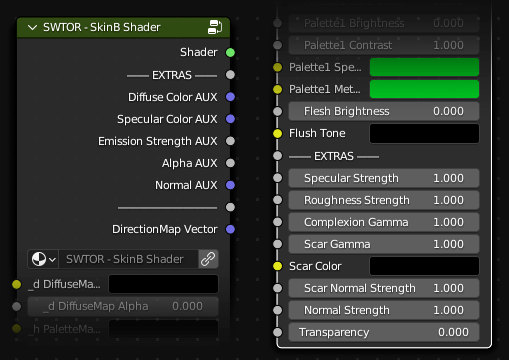
In the SkinB Shader:
-
Complexion Strength: it controls the contrast of a character's complexion texture map without the need for the old trick of switching its Color Space to sRGB or interposing some color correction node. Internally, it uses a Photoshop's Levels-like Gamma value.
-
FacePaint Strength: it's a mixing value for a character's make-up, tattoo, pattern and others in the FacePaint texture map. Not only allows for fading those but it can be raised above 1 and give their alpha channels more density and, so, more opacity, especially in cases like tattoos where the alphas aren't fully opaque but a little transparent and noisy to suggest skin detail underneath.
-
Multiplied Tattoos Color, Mask, and Strength: these are a simpler way to make tattoos that works very well with Blender's 3D texture painting system. Instead of using images with alpha channels to stamp make-up or tattoo images over the base skin texture, it applies them in the style of Photoshop's Multiply layer transfer mode. At its simplest, we choose a color (say, black), load a greyscale image as the mask, and adjust its opacity to taste. As it's not an opaque layer but a multiplied one, it ought to reinforce all the skin texture detail underneath. And, being the mask a simple greyscale image instead of the alpha of a RGBA one, it's easier to use by the 3D painting system in Blender. White or grey in the mask means ink, just as SWTOR's FacePaint alpha channels do, but that could be changed if you feel it's counterintuitive.
It can be made more complex by using a multicolor texture in the color input. The thing is, its colors ought to mix in a manner more tattoo ink-like than using the FacePaint system.
This Multiplied tattoo layer sits under the FacePaint one, so, one can use both at once.
-
Scar Strength, Color and Normal Strength, to adjust scars and age maps in intensity (Gamma), color, and appearance of bumpiness through Normal map strength.
-
There is a secondary Normal Strength and associated mask, too: it's meant to isolate a region of the body, easy to determine by observing the diffuse maps and UVs, and apply a different strength (for example, one could want to enhance the muscles of the body but keep the face at its original normal strength.
-
Skin Pores Density, Strength, and auxiliary Holdout Mask: it's a Voronoi noise-based bump effect that simulates skin pores with a certain amount of success. It takes advantage of other already existing texture channels to attenuate its effect in regions of the face where it's obvious it doesn't work too well, like the lips, and it's mostly an illusion of skin pores that holds up if one squints a lot 😅.
A problem with its Density input is that such density is dependent on the object's base size (independent of object scaling): for example, a head object will need a far lower density figure than a joined single mesh full body. Experimentation is advised.
As the diverse channels of information in SWTOR's textures can only do so much in a generalized way, there is a Skin Pores Holdout Mask that allows for manually (or through custom channel mixing trickery) protecting areas of skin from the pores effect. For example: if we use the blue channel of a Devaronian's PaletteMaskMap (
_h) texture map and contrast it a little, we can isolate the horns and keep them from showing pores. Black or dark occludes the effect.
In the Eye Shader:
-
Emission Strength: as mentioned, it only shows its effects in species with naturally glowy eyes like the Chiss.
-
In-Shadow Compensation: as it is easy for the eyes of a character to get lost inside the face's shadows, this allows for adding a bit of emissiveness to compensate.
-
Dark Side Glow Strength and Tint: Sith Glowy Eyes!!! As it is done right now, it uses as a base the character's eye texture without the re-color that the character uses, as most eye textures have warm colors that will give the typical Sith glowy amber look when mixed in. Still, there is a tinting color well for finetuning or completely altering the effect: to cancel the tinting, just set the color's saturation to zero (either the S of HSV to zero, or all RGB to equal values).
-
Normal Strength in the Eye Shader doesn't do much. It's there for consistency, and at best it displaces the reflections in the eye a little. Ideally, we would add an anime-like pupil system and specific controls for that. We'll see.
Extra Outputs:
-
Diffuse Color AUX: the diffuse color in RGB, with the PaletteMap re-hue already applied!
-
Specular Color AUX: the specular color on black, in RGB. Typically, one would mix it with the diffuse in Add mode.
-
Emission Strength AUX: it's the emissive channel from the _n RotationMap.
-
Alpha AUX: it's the opacity channel from the _n RotationMap.
-
Normal AUX: this is the Normal information, already processed to be directly usable in any Blender node that we could want to chain to the rest of the shader's outputs.
These channels are mostly there for experimenting with adding our own node trees for things like, say, trying comic book or anime-like Non Photorealistic Rendering (NPR), or maybe to produce baking information.
- DirectionMap Vector: as DirectionMaps require pre-calculated data that is internally generated in the automatic modern shaders, this is a bit of a kludgey way to produce that information and link it to the DirectionMaps' vector input. The Converter tool adds those links by itself. Even if such setup looks like a looping circuit, it really isn't. Blender seems to tolerate it well.
Make them your own.
We should point out that these shaders, as such, are meant to be further customized and evolved by any of us based on our particular interests. For example, the current implementation of glossiness is meant to replicate SWTOR's own, but someone might prefer to discard that and do their own Blender Specular node or Principled BSDF node-based one, or substitute SWTOR's Flush Tone-based pseudo-subsurface scattering effect with Blender's own, add adjustable noise-based skin pores, etc.
The downloadable shader library file is just an example of a starting point. The sky is the limit.
Apply values to multiple Custom Shaders.
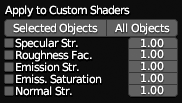
This panel lets us alter some of the Custom Shaders' extra inputs in several objects at once, specially useful when dealing with assembled game areas (increasing the emission strength of wall lighs, computer panels, etc. is a typical need), but also usable for characters' skin and armor (say, strengthening their normals to make details pop up better).
(Strictly speaking, this tool looks for Nodegroups with inputs using certain names: "Emission Strength", "Normal Strength", etc., and modifies their values. It works with any other Nodegroups that use the same naming conventions: they don't have to be our Custom Shaders, necessarily. We could add variants of the terms to cover more cases, such as "Normals" plural instead of "Normal", to help in making it more universal)
To use it, we tick the checkboxes of the inputs we want to alter, enter the desired values, and use the buttons to apply them (the reason we haven't made the tool interactive is that it could be painfully slow when dealing with whole game areas at once).
A couple of things to take into account:
-
If unselected objects happen to share a material that's being processed with selected objects, they'll show the results, too. That is normal and expected. To avoid it, we would have to make their relevant materials independent, renamed duplicates.
-
If applying changes to too many objects (or many objects with too many material slots, which is typical in game area objects, it's advisable to open Blender's console and check the tool's progress there.
Character's Skin Settings "control panel" Nodegroup.
Requirements.
- Skin materials using the Customizable SWTOR Shaders.
- A selection of objects some of which use such materials.
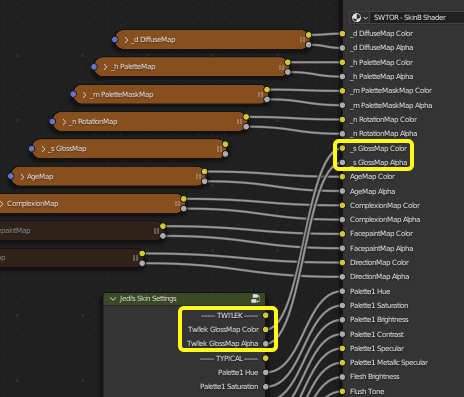
This tool applies to a series of SkinB Shader-using materials a Nodegroup holding common values to such materials, so that a change in such Nodegrou's values' affects them all at once and saves time. It needs to use the Customizable SWTOR Shaders, as the normal modern SWTOR Shaders' user interface doesn't accept inputs from other nodes or nodegroups.
Managing a Player Character or a NPC's skin materials is rather cumbersome, as we can have to handle up to five at once (head, torso and arms, hands, hips and legs, and feet). Any character-wide change we might want to make involves copy-pasting values like recoloring palettes, specular colors, extras such as skin pore densities between those materials, etc.
We can take advantage of Blender's Nodegroups by storing all those values in one such Nodegroup per character and have it pass them to the customizable SWTOR SkinB shaders involved.
This tool has two versions: a fully automated one in the 3D Viewer, and another in the Shader Editor that allows for applying its steps manually. The way they work is as follows:
In the 3D Viewer.
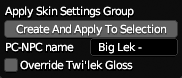
We type a name for the Nodegroup we want to generate (typically the character's name plus some separators: spaces, an hyphen, etc.) in the PC-NPC name field, and select the objects of a character: all of them or just some specific ones. The tool only affects skin materials, so, selecting all objects including non-skin ones is fine.

Upon clicking the Apply New Skin Settings Group button, the Add-on will:
-
Create a Skin Settings Nodegroup labelled following a "USER INPUT Skin Settings" scheme. It is advised not to ever delete the "Skin Settings" part of the name, as that will allow for further automation in the future.
-
If it finds among the selected objects any material containing the word "head", it'll copy all the non-texture map values in the material's SkinB Shader to the Nodegroup. If it doesn't it will copy any other skin material.
-
It will add an instance of the Nodegroup to every skin material and link its outputs to the SkinB Shader's inputs.

(If the Override Twi'lek GlossMaps checkbox is ticked, it'll unlink the GlossMap texture map nodes and link instead common Nodegroup values to those.

This is meant to be used for Twi'lek characters, as BioWare did something to their glossiness maps that produces noticeable diferences in shininess between their heads and the rest of their bodies. It's clearly visible ingame.
To modify the character's skin settings, we just need to enter the Skin Settings Nodegroup present in all the involved Skin materials (or by using some Add-on that lets us jump directly into any Nodegroup in the Blender file, such as Greg Zaal's excellent Matalogue Add-on) and begin tweaking values, watching how all the skin parts react at once.

Something to note is that, once created, we can add our own fields to the bottom of the Nodegroup. For example, we might add hair recolor palette values and manually add the Nodegroup to the hair materials and link such values to the relevant HairC Shader inputs. We could add more nodes inside to build more complex data such as, say, noise generators to produce FacePaint (tattoo, make-up, etc.) patterns that will affect the whole body, affect multiple inputs to simulate bioluminescence, etc.
This Nodegroup is stored as a template in the custom_swtor_shaders .blend file, named "SW Template - Character's Skin Settings". This tool makes local duplicates of it, so that they stay stable, unique to the working Blender project. That said, they are just normal Blender Nodegroups that we can insert in non-skin materials for using some data from it anyway, or append or link to other projects (which wouldn't even be necessary when importing a character from other project into a new one, as Blender brings with it all the necessary Material information).
What's important about this detail is that one can do those custom additions to the Skin Settings Nodegroup to the customizable shaders library Blender project, so that all applications afterwards add such additions.
In the Shader Editor.

Most of the same functionality is available in the Shader Editor, too, if separated in pieces, plus some extras. We can:
-
Add (create) a new named Skin Settings Nodegroup.
-
Copy a selected SkinB Shader's information to a present Skin Settings Nodegroup (requires selecting the Nodegroup, as we might have several present for, say, comparing a few different combinations of settings).
-
Connect a selected Skin Settings Nodegroup to the SkinB Shader, all links in one go. Includes the Twi'lek specific variation checkbox.
-
Disconnect those links (just the equivalent to using Blender's Blade tool).
With those, we can have some extra flexibility in all this.
Ideally, we would have some kind of menu for selecting and applying already existing Skin Settings Nodegroups in a more elegant manner… but I'm still learning how to 😅. Anyway, plans for the future include doing something similar for the Garment and HairC Shaders, and maybe simpler Dye Settings Nodegroups. We'll see.
Other Node Tools in the Shader Editor.
Link Matching Inputs/Outputs.

It simply links nodes' sockets based on matching names. The Active (last to be selected) node is the one receiving the links. Useful for connecting nodegroups that act as "control panels" holding common values for several materials' shaders.
It omits sockets with hidden values or only dashes in their names (used as input and/or output separators, typically)
Copy Matching Inputs/Outputs' values.
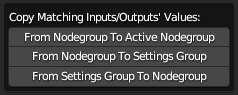
It copies nodes' values' based on their sockets' matching names. It has a generic Nodegroup To Nodegroup version, and another meant to be used with Skin Settings Groups and future similar settings groups.
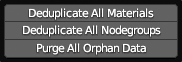
Deduplicate Scene's Materials and Nodegroups.
Requirements: none.
(It acts on all the nodes of a scene, so, it doesn't require a selection of objects)
Consolidates all duplicates of a node or a material in the scene ("node.001", "node.002", "material.001", etc.) so that they all become instances of a single original instead of independent ones. The copies are marked as "zero users" so that, after saving the project, the next time it is opened they will be discarded. They can be eliminated more immediately by purging all orphan data in the Blender project file, although one must be sure of not having any other zero users data of any kind that might be unintendedly deleted alongside. This purger button is the same as the one at the Outliner's Orphan Data view.
Set all .dds to Non-Color.

Requirements.
- It acts on all the images of a scene, so, it doesn't require a selection of objects.
It sets all images in the blender project whose names use the .dds extension (as the case is in SWTOR's texture map images) to Color Space: Non-Color, and Alpha: Channel Packed, which are the settings our SWTOR shaders expect in order to work properly.
In previous versions the tool set them to "Raw", but Blender 4.0 has discarded this option, so, we are moving to this alternative. "Non-color" is functionally identical (it doesn't apply any colorspace processing to the texture map data, and treats the alpha as just another data channel). The meaning isn't quite the same (strictly speaking, it means that no image processing must be applied because the texture map data is not image data, such as the case of a normal map or a height map, although it could be argued that, in a sense, it is. Semantics 😐).
A typical trick to add contrast to some texture map images, such as complexion maps, was to set them to sRGB because that makes them appear a little bit darker, something that this tool would revert. Such trick shouldn't be necessary when using the new customizable shaders, as they provide with extra Complexion Gamma settings, and we can add color correction nodes very easily anyway.