ZG SWTOR Character Tools - SWTOR-Slicers/WikiPedia GitHub Wiki
(Back to ZG SWTOR Tools Add-on's index)
This panel holds the SWTOR Character Assembler and some other related tools.
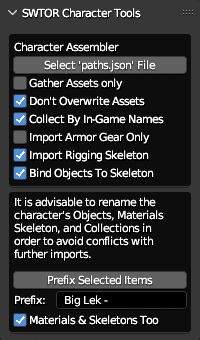
Character Assembler.

This tool processes data exported by TORCommunity.com's Character Designer (which replicates SWTOR's Character Creator and Outfit Designer in a single tool) and TORC's NPC database's 3D Viewers to auto-assemble and auto-texture our Player Characters and NPCs (see our full guide: Locating SWTOR Characters Assets Automatically).
(It uses the .gr2 Importer Add-on's Character Importer under the hood).
Requirements.
-
A SWTOR assets extraction performed via ExtracTOR, or with the now deprecated Slicers GUI (with either the "Dynamic" or "All" presets), or even by EasyMYP (no longer working with SWTOR 64-bit). This Add-on can work with assets from both the deprecated 32-bit version of SWTOR or the current 64-bit one.
-
TORCommunity.com's Character Designer-exported description folders, or non-Creature-type NPCs ones exported from its NPC database.
Features.
The Character Assembler:
-
Fills a Player Character/NPC's description folder (exported by TORCommunity.com's Character Designer or the NPC database) with all the game assets required for assembling them in Blender.
WARNING: It doesn't process Creature-type NPCs (single mesh object ones). Those have to be imported manually.
It gathers the character or NPC's skeleton rig, too, saving it inside a "skeleton" folder next to "models" and "materials".
It solves some long lingering issues with Slicers, such as placing the typically missing "black.dds" texture map in our SWTOR asset extractions if detected as missing.
It also gathers some maps that weren't being covered by older tools:
-
DirectionMaps, that can be used by the Creature, SkinB, and HairC Shaders to produce anisotropic-like speculars.
-
WrinklesMaps, meant to be used in heads' SkinB Shaders to animate facial wrinkles. Our version of SWTOR's skin shader for Blender doesn't support them yet, but some experiments are being carried in order to implement their use).
-
-
Under the hood, the tool calls Darth Atroxa's .gr2 Importer Add-on's Character Import feature to assemble the character. This means this tool shares the same inability to process Creature-type (single mesh) NPCs.
-
It adds a series of "quality of life" options to the process, such as collecting armor parts by their in-game names, separating the eyes from the head object to use them with custom rigs or just rotate them numerically, or solving some issues with Twi'lek characters' eyes UV-mapping.
-
It reports its progress and errors through Blender's Console. It is recommended to keep it open to check for any error message, as it lists all the files it detects and copies, showing if any entry is malformed or leads to a missing file.
Limitations.
- The old limitation of requiring setting a 'resources' folder even if a character's assets were already collected in some previous session has been eliminated. That said, this means that any missing asset (objects, textures, or material definition files) will produce an error and cancel the importing process. Typically, it shouldn't happen to characters previously imported with this tool. If it does, the solution is, of course, to set the 'resources' folder to let it gather the missing elements, or get them and put them manually inside the character's relevant subfolders).
Importing options.
-
Gather Assets Only: it only locates and copies the asset files to the character folder, without importing them and assembling the character.
-
Don't Overwrite Assets: if an asset already exists in the folder, it preserves it instead of overwriting it. Useful if the files in the folder have been modified in some manner, such as manually retouching a texture, without changing the name (you should change the name when doing something like that, though, to avoid the risk of an accidental overwrite).
The tool will never delete existing files if they don't concern it, though.
-
Collect By In-Game Name: it places each armor part's objects inside a Collection named after the armor's in-game name (say, "Canderous Ordo's Vest"). It does that by finding a
presets.jsonfile alongside thepaths.jsonone, inside the character's folder. If unchecked, it just places all the objects in a common Collection. -
Import Armor Gear Only: discards the non armored body parts, expediting the creation of multiple sets of armor for a same character (take into account that there is armor that includes skin materials to simulate areas where the skin is exposed: those are considered armor gear, too, and that includes the default underwear).
If attempting to collect multiple sets in a same Blender project, please pay attention to the need to rename the assets to avoid making an absolute mess 😅.
-
Import Rigging Skeleton: imports the character's armature ("skeleton"), without binding the character's objects to it unless we tick the next option:
-
Bind Objects To Skeleton: binds the character's objects to the imported skeleton.
-
Separate Eyes From Head: it separates both eyes from the head as a single object that still works with SWTOR's skeletons. This feature is meant to make them easier to use with other rigging systems, such as the popular Auto-Rig Pro, that require the eyes to be a separate object to be able to pick them.
-
As Two Eye Objects: it also separates each eye into its own object, again keeping them usable with SWTOR skeletons, and with other rigging systems that might like them this way. The main advantage is that we can rorate them manually beyond what the rig's eye bones dictate. As the way SWTOR does it induces too much distortion in both the eyes and their orbits, we can do a bit via the bones and the rest via rotations and get a more natural look.
This option translates the separate eye objects' origins to the correct pivoting position (SWTOR's eyes aren't full spheres but truncated ones, possibly for polygon economy reasons).
-
Correct Twi'lek Eyes' UVs: for some reason, Twi'lek eyes have their UVs beyond the UV space's 0,0 to 1,1 coordinates region, lying between the 0,2 to 1,3 ones instead. This has no noticeable effect during normal use, but it seems to break the baking of the eye material when prepping the model for exporting to other apps and engines. This option moves the coordinates back to the 0,0 to 1,1 region.

-
NPC Gear Can Show Skin: when importing non-Creature NPCs that use the same kind of interchangeable armor or clothing parts that Player Characters do, a bug in TORC happens to omit data on whether those armor parts use skin materials (typically in the second Material Slot if there is any. E.g.: cantina dancer NPCs). This checkbox, when ticked, forces the use of a skin material there (which is usually correct). If unticked, a garment material is used instead. If a NPC happened to be a mixed case, the issue is easy to correct manually: skin materials are ALWAYS generated, no matter if applied or not.
This option doesn't affect Player Characters, or Creature-type NPCs (single or double mesh objects).
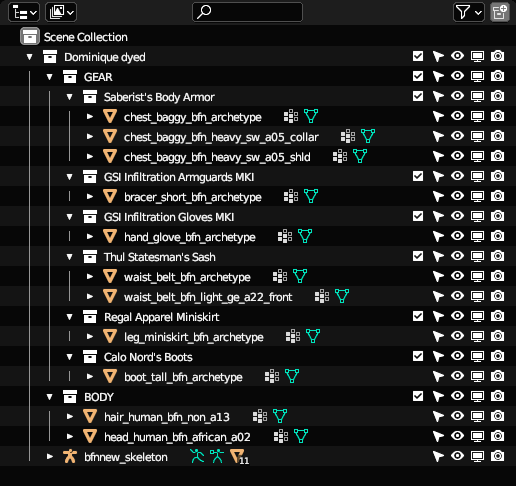
This is the typical result of a character import with the default settings:
About multiple importings in a same Blender project.
As the text following the options checkboxes points out, it is advisable to rename the imported character's objects and materials (and the Collections they are in, too) in some fashion, as that will allow for importing more characters or armor gear sets in the same project while avoiding naming conflicts (the .gr2 Importer Add-on which is doing the heavy lifting underneath doesn't cater to those, so, it's something we have to take care for by ourselves).
If we keep a single import result per Blender project, this renaming isn't strictly necessary for combining already imported characters in a new scene: Blender, when combining assets (via appending, linking, or its Asset Library equivalents), uses ".00x" suffixes to avoid naming conflicts. Of course, the result of that is rather untidy, so, it's still convenient to rename things.
For that, there is the Item Names Prefixer tool:
Item Names Prefixer.

Requirements.
- A selection of items, which can include Collections, be it in the 3D View or the Outliner.
It adds a prefix to any item selected in the 3D View or in the Outliner (where we can select and prefix Collections, too). What's more, it's smart enough to prefix any selected object's materials and skeletons' inner data-blocks without needing to explicitly select them.
The motivation behind those specific features is to apply them to SWTOR character imports done by the Character Assembler tool. That lets us make all their names unique enough to be able to do several imports in a same Blender project (for example, different sets of armor) without making an utter mess of their objects and, especially, of their materials.
Don't forget: for multiple character imports, Collections must be renamed too, or the results of successive imports will end up disorganized.
(If our renaming needs are more complex than simple prefixing, then it's Blender's own Batch Renaming tool's turn)
Merge Physics Bones' Vertex Groups.

Requirements.
- Objects with Cloth Physics-related Vertex Groups.
Features.
This tool is meant to help working with SWTOR objects that were to be animated by the game's cloth physics system.
SWTOR's skeleton .gr2 files lack the bones used by that system. They are defined in .clo files, instead, and we aren't able to parse them yet. What the objects have is the Vertex Groups (VGs) named after those bones, waiting to be bound to them. It's their polys the ones that typically fall behind when aplying poses and animations to the normal skeleton.
There are several possible strategies to deal with those. We can weight-map them to obey other bones, which isn't ideal; we can create new bones with matching names and place them inside the VGs; we can create new bones without paying attention to the VGs' names and use automatic weight mapping to affect those polys (works quite well for Twi'lek lekku); or we can try applying Blender's cloth and physics simulations to them.
One way or another, specially in the latter approaches, it would be nice to be able to quickly create new Vertex Groups that include all the polygons from the original game physics-driven ones.
That's what this tool does: for each object in the project or in a selection, it reads all the polygons in those VGs and assigns them, too, to a new VG named "physics". Knowing which of an object's VGs are physics-related is a bit tricky, so, we have the following options:
-
Best-Guess Their Names: BioWare has been following the convention of numbering physics Vertex Group names with an underline and two-digit numbers ("_02", "_12"), while the rest are either no digit, single digit, or two-digit but lacking the underline.
-
Match: use as a matching criteria some common text in their names (one can check the VGs' names in the Object Data Properties editor and quickly notice whole bunches of VGs with a common root name, such as, say, Twi'lek's "newtonparticle").

The Delete Original Physics Vertex Groups option might be interesting for tidiness' sake, but the truth is that the original physics VGs aren't a bother save for the space they occupy in the object's VG list, and one might want to keep them just in case we ever manage to process the .clo files that would give us their matching bones.
Remember that, when doing your weight mapping or physics simulation experiments, Blender prefers the objects to have "real world" sizes (for weight-mapping it's a requisite, temporarily at the very least).