Using Blender and the SWTOR importer add on to auto assemble the model - SWTOR-Slicers/WikiPedia GitHub Wiki
NEW AVAILABLE TOOL: the SWTOR Character Assembler Blender Addon:
Improving upon the features of the Slicers GUI and the .gr2 Importer Addon, we have now a new one: the SWTOR Character Assembler Blender Addon. It combines in a single button operation the character asset-locating function of Slicers GUI described in the previous page with the character importing explained in this one, adding a few options of its own.
It is still recommended that you read these two pages to understand what this new Addon does under the hood.
Now that we have the character's folder filled with the assets we need (meshes and textures), we can use one of the features of our Blender .gr2 Importer Add-on, which is to read the information in that folder's "paths.json" file to automatically grab its assets, and assemble and texture them for us.
(For those of you who have never used Blender, we recommend you to try at the very least the first four videos of Blender Foundation's official YouTube guide to Blender: they are very short, friendly, to the point, and will give you a feel for the app's user interface and teach you some basic navigation that will let you move the camera around your assembled character)
This add-on's installation follows Blender's usual conventions: download the add-on's .zip file, DON'T decompress it (Blender uses it as such .zip), and install it via Edit menu > Preferences > Add-ons > Install. Activate it by clicking on its checkbox (no need to relaunch Blender) and it'll show up in the File menu > Import and Export submenus:

Make sure of choosing the "paths.json" file instead of the "IMPORT_THIS.json" one.
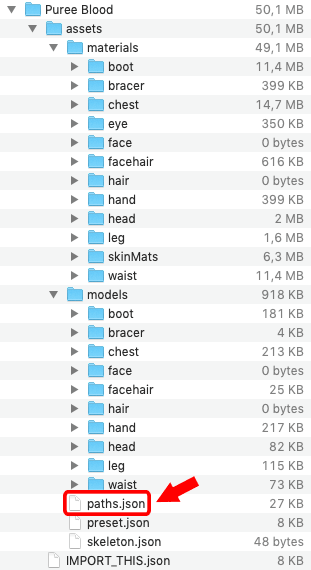
(The latter is meant to be imported by TORCommunity.com's Character Designer as a means to reload the character for further modification, instead)
After a few seconds, the character will appear, assembled and textured. They'll show up very tiny, as if a tenth of their "real world" measurements, so, we'll have to zoom in or do a Fit To View to fully appreciate the results (if we didn't delete the default cube in the scene, the character surely will be lost inside it).
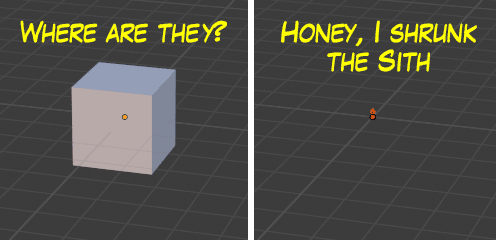
(We can always scale the character up by, say, x10, later on)
And if the character appears as a textureless, greyscale model, most probably the 3D viewport's shading mode is set to solid mode. To change it to Material Preview mode we click on the Viewport Shading buttons row's second ball from the right.

DON'T IMPORT SEVERAL CHARACTERS IN THE SAME BLENDER PROJECT. Use a separate project for each character and later append them or link them together if you need to.
The reason for this is that the importer, when it loads the parts of a character and names its materials, isn't smart enough to notice that there might be existing materials with the same names already, and can make a mess, aplying wrong textures and materials. Blender, though, when appending assets from other projects, is aware of such things and adds suffixes to anything with the same name (".001", ".002", etc.) to avoid getting us into trouble.
(Also, Blender has a Batch Rename tool that can help us rename a character's meshes and materials if we want to keep things tidy. For example, we could prefix all objects and material names from a character with its name).