TORC Character Designer and Manually Creating Armor Sets - SWTOR-Slicers/WikiPedia GitHub Wiki
This guide has been created as a short term solution to the recurring outages with the Character Designer as a result of TORCommunity's server issues. This is by no means a perfect solution to creating armored characters for importing into Blender, but it is currently the most user friendly available.
- Getting Started.
- Understanding The Template, and IMPORT_THIS.json Files.
- Modifying the Template for YOUR Character Customizations.
- Modifying the Template to Change Armors.
- Dealing with Dyes.
- Final Export and Importing Into Blender.
Tools Required:
- Access to TORCommunity
- A text editor capable of reading .json files (Notepad++ is recommended, but Notepad is acceptable).
- Default TORC Armor Template -
Right Click > Save Link As
Assumptions:
- You are familiar with searching for gear on TORCommunity.
- You are familiar with importing existing characters into the Character Designer on TORCommunity.
- You have already created a custom character in the Character Designer on TORCommunity.
Getting Started.
The very first thing you'll need to do to start this guide, is download a Default Template to modify - Right Click > Save Link As. This Template .json file is configured to import a BTN Male Character in full Havoc Squad Armor into the Character Designer. The armor used in the template isn't important, however it was chosen for the very specific reason of filling all seven gear slots. It is also an easy to recognize armor, making it quick to identify if your modifications have failed upon importing.
Understanding The Template, and IMPORT_THIS.json Files.
Once you have downloaded the file, open it up in a your preferred text editor and have a quick skim trough the first few sections. Without going into great detail, you should notice the following:
- The first section details basic information, such as class, gender, race, and customization options.
- The second section contains information on
faceGear, or in simple terms, the Helmet your character wears. - Ongoing sections are used for the remaining pieces of armor worn by the character (
chestGear,bracerGear, etc). - The final section contains
GU(Global Unify) andDyeinformation. In the template Global Unify is configured totrue, so it is enabled.
 |
|---|
Modifying the Template for YOUR Character Customizations.
With some careful consideration you will be able to overwrite the default species, and customization options in this template with your own. All that entails is replacing everything from Lines 2 to 15 (From tClass to corruptionLvl) with data from an IMPORT_THIS.json file from your own character, using all the data from the lines tClass to corruptionLvl. This includes those options.
This is a relatively simple step that involves basic copy and paste skills, although it is worth saving your template once you're done and manually importing the character into the Character Designer. After a few seconds, a character in full Havoc Squad armor should load, and when you remove the helmet by clicking on it's icon, you should see your characters face.
If that worked, congratulations, you did it, and your character is now a proud member of Havoc Squad. We'll fix that egregious conscription of your character by the Republic in the next section. If it didn't work however, redownload the template and try again. If you encounter issues ask on Discord.
Modifying the Template to Change Armors.
Things get a little more time consuming and involved here. The high level overview of it is, as the search function of the Character Designer doesn't currently work, but it loads armors without issue from existing files, we need to update the Template file you've created to trick it into loading what we want.
The only part of each gear dataset you'll need to concern yourself with is the ippPath lines. These are what the Character Designer reads to import the assets and assemble the character. As not every character uses a Helmet, this Guide is going to skip straight to the Chest piece, but the steps are the same - So you can correct the helmet after using the same process.
Scroll down in the file until you come across the following section:
"chestGear": {
	"name": "Havoc Squad Breastplate",
	"rarity": "Moddable",
	"slot": "chest",
	"slotSimplified": "chest",
	"ippPath": "ipp.mtx.season7.havoc_squad.chest",
If you want to do this the proper way, you would go through and meticulously change every line to match the armor, but that's a lot of effort, and we don't need to do that, so why would we? All that needs to be updated is "ippPath": "ipp.mtx.season7.havoc_squad.chest", changing the ipp path to match whatever armor you want.
Please note: You still will not be able to import gear from after 7.0 as that requires a separate update. This is as it was before the TORCommunity crash.
Finding IPP Paths is quick and easy:
-
In TORCommunity.com: Using the search function on the top right corner of the page, search for the item you want. For this guide we will be defecting from Havoc Squad to the Empire, and therefore will be looking for Imperial Trooper gear, so search for
Imperial Trooper.The page will load on the 'Abilities' Tab, you will need to switch it to the 'Items' Tab where you will note 7 found matches. As we're starting with the chest piece, click onto the Imperial Trooper Jacket, and once the page has loaded change to the 'DETAILED DATA' Tab. This phased json file contains the
ipppath we require, and you can either manually read the file or simply search the page foripp, which should immediately bring you to a line containing:"Icon": "ipp.custom.keyfob.imperial.imperial_trooper.01.chest".
-
In Jedipedia.net: use any of the search fields to look for that same
Imperial Trooperset. Of the different sets of results (Abilities, Items, NPCs, etc.) it is the Items block where actual armor parts are listed. Click onImperial Trooper Jacket: a page will open with all related data. The IPP Path is in the first line inside the Appearance block, containing:ipp.custom.keyfob.imperial.imperial_trooper.01.chest.
You will want to copy the full ipp path (between the quotation marks if any), and then return to the template we've been modifying and replace the existing ipp path with the new one we've found - ipp.custom.keyfob.imperial.imperial_trooper.01.chest.
The new section should look like this:
"chestGear": {
	"name": "Havoc Squad Breastplate",
	"rarity": "Moddable",
	"slot": "chest",
	"slotSimplified": "chest",
	"ippPath": "ipp.custom.keyfob.imperial.imperial_trooper.01.chest",
Save your template, and import it again. If you've made the correct changes, when the character loads he or she will be wearing an Imperial Trooper chest piece, and the rest of their armor will be the Havoc Squad set. You will note that the icons, tooltips, and other ancillary aspects of the character designer will be wrong. This doesn't matter, our only goal is to have the character in the viewport display wearing the right piece of armor.
Dealing with Dyes.
As we typically dye our Player Characters, we use a similar method to fool TORC's Character Designer into processing dye IDs in the template file. Obtaining them is a little involved, as we need to use Jedipedia's File Reader tool.
-
First, locate the dyes you wish to use on Jedipedia's Search, and take note of their
FQNs. For example:Black and Dark Purple Dye Module
FQN: itm.mtx.dye_pack.black_deeppurple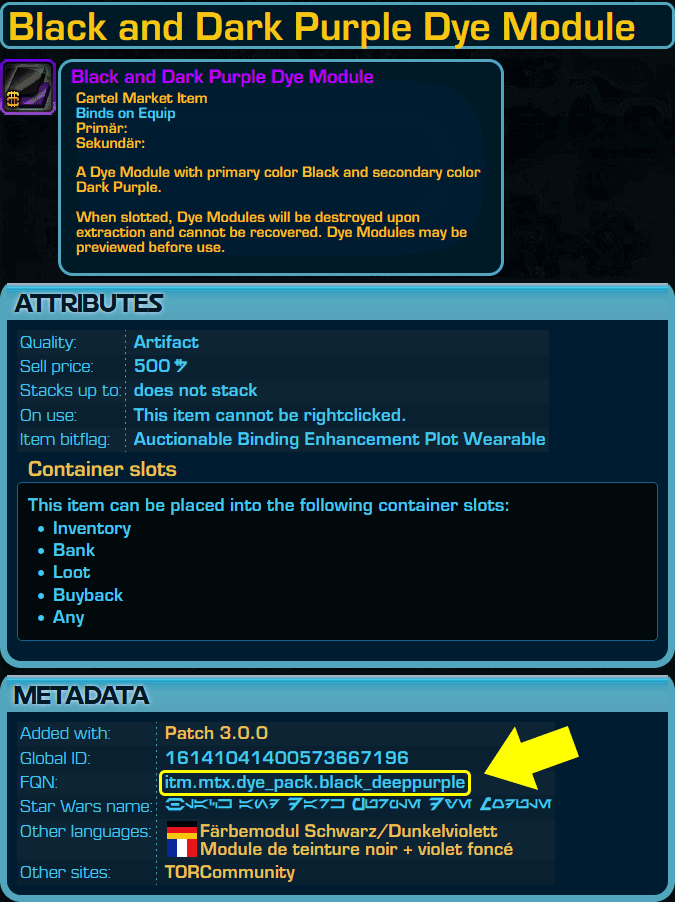
-
Using Jedipedia's File Reader, add all your .tor files in the usual manner and navigate to the 'Nodes' tab, and then search for the
FQNfound above.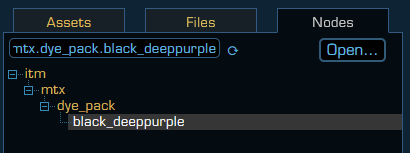
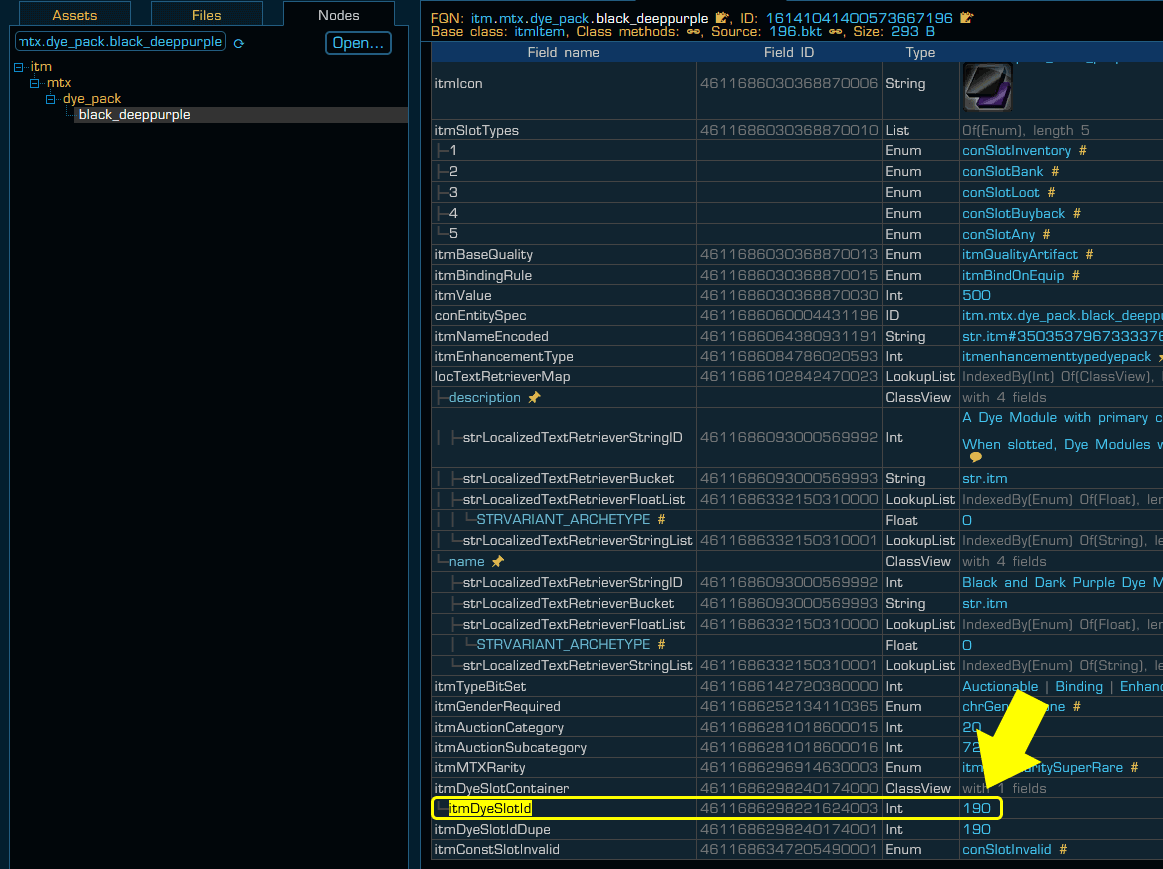
Select the dye to open its item information, and locate the
itmDyeSlotIdnumber:itmDyeSlotId: 190
-
Clear your previous search and whilst still in the 'Nodes' tab search for
itmAppearanceColorsPrototype. Open the only file displayed, and search through the list for theitmDyeSlotIdnumber on the left hand side under the 'Field Name' column.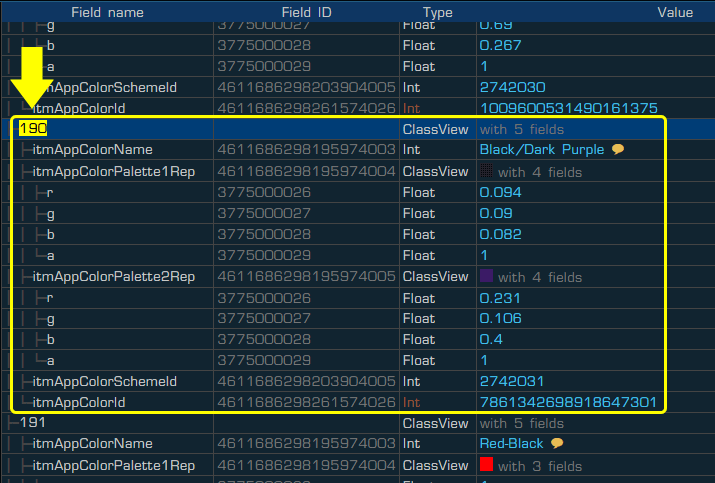
-
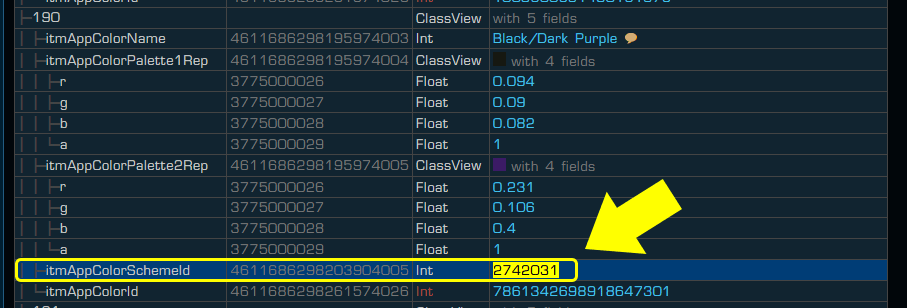
Locate the
itmAppColorSchemeIdfield which we will use for our IPP ID:itmAppColorSchemeId: 2742031
-
In the Import_This.json template replace the
ippPathlocated in the dye section.
At this point you know all you need to know to start manually building a custom file to import into the Character Designer. I would recommend as part of this tutorial to finish converting the default gearset from Havoc Squad to Imperial just to gain some practice, but if you don't, only you will know. If you wish to remove any pieces of gear, say a helmet, or bracers, simply click on the icon and they will be removed. You will not be able to return them through the traditional search method should you wish to change them later - You will have to update your template as we've done in this guide.
Final Export and Importing Into Blender.
Once you've finished converting your character to wear the correct armor, save it again using the File > Save feature of the Character Designer. The exported ZIP File will contain a perfect IMPORT_THIS.json file, with all the paths correctly exported, not just the lazily modified ipp paths we've used to trick the Character Designer into loading what we want. Make sure to keep this safe, because you always modify and update the IMPORT_THIS.json file the same way we did the default provided template from this guide, rather than starting the whole process over again.
From here on, importing into Blender is business as usual with the ZG SWTOR Tools' Character Assembler.
Congratulations, we're done here. Happy Slicing!