Importing the character with the Character Assembler Add on - SWTOR-Slicers/WikiPedia GitHub Wiki
Now that we have the unzipped folder containing the information about the character, we'll use the SWTOR Character Assembler Add-on (or, alternatively, the "All-in-One-ish" ZG SWTOR Tools Add-on, which includes the Character Assembler, too) to automatically fill it with the requisite assets and import it.
(In the past we used to have to do two steps: use the Locate tool in the Slicers GUI app to fill the character folder with the necessary objects and textures files, and then use the .gr2 Importer Add-on's .json importer to actually import and assemble the character. The Character Assembler Add-on does both steps from within Blender in one go, although it still requires the .gr2 importer add-on to be installed, as it uses it under the hood)
Installation
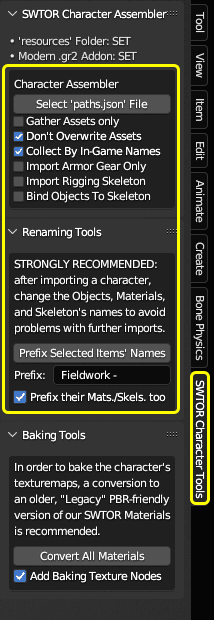
The installation process is the typical for any standard Blender Add-on: in Preferences > Add-Ons, install the Add-on's .zip file, and then enable it by ticking its checkbox. The Add-on will be available in the 3D Viewport's Sidebar as a "SWTOR Character Tools" tab.
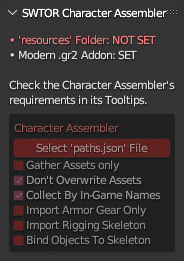
In order to work, it requires us to tell it the path to the resources folder, which is inside the one we set as Slicers GUI's "Output Folder". We do that in its Preferences panel.

If not set, the Add-on's Status information will tell us what is missing, and color the affected tools red. Generally, the tools' tooltips will explain what they do and what their requisites are: when in doubt, hover the cursor over any button or checkbox to read them.
Operation
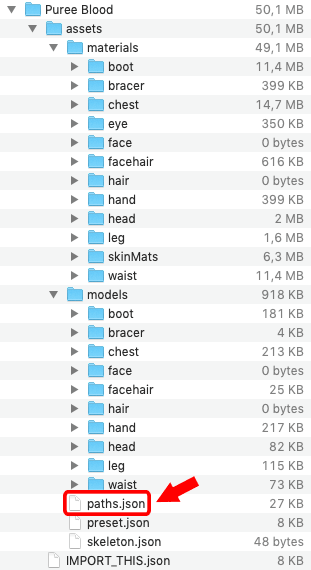
To import our character, we just click on the Select 'paths.json' File button and do just that. Remember: don't select the IMPORT_THIS.json file: that one is for loading a character back into TORCommunity.com's Character Designer to let us keep on tinkering with it.
Processing the character is a matter of a couple of seconds.
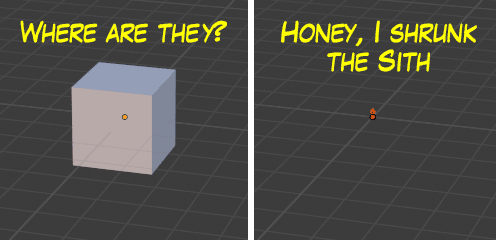
Something to take into account: SWTOR objects are all scaled down to a 10% of their real world counterparts. If you happen not to have deleted Blender's default cube, your character might have ended up inside it.
In Blender's Outliner, with the default options, things should show up fairly tidy, with a main Collection named after the character's folder name as saved from TORC's Character Designer, and with each armor piece's objects collected by in-game name, plus a BODY Collection holding any non-armored bodypart.

Limitations
-
This Add-on no longer demands to have the "resources" folder available to it, and will attempt to work in its absence, but that shifts the responsibility of having all the assets of a character in its folder to us: if a single one is missing, the importing will fail. It shouldn't typically happen, though.
-
Be careful when doing multiple character imports in a same Blender project. SWTOR recycles lots of objects and materials, which means that the chance of importing new elements that have the same names as previous ones is almost assured, messing things up.
To avoid that, the Add-on comes with an Items Prefixer: it lets us add a prefix to any item selected in the 3D View or the Outliner including any Collections (it's important to rename them, too). What's more, it's smart enough to prefix any selected object's materials without needing to explicitly select them, too, plus any skeleton's internal data-block. Doing this to the results of a character import lets us make all those names unique enough to be able to import several characters to the same Blender project (for example, different sets of armor) without making an utter mess of their materials.
(If our renaming needs are more complex than that, then it's Blender's own Batch Renaming tool's turn. Just remember that it is crucial that the Materials are renamed, too, not just the objects)
In general, do one Blender project per character, and be careful to give unique names to everything. When creating scenes combining several characters, just append or link them from those individual projects: if any naming conflict happens at that stage, Blender will do its usual .001, .002., etc.-suffixing dance and everything will be okay.
This Add-on reports its progress and errors through Blender's Console. If anything goes wrong, we can use Window > Toggle System Console to be able to retry and check for any error message: the Add-on lists all the files it detects and copies, letting us see if any entry in the paths.file is malformed or leads to an inexistent file.
Importing options
The Add-on's importing options are:
- Gather Assets Only: it only locates and copies the asset files to the character folder, without importing them.
- Don't Overwrite Assets: if an asset already exists in the folder, it preserves it instead of overwriting it. Useful if the files in the folder have been modified in some manner, such as retouching a texture, without changing the name (you should change the name when doing something like that).
- Collect By In-Game Name: it places each armor part's objects inside a Collection named after the armor's in-game name (say, "Canderous Ordo's Vest"). It does that by finding a
preset.jsonfile inside the character's folder. If unchecked, it just places all the objects in a common Collection named after the character folder's name. - Import Armor Gear Only: discards the non armor-body parts of the character, expediting the creation of multiple sets of armor for a same character.
- Import Rigging Skeleton: imports the character's skeleton, without binding the character's objects to it.
- Bind Objects To Skeleton: binds the character's objects to the imported skeleton.
Conclusion
At this point, we have our character done. Further steps are marginally more complex: using the rigging skeleton to pose the character manually or by applying game animations is suprisingly super-easy, but there are little nagging issues, such as dealing with objects that are driven by SWTOR's physics engine (capes, skirts, long hair…), some animation types that don't work at the moment, importing weapons which are a fully manual process for the time being…
Check the guides following this one in the sidebar's Table of Contents: you'll find there further information on how to proceed about those.