Character Assembler Add on - SWTOR-Slicers/WikiPedia GitHub Wiki
Notice: the most recent version of this tool is available in the ZG SWTOR Tools Add-on (please check its guide here), with new features and some under-the-hood improvements. We'll update the standalone Character Assembler Add-on as soon as possible.
This Blender Add-on allows for the processing of TORCommunity.com's Character Designer (and its NPC Database)'s .zipped SWTOR characters folders directly from Blender.
It doesn't process Creature-type NPCs (single mesh object ones), though. Those need to be imported manually.
This Add-on also provides a quick Objects / Materials / Collections prefixer, to be able to do multiple imports in a single Blender project, and a Materials converter to facilitate (to a little extent) baking operations for exporting SWTOR characters to other apps.
Download the Add-on's latest release
- Requirements
- Features
- Importing options
- Installation
- Operation
- Baking-friendly Material Converter
- Limitations
Requirements
- An enabled "Modern" .gr2 Importer Add-on, as this one calls it to execute the actual character importing and assembling.
- A SWTOR assets extraction performed via Slicers GUI (with either the "Dynamic" or "All" presets) or EasyMYP.
- TORCommunity.com's Character Designer-exported (unzipped) folders, or non-Creature-type NPCs ones exported from its NPC database.
- THERE'S NO NEED TO PROCESS THE FOLDERS WITH THE SLICERS GUI'S LOCATE FEATURE. It's the whole point of this new Add-on 🙂.
Features
The SWTOR Character Assembler:
-
Fills a Player Character/NPC's folder (exported by TORCommunity.com's Character Designer or NPC database) with all the game assets required for assembling them in Blender.
It gathers the character or NPC's skeleton rig, saving it inside a "skeleton" folder next to "models" and "materials". We are now compatible with SWTOR 64 bit (Game Update 7.2.1 onwards)'s skeletons!
It solves some long lingering issues, such as placing the typically missing "black.dds" texturemap in our SWTOR asset extractions if absent.
It also gathers some maps that weren't being covered by Slicers GUI:
- DirectionMaps, that can be used by the Creature, SkinB, and HairC Shaders to produce anisotropic-like speculars.
- WrinklesMaps, meant to be used in heads' SkinB Shaders to animate facial wrinkles. Our version of the shader doesn't support them yet, but some experiments are being carried in order to implement their use).
-
Under the hood, the Add-on calls Darth Atroxa's .gr2 Importer Add-on's Character Import feature to assemble the character. It should be pointed out that this means this Add-on has the same limitations regarding Creature-type (single mesh) NPCs.
-
It reports its progress and errors through Blender's Console. It is recommended to keep it open to check for any error message, as it lists all the files it detects and copies, showing if any entry is malformed or leads to an inexistent file.
-
It adds a series of "quality of life" options to the process, such as collecting armor parts by their in-game names.
-
Also, it comes with an Items Prefixer: it allows for adding a prefix to any item selected in the 3D View or the Outliner, including any Collections. What's more, it's smart enough to prefix any selected object's materials without needing to explicitly select them, too, plus any skeleton's internal data-block. Doing this to the results of a character import lets us make all those names unique enough to be able to import several characters to the same Blender project (for example, different sets of armor) without making an utter mess of their materials.
(If our renaming needs are more complex than that, then it's Blender's own Batch Renaming tool's turn. Just remember that it is crucial that the Materials are renamed, too, not just the objects)
-
Finally, it includes a Material converter to help baking the character's textures into something we can export to other apps.
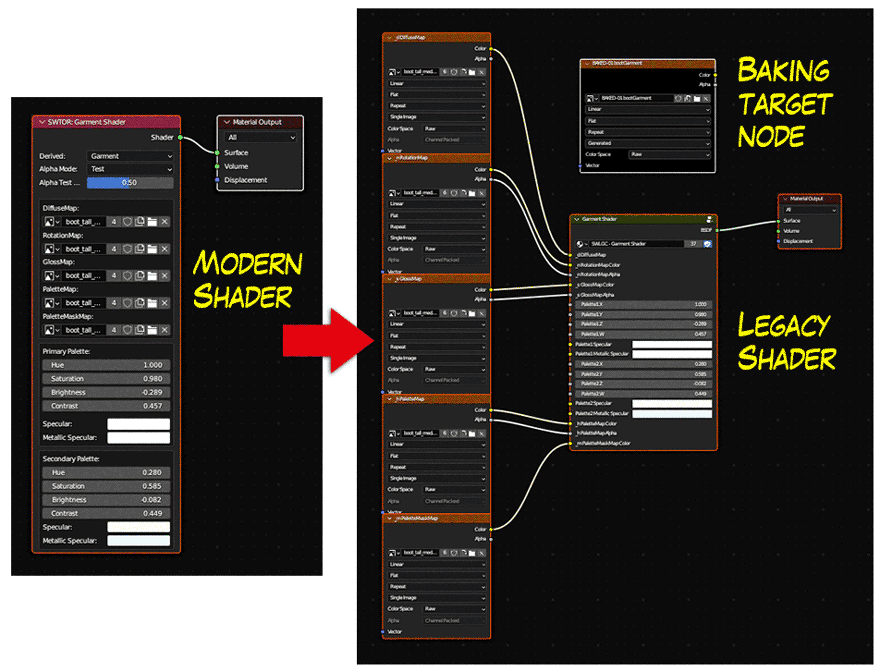
The SWTOR shaders from the modern version of the .gr2 Importer Add-on are quite faithful to the game's ones, but to achieve that they reproduce the way SWTOR calculates certain material attributes, which doesn't work well with Blender's baking workflow.
The older, "Legacy" version of the shaders wasn't as good, but happened to be more baking-friendly. So, we've included this simple converter: it converts every material in the Blender project that uses any of the basic SWTOR shaders (Uber, Creature, Garment, SkinB, Eye, HairC), and adds a texturemap node set as the Active node in the material, with a preloaded blank image, set to the resolution of the material's diffuse map. With such setup, one can just select the character's objects, set the baking parameters, and fire it up.
It should be pointed out that this conversion works for any type of SWTOR objects, not just character ones. On the other hand, there are some other SWTOR shaders that we've added rather recently, such as AnimatedUV, that aren't covered yet.
Installation
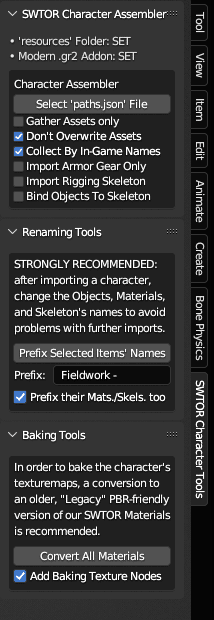
The installation process is the typical for any standard Blender Add-on: in Preferences > Add-Ons, install the Add-on's .zip file, and then enable it by ticking its checkbox. The Add-on will be available in the 3D Viewport's Sidebar as a "SWTOR Character Tools" tab.
In order to work, it requires us to set the path to a SWTOR assets extraction's resources folder. We do that in its Preferences panel.

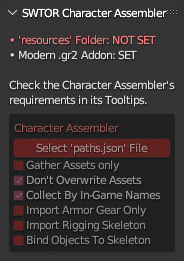
The Add-on will appear as the "SWTOR Character Tools" tab in Blender's 3D View's Sidebar. If its Preferences aren't set, the Add-on's Status information will tell us that it is missing, and set the concerned tools to red. Generally, the tools' tooltips will explain what they do and what their requisites are.
Importing options
The Add-on's importing options are:
- Gather Assets Only: it only locates and copies the asset files to the character folder, without importing them.
- Don't Overwrite Assets: if a located asset already exists in the folder, it preserves it instead of overwriting it. Useful if the files in the folder have been modified in some manner, such as retouching a texture, without changing the name (you should change the name when doing something like that).
- Collect By In-Game Name: it places each armor part's objects inside a Collection named after the armor's in-game name (say, "Canderous Ordo's Vest"). It does that by finding a
presets.jsonfile inside the character's folder. If unchecked, it just places all the objects in a common Collection named after the character folder's name. - Import Armor Gear Only: discards the non armor-body parts of the character, expediting the creation of multiple sets of armor for a same character.
- Import Rigging Skeleton: imports the character's skeleton, without binding the character's objects to it.
- Bind Objects To Skeleton: binds the character's objects to the imported skeleton.
Operation
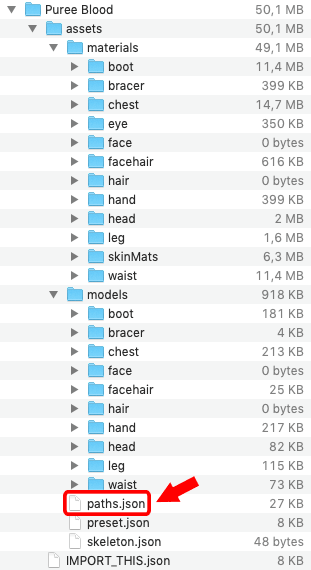
To import our character, we just click on the Select 'paths.json' File button and do just that. Remember: don't select the IMPORT_THIS.json file: that one is for loading a character back into TORCommunity.com's Character Designer to let us keep on tinkering with it.
Processing the character is a matter of a couple of seconds.
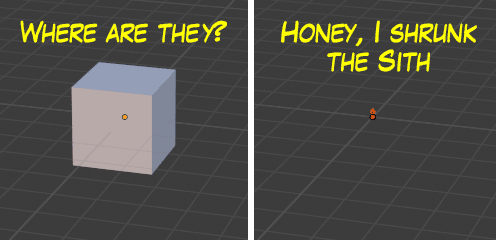
(Something to take into account: SWTOR objects are all scaled down to a 10% of their real world counterparts. If you happen not to have deleted Blender's default cube, your character might have ended up inside it 😅)
With the default settings, the results are somewhat tidier than the plain .gr2 Importer Add-on's, as this one is able to read the TORCommunity.com Character Designer preset stored in the folder, which happens to hold the in-game names of the armor gear. This is an example of those results, with a main Collection named after the character's folder name as saved from TORC's Character Designer, and with each armor piece's objects collected by in-game name, plus a BODY Collection holding any non-armored bodypart (typically the head at the very least).

Baking-friendly Material Converter
As for the Material converter, this is an example of what happens when applied. The modern SWTOR shader is converted to a baking-friendlier Legacy version, and a image texturemap node is created alongside and set as the active node, so that it receives the texture baked for this material when the objects using it are selected and a bake is launched.
(We know this is a very minimal help, as baking tools go. Ideally, it would automate baking each texture type and doing a final Principled BSDF Shader replacement, leaving the model ready for a FBX export. That's being thought about, but it'll take time)
We recommend being careful when thinking about saving the project after doing the conversion. It's maybe better to do the baking on a duplicate, as the original modern materials will disappear after saving because of becoming unused ("zero users", in Blender's parlance).
(The Legacy shaders that this Add-on uses for the conversion are stored as a .blend file inside the Add-on's folder. Those could be retouched manually, if you want to. As long as the names of the template materials, shader nodegroups, and their inputs, are preserved, the Converter tool will be able to deal with any changes to their internals)
Limitations
-
The Add-on no longer requires to have the "resources" folder always available to it to import a character, but it'll fail if any of a character's required assets isn't present in that character's folder (which typically won't happen if it was processed by this tool in the past).
-
Be careful when doing multiple character imports in a same Blender project. SWTOR recycles lots of objects and materials, which means that the chance of importing new elements that have the same names as previous ones is almost assured, messing things up.
To avoid that, the Add-on comes with an Items Prefixer: it lets us add a prefix to any item selected in the 3D View or the Outliner, including any Collections. What's more, it's smart enough to prefix any selected object's materials without needing to explicitly select them, too, plus any skeleton's internal data-block. Doing this to the results of a character import lets us make all those names unique enough to be able to import several characters to the same Blender project (for example, different sets of armor) without making an utter mess of their materials.
(If our renaming needs are more complex than that, then it's Blender's own Batch Renaming tool's turn. Just remember that it is crucial that the Materials are renamed, too, not just the objects)
In general, do one Blender project per character, and be careful to give unique names to everything. When creating scenes combining several characters, just append or link them from those individual projects: if any naming conflict happens at that stage, Blender will do its usual .001, .002., etc.-suffixing dance and everything will be okay.
This Add-on reports its progress and errors through Blender's Console. If anything goes wrong, we can use Window > Toggle System Console to be able to retry and check for any error message: the Add-on lists all the files it detects and copies, letting us see if any entry in the paths.file is malformed or leads to an inexistent file.