ROS2 basics - RobotTeaching/COMP4034 GitHub Wiki
Introduction to ROS2
Before you start: we will be using the Linux command line during this module. If you are not familiar with the command line, you can find resources at the bottom of this tutorial to help you - as you work through the tutorial, make sure to look up any commands you're not familiar with.
COMP4034 uses ROS2 Humble Hawksbill (or just "Humble", for short) as the middleware for controlling our robots. Humble is installed on all of the B85 lab machines already, and there are instructions later on this page for running Humble on your own machines (so you can work on code outside of the labs). This introduction to ROS2 is designed to complement the lecture on ROS2: this tutorial will cover the practical fundamentals, whereas the lecture will dive deeper into the inner workings of ROS2 to build your understanding.
This tutorial is designed to be completed in B85. In this tutorial, we will cover:
- Some initial setup for your B85 workstation
- How to run the TurtleBot simulation
- The 3 key ROS2 concepts - nodes, topics, and messages
- How to teleoperate (drive around) the TurtleBot in simulation
Initial setup
ROS2 is already installed on the lab machines and runs inside a Docker container. You will need to start the container every time you sign-in to the lab machines.
- Open a terminal, and
cd ~/COMP4034/src - In your terminal, open VSCode with
code .(note the full-stop! This allows VSCode to run and you to continue using the terminal) - In your terminal, type
xhost +local:docker. You will get a message that local network connections have been added to the access control list if this is successful - Inside VSCode, press
ctrl + shift + pon your keyboard and then search and select "Dev Containers: Reopen in Container"
If this is successful, you will see a new terminal prompt open inside VSCode that's pointing to /home/ros2_ws. This is the terminal where you will run your ROS2 commands. Start by running source /opt/ros/humble/setup.bash.
You will also need to build your packages by running colcon build, then source install/setup.bash.
You can check your setup so far by typing ros2 topic list into this terminal and checking it returns some topics (if nothing else is running, you should see /rosout and parameter_events).
Running the TurtleBot simulation
You can now run the TurtleBot simulation.
- Run the following command inside the VSCode terminal:
ros2 launch turtlebot3_gazebo turtlebot3_world.launch.py
Important notes about Gazebo Gazebo (the TurtleBot simulation software) might take a few minutes to launch the first time as it loads in the world file. You may also find it doesn't open successfully the first time, due to the "spawn service" being unavailable. This is a strangeness with Gazebo itself trying to use a service before Gazebo has started it properly (!) - if this happens, ctrl+c in the terminal running Gazebo and try launching it again.
Once it's successfully launched, it should open the world below:
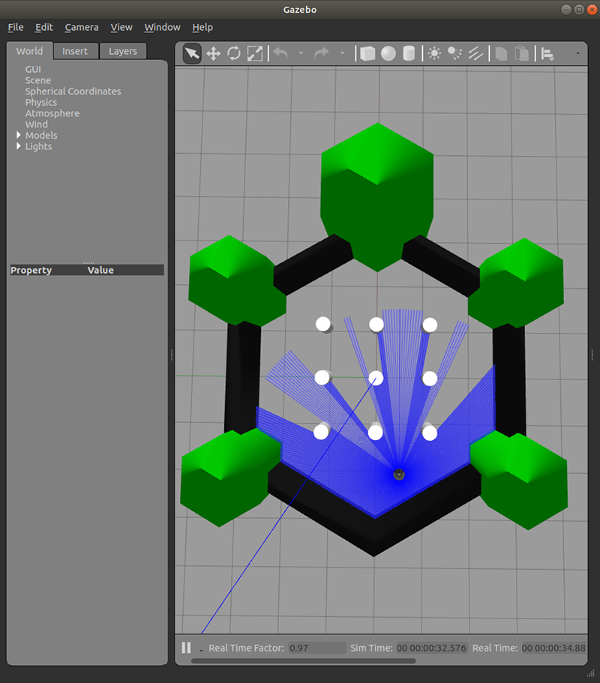
We will leave this open for the rest of this tutorial. It's important to make sure you don't close the terminal running Gazebo, else the simulation will close and you'll need to restart it. You can also ignore the warning that Gazebo displays about reaching EoL.
Exploring Nodes, Topics and Messages
ROS2 predominantly uses a publisher/subscriber architecture for communication. We will go into more detail in the lectures, but for now it's easy to understand "nodes" as "tasks the robot will achieve", "topics" as channels of communication between tasks, and "messages" as the type of information sent on the channels. A simple example of how these concepts works is below, using a node that runs the robot's LIDAR and a node that runs the robot's movement:

Go back to VSCode and open a new terminal - click the "+" sign at the right of the bar where "PROBLEMS | OUTPUT | DEBUG CONSOLE | ..." are displayed.
In this new terminal tab, run the command rqt. RQT is a tool that allows us to visualise different elements of our ROS system. In this instance, we will set it up to show us the nodes and topics actively publishing. You will need to press Plugins > Introspection > Node Graph in the top bar of RQT. Select your check-boxes to match the image below and press the refresh button.
In RQT, the circles are nodes and the rectangles are topics. You will need to use the terminal to find out what message type is used by each topic. Open a new terminal tab in VSCode (so that you keeping RQT running in the background) run the command ros2 topic list -t.
You can use RQT to learn about each message type. In the top bar of RQT, select Plugins > Topics > Message Type Browser. You can use the drop-down boxes in the new view to select the message package, then the message type. You need to press the "+" button to add the message to your view. There is an example below for the Twist message:

You should use the useful links at the bottom of this page to learn more about nodes, topics, and messages.
Teleoperating the TurtleBot
Teleoperation lets us drive the robot around, like a remote-controlled car. Close the terminal tab running RQT, and open a new terminal tab. Then run ros2 run turtlebot3_teleop teleop_keyboard. You need to keep this window focused as you press the buttons on your keyboard, and you will need to be able to see Gazebo to see the robot move. This command runs a node (a simple program) that publishes Twist commands to drive the robot based on which key you press. Each press of the keyboard key increases the velocity of the robot. As you can see here, a Twist message is a data type which contains two geometry_msgs/msg/Vector3 objects named linear and angular, which are respectively the linear and angular velocity commands you send to the motors. At each key press, you are basically incrementing the velocity values.
When you've finished driving your robot around, close all the terminal tabs. Congratulations, you've now finished this section! You should now move onto the page "Using real robots".