Unity Mover Tutorial - RenegadeMinds/testbed GitHub Wiki
This tutorial demonstrates how to wire up a game to run on the XAYA platform. Of particular interest, it shows how to use libxayagame and various RPCs. But most importantly, it shows how to write a simple game on the XAYA platform. Portions of this tutorial repeat portions of other tutorials. This tutorial is written such that you can skip around easily to those parts of greatest interest to you.
You'll need to download the code. It's available here. Extract the ZIP file. You'll find 3 projects inside the folder.
- BitcoinLib: The RPC library
- XAYAWrapper: The libxayagame wrapper
- XAYAUnity: The example game. Uses #1 and #2
If you're impatient and simply want to get started, you can use the code as a template. For a thorough tutorial, skip to here.
- Compile BitcoinLib and XAYAWrapper
- Use Mover as a template
- Write your game logic
- Write your front end
The most important things you'll also need to know are:
Open up the BitcoinLib and XAYAWrapper projects and compile them. They're referenced in the Unity project. The libxayagame library (wrapped by XAYAWrapper) does the difficult, heavy lifting of handling various blockchain operations for you. For RPCs (Remote Procedure Calls), we've modified BitcoinLib.
Open up the XAYAUnity folder in Unity then click XAYA in SampleScene. Click in the Inspector to open up the scripts in Visual Studio. The files of interest are:
- XAYAConnector.cs
- XAYAClient.cs
- HelperFunctions.cs
- JSONClasses.cs
- CallbackFunctions.cs
- MoveGUIAndGameController.cs
No edits are needed for XAYAConnector.cs, although you may wish to make some changes in the WaitForChangesInner IEnumerator.
Game moves are submitted through XAYAClient, so you'll need to change the ExecuteMove method to match however you create moves.
The game logic resides in the XAYAMoverGame namespace, which is found in HelperFunctions.cs, JSONClasses.cs, and CallbackFunctions.cs. See below for explanations of the various callbacks. This is meat for creating a new XAYA game.
MoveGUIAndGameController is the front end and where all the Unity code resides. This is where you consume the GameState. You'll need to change the front end for your game. Take note of how the XAYAConnector and XAYAClient classes are used in the various controls in Mover.
There are 2 methods of particular interest to get started quickly:
UpdateRedrawGameClient
The needsRedraw flag in the Update method is set in the XAYAConnector. Check the WaitForChangesInner method for how that's done. If the screen needs to be redrawn, the RedrawGameClient method is called.
Similarly for RedrawGameClient, the data (i.e. the GameState) you need to consume comes from XAYAConnector. However, that data comes from XAYAWrapper (libxayagame) but is set in the callbacks that you must write. In this case, they're in the XAYAMoverGame namespace, and in particular, in the forwardCallbackResult and backwardCallbackResult methods.
There is no 'fast' way to explain the callbacks. Refer to the section on callbacks for more information.
If you have further questions from the FAST way, see the relevant portions below. You can also post for help in the Development section of the XAYA forums.
For this tutorial, you'll need several pieces of software:
- Unity
- Visual Studio
- VS Class Diagram
- Mover Unity projects
- Knowledge of Unity
Visual Studio no longer ships with Class Diagram. To get it, type "class diagram" into the Quick Launch in the upper-left corner of Visual Studio and search. It will return a link to install VS Class Diagram.
The Mover Unity projects contain all the code for this tutorial.
This tutorial doesn't delve into explaining Unity elements. You should have a basic understanding of Unity already. If not, you will need to read the code, explore, and search online for information about Unity.
The various components in Unity Mover are referenced in each other as illustrated below.

Red signifies "black box" code. You don't need to change anything here. Simply compile it and add the reference or copy the DLL.
Yellow signifies code that you can edit if you wish.
Green signifies code that you must write in its entirety. This is YOUR game.
Starting from the bottom of the diagram, we have BitcoinLib. It's the RPC library used in this tutorial. It's referenced in:
- XAYAWrapper
- XAYAClient
- XAYAConnector
We'll examine what's being done when we get to that code. The BitcoinLib code is included in the download. You can edit it as you wish to add in more RPC methods. (See the XAYA RPC Methods and Interacting with the XAYA Wallet Through RPC in C# for more information.)
XAYAWrapper wraps the statically linked libxayagame library. You need only add a reference to this in your own projects. Full C# source code is provided. libxayagame is written in C++ and can be found here.
For our purposes, this is a "black box" until we look at the XAYAMoverGame namespace where we implement several libxayagame callbacks.
This connects to and disconnects from XAYAWrapper. It gets data through RPC (BitcoinLib) and updates information for MoveGUIAndGameController so that MoveGUIAndGameController can update the UI. This will be examined in more depth later.
This is used for some RPC calls through BitcoinLib, and more specifically to get a list of XAYA names in the user's wallet and to send moves to the XAYA blockchain.
It also sets the XAYAConnector to subscribe for updates from libxayagame. Those updates that XAYAConnector receives, as mentioned above, are then asynchronously updated in the front end, i.e. MoveGUIAndGameController. This will be examined in more depth later.
It is up to you to write this as this is the core game logic. We'll examine this in great detail below and explain the callbacks extensively.
This is your front end. It launches and disconnects from XAYAConnector. It uses XAYAClient to get a list of XAYA names from the user's wallet and to send moves to the blockchain.
It uses XAYAMoverGame for the GameState, which is used to update the UI for each block where there are moves.
As above, there are 3 projects:
- BitcoinLib (RPC library)
- XAYAWrapper (wraps libxayagame)
- XAYAUnity (the game)
We'll look at the first 2 very briefly then dive into the lovely goodness of actual game coding.
We've already explained the purpose of BitcoinLib above, but should mention that you can very easily extend it. In particular, see these files:
- BitcoinLib\Services\RpcServices\RpcService\IRpcService.cs
- BitcoinLib\Services\RpcServices\RpcService\RpcService.cs
Scroll to the bottom and you'll see how new functionality can be easily added. For more information on XAYA RPCs, refer to XAYA RPC Methods and Interacting with the XAYA Wallet Through RPC in C#.
XAYAWrapper wraps libxayagame and exposes several fields and methods.
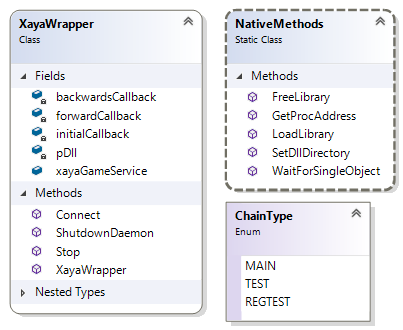
The imporant fields are:
- initialCallback
- forwardCallback
- backwardsCallback
- xayaGameService
We'll examine the callbacks later on when we look at the game logic. In order to use libxayagame, this is perhaps the most important part to understand.
xayaGameService is part of BitcoinLib and can be used to send RPC calls. While we've used BitcoinLib for RPCs, you can choose any RPC library that you prefer.
There are 4 methods:
-
Connect: Connects to the daemon -
ShutdownDaemon: Stops the daemon -
Stop: Stops BitcoinLib -
XayaWrapper: Constructor
Wiring up XAYAWrapper is very easy, but it must be done in 2 threads.
1. Instantiate a XAYAWrapper as a member variable as seen in XAYAConnector:
public XayaWrapper wrapper;
2. Call it's constructor as in XAYAConnector (this is done in a thread):
wrapper = new XayaWrapper(dPath,
	MoveGUIAndGameController.Instance.host_s,
	MoveGUIAndGameController.Instance.gamehostport_s,
	ref functionResult,
	CallbackFunctions.initialCallbackResult,
	CallbackFunctions.forwardCallbackResult,
	CallbackFunctions.backwardCallbackResult);
The constructor's signature is:
public XayaWrapper(string dataPath,
	string host_s,
	string gamehostport_s,
	ref string result,
	InitialCallback inCal,
	ForwardCallback forCal,
	BackwardCallback backCal)
- dataPath: The path to the libxayagame DLL and its dependencies, i.e. the "XayaStateProcessor" folder
- host_s: The URL to connect to, e.g. http://user:[email protected]:8396
- gamehostport_s: This is 8900
- result: A string that tells you if the wrapper initialised ok or an error message
- inCal: The InitialCallback callback that you've written
- forCal: The ForwardCallback callback that you've written
- backCal: The BackwardCallback callback that you've written
3. Connect as in XAYAConnector (same thread as #2):
    functionResult = wrapper.Connect(dPath,
	FLAGS_xaya_rpc_url,
	MoveGUIAndGameController.Instance.gamehostport_s,
	MoveGUIAndGameController.Instance.chain_s.ToString(),
	MoveGUIAndGameController.Instance.GetStorageString(
		MoveGUIAndGameController.Instance.storage_s),
	"mv",
	dPath + "\\..\\XayaStateProcessor\\database\\",
	dPath + "\\..\\XayaStateProcessor\\glogs\\" );
The Connect signature is:
public string Connect(string dataPath,
	string FLAGS_xaya_rpc_url,
	string gamehostport_s,
	string chain_s,
	string storage_s,
	string gamenamespace,
	string databasePath,
	string glogsPath)
- dataPath: Unused. You can use this to modify the wrapper if you wish
- FLAGS_xaya_rpc_url: The URL to connect to, e.g. http://user:[email protected]:8396
- gamehostport_s: 8900
- chain_s: This is the network to use: MAIN, TESTNET, or REGTEST
- storage_s: One of "sqlite", "lmdb", or "memory"
- gamenamespace: The game name. This is "mv" for Mover
- databasePath: The path to the sqlite or lmdb database
- glogsPath: The path to glog
We'll look at getting data (new game states) from libxayagame below.
The XAYAUnity project is where the game is written. There are 8 files that we should look at. They fall into 4 categories:
- Core game files
- CallbackFunctions.cs
- HelperFunctions.cs
- JSONClasses.cs
- "Wiring up" and utility files
- XAYAClient.cs
- XAYAConnector.cs
- Front end
- MoveGUIAndGameController.cs
- Ancilliary examples
- MoverObject.cs
Rather than follow a file-by-file approach, we'll instead do our examination by starting with fundamental elements. We'll then progress through the Mover game code, gradually adding new elements.
Here we'll look at:
- Connection Settings
- Connecting XAYAClient
- Getting and Populating Player Names
- Making a Move
- SubscribeForBlockUpdates
- Game Logic
- Update the Front End with a GameState
In MoveGUIAndGameController, there are several inputs for the XAYAWrapper's connection settings. In your own game, you won't have inputs like this for your users. Instead, you'll have other code to get that information. The inputs here are for demonstration purposes.
Those inputs appear in the Unity designer as illustrated below.
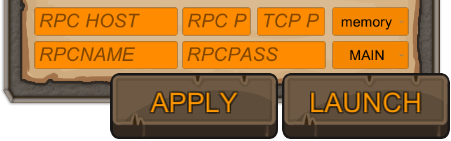
When running and filled in, those settings will appear as illustrated below.
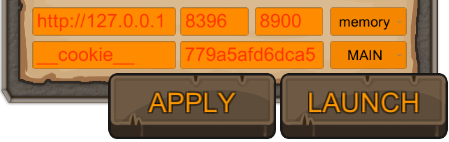
These settings are used with XAYAWrapper as we'll see below.
How these settings make their way to XAYAWrapper follows this path:
- Settings are saved as member variables in
MoveGUIAndGameController -
XAYAConnector.LaunchMoverStateProcessorsets 2 additional parameters and starts a coroutine withStartEnumin order to continue starting the XAYAWrapper -
XAYAConnector.StartEnumuses Ciela Spike's Thread Ninja to start an asynchronous coroutine withDaemonAsync -
XAYAConnector.DaemonAsyncfinally constructs theXAYAWrapper(wrapper) and calls itsConnectmethod
The following walks through those steps all the way from initially getting the settings to finally connecting and disconnecting the XAYAWrapper.
The APPLY button saves the settings (OnButton_SettingsSave in MoveGUIAndGameController).
public void OnButton_SettingsSave()
{
    PlayerPrefs.SetString("host",host.text);
    PlayerPrefs.SetString("hostport", hostport.text);
    PlayerPrefs.SetString("tcpport", gameport.text);
    PlayerPrefs.SetString("rpcuser", rpcuser.text);
    PlayerPrefs.SetString("rpcpassword", rpcpassword.text);
    PlayerPrefs.SetInt("storage", storage.value);
    PlayerPrefs.SetInt("chain", chain.value);
    PlayerPrefs.Save();

    FillSettingsFromPlayerPrefs();
}
The FillSettingsFromPlayerPrefs method sets connection member variables from those settings.
void FillSettingsFromPlayerPrefs()
{
    host_s = PlayerPrefs.GetString("host", "http://127.0.0.1");
    hostport_s = PlayerPrefs.GetString("hostport", "8396");
    gamehostport_s = PlayerPrefs.GetString("tcpport", "8900");
    rpcuser_s = PlayerPrefs.GetString("rpcuser", "xayagametest");
    rpcpassword_s = PlayerPrefs.GetString("rpcpassword", "xayagametest");
    storage_s = PlayerPrefs.GetInt("storage", 0);
    chain_s = PlayerPrefs.GetInt("chain", 0);
}
Starting and stopping the XAYAWrapper begins in the OnButton_DaemonLaunch method, but it is the XAYAConnector that actually starts the XAYAWrapper.
public void OnButton_DaemonLaunch()
{
    if (btnLaunchText.text != "STOP") // This is the "LAUNCH" button.
    {
        xayaConnector.LaunchMoverStateProcessor();
        btnLaunchText.text = "STOP";
    }
    else
    {
        xayaConnector.Disconnect();
    }
}
The method to disconnect XAYAWrapper is in the button code as well. See Disconnecting XAYAWrapper below for how that is done.
Here you can see the settings being used. Starting XAYAWrapper begins in the XAYAConnector.LaunchMoverStateProcessor method.
public void LaunchMoverStateProcessor()
{
    Instance = this;
    dPath = Application.dataPath;
    FLAGS_xaya_rpc_url = MoveGUIAndGameController.Instance.rpcuser_s + ":"
	+ MoveGUIAndGameController.Instance.rpcpassword_s + "@"
	+ MoveGUIAndGameController.Instance.host_s + ":"
	+ MoveGUIAndGameController.Instance.hostport_s;
    // Clean last session logs
    if (Directory.Exists(dPath + "\\..\\XayaStateProcessor\\glogs\\"))
    {
        DirectoryInfo di = new DirectoryInfo(dPath + "\\..\\XayaStateProcessor\\glogs\\");
        foreach (FileInfo file in di.GetFiles())
        {
            file.Delete();
        }
    }
    StartCoroutine(StartEnum());
}
In order to prevent UI thread blocking, the XAYAWrapper must be in a separate thread. This begins with StartCoroutine(StartEnum()).
Actually starting the wrapper is done in a separate thread beginning with StartCoroutine(StartEnum()).
IEnumerator StartEnum()
{
    Task task;
    this.StartCoroutineAsync(DaemonAsync(), out task);
    yield return StartCoroutine(task.Wait());

    if (task.State == TaskState.Error)
    {
        MoveGUIAndGameController.Instance.ShowError(task.Exception.ToString());
        Debug.LogError(task.Exception.ToString());
    }
}
This starts DaemonAsync in a thread. We've already seen some of this code when we looked at wiring up XAYAWrapper above.
IEnumerator DaemonAsync()
{
    string functionResult = "";

    wrapper = new XayaWrapper(dPath, MoveGUIAndGameController.Instance.host_s,
	MoveGUIAndGameController.Instance.gamehostport_s,
	ref functionResult,
	CallbackFunctions.initialCallbackResult,
	CallbackFunctions.forwardCallbackResult,
	CallbackFunctions.backwardCallbackResult);

    yield return Ninja.JumpToUnity;
    Debug.Log(functionResult);
    yield return Ninja.JumpBack;

    functionResult = wrapper.Connect(dPath,
	FLAGS_xaya_rpc_url,
	MoveGUIAndGameController.Instance.gamehostport_s,
	MoveGUIAndGameController.Instance.chain_s.ToString(),
	MoveGUIAndGameController.Instance.GetStorageString(
		MoveGUIAndGameController.Instance.storage_s),
	"mv",
	dPath + "\\..\\XayaStateProcessor\\database\\",
	dPath + "\\..\\XayaStateProcessor\\glogs\\" );

    yield return Ninja.JumpToUnity;
    Debug.Log(functionResult);
    yield return Ninja.JumpBack;

    Debug.Log("Check if fatal?");

    CheckIfFatalError();
}
wrapper.Connect is called and if all goes well, we're successfully connected to libxayagame.
The XAYAConnection Disconnect method is:
public void Disconnect()
{
    StartCoroutine(TryAndStop());
    Instance = null;
}
It calls TryAndStop asynchronously:
IEnumerator TryAndStop()
{
    if (wrapper != null)
    {
        wrapper.Stop();
        yield return new WaitForSeconds(0.1f);
        StartCoroutine(TryAndStop());
    }
}
That method recursively tries to stop the connection to the wrapper.
The CONNECT button in the front end calls the ConnectClient method. This method does 3 things:
-
Connects
xayaClientxayaClient.Connect()
-
Submits moves
ShowError(xayaClient.ExecuteMove(nameSelected, DirectionDropdownToMoverDir(directionSelected), distanceSelected));
-
Toggles between "CONNECT" and "MOVE!"
When xayaClient connects, it:
- Creates a XAYAService (from BitcoinLib) for RPC calls
- Subscribes the XAYAConnector to the wrapper to listen for updates.
Connecting xayaService is done in its constructor:
xayaService = new XAYAService(MoveGUIAndGameController.Instance.host_s + ":"
	+ MoveGUIAndGameController.Instance.hostport_s + "/wallet/game.dat",
	MoveGUIAndGameController.Instance.rpcuser_s,
	MoveGUIAndGameController.Instance.rpcpassword_s,
	"",
	10);
If the connection is successful, XAYAClient calls:
connector.SubscribeForBlockUpdates();
This subscribes the XAYAConnector instance to updates from libxayagame (XAYAWrapper or wrapper). This happens in a separate thread to prevent blocking. See SubscribeForBlockUpdates below for how this is done.
Once connected, we can get a list of names from the user's wallet and populate the name list drop down menu.
FillNameList gets and populates the menu.
public void FillNameList()
{
    nameList = xayaClient.GetNameList();

    playernamelist.ClearOptions();
    playernamelist.AddOptions(nameList);

    if(nameList.Count > 0 && nameSelected.Length <= 1)
    {
        nameSelected = nameList[0];
    }
}
There is no error checking there for the sake of simplicity. However, in general you should check that:
- You only use names in the
p/namespace - You ensure that elements of your game properly handle long or otherwise complex names
- You filter for script injection attacks
xayaClient.GetNameList returns a List<string> of names.
public List<string> GetNameList()
{
    List<string> allMyNames = new List<string>();

    List<GetNameListResponse> nList = xayaService.GetNameList();

    foreach(var nname in nList)
    {
        if (nname.ismine == true)
        {
            allMyNames.Add(nname.name);
        }
    }

    return allMyNames;
}
The xayaService.GetNameList is the RPC call to the XAYA wallet to get the names.
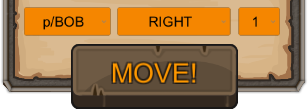
With the name list populated, users can select a name and play the game.
Users choose a direction and a number of steps to take. When they click MOVE!, their move is submitted to the XAYA blockchain, as mentioned above under Connecting XAYAClient.
ShowError(xayaClient.ExecuteMove(nameSelected,
	DirectionDropdownToMoverDir(directionSelected),
	distanceSelected));
The ExecuteMove method is:
public string ExecuteMove(string playername, string direction, string distance)
{
     return xayaService.NameUpdate(
	playername,
	"{\"g\":{\"mv\":{\"d\":\"" + direction + "\",\"n\":" + distance + "}}}",
	new object());
}
It uses xayaService (from BitcoinLib) to send a name_update RPC to the XAYAWallet. The wallet then broadcasts the name_update to the XAYA network and a miner somewhere in the world then mines the transaction into the blockchain. Once that's done, XAYAWrapper (libxayagame) picks up all the moves for all players and passes that data to the XAYAConnector, which then asynchronously updates member variables in MoveGUIAndGameController so that the front end can update itself for the new game state.
Here are a couple example moves:
{"g":{"mv":{"d":"n","n":1}}}
{"g":{"mv":{"d":"k","n":5}}}
- g: This indicates the game namespace
- mv: This is the XAYA game name for "Mover"
- d: This is a direction. See game logic for more information
- n: This is the number of steps to take
As mentioned above, when we connect the XAYAClient, it subscribes the XAYAConnector to XAYAWrapper in a new thread. The XAYAConnector then listens for updates from XAYAWrapper (libxayagame) and asynchronously updates member variables in MoveGUIAndGameController so that it can update the front end with the new game state.
The path for this begins in XAYAClient.Connect:
connector.SubscribeForBlockUpdates();
The SubscribeForBlockUpdates method starts a coroutine with WaitForChanges:
StartCoroutine(WaitForChanges());
WaitForChanges uses Thread Ninja to start a new thread with WaitForChangesInner:
IEnumerator WaitForChanges()
{
    Task task;
    this.StartCoroutineAsync(WaitForChangesInner(), out task);
    yield return StartCoroutine(task.Wait());
}
WaitForChangesInner runs a while(true) loop. The portion we are concerned with is:
wrapper.xayaGameService.WaitForChange();

GameStateResult actualState = wrapper.xayaGameService.GetCurrentState();

if (actualState != null)
{
	if (actualState.gamestate != null)
	{
	    GameState state = JsonConvert.DeserializeObject<GameState>(actualState.gamestate);

	    MoveGUIAndGameController.Instance.state = state;
	    MoveGUIAndGameController.Instance.totalBlock = client.GetTotalBlockCount();
	    var currentBlock = client.xayaService.GetBlock(actualState.blockhash);
	    MoveGUIAndGameController.Instance._sVal = currentBlock.Height;

	    MoveGUIAndGameController.Instance.needsRedraw = true;
In there the XAYAWrapper (wrapper) waits for a change and when one happens, it gets the current state as a GameStateResult. The GameStateResult is then deserialised as a GameState.
Member variables of MoveGUIAndGameController are then set. Most importantly:
- state: The
GameState - needsRedraw: A flag that tells the front end to update itself with the new
statevalue
At long last we arrive at the game logic. It is in the XAYAMoverGame namespace and contained in 3 files:
- JSONClasses.cs
- HelperFunctions.cs
- CallbackFunctions.cs
The following is a class diagram of XAYAMoverGame.
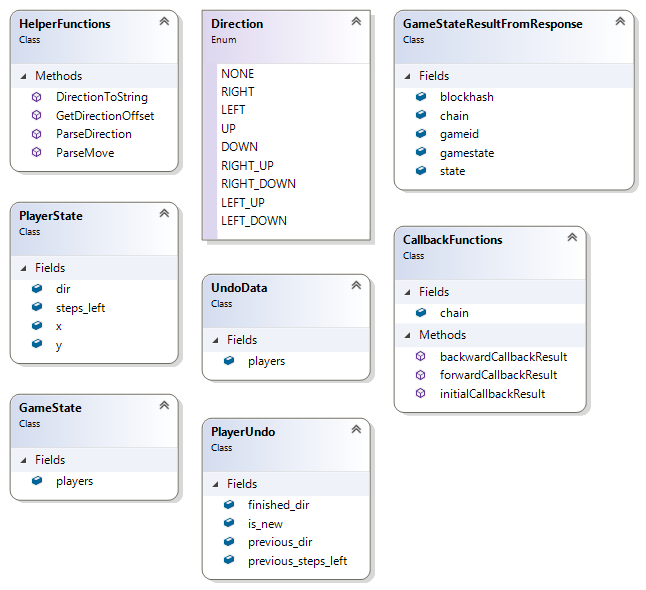
JSONClasses.cs has the core classes for game elements.
- Direction: This is the direction for the player to move
- PlayerState: This tells where the player is on the map, their direction, and the number of steps left for them to take
- GameStateResultFromResponse: This is for receiving a GameStateResult. It has been implemented in BitcoinLib as
GameStateResultto illustrate another technique - GameState: This is a dictionary of all players, i.e. their
PlayerStates.GameStateis used to update the front end - PlayerUndo: This is the undo information for a single player
- UndoData: This is a
DictionaryofPlayerUndos. It is used to rewind the current game state by 1 block
Because a user could encounter a bad block or require a reorg, we need to keep undo data so that we can "rewind" the game if needed. You can think of this as a user being sucked into an alternate reality that's not compatible with the game. Undoing (or rewinding) then brings them back into reality, i.e. a valid game state.
We'll examine rewinding when we look at the backwardCallbackResult.
Our HelperFunctions class contains static methods that we’ll use in the game logic. Note that for some we have return values from parameters that we pass in by reference, i.e. ref type var.
-
ParseMove: Takes a JSON object, sets some parameters, and returns true if the move is valid -
ParseDirection: Takes a string and returns a Direction enum -
GetDirectionOffset: Takes aDirectionenumthen sets an x and y offset for that direction -
DirectionToString: Takes aDirectionenumand returns plain English for a valid direction or an empty string
As there's nothing particularly special in this class, further examination of it is left to the reader to pursue on their own. The only remaining point that should be made is that there should be thorough error checking, and particularly for data received through the blockchain, which in this case would be the JObject passed to ParseMove. See the error checking in that method for an example.
To make the case for extreme error checking, consider that anyone could issue a name_update operation through the daemon or XAYA QT wallet console. That data would be entirely arbitrary. Each and every bit of data from the blockchain MUST be checked. While normal people just want to play the game, there are some people that just want to see if they can break things. You must guard against them. For example, someone could issue a name_update like so:
{ "g": { "mv": { "d": "Dr. Evil", "n": "1 million dollars!" } } }
This is obviously an invalid move for our Mover game. As such, it is critically important to ensure that you do proper error checking and exclude invalid moves.
If you recall from above, these callbacks are implementations of the callbacks in libxayagame (XAYAWrapper).
- initialCallbackResult:
- forwardCallbackResult:
- backwardCallbackResult:
This is where the main game logic resides.
The initialCallbackResult reads which chain we plan to use, then sets the height to start at, and the hash for that block in hexadecimal. It’s very straight forward.
public static string initialCallbackResult(out int height, out string hashHex)
{
    if (Program.chainType == 0)
    {
	height = 125000;
	hashHex = "2aed5640a3be8a2f32cdea68c3d72d7196a7efbfe2cbace34435a3eef97561f2";
    }
    else if (Program.chainType == 1)
    {
	height = 10000;
	hashHex = "73d771be03c37872bc8ccd92b8acb8d7aa3ac0323195006fb3d3476784981a37";
    }
    else
    {
	height = 0;
	hashHex = "6f750b36d22f1dc3d0a6e483af45301022646dfc3b3ba2187865f5a7d6d83ab1";
    }

    return "";
}
We must know what block we should start reading at. There’s no sense in reading blocks prior to a game’s existence, so you should set your height to the block where your game first went "live".
For the hashHex, to find out a block hash, you can use the official XAYA explorer available at https://explorer.xaya.io/. As an example, this is block zero (0), also known as the genesis block:
https://explorer.xaya.io/block/0
Its hash is “e5062d76e5f50c42f493826ac9920b63a8def2626fd70a5cec707ec47a4c4651”.
First, we must clarify some language used here. While the name of the game is "Mover", and players "move" in the game, when we talk about a moving or non-moving player, this has nothing to do with a player moving on the map in the Mover game.
MOVING (or "moving") means that the player has a set of move orders that are active.
NON-MOVING (or "non-moving) means that the player does not currently have a set of move orders.
A "move" or "move orders" are whatever instructions the player has told the game to do. These instructions/orders are sent to the XAYA blockchain in a XAYA name_update as a value. (See A Quick Look at Moves.) We receive those orders as a "move" through the blockData parameter.
Moves or orders may include passive effects. Imagine a character with a "vampire death aura necklace". When they wear the necklace, anyone that comes within x distance of them loses y health points while the player gains y or z health points. The player may be standing still and not be "active" per se, but that passive effect is still active while the necklace is worn.
For example, the following:
Verify that the move is valid.
This is how moves are processed.
are equivalent to:
Verify that the player's orders are valid.
This is how orders are processed.
To be more specific, the blockData parameter returns moves which is an array of move data. Here's one example:
{
  "block": {
	"hash": "dda7eccde4857742e5000bd66cf72154ce26c22876582654bc8b8d78dadbce8c",
	"height": 558369,
	"parent": "18f72c91c7b9223e9c7d0525216277e4016d748a2c81be4ba9d4a2b30eaed92d",
	"rngseed": "b36747498ce183b9da32b3ab6e0d72f2a17aa06859c08cf1d1e91907cb09dddc",
	"timestamp": 1549056526
  },
  "moves": [
	{
	  "move": {
		"m": "Hello world!"
	  },
	  "name": "ALICE",
	  "out": {
		"CMBPmRos5QADg2T8kvkQhMaMV5WzpzfedR": 3443.7832612
	  },
	  "txid": "edd0d7a7662a1b5f8ded16e333f114eb5bea343a432e6c72dfdbdcfef6bf4d44"
	}
  ],
  "reqtoken": "1fba0f4f9e76a65b1f09f3ea40a59af8"
}
As such, when we say "moves" or "move", it is that data in blockData that we are referring to.
forwardCallbackResult runs whenever a new block is received. It processes the moves (or game logic) to create a new game state and creates undo data. Let's examine it in detail.
In the callback there are general tasks that need to be done.
- Get data that's passed in into variables
- Check errors for the game state and players. Construct them if they're null. That only ever happens once
- Update moves, i.e. Loop over all new moves for each player
- Process moves, i.e. Loop over each player state
- Update the new game state and new undo data then return them
Here's the signature:
public static string forwardCallbackResult(string oldState,
	string blockData,
	string undoData,
	out string newData)
-
oldState: This string contains the game state as it currently is -
blockData: This contains all the new moves that have come in from the blockchain -
undoData: This is the undo data that will be created. This is the return value of the callback -
newData: This is an out parameter and will store the updated game state
First, we deserialise the oldState JSON string as a GameState object. Remember that most of our string data like this is actually JSON.
GameState state = JsonConvert.DeserializeObject<GameState>(oldState);
Similarly, we deserialise the block we received from the XAYA daemon as a dynamic type.
dynamic blockDataS = JsonConvert.DeserializeObject(blockData);
We'll be creating undo data to hedge against the possibility of encountering a fork/reorg, so we initialise a Dictionary for that with the PlayerUndo type.
Dictionary<string, PlayerUndo> undo = new Dictionary<string, PlayerUndo>();
It's possible that there are no moves for us to process, so we check for that and if there are no new moves, we simply exit the method.
if (blockData.Length <= 1)
{
    newData = "";
    return "";
}
While we're developing our example game, it's nice to have console feedback. This would be commented out or removed in our final release.
Console.WriteLine("Got new forward block at height: " + blockDataS["block"]["height"]);
If this is the first move of the game, then we should create a new instance of our game.
if (state == null)
{
    state = new GameState();
}
If you remember from above in JSONClasses.cs, our GameState class merely contains a Dictionary of PlayerStates.
public class GameState
{
    public Dictionary<string, PlayerState> players;
}
So for the players property of our GameState, if it's null, then we should initialise it.
if (state.players == null)
{
    state.players = new Dictionary<string, PlayerState>();
}
Let's remind ourselves about the players property being a PlayerState. Again, that is found in the JSONClasses.cs file.
public class PlayerState
{
    public int x;
    public int y;
    public Direction dir = Direction.UP;
    public Int32 steps_left;
}
That completes the basic setup and initialisation for us to process a move.
The rest of our game logic consists of 2 loops:
- A loop to get moves and create undo data for moving players
- A loop to process moves and create undo data for non-moving players
We then set our game state and undo data variables and return them.
Before proceeding, let's look at what a typical move will look like for any given name that wishes to create that move.
{
  "g": {
    "mv": {
      "d": "u",
      "n": 10
    }
  }
}
Or, as a single line:
{ "g": { "mv": { "d": "u", "n": 10 } } }
The g; tells us that we're in the game name namespace for the XAYA blockchain. Inside of that, the first element, mv, tells us that this name_update is for our Mover example game, i.e. the XAYA name for Mover is "mv". Inside of mv is a move. d is the direction, which will be resolved by our HelperFunctions.ParseDirection method. n is the number of steps to take. ("u" is Direction.RIGHT_UP.)
Moves are done through the name_update operation in the XAYA daemon. It's possible for people to issue these name_updates through the XAYA QT wallet or directly into the daemon with arbitrary data. For example, someone could issue a name_update like so:
{ "g": { "mv": { "d": "Dr. Evil", "n": "1 million dollars!" } } }
This is obviously an invalid move for our Mover game. As such, it is critically important to ensure that you do proper error checking and exclude invalid moves.
Let's look into our first loop inside forwardCallbackResult.
foreach (var m in blockDataS["moves"])
Here, blockDataS contains many moves that we will iterate over, storing each one as a var in m.
First, we extract the player's name from m.
string name = m["name"].ToString();
Next, we put the move into a JObject that we will pass to ParseMove to verify. Note that we're using the Newtonsoft JSON library here.
JObject obj = JsonConvert.DeserializeObject<JObject>(m["move"].ToString());
All moves have a direction and a number of steps to take, so we initialise a couple variables to hold those values. The initial values are arbitrary and will change in ParseMove.
Direction dir = Direction.UP;
Int32 steps = 0;
As stated above, error checking is critical. Our ParseMove method will determine if a move is valid or not, and will update values for the parameters we pass in as they are being passed by reference (ref). In particular, we'll be using the values for dir and steps later on.
if (!HelperFunctions.ParseMove(ref obj, ref dir, ref steps))
{
    continue;
}
If the move isn't valid, we continue, i.e. we stop where we are in the loop and start over with the next move (m) inside of our blockDataS object.
We need a PlayerState, so we allocate memory for one.
PlayerState p;
It's important to know whether we have an existing name (game account) or if this player is already in the game. In our first step above, we assigned a value to our string variable name. Here we check to see if it already exists in our GameState object, state.
bool isNotNew = state.players.ContainsKey(name);
If it exists, then we set our PlayerState object (p) to that name. If not, we initialise our PlayerState p as a new instance of a PlayerState and then add it to our GameState (state).
if (isNotNew)
{
    p = state.players[name];
}
else
{
    p = new PlayerState();
    state.players.Add(name, p);
}
At this point, the player has been added to the game state, but we've not yet processed the move.
Here we create player undo data for MOVING players.
In the second loop, we'll add those players that have just completed their move, i.e. they are now NON-MOVING players. We can't add the non-moving players here because we process moves in the second loop.
We must create undo data for each player, so we initialise a new instance of PlayerUndo.
PlayerUndo u = new PlayerUndo();
We've not changed the PlayerState yet, so what we have in p originally comes from our oldState parameter, which we deserialised as state. We must preserve this as undo data, so we add it to our undo Dictionary.
undo.Add(name, u);
If we have a new player, then we set the is_new property of our PlayerUndo object to true and update our PlayerState (p) to place the player on the map at the origin, i.e. (0, 0).
Otherwise, we update the previous_dir and previous_steps_left with the current values in our PlayerState (p).
if (!isNotNew)
{
    u.is_new = true;
    p.x = 0;
    p.y = 0;
}
else
{
    u.previous_dir = p.dir;
    u.previous_steps_left = p.steps_left;
}
Finally, we update our PlayerState (p) with the new direction and number of steps left. Recall from above that we obtained these values when we called the HelperFunctions.ParseMove method with dir and steps being passed in by reference. Refer to the ParseMove method for how this is done.
p.dir = dir;
p.steps_left = steps;
That completes our first loop. To summarize what we did here:
- We initialised variables
- We checked to see if we had a valid move (this updated values for us)
- We determined if we had a new or existing player and updated as required
- We saved the
PlayerStateas undo data and stored it in ourundoobject - We finally updated the move in our
PlayerState(this did not process the move - see below for that) - We looped back and did 1-5 for all moves
Our second loop iterates over each player state to process the move that was added to the player state above, and to add undo data for players that are no longer moving.
The second loop iterates over all players. Here's the loop declaration:
foreach (var mi in state.players)
For each player, we get the name and PlayerState into variables.
string name = mi.Key;
PlayerState p = mi.Value;
If the player isn't moving, then we stop and skip back to the beginning of the loop and start again with a new player.
if (p.dir == Direction.NONE)
{
    continue;
}
Similarly for steps, if they have 0 or fewer steps to go, we skip back to the top of the loop. For situations like this, you should do error checking as people may issue commands through the QT or daemon for negative steps in a direction, which is equivalent to positive steps in the diametrically opposed direction. We're skipping those kinds of error checks here for simplicity, but you should be aware that people can issue arbitrary commands, so error checking is an absolute imperative.
if (p.steps_left <= 0)
{
    continue;
}
Next, we initialise a couple integers for the player's move, then update those variables by passing them by reference to our HelperFunctions.GetDirectionOffset method, and update our PlayerState (p).
Int32 dx = 0, dy = 0;
HelperFunctions.GetDirectionOffset(p.dir, ref dx, ref dy);
p.x += dx;
p.y += dy;
As we've now "used" that move by updating the PlayerState, we must decrement the number of steps left for it to go.
p.steps_left -= 1;
If there are no steps left for that player, then we set undo data and do some cleanup.
In the first loop, we added undo data for MOVING players. Now we must add undo data for players that have just completed their move.
For the undo data, we check whether the player already exists in our undo Dictionary and add the player by name. If not, we create a new PlayerUndo and then add that to our undo Dictionary with the player's name.
To clean up, we set the finished_dir of the PlayerUndo object and set the PlayerState's dir property to Direction.NONE, i.e. there are no steps left.
if (p.steps_left == 0)
{
    PlayerUndo u;

    if (undo.ContainsKey(name))
    {
        u = undo[name];
    }
    else
    {
        u = new PlayerUndo();
        undo.Add(name, u);
    }

    u.finished_dir = p.dir;
    p.dir = Direction.NONE;
}
Finally, we set the undoData parameter and the newData (the new game state) parameter (that was passed by reference) and return undoData.
undoData = JsonConvert.SerializeObject(undo);
newData = JsonConvert.SerializeObject(state);
return undoData;
To quickly summarize forwardCallbackResult:
- We received data and set up variables, including a
GameState - We checked for errors and new moves
- We updated moves for all players in our game state
- We created undo data for moving players in case we encounter a fork/reorg
- We processed all moves
- We added undo data for non-moving players
- We updated our
GameStateand undo data - We returned our
GameStateand undo data
backwardCallbackResult rolls back the game state by 1 block with the undo data from the previous block. It is similar to forwardCallbackResult, but we don't create any undo data because we're consuming some undo data.
In a production game, you will likely want to store more undo data than just for 1 block. This allows you to have a greater buffer in the unlikely event that you discover that you've been on a fork for more than 1 block. Remember, you can always post questions in the XAYA Development forums at https://forum.xaya.io/forum/6-development/.
Here's the method signature:
public static string backwardCallbackResult(string newState,
	string blockData,
	string undoData)
-
newState: OurGameStatedata -
blockData: This is unused in this example -
undoData: This is the data we use to roll back the game state by 1 block
To start, we initialise GameState and UndoData objects with deserialised data from our parameters.
GameState state = JsonConvert.DeserializeObject<GameState>(newState);
UndoData undo = JsonConvert.DeserializeObject<UndoData>(undoData);
Any given block can have new players join, so we need to keep track of those independently. We'll do that in a string list.
List<string> playersToRemove = new List<string>();
We need to check each player to see if they need to be rolled back. We do this by iterating through all players in the game state.
foreach (var mi in state.players)
To start our loop, we initialise some variables. We need to know the player's name and PlayerState. We get this from mi. A PlayerUndo variable is also created as null.
string name = mi.Key;
PlayerState p = mi.Value;
PlayerUndo u;
We only need to undo a player if they exist in our undo data, so we create a boolean flag for us to use and set its value.
undoIt = undo.players.ContainsKey(name);
The first thing to do if a player needs to be rewound, is to check if they are new players and add them to our playersToRemove list. We get the specific player through undo.players[name] and then we check the is_new property. Also, if the player is a new player, then we skip to the top of the loop. We'll remove the new players all at once later with our playersToRemove list.
if (undoIt)
{
    u = undo.players[name];

    if (u.is_new)
    {
        playersToRemove.Add(name);
        continue;
    }
}
Next, if the player has not finished moving according to the undo data, i.e. their Direction is not Direction.NONE, then we must check whether or not their current direction is NONE and they have no steps left. If so, we set their current direction to their undo data direction.
if (undoIt)
{
    u = undo.players[name];

    if (u.finished_dir != Direction.NONE)
    {
        if (p.dir == Direction.NONE && p.steps_left == 0)
        {
            p.dir = u.finished_dir;
        }
    }
}
Now, for all players we check if their current direction is not NONE. If so, we add a step and subtract the direction offset from their current position.
if (p.dir != Direction.NONE)
{
    p.steps_left += 1;
    Int32 dx = 0, dy = 0;
    HelperFunctions.GetDirectionOffset(p.dir, ref dx, ref dy);
    p.x -= dx;
    p.y -= dy;
}
To undo a player move we must set their current player state to their undo player state if our undoIt boolean flag is set for this player (this was set above in bool undoIt = undo.players.ContainsKey(name);).
So, for all players in the undo data, if their direction is not NONE, we set their current player state direction to the direction in the undo data. This effectively undoes their direction.
We also set their current player state steps to the number of steps in their undo data if it's not our default value of 99999999.
if (undoIt)
{
    u = undo.players[name];

    if (u.previous_dir != Direction.NONE)
    {
        p.dir = u.previous_dir;
    }

    if (u.previous_steps_left != 99999999)
    {
        p.steps_left = u.previous_steps_left;
    }
}
This effectively completes undoing the player's last move so we return back to the start of the loop, i.e.:
foreach (var mi in state.players)
That completes our loop over the players. The only remaining step to rewind 1 block is to remove all the new players that we stored in playersToRemove.
foreach (string nm in playersToRemove)
{
    state.players.Remove(nm);
}
Finally, we return the serialised GameState object so we can update the game state.
return JsonConvert.SerializeObject(state);
Your game will require more complex logic to undo a block, but the above should suffice to illustrate the general technique.
After creating the game logic, it's time to update the front end for the user. There are 2 important methods in MoveGUIAndGameController.
- Update
- RedrawGameClient
Update is automatically called by Unity. In it, we check to see if the game screen needs to be redrawn/updated.
void Update()
{
    if (needsRedraw)
    {
        needsRedraw = false;
        RedrawGameClient();
    }
}
As we saw above, the needsRedraw flag is set to true whenever new information comes in from XAYAWrapper. It was set in XAYAConnector.WaitForChangesInner.
MoveGUIAndGameController.Instance.needsRedraw = true;
If needsRedraw is true, it's set to false and RedrawGameClient is called.
RedrawGameClient is where the GameState (state) is consumed in order to process all the moves that were included in the last mined block and update the display.
Mover is very simple. To update the map, it's cleared and then each player is added inside a loop.
foreach (KeyValuePair<string, PlayerState> pDic in state.players)
pDic is used to set the coordinates as the player is placed on the map.
player.GetComponent<RectTransform>().anchoredPosition
	= new Vector3(pWidth * pDic.Value.x, pWidth * pDic.Value.y, 0);
Most everything else in the RedrawGameClient method is regular code.