Setup Notes - Oliver-Mustoe/Oliver-Mustoe-Tech-Journal GitHub Wiki
This page will detail all the steps I took in Lab-2
Server 2019
In this section I detail the steps I took to setup the Active Directory VM
Notes
First I edited the virtual machines properties in "VM Hardware" and adjusted the Network adapter 1 to have "DNES-255-LAN-oliver.mustoe" selected.
I then stared the VM via "Launch Remote Console" (The VM will prompt you to press ctrl-alt-delete, use ctrl-alt-insert instead for VMware) and then proceded with the setup of the VM with default setting except for:
- Product Key > Do this later Don't remember running into this but still good to know
- Set a Administrator password - REMEMBER THIS
Host and Network Configuration
This section will detail the steps I took to configure the server
Notes
When I launch the VM Server Manager this comes up automatically, but incase it doesn't search for "Server Manager" in the search bar.
I went to Local Server Manager, left selection bar, and set the following:
To access the network related options, first four below, click near "Ethernet0" in properties or paste "Control Panel\Network and Internet\Network Connections" into the address bar in control panel > Right click ethernet > properties
- IP Address: 10.0.5.5
- Netmask: 255.255.255.0
- Gateway 10.0.5.2 (Make sure fw01 is running).
- DNS 10.0.5.2
- Discoverable option. If this dialog shows up, select Yes for those systems on your LAN.
- Time should be set to UTC-5:00 Eastern Time (US & Canada)
- Computer name: ad01-yourname (make sure you get this right).
Double check these as it is easy to mistype after all this I rebooted and the config should looked like this:
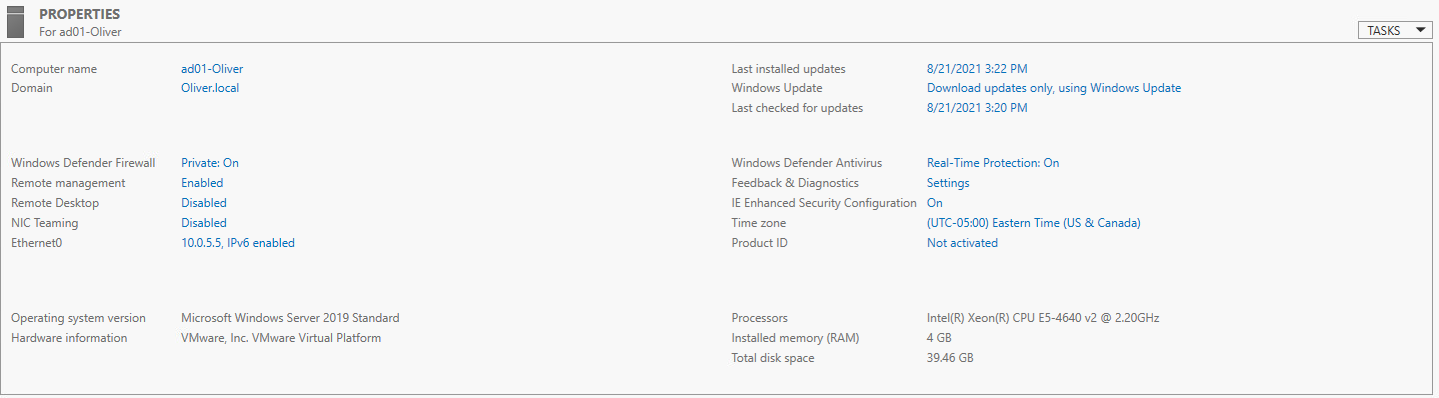
NOTE: Some options outside of the ones set above may look different, this is fine, this screenshot was taken at the end of installation so it can also be used as a model for that as well
Check-1
At this point I check that I was on the right track with the commands:
- whoami
- ping google.com
And everything worked as it should
Installing the ADDS Role
In this section I detail the steps I took to setup ADDS Roles
Notes
From Server Manager I went to the top right to the "Manage" dropdown menu and selected "Add Roles and Features". Many settings in this setup are default so take your time and if it is not mentioned leave it as is and press next.
In "Server Roles" when a list of check boxs appears I selected "Active Directory Domain Services" and when it asks to "Add Features" (MAKE SURE MANAGEMENT TOOLS IS CHECKED) I clicked it. I then clicked the restart server option and selected yes on the confirmation, then selected yes at the "restart now" option.
Promotion
In this section I detail the steps I took to setup the server as the primary domain controller for my domain (firstname.local).
Notes
After the installation above I clicked the link "Promote this server to a domain controller".
Firstly I clicked the "Add new forest" deployment operation and named the root domain "firstname.local". I then entered a DSRM password, REMEBER THIS as it is used to recover the directory in case of error.
DNS Error
A DNS error may be shown during installation, as this is a internal domain I did not change anything.
After installation and a reboot, I logged back in as the Domain admin not the local admin using the Admin password set above.
DNS
In this section I detail the steps I took to setup DNS functionality
Notes
From the Server manager I went to the DNS section in the left sidebar > Right clicked the only server in the "Server" tab > from the dropdown select "DNS Manager" (towards the bottom).
Forward DNS
In the "Forward Lookup Zones" section > firstname.local section I checked for a entry for ad01-firstname, which there was one, then I right clicked on firstname.local and from the dropdown menu selected "New Host". I then filled out the following info:
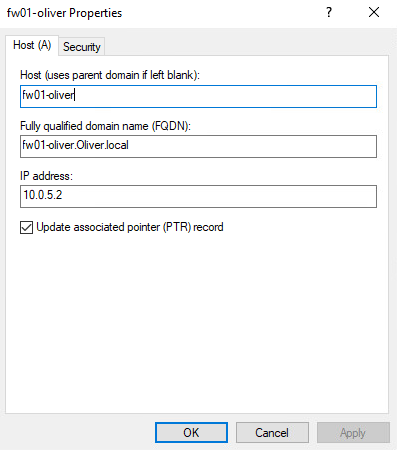
This will provide an error, click ok, that will be fixed in the next sub-section
Reverse DNS
Next I right clicked on "Reverse Lookup Zones" and selected the first option to create a new zone. In the setup wizard I would fill in "10.0.5" in the network ID section. Then I went back to fw01-firstname and ad01-firstname and:
- Unchecked update
- Apply
- Check update
- Apply
To check this worked I kept expanding/refreshing the reverse lookup zone's section till I found an entry for fw01 and ad01.
Creating Named Domain Users
In this section I detail how I created 2 named domain users on ad01, a named domain admin and a named non-priviledged user account.
REMEMBER ALL PASSWORDS
Notes
In server manager I selected "AD DS" in the left sidebar and right clicked the only server in the servers tab and selected "Active Directory Users and Computers". I right clicked the "Users" folder and selected "New" > "User".
I then configured the Admin user with my first and last name BUT I added (adm) to the end in the full name category.
In user logon name I filled it out with "first.lastname-adm". I continued with the wizard and gave it a password while unselecting the option to make the user have to remake password at login.
I would make a second user with the same information EXCEPT not including "adm" anywhere and a different password.
I then added the "adm" account, found by expanding users and looking in the name section, to Domain Admins by:
- Right clicking the account
- Clicking "Add to a group"
- Then adding "Domain Admins" to the write in section, bottom text box, then clicking ok.
Joining WKS01 to your new domain
In this section I will detail how I added WKS01 to my new domain.
ANYTIME A NEW SYSTEM JOINS A DOMAIN IT MUST REFER TO THE DOMAIN'S DNS SERVER DESCRIBED IN THIS SECTION
Notes
First I went to where I setup the Windows machines initial IPv4 information, refer to earlier sections, Windows 10 workstation setup, or idoc's guide here if needed.
In here I set the DNS to "10.0.5.5" then clicked ok, to test this is working I pinged firstname.local in powershell and it worked.
In the same section I set the Windows workstations name, refer to Windows 10 workstation setup, I changed "Member of" to domain, then set the domain to firstname.local.
This will come with a prompt to login, where I used the adm accounts logon info created in above sections to login, after this I restarted.
From now on, on the Windows workstation, login with one of the two domain accounts made above depending on priviledge needs*