Classification and Palette editor - ObjectVision/GeoDMS GitHub Wiki
User Guide GeoDMS GUI - classification and palette editor
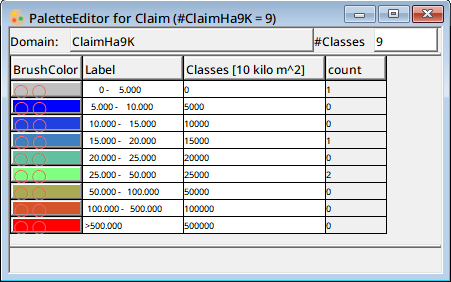
The (number of) classes, the type of classification and the colors used for each class can be edited with the classification and palette editor.
Edits made with this editor are only in use for the current session. If you want to save the edits, you need to add or edit the relevant configuration file, see the section classification.
Since GeoDMS 20.18.0 a color, a label or a class break can also be edited when the data item behind it has a calculation rule. The configured item is never written: the values it currently computes are copied into a view-local item under /Desktops/<desktop>/ViewData/ on the first edit, the layer is re-themed onto that copy, and every following edit of the same cell goes there. See Map View Legend for what is and is not copied; changing the number of classes resizes the class unit itself and is not covered by this copy.
The editor is activated from the Map View Legend, with the pop-up menu option: Edit Palette on a layer with a classification.
Since GeoDMS 20.18.0 the pop-up menu of the editor itself (right mouse click outside the columns) offers Copy Classbreaks and Paste Classbreaks, next to the Classify submenu. Together with the same two options in the Map View Legend pop-up menu they carry a classification, with its colors and labels, from one view to another over the clipboard. See the Map View Legend for the clipboard format, and for what happens when the classification of the target layer is configured rather than generated for the view.
-
BrushColor: a column showing the colors used as BrushColor. Individual colors can be edited by double-clicking on a specific color cell. A color dialogue appears. Since GeoDMS 20.16.0 this is the Qt color dialogue instead of the Windows common control, which also makes it available on Linux; it has an opacity slider, where 0% sets the color to fully transparent. Only fully opaque and fully transparent are drawn: pick an intermediate opacity and the color is stored as the nearest of the two, with a warning in the event log saying which. The pop-up menu option for this column contains (additional to the generic applicable table column menu options) the following options:
- Remove BrushColor: remove the column from the view.
- ramp Colors: ramp the colors between the start and end color or between the start and an intermediate color and between an intermediate color and the end color. To set an intermediate color, select a cell in the column, choose a color and keep the cell highlighted.
- Change Brush/Pen Color: select a color from a palette editor or set the color to fully transparent for the brush or the pen.
- Classify data item: classify the original data item, see the class’s column.
- Classes : split and merge to split the current class or merge two or more existing classes.
-
LabelText: individual labels can be edited by activating the cell and typing a new label or by pressing the F2 function key and editing the current label. The pop-up menu option for this column contains (additional to the generic applicable table column menu options) the following options:
- Remove LabelText: remove the column from the view.
- Classify data item: classify the original data item, see the class’s column.
- Classes : split and merge to split the current class or merge two or more existing classes.
- ReLabel: relabel the contents of the label column with derived labels from the class boundaries
-
classBreaks: individual classes can be edited by activating the cell and typing a new class value or by pressing the F2 function key and editing the current class value. The pop-up menu option for this column contains (additional to the generic applicable table column menu options) the following options:
- Remove ClassBreaks: remove the column from the view
-
Classify data item. reclassify the original data item. First, specify the number of requested classes in the class’s text box. Next, select one of the types of classifications that are available:
- Unique values (available for all data items with a number of unique occurrences that fits in the range of the domain unit): a class is added for each value that occurs in the data item. The number of classes is based on the number of unique occurrences. The maximum number of classes is dependent on the domain unit of the class unit.
- Equal counts non-zero (available when the data item has two or more different values and contains 0 or values of both signs): as Equal counts, but with the value 0 treated separately; the class breaks are those of ClassifyNonzeroEqualCount (since 20.23.1).
- Equal counts (available for all data items): the occurring data items are split up into classes with, as far as possible, an equal count of occurrences in each class. The class breaks are first set to the number of sorted data elements (excluding the no data values) divided by the number of requested classes. Each class break is checked to determine whether the next data element has the same value as the data element at the break. If this is the case, the class break is increased to the next data element, until a data element is found with a new value. If this data element is not found before the next class break, the last class break is removed and the number of classes is decreased by one class.
- Equal intervals non-zero (available with two or more requested classes, when the data item has two or more different values and contains 0 or values of both signs): as Equal intervals, but with the value 0 treated separately; the class breaks are those of ClassifyNonzeroEqualInterval.
- Equal intervals (available for all data items): the range of the data in a data item, or the specified range of a values unit, is split up in intervals of the same size. If no range is specified the default range for the value type of the unit is used.
- JenksFisher non-zero (available with two or more requested classes, when the data item has more different values than requested classes and contains 0 or values of both signs): as JenksFisher, but with the value 0 treated separately; the class breaks are those of ClassifyNonzeroJenksFisher.
- JenksFisher : applies the JenksFisher classification method to minimize the variance within each class.
- Logarithmic intervals (available for all items with a minimum value of zero): the range of the data in a data item or the specified range of values unit is split up in intervals of the same size using a logarithmic distribution. If no range is specified the default range for the value type of the unit is used.
- Classes : split and merge to split the current class or merge two or more existing classes.
-
Count: a derived column, showing the number of elements in each class. The values can not be edited. The pop-up menu option for this column contains (additional to the generic applicable table column menu options) the following options:
- Remove count: remove the column from the view.
- Ramp values: option is disabled.
- Classify data item: classify the original data item, see the class’s column.
- Classes : split and merge to split the current class or merge two or more existing classes.