DocRealtime - Maproom/qmapshack GitHub Wiki
Prev (Areas) | Home | Manual | Index | (Database) Next
Table of contents
- Realtime applications
Realtime applications
Valid from patch version 3933a3a (Mon Mar 6 14:32:38 2023 +0100).
General description
QMapShack offers limited support for handling realtime positional data. Currently, the following data sources can be used in QMS:
- OpenSky flight data
- AIS vessel positions
- GPS location data (GPS Tether)
To use these realtime data click first the Window - Realtime entry in the main menu to open the realtime window. This window is empty after opening it the first time. To activate a realtime application right-click in the window and select Add source. A new window pops up where you can select an available application. Click the Ok button to activate the selected application. Repeat this step to activate more applications.
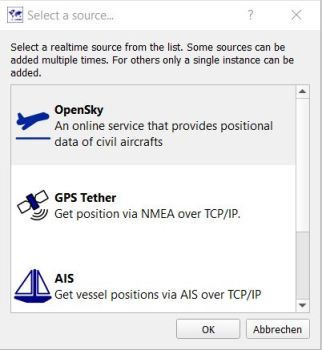
The active sources are now displayed in the realtime window. They need further general and application-specific configuration to get the data from their source.
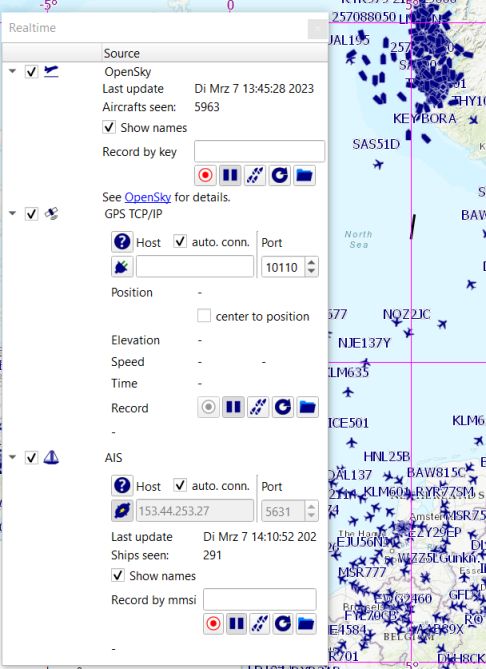
An active data source can be deleted (deactivated) with the help of a right-click on the data source header line and clicking the context menu entry Delete source.
Each of the applications has a toolbar of the form

To prepare (configure) the application the following general initial toolbar procedure is recommended for each data source:
- Be sure the second icon with tooltip
Pause recordingis pressed. - Click the rightmost icon with initial tooltip
Select record file. This opens a file selection window. Define a filename and a path for a file where the realtime data can be saved (default extension:.rec). After selecting a record file, the tooltip of this icon changes to the name of the selected file. - Click the fourth icon with tooltip
Reset recordand confirm, if required, the reset of the content of the record file. - Now, the first icon with tooltip
Start recordingshould be active (red). - Insert, if required, a server address and port in the respective fields.
- Click the connect icon (
 ). The connection between QMS and the data source will be established and the icon changes to show that the connection is established (
 ). If the
 auto.conn.checkbox is selected, then the connection is established automatically. - If necessary, continue with application-specific configuration.
As soon as the connection is established between the data source and QMS and realtime data is reaching QMS an animated line joining the received locations of selected objects (aircraft or vessels) is displayed in the QMS map window (without activated recording only a moving object and no animated line is shown).
OpenSky flight data
Activate the OpenSky data source as described in the previous section.
The OpenSky Network provides realtime flight data (aircraft information). The given application uses this data and displays graphically information about a selected aircraft moving within the map area. Remark: There exists an access restriction for the service: anonymous users have a limit of 8 min, registered users of 80 min per day.
As soon as the computer is connected to the Internet, the QMS map window shows small blue moving aircraft. Moving the mouse on an aircraft the available flight data is displayed in a pop-up window.
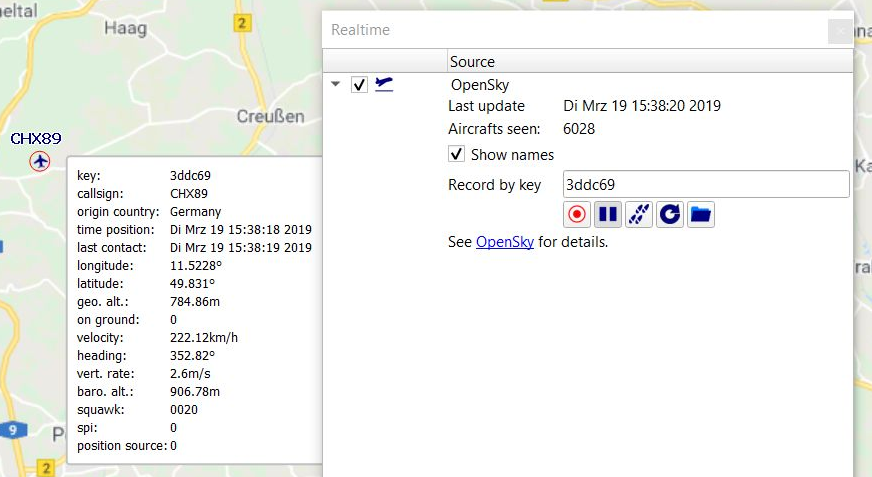
The flight of an aircraft can be recorded by
- finding the flight key in the aircraft info window and inserting it into the
Record by keyedit field of the realtime window and - pressing the record icon
 in the toolbar.
The flight track of the aircraft is then shown in the map window as animated line.

Use the pause button  to pause or stop recording. The record can be converted into a proper QMS track contained in a workspace project by clicking the track button
 ![]() .
.
AIS vessel positions
AIS (Automatic Identification System) is a widely used method of transmitting information such as identification, position, course, and speed from vessels equipped with suitable transponders to maritime authorities. A server transmitting AIS data for vessels off the coast of Norway is https://www.kystverket.no/en/navigation-and-monitoring/ais/access-to-ais-data.
To show vessels locations off the coast of Norway in QMS proceed as follows:
- Right-click in the realtime window and add the AIS data source.
- Insert
153.44.253.27in the server address field and5631in the port field. - Press the connect icon (
 )
)
Vessels moving near Stavanger (Norway) or Svalbard are now displayed.
If the Show names checkbox is selected and if the AIS data obtained provide the vessel name, then the vessel name is shown next to the vessel. Otherwise, its mmsi
(Maritime Mobile Service Identity code) is shown.
Moving the mouse pointer on a vessel pops up information about the vessel. The volume of information depends on the data transmitted by the vessel via AIS:
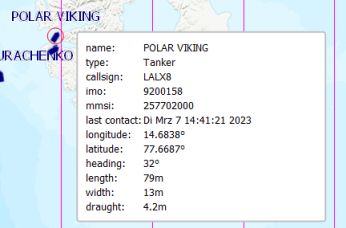
(Remark: IMO: ship identification number)
GPS location data
General remarks
Using this data source QMS can display the location transmitted by a GPS receiver on your favorite QMS map. The application is using the following (data) model:

This model is based on 2 assumptions:
- GPS location data should be in NMEA form. Most GPS receivers and loggers support this data format after appropriate configuration.
- QMS can handle the GPS data only if it can be obtained via TCP.
Tested GPS receivers are
- Android smartphones with GPS support.
- Garmin GPSMap 64s, GPSMap 60CSX, Garmin Etrex Vista, and similar devices.
- NL 8002 U Multi GNSS Receivers.
- NMEA data saved in file form and streamed to an appropriate TCP server (virtual GPS receiver, GPS replay).
The hardware of a GPS receiver connected to a PC can appear in various forms. Older devices are connected using a serial interface. Other devices have their proprietary device type (e.g. Garmin GPSMap 64s). Different operating systems handle the hardware attached to the PC differently. Various NMEA data transmitters (TCP servers) can be used with GPS receivers. As a consequence, there is no unique approach for using different GPS receivers. This page describes in the following sections a few typical and tested use cases.
GPS Tether on Android smartphones
In this use case, it is assumed that the smartphone has a GPS receiver. The NMEA data transmitter is located on the smartphone itself.
This TCP server together with QMS as TCP client needs a few installation and configuration steps on the smartphone and the PC:
-
Download and install GPS Tether on the Android smartphone.
-
Establish Ethernet connection
- Connect the PC running QMS and the smartphone either via a mobile hotspot or via Wi-Fi (both devices should be in the same network!).
-
Configuration of the Android smartphone with GPS
-
Activate GPS on the smartphone.
-
Start
GPS Tetheron the smartphone. -
In the
Sharingtab clickWi-Fi Hotspot Sharing. After being connected to the PC this tab displays the smartphone IP address and the port required for the QMS configuration: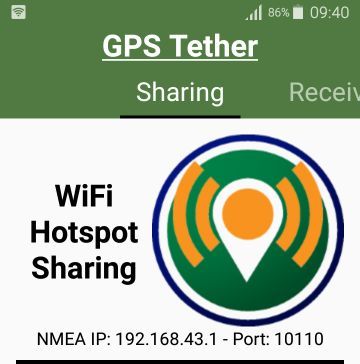
-
In the
Settingstab activateEnable NMEA Wi-Fi sharing. Remember the TCP port shown.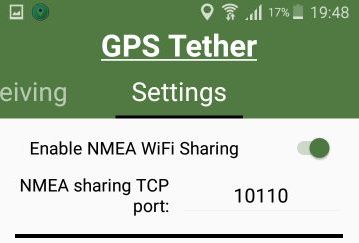
-
If everything is ready for use a notification is shown on the smartphone main page:
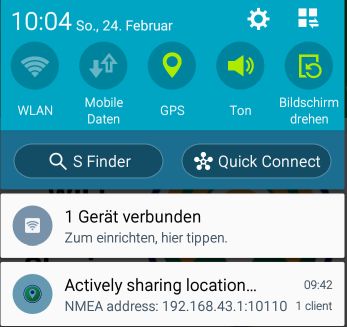
Remark: There are many smartphone applications working in the same way as
GPS Tetherdoes. The user is encouraged to try them out as NMEA data transmitters.
-
-
Configuration of QMS
- Activate the GPS Tether data source as described at the top of this page.
- Insert the IP address of the smartphone and the port number into the respective edit fields.
- Click the connect icon (
 ). The connection between QMS and
 GPS Tetheron the smartphone will be established and the icon changes to show the connection ( ).
).
Using serial interface and Ncat (Windows OS)
(Contributed by Helmut Schmidt)
Many GPS receivers (e.g. the above-mentioned NL 8002 U Multi GNSS receiver and older Garmin devices) provide a (virtual) serial interface. Nowadays, devices with a serial interface are connected with a USB-to-Serial adapter to a PC. Check, if your operating system detects the serial interface provided by the adapter!
Ncat is a networking utility for the Windows operating system which reads and writes data across networks from the commandline. Ncat was written for the Nmap Project. It can be used as NMEA data transmitter.
Proceed as follows to use this transmitter:
-
Activate NMEA data transmission in the GPS receiver.
-
Download the
netcat/Nmappackage for Windows from https://nmap.org/download.html (download file https://nmap.org/dist/nmap-7.70-win32.zip) and unzip it. -
Identify the serial (COM) port provided by the GPS receiver with the help of the Windows device manager or similar tools.
-
Call
ncat -v -l 1234 < COM5from the commandline (replaceCOM5with the COM port found in the previous point!). This startsNcatas TCP server transmitting NMEA data from the receiver via TCP. The following lines are shown in the commandline window after the server start:ncat -v -l 1234 < COM5 Ncat: Version 7.70 ( https://nmap.org/ncat ) Ncat: Listening on :::1234 Ncat: Listening on 0.0.0.0:1234 -
After connection lines of the following form appear:
Ncat: Connection from ::1. Ncat: Connection from ::1:60629. -
Go to the QMS realtime window and insert
localhostas host name and1234as port number into the respective edit fields. -
Click the connect icon (
 ). The connection between QMS and
 GPS Tetheron the smartphone will be established and the icon changes to show the connection ( ).
).
Python server for Linux-like OS
(Author of Python script: Henrik Schulz)
Assume a GPS receiver is connected via a serial interface to a PC running a Linux-like operating system.
The Python script which can be downloaded from here works as a data transmitter. The script tries first to find a serial port following a given device naming pattern. If such a serial port is found, then it starts a TCP server transmitting NMEA data from the GPS receiver (should be activated for NMEA data transmission!) to a TCP client (QMS).
Due to the device naming pattern used the script can only be used on operating systems having the given naming pattern for its hardware (Linux-like systems). It can't be used without changes on a Windows PC.
The script should be started from a commandline. The parameters that should be supplied to the script can be revealed with the help of a call of the form:
gpsserver.py -h
which gives the following information:
gpsserver.py -h
usage: gpsserver.py [-h] [--port PORT] [--host HOST] [--device DEVICE]
                    [--device-directory DEVICE_DIRECTORY]

optional arguments:
-h, --help            show this help message and exit
--port PORT           provide port to listen to, default=10000
--host HOST           provide host name to listen, default=localhost
--device DEVICE       provide device pattern, e.g. ttyACM without number,
                      default=ttyACM
--device-directory DEVICE_DIRECTORY
                      provide device directory, e.g. /dev, default=/dev
Configure and use QMS as described for GPS Tether on smartphones.
Remark: The Python script imports the serial module. This module should be installed first.
Track replay
Tracks recorded by a GPS device are typically saved as GPX or similar files and not as NMEA files. The well-known GPSBabel tool converts tracks and other GPS data between different formats. For example, GPSBabel can convert a GPX file with recorded GPS data into an NMEA file. Therefore, GPSBabel can be used as a virtual GPS receiver and replay the recorded data via a TCP server into QMS. An advantage of GPSBabel is the control over the frequency of the data output. The only restrictions are the (quite reasonable) requirements imposed on NMEA data by QMS. On output of NMEA GGA sentences GPSBabel sets the Fix quality to 0 and adds microseconds to timestamps. These 2 data items can be easily corrected with a small script reading the GPSBabel NMEA output, changing the 2 items properly and forwarding the corrected output to the TCP server.
Start the TCP server on a commandline with a sequence of commands as follows:
GPSBabel.exe -t -i gpx -f RecordedTrack.gpx -o nmea,gpgga=1,gprmc=0,gpvtg=0,gpgsa=0,pause=3 -F - | nmeahandler.py | ncat.exe -v -l 1234
Here, GPSBabel converts the GPX data of the input file to NMEA GGA sentences only and streams them to the nmeahandler.py script which carries out the described data update and forwards the updated data to the TCP server. Each NMEA data sentence is sent by GPSBabel after a 3 seconds pause. Ncat is used in the example as TCP server. The next image shows the result of such a procedure in QMS.
NMEA GGA sentences have only time but no date information. The timestamp displayed in the realtime window is composed of the date of the replay and the UTC time of recording!

Using Garmin devices with Windows 10
The approach described in this section is similar to the one described in the section Track replay. The only difference is the input to GPSBabel. For GPS replay a GPX file is used as GPSBabel input. Here, GPSBabel reads its input directly from the connected GPS receiver in form of NMEA data.
To get NMEA data from Garmin GPSMap 64s or a similar device on a Windows 10 PC a few configuration settings must be done:
-
Switch on the device and wait for a satellite fix.
-
Go to the main page and select
Setupand thenSystem. -
Set the interface to
Garmin spanner. -
Connect the device with a USB cable to the PC.
-
When asked
Would you like to go to mass storage?selectno(no additional disk drives are added in this case!). The device is now ready to send NMEA data to the PC using the USB interface. -
Open the Windows device manager or a similar tool. There should be a new entry
Garmin deviceswith a subentryGarmin USB GPS. Double-click the last entry and check the device information in the next window. If the device has been installed properly, then there shouldn't be an error message in this window.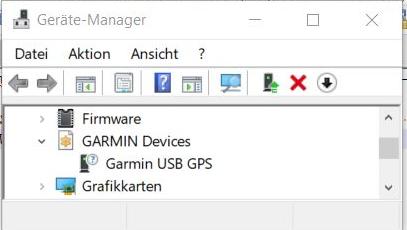
The next snapshot shows the driver details tab revealing the installed Garmin drivers for the device.

Remark: If no Garmin device appears in the device manager, then
- check if your device is connected to a serial port. In this case, use the approach described in section Using serial interface and Ncat,
- check if your device is exposed as mass storage device. In this case, restart your GPS receiver, ensure the correct settings and don't use it as mass storage device, when asked.
On a commandline a sequence of commands for starting the TCP server can look as follows:
GPSBabel.exe -T -i garmin,get_posn -f usb: -o nmea,gpgga=1,gprmc=0,gpvtg=0,gpgsa=0,pause=3 -F - | nmeahandler.py | ncat.exe -v -l 1234
Stop the transmission of data from the receiver by pressing CTRL-C in the commandline window.
Remarks:
- A Garmin GPSMap 60CSx device can be used similarly.
- Garmin Etrex Vista devices only support serial interfaces, either directly or with the help of a USB-to-Serial adapter. When using a USB-to-Serial adapter be sure that it works correctly with your operating system (insert GPSBabel option -D9 to see if and how GPSBabel establishes the serial connection). Tested was a TrendNet TU-9 adapter with a Prolific PL-2303 HXD chip and latest Windows 10 drivers. Set the interface in the Etrex Vista settings to
Garminand replaceusb:in the commandline shown above withcom9where9should be the number of the COM port for the adapter. If the Etrex Vista interface is set toNMEA, then the device sends a continuous flow of NMEA data without line end markers. These data can't be parsed by the involved tools because they assume that NMEA data is sent in records (with some line end).
Using Garmin etrex VISTA HCx with Ubuntu 20.04
Some experience using Garmin etrex Vista HCx with Ubuntu 20.04 can be found here.
QMS as TCP client
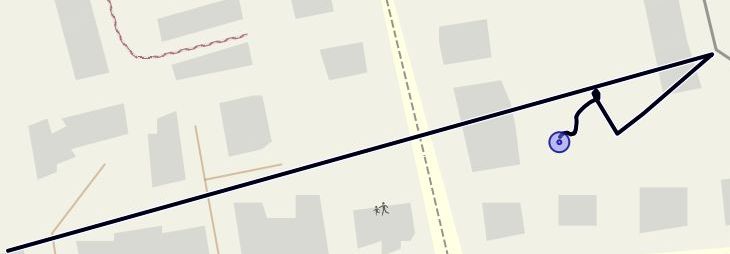
After successful configuration of the TCP server and the QMS TCP client and after establishing the connection between server and client QMS receives permanently the GPS locations transmitted by the TCP server and visualizes them as moving objects (aircraft or circles) in the map window. If the record icon is pressed, then the locations are shown as an animated line in the map window. The locations can be recorded as described in the OpenSky application section.
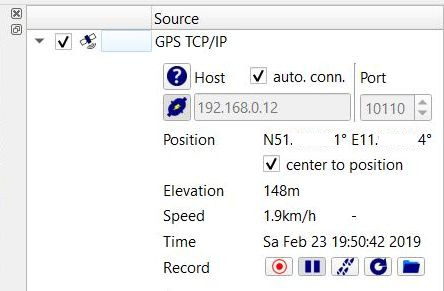
The last location (position) is shown together with other GPS data in the realtime window, too.
NMEA and other restrictions
The NMEA data format is a rather variable. Each GPS receiver may use some specific features of this format. QMS does not know about all of these conceivable formatting variants. The QMS NMEA data parser handles mainly the most commonly used NMEA sentence identifiers RMC (Recommended minimum specific GPS/Transit data) and GGA (Global Positioning System Fix Data) to get timestamp, position, elevation, and some other data.
NMEA data in QMS is valid (is used in QMS) if it fulfills the following reasonable restrictions:
RMCdata: The data fieldReceiver warningshould have the valueA(Available, ok). Sentences with other values are skipped by QMS.GGAdata: The data fieldFix qualityshould have a value>0(GPS fix). Sentences with other values are skipped by QMS.- Timestamps in both types of NMEA records should have the format
hhmmss.00(no milliseconds and00after decimal point). They are interpreted as UTC time. - The date is set to the current date for
GGAsentences in QMS (GGAsentences don't provide a date information!). - The first NMEA sentence with valid data for a given timestamp is used in QMS. If there are more sentences with the same timestamp, then they are skipped (this may lead to invalid elevation, if a valid
RMCsentence is in front of a validGGAsentence with the same timestamp).
Further on, QMS updates its data only with a 1-second frequency. If data arrives at a higher frequency, then some data might be skipped.
Prev (Areas) | Home | Manual | Index | Top | (Database) Next