Modifying 2DA tables via a DLC mod (ME1 LE1) - ME3Tweaks/LegendaryExplorer GitHub Wiki
- 55tumbl, August 2021: original version of the tutorial.
- 55tumbl, August 2023: tutorial updated to account for new features of Mod Manager.
- Mgamerz, January 2026: Added notes about Bio2DA merge. Removed references to merge mod usage
Introduction
STEP 1. Creating a DLC mod including a 2DA package file
STEP 2. Implementing our 2DA modifications
STEP 3: Informing the game that it has to load our file
In the first game of the trilogy, a lot of information is stored in the 2DA tables that can be found towards the bottom of the Engine.u (ME1) or Engine.pcc (LE1) file.
Figuring out the organisation of the data in those tables might require a little bit of digging and poking around, as it is not always trivial. But we'll assume here that the reader knows exactly what they want to modify.
There are 3 options for making a mod that modifies values in 2DA tables:
- Directly editing the values in the 2DA tables in
Engine.pcc. This is the easiest way, and it can sometimes be useful for preliminary tests of feasibility, but it is absolutely not a good option for distributing a mod. I would even recommend to avoid this for personal use mods, and to steer away from this as quickly as possible during development. It is indeed very unpractical to install-uninstall.
Caution
(Legendary Edition only) ME3Tweaks Mod Manager will automatically reset 2DA tables that shipped in the original game as part of its Bio2DA Merge feature. Turn this setting off in Mod Manager during prototyping if you decided to use this method.
- The games have a system to incorporate updates of the 2DA tables (row replacements or additions) via DLC files. Shipping updates to tables as DLC is more preferable both in terms of compatibility (it allows different mods to alter the same 2DA table) and user-friendliness (the mod can be installed / uninstalled / temporarily disabled like any DLC mod).
Warning
(Legendary Edition only) This feature is not fully implemented in LE1 due to changes made in the PS3 port of Mass Effect 1 (2011), which leads to inconsistent results. Use the Bio2DA merge feature in ME3Tweaks Mod Manager instead.
- For Legendary Edition, shipping 2DA updates via ME3Tweaks Mod Manager's Bio2DA Merge feature is the preferred method, as it provides flexibility to both the developer and the user and works properly. The files this method use are the same as #2 in this list, but they are referenced differently by the mod.
In this tutorial we will detail and illustrate the process of modifying a 2DA table via a DLC mod, by creating a very simple mod that tells the player where Earth is, and where it isn't. This will hopefully make taking Earth back slightly easier when push will come to shove. In practice, the main steps consist in 1) Creating a DLC mod that includes the necessary 2DA package file, 2) Implementing our modifications in the 2DA table, and 3) Properly informing the game that we wish our new 2DA package file to be taken into account. We will also briefly address the situation where a merge mod may be necessary.
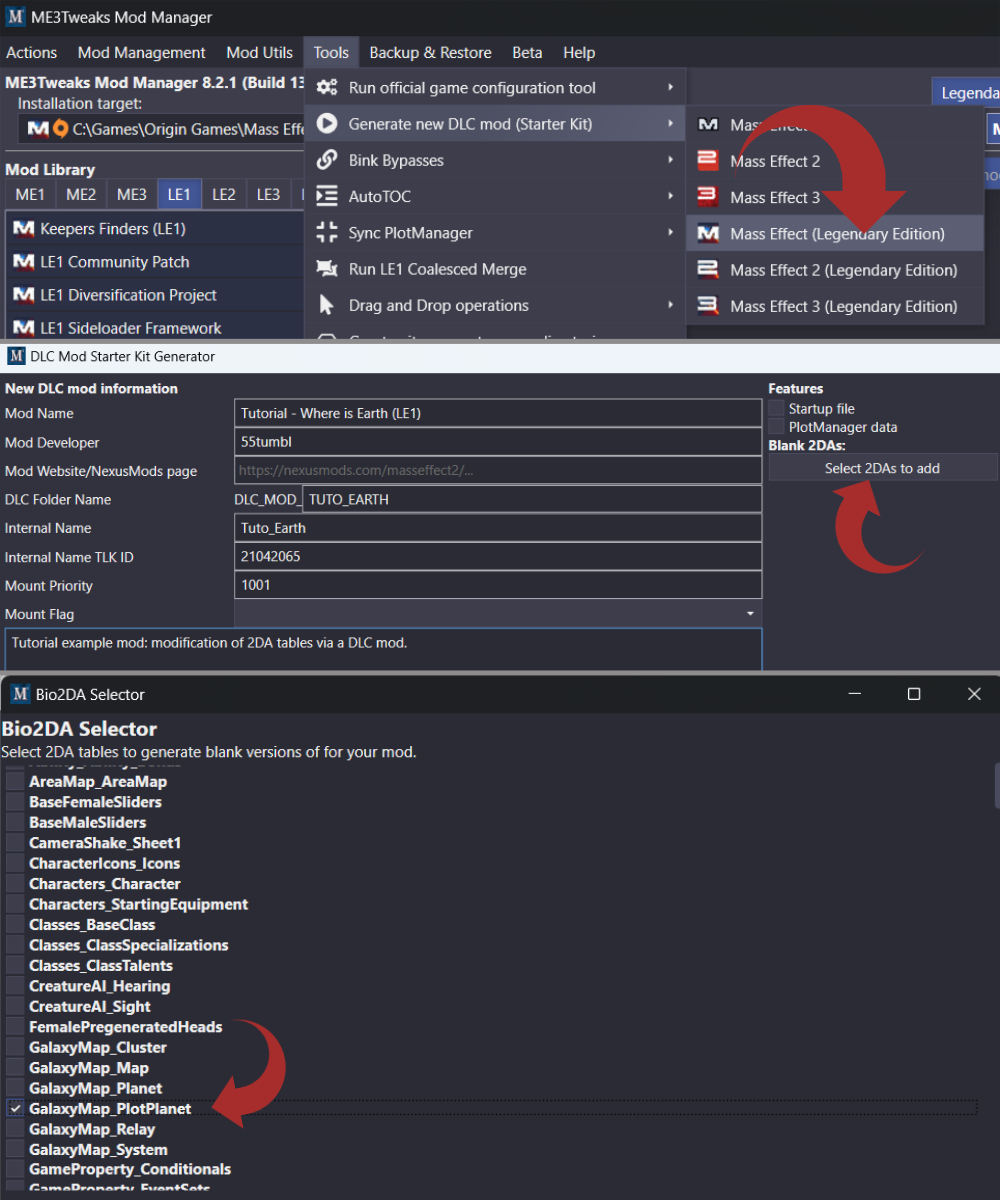
We start by creating a new DLC Starter Kit using Mod Manager, which has recently been upgraded with the option to add 2DA packages. So we simply need to check the boxes corresponding to the 2DA tables that we want to modify. Here we only want to modify GalaxyMap_PlotPlanet, which defines the trackers on the galaxy map.
Once the DLC mod has been created, we can go look inside the CookedPCConsole folder, and we'll find a file named BIOG_2DA_MOD_TUTO_EARTH_GalaxyMap_X.pcc. Note that the 2DA tables are divided into groups, with the GalaxyMap group containing the table we want to edit PlotPlanet, but also others like Cluster or Planet. If we had selected more than one table from the same group, they would end up in the same file BIOG_2DA_MOD_TUTO_EARTH_GalaxyMap_X.pcc. If we had also selected 2DA tables from another group (e.g. Equipment), a separate file would have been created.
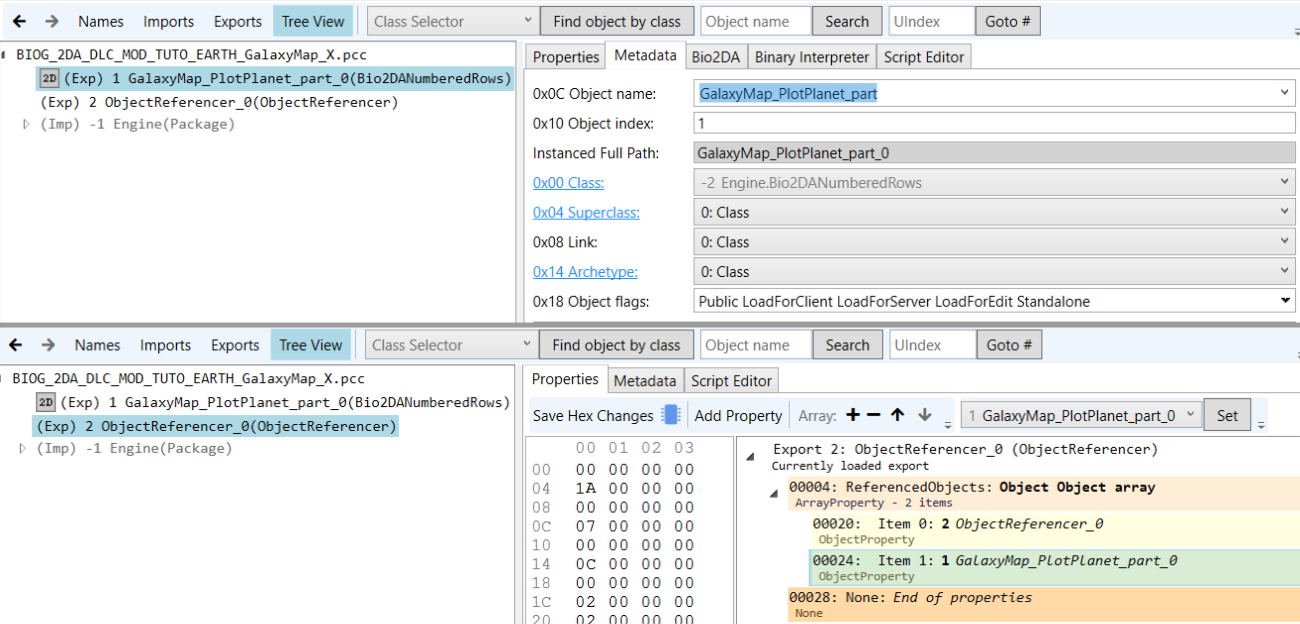
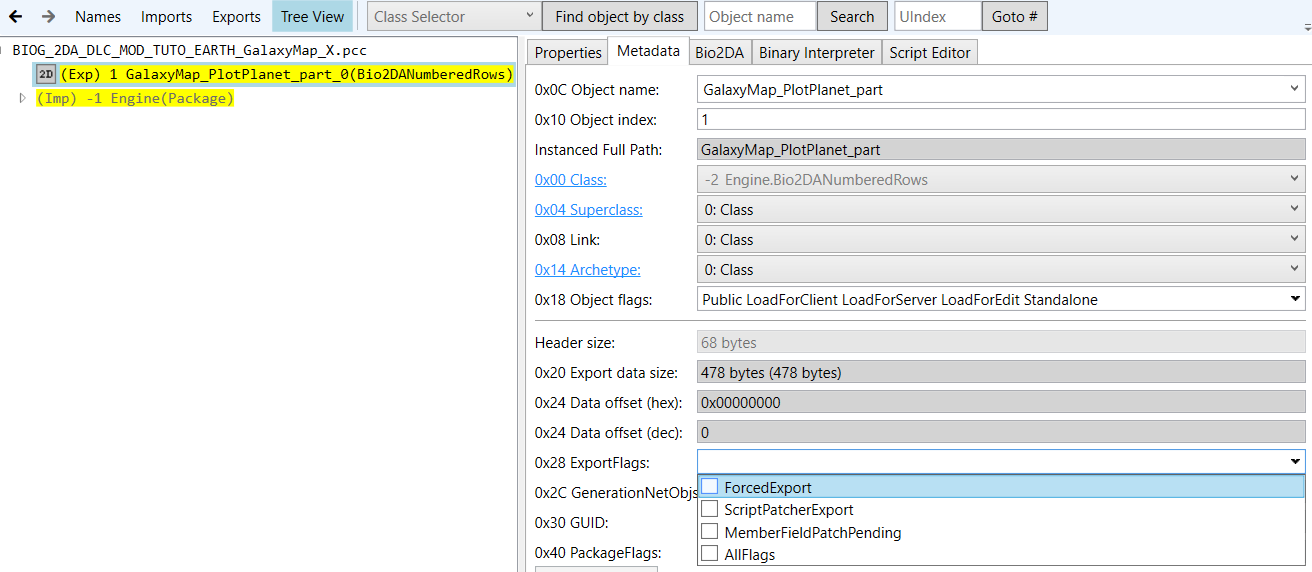
If we open BIOG_2DA_MOD_TUTO_EARTH_GalaxyMap_X.pcc with Package Editor, we'll see that it contains 2 exports:
- The empty 2DA table. Importantly, the name is somewhat different than that of the corresponding table in
Engine.pcc:
- The first part should be exactly the same as the name of the 2DA table export in Engine, in our case
GalaxyMap_PlotPlanet. - The second part is
_part, which signifies that this is not a whole new 2DA table, but an addition to the base 2DA table that is in Engine. - The last part of the displayed export name is
_#(where # is a number). This is the instance index of the object name, which can be defined underMetadata(note the displayed number is 1 unit below the value, so if the index is 1, it will show as_0, and won't show at all if the index is 0). This value is not particularly important unless you have several objects with the same name in the same file (which you should not have for 2DA tables), so you may just leave it at_0or whatever. Two mods that modify the same 2DA table will work together even if they use the same instance index.
- The ObjectReferencer (LE1 only), which should have in its properties an array named
ReferencedObjectsthat contains a reference to the ObjectReferencer itself, and to each of the 2DA tables exports. Check that it is indeed the case, and if not you can add/remove/modify the items in theReferencedObjectsarray.
Alternative: create manually the 2DA package file
Using Mod Manager's feature to create the 2DA package files along with the DLC Starter Pack is the easiest way to do this. But it is also possible to do it manually.
-
Create a New Empty Package (for LE1) using Package Editor, and name it
BIOG_2DA_DLC_MOD_TUTO_EARTH_GalaxyMap_X(replaceTUTO_EARTHby the short name of your mod, andGalaxy_Mapby the name of the group of 2DA tables). -
Open
Engine.pccin a new window of Package Editor, find the 2DA table that you want to modify, and drag&drop it into your new package file. Select "Add Only (...) as Child of Root" in the drag&drop popup menu of Package Editor. Repeat with any other 2DA tables you want to modify from the same group (e.g.GalaxyMap_Cluster). -
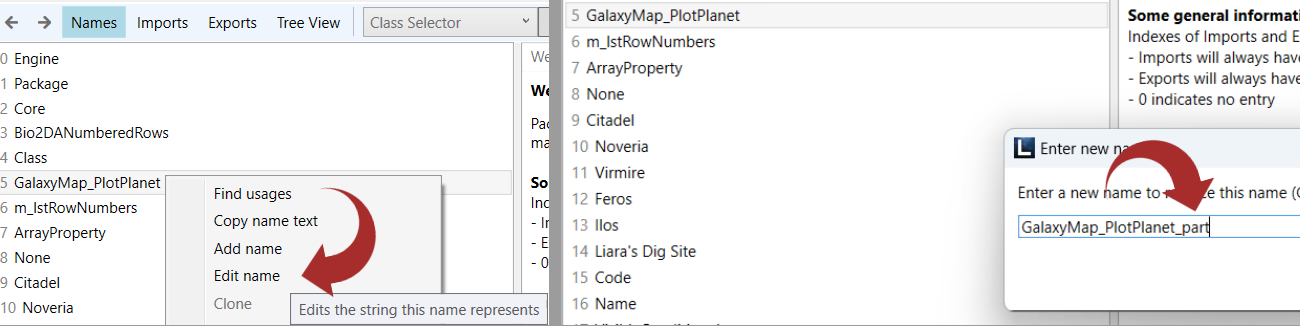
Under
Namesin your new package file, èdit the names of the 2DA tables to add_partat the end.
- Under
Tree View, for each 2DA table export, select theMetadatatab, set theObject Indexto 1, and uncheck theForcedExportflag.
-
To get an ObjectReferencer (LE1 only), you can open for example one of the vanilla files
BIOG_2DA_UNC_(...).pccin a new window of Package Editor, and drag&drop its ObjectReferencer into your new package file, again with "Add Only (...) as Child of Root". You will get a few warnings that some relinks failed, but this is normal. -
Under
Tree View, select the ObjectReferencer andPropertiestab, and make sure that theReferencedObjectsarray contains references to the ObjectReferencer itself, and to each 2DA table export in your file. Remove all other items from that array.
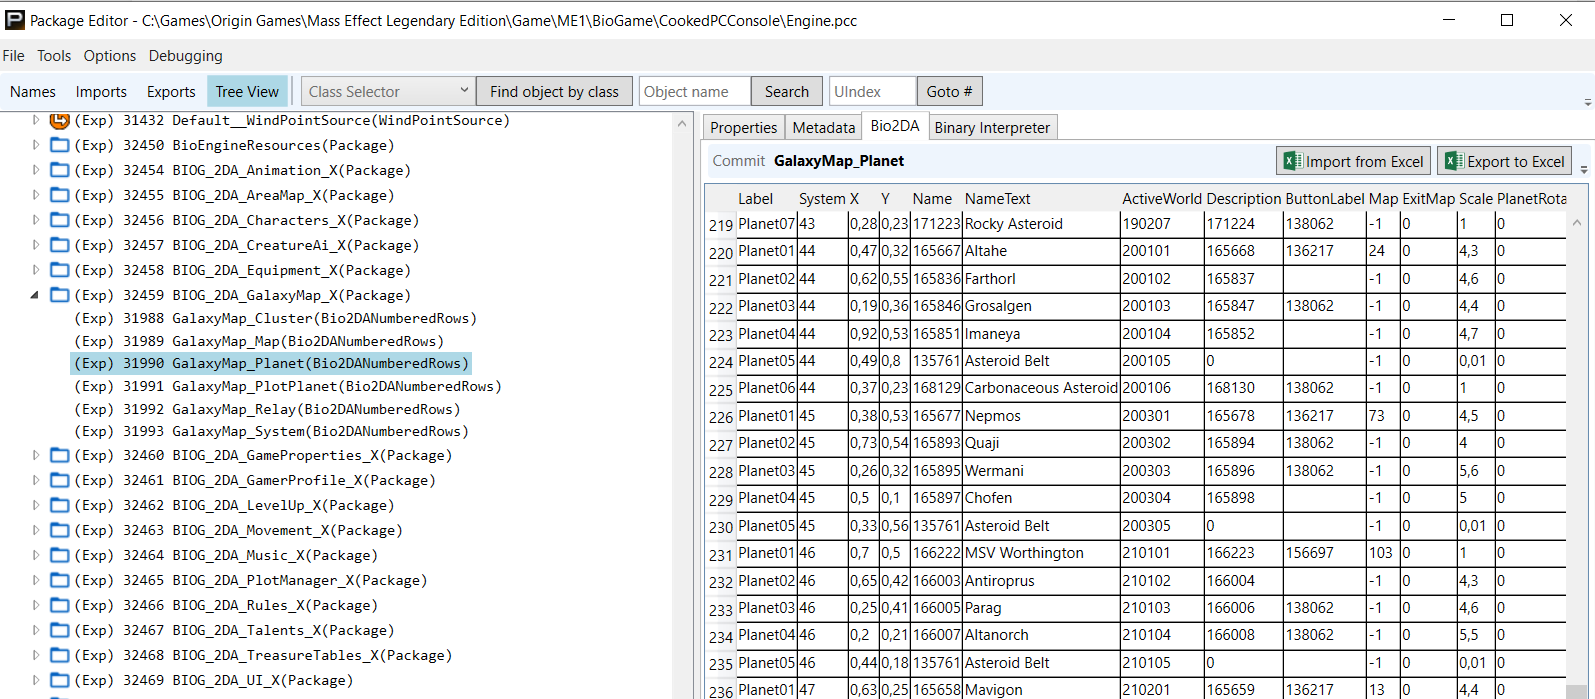
We can start from the vanilla 2DA table in Engine.pcc, and export it to excel using the relevant button in the top right corner:
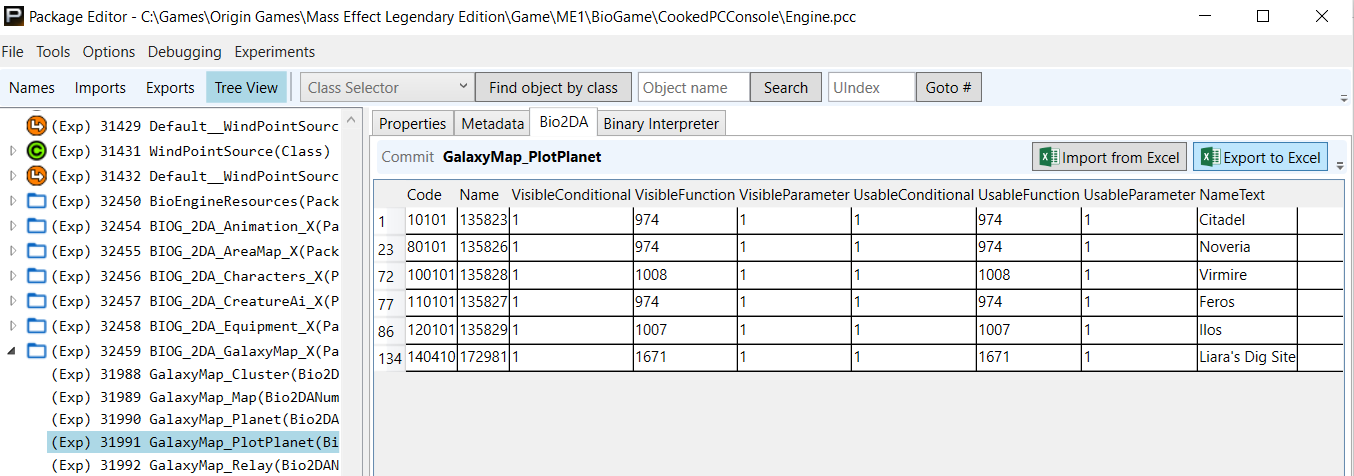
In Excel, we make the modifications we want. Here we have made some modifications to the row corresponding to Noveria (id=23), and added a new row (id=9001). I won't go into what the different columns and numbers correspond to, since this tutorial is about turning 2DA modifications into a DLC mod, assuming the author knows what to do in the 2DA table.

Once this is done, we go back to our 2DA DLC package, and we import the Excel file into the 2DA table.

The important points are:
- The overall structure of the table should be conserved. Let's not go and try to add new columns and stuff like that.
- Only the modified rows and the new ones should be left in our 2DA table. Those that are not modified should be deleted during the Excel stage.
- In case of a modified row, the 2DA index (value in the first column of the excel sheet) should obviously remain untouched, and be exactly the same as in vanilla.
- In case of a new row, the index must be a value that is not used in vanilla (including the DLC_UNC partial tables), nor in another mod.
The last point can become difficult once several mods start modifying the same tables. This is why I very highly recommend to keep a list of the indexes of modified rows, and new rows, for each modified table, and put it somewhere it can easily be accessed by other mod authors. I did this here for my ME1 mods. Maybe a database will be set up at some point in the future.
See the Bio2DA Merge documentation. The package file created above can be used and will be referenced by the mod's .m3da file. Creating a mod with Starter Kit in Mod Manager and selecting 2DAs will automatically create blank 2DA packages and set them up for use by the mod in the generated .m3da files.
The file Autoload.ini in our mod directory should contain instructions for the game to properly load the 2DA package files in our DLC mod. The DLC Starter Kit feature of Mod Manager should have automatically done this if you've used the option to add all your 2DA tables when creating the DLC mod. In case you want to see how it looks, or have created your package files manually, you can open Autoload.ini with any plain text editor.
For our example mod, it should simply include the line 2DA1=BIOG_2DA_MOD_TUTO_EARTH_GalaxyMap_X:
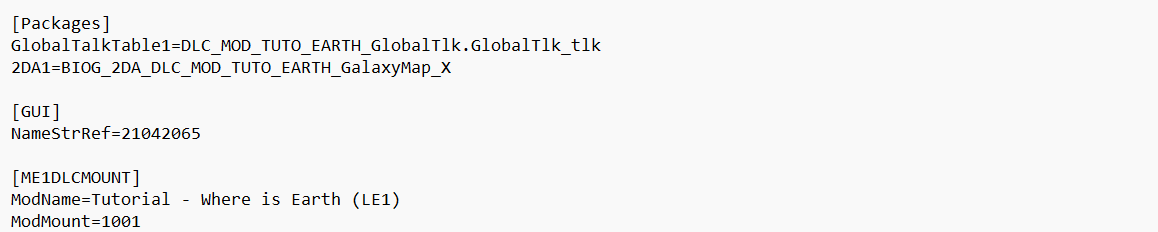
- The name used here is simply the name of the 2DA package file that we created, without the
.pccat the end. - If we modify multiple 2DA tables in the same group (e.g.
GalaxyMap_PlanetandGalaxyMap_PlotPlanet), they are in the same file. So that single line inAutoload.iniis sufficient. - If we modify 2DA tables in different groups, we have several
BIOG_2DA_MOD_package files, each of them should have its own line, like this:

Now we can install our DLC mod with mod manager, and we go check out the Galaxy Map, which is full of new exciting and extremely useful information.
