Setting up a ModuleEmissiveController - KSPSnark/IndicatorLights GitHub Wiki
What to do
To wire a ModuleEmissiveController into your part, you do the following:
- Choose the controller type you want to use.
- Note that ModuleEmissiveController is itself an abstract class-- you'll never see "ModuleEmissiveController" in any
.cfgfile. - Instead, you need to pick some specific, concrete subclass to use, depending on what functionality you want.
- List of available classes appears below.
- Note that ModuleEmissiveController is itself an abstract class-- you'll never see "ModuleEmissiveController" in any
- If this controller will be directly controlling a ModuleControllableEmissive, set its
emissiveNamefield accordingly (see discussion below). - If any other controllers will be using this controller as input, you may want to set its
controllerNamefield (see discussion below). - Set whatever additional properties the subclass may have that you've chosen.
Setting emissiveName
IndicatorLights works by having a controller driving an emissive which drives a mesh:
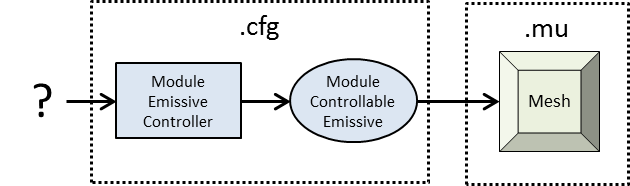
The way IndicatorLights implements that arrow from "ModuleEmissiveController" to "ModuleControllableEmissive" is via the emissiveName property. Every ModuleControllableEmissive has an emissiveName. To point your controller at it, just set your controller's emissiveName to match the emissive's emissiveName.
Here's an example: the Mk1-2 pod config that adds three crew indicators. Note that there are three controllers, and each one specifies a different emissiveName, so that each one of them controls a different emissive.
Note that your controller will drive all emissives that have the same name. For example, here's the Clamp-o-tron Sr. docking port config that adds indicators for fuel crossfeed status and docking-field state. Note that there's just one controller, and it specifies just one emissiveName, even though there are two ModuleControllableEmissives here. That's because both of them have the same emissiveName, so this controller will control both of them.
(The big docking port makes for an interesting case study. It has to use two different ModuleControllableEmissives because it has two different meshes with different names that need to be controlled. If this were just a case of having multiple meshes with the same name, such as on the Z1K battery, then one could just have a single ModuleControllableEmissive whose target value would encompass all the meshes.)
When not to set emissiveName
You should only set emissiveName if you want your controller to directly drive an emissive.
Sometimes, you don't. For example, you may have a controller whose output you want to send not to an emissive, but rather, directed to the input of another controller.
In that case, you wouldn't set emissiveName on this controller. Only the controller at the "end of the line" that actually drives the emissive would set an emissiveName.
See the example section at the end of this page to observe this principle in action.
(Why it's important not to set emissiveName in this case: You should never have two different controllers on the same part which both specify the same emissiveName. They'll both try to control the same object and will end up arm-wrestling over it, which is almost certainly not what you want.)
Setting controllerName
The controllerName field on your controller uniquely identifies it, in the same way that the emissiveName uniquely identifies an emissive. It's used by other controllers that want to use this controller as input.
However, you don't always need to set it.
First, you don't need to set it if no other controllers are using it for input. The most common case is if your controller is directly driving an emissive (i.e. you've set emissiveName on it). If nobody's trying to find you, then you don't need a name.
Second, even if another controller is using this one for input, you don't necessarily need to specify a controllerName. The other controller can simply refer to this controller by its class (e.g. "ModuleToggleLED" or whatever), rather than requiring a unique name.
The only case where you actually need to specify a controllerName is if another controller is using this one for input, and there is more than one controller of this type on the part. Then you need a controllerName in order to tell them apart.
For example, if you consider the config for the BL-01 indicator light:
- This part allows the user to customize the "on" color (which it uses a ModuleCustomColoredEmissive to do), and also to customize the "off" color (for which it uses another ModuleCustomColoredEmissive).
- Neither of those controllers directly drives an emissive. Instead, they're used as input by other controllers.
- Therefore, to tell them apart, they need to set
controllerName. One of them uses the name "activeColorSource", and the other uses the name "inactiveColorSource".
Choosing a controller type
IndicatorLights includes a variety of controllers to do all sorts of things. Decide what functionality you want, then pick the controller type that will let you do that.
Note that most controllers are designed to be very simple, and just do one thing. This is quite deliberate: it's to maximize flexibility by allowing you to wire together multiple controllers in sequence, like Lego blocks, so that you can build complex behaviors out of simple pieces. Therefore, it to achieve the desired effect, you may need to break down your desired functionality into its component pieces, choose various controllers to handle those pieces, and then wire them together appropriately. See the complex design example section below to watch this process in action.
Here's the list of currently available controller types:
- ModuleBiomeScannerIndicator: Indicates whether the current biome can be scanned or not.
- ModuleBooleanIndicator: Displays one of two colors, depending on whether an arbitrary toggle input is true or false.
- ModuleConverterIndicator: On/off indicator showing when a resource converter is active.
- ModuleCrewIndicator: On/off indicator showing when a crew slot is occupied. Color indicates profession of occupant.
- ModuleCrewIndicatorToggle: An input toggle with UI and action groups, useful for toggling sets of crew indicators on/off at once. (Does not directly drive emissives itself.)
- ModuleCustomBlink: Blinking animation with editor UI that allows the player to customize the behavior.
- ModuleCustomColoredEmissive: A simple constant color, with editor UI that allows the player to pick the color via UI sliders.
- ModuleDataTransmitterIndicator: Shows whether an antenna is currently transmitting science.
- ModuleDockingCrossfeedIndicator: A bi-state indicator that shows whether a docking port's fuel crossfeed is enabled or not.
- ModuleDockingStateIndicator: An indicator that shows when a docking port's docking field is engaged.
- ModuleIndicatorToggle: A general-purpose input toggle with UI and action groups, useful as a control input for other controllers. (Does not directly drive emissives itself.)
- ModuleOrbitalSurveyorIndicator: Shows the status of an orbital surveyor (e.g. can it take a scan or not).
- ModuleReactionWheelIndicator: Shows the status of a reaction wheel: its mode, whether it's turned on, whether it has electricity.
- ModuleResourceEnabledIndicator: A bi-state indicator that shows whether a resource container is enabled.
- ModuleResourceLevelIndicator: A color-coded indicator that shows how full a resource container is.
- ModuleResourceScannerIndicator: Indicates the relative degree of resource concentration found by the scanner: none, low, medium, high.
- ModuleScalarIndicator: Displays one of several colors, depending the value of an arbitrary scalar input is true or false.
- ModuleScienceAvailabilityIndicator: Shows that science is available to acquire in the current location.
- ModuleScienceContainerIndicator: Uses color to display the data content of a science container (such as the "science box" introduced in KSP 1.2).
- ModuleScienceDataIndicator: Uses color to display the data content of a science instrument.
- ModuleToggleLED: An on/off toggle that the player can activate via right-click menu or action group.
(Note that the above list is growing as IndicatorLights expands. If you can't find the controller type that you need in this list, please post in the IndicatorLights forum thread to ask about it! Feature requests are welcome.)
Case study: Connecting controllers to get complex behaviors
Let's take a look at a the BL-01 Indicator Light. It has a fairly sophisticated set of behaviors, but they're built up from very simple components wired together in a specific way. Let's walk through the design process, starting with "here's what I want it to do."
The desired behavior
- I want an on/off lamp that the player can toggle, the same way they can turn regular lights on/off (i.e. with similar UI hooks and action groups).
- In the vehicle editor, I want the player to be able to customize the "on" color with RGB sliders.
- Also in the vehicle editor, I want to be able to customize the "off" color, too.
- I want the light to be able to blink, with UI options that let the player customize the blinking.
- When the light is turned on via the main toggle, I want it to blink if blink mode is active. But when the light is turned off, it should just be off (regardless of whether blink mode is turned on or not).
- While the light is actively blinking, I want the two colors that it's alternating to be the "on" and "off" colors that the player customized.
The "circuit diagram"
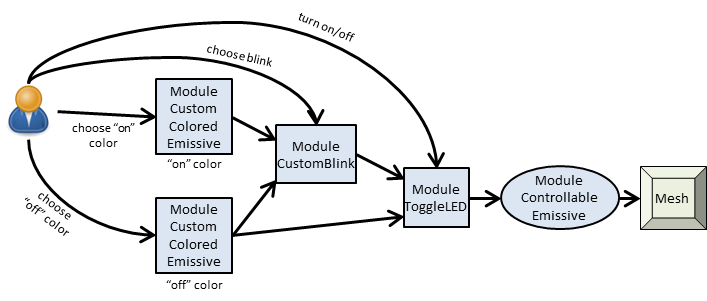
Let's walk through how this works:
- We need two custom colors with UI sliders (behaviors #2 and #3).
- That's what ModuleCustomColoredEmissive does.
- So we'll add two of them (one for each customizable color).
- They're inputs to other controllers, not directly driving emissives themselves, so we don't set
emissiveNameon either one. - However, the other controllers are going to need to tell them apart, so we need to set
controllerNameon each. Let's call one of them "activeColorSource", and the other one "inactiveColorSource".
- We want to have a customizable blink action, with UI for the player to set it up (behavior #4).
- That's what ModuleCustomBlink does, so we'll add one.
- We want its UI to show up below the color sliders in the UI, so we make sure to put it after the ModuleCustomColoredEmissives in the
.cfgfile. - This module requires us to tell it "what are the two colors I should blink between?" In this case, we want those two colors to be the output of the two ModuleCustomColoredEmissives (behavior #6 in the list above).
- Therefore, we set its
onColor = activeColorSourceandoffColor = inactiveColorSource. - It's worth taking note of what we just did there: some magic just happened. The
onColorandoffColorfields on ModuleCustomBlink are actually in ColorSource syntax. We could have said "#FFFFFF" and "#000000" for these two fields if we wanted it to just blink between black and white, for example. However, by providing the names of the other modules, we created a "reference" ColorSource. That makes it use the output of the other modules as its own inputs. - We don't want this module to directly drive the light. So we don't set an
emissiveNameon it. - Why don't we want it to drive the light? Because of desired behavior #5. If the ModuleCustomBlink were driving the light, the light would be blinking even when the main toggle is turned off, which is what we don't want. The main toggle is the ultimate authority, so it needs to be the one that's "in charge".
- We are going to be using the output of this control to drive another ... but since this is the only ModuleCustomBlink on this part, we can just refer to it by its class name and don't need to set a
controllerNameon it.
- Finally, we come to the actual "main toggle" that the player uses to turn the light on an off (behavior #1).
- That's what ModuleToggleLED does, so we add one of those.
- We want the "Toggle LED" UI item to be at the top of the UI (above the sliders for customizing color), so we put this module first in the
.cfgfile, before any of the others. - It needs two inputs: one for when it's on, one for when it's off.
- When it's on, we show the output from the blink module. So we set
activeColor = ModuleCustomBlink. - When it's off, it shows whatever the custom "off" color is. So we set
inactiveColor = inactiveColorSource. - This module is the one that's actually controlling the emissive, so we set
emissiveName = light(we use "light" because that's the name of the ModuleControllableEmissive we've added).
Put it all together, and here's the config for the part!
What if?
It's an interesting exercise to consider how we could easily make all sorts of custom changes to the light's behavior, just by tweaking the config a little. Let's consider some alternate scenarios:
- What if I wanted the "off" color to be just "off", and not customizable via sliders?
- What if I wanted it to always blink when the blink mode is turned on, even if the "main switch" is turned off?
- Just swap the positions of the ModuleCustomBlink and the ModuleToggleLED in the circuit diagram above.
- What if I didn't want any blinking?
- Get rid of the ModuleCustomBlink.
- On the ModuleToggleLED, change it to
activecolor = activeColorSource.
- What if I wanted it to just blink all the time it's on, in a 100-millisecond on/off pattern, with no player customization?
- Get rid of the ModuleCustomBlink.
- In the ModuleToggleLED, change
activeColorso that instead of sayingModuleCustomBlink, it instead saysblink(activeColorSource,100,inactiveColorSource,100).