Migrating Galil motors from SECI to IBEX - ISISComputingGroup/ibex_developers_manual GitHub Wiki
Wiki > Deployment > Migrate an Instrument Control PC > Migrating Galil Motors from SECI to IBEX
Wiki > The Backend System > IOCs > Motor IOCs > Galil > Migrating Galil Motors from SECI to IBEX
Physical setup (serial to ethernet conversion)
Under SECI, motors are controlled via a serial connection. The IBEX Galil IOC only works properly with an ethernet connection, so the motors need to be migrated.
Network Configuration
- SECI VI needs to be converted from serial to ethernet: In the Galil Labview VI, switch the Communication protocol from RS232 to TCP and enter the appropriate network address (see below)
- Physical private network, e.g. network switches need to be installed. This is done by another group; make sure they are warned well in advance so that any bits of kit are available when we need them
- The Galil controllers need to be patched through from the blockhouse to the private network ports on the switch.
The motors are assigned IP addresses on the private network in the following way (this is a convention, whoever set up the private network should have set it up like this, if it doesn't look like it's working then check with them):
GALIL_01 -> 192.168.1.201
GALIL_02 -> 192.168.1.202
GALIL_03 -> 192.168.1.203
...
An IP address needs to be assigned to the Galil controller, you need to do this via a serial connection using e.g. hyperterminal. After setting an appropriate IP address you also need to "burn" the information into non-volatile memory or else the IP address will be lost of power cycle. For example:
IA 192,168,1,201
BN
To see the current IP address you can type either IA? or TH
Physical Cabling
In addition to configuring the network, this requires the Galil controllers in the blockhouse need to be physically patched through to the private ports on the NDH machine's network switch.
Below is a diagram of an example setup for the cabling on a fictional instrument:
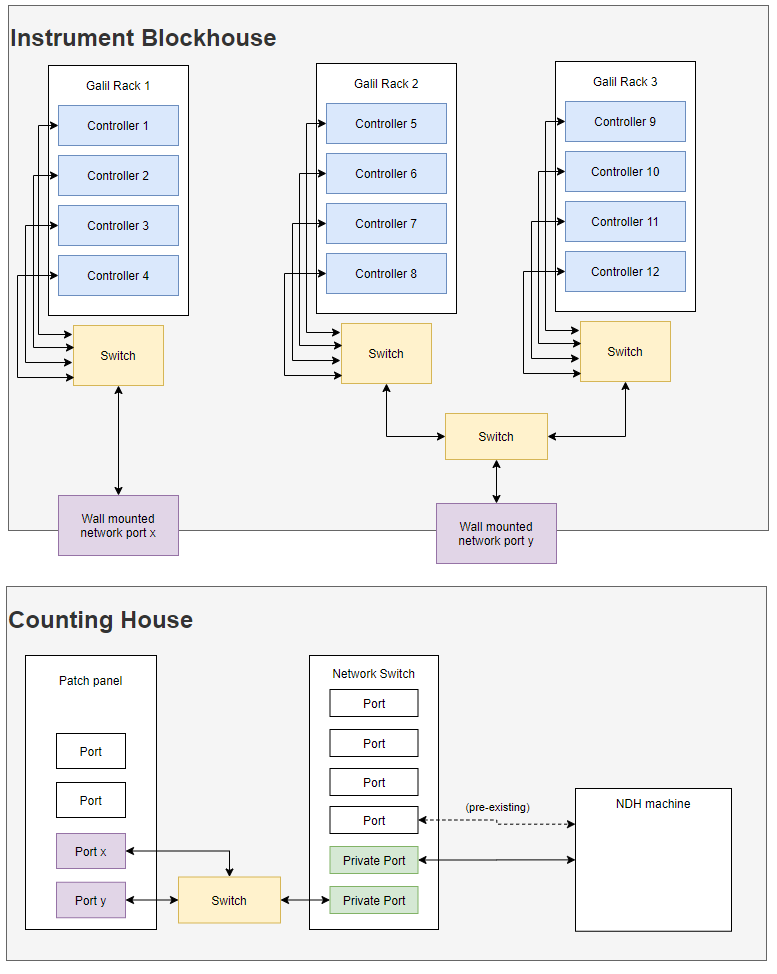
Notes
- Lines represent Ethernet cables
- The counting house which contains the NDH machine is often located in or adjacent to the instrument cabin (but not always)
- There are two notable bottlenecks which may require intermediate switches depending on the number of Galil controllers present:
- Free ports in the block house near the racks (purple in the diagram)
- Private network ports (green in the diagram)
Preparation steps (if possible)
- Find out where the racks are located within the block house
- Find out where free network ports are located within the block house
- Find out where the network switch with private ports is in relation to the patch panel
- Ask FIT to configure private ports on network switch (minimum of 2 - one for the NDH machine, one for the Galils)
- Burn IP address into Galil as detailed above
- Plan how to patch all controllers through to the private network ports and note the number of switches and the number / length of cables required
Installation
- Get the appropriate cables / switches from the store room (currently located in R6, entrance by the mound opposite R2, then the first door on the left)
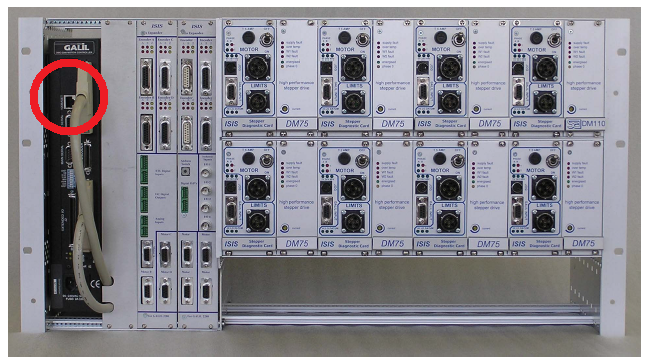
- In the blockhouse:
- find the Galil racks. They are big racks with several controllers inside (see picture of controller above - Ethernet port highlighted)
- Install any switches needed (plug them into a mains socket, make sure they light up)
- Wire up the controllers to the switches / directly to wall ports
- Note the number on the the wall ports used as they correspond to the port in the counting house. Label the used port with "private network" (otherwise people may try to just plug a different device into the port later which may not work)
- In the counting house
- Connect the corresponding port(s) on the patch panel leading to the block house to private port(s) on the network switch. Label each cable with the controllers it connects to (e.g.
MOT01-04) - Install an additional Ethernet cable between the instrument PC and one of the private ports on the network switch
- Connect the corresponding port(s) on the patch panel leading to the block house to private port(s) on the network switch. Label each cable with the controllers it connects to (e.g.
- After all the cables have been connected, you can confirm the PC is talking to each Galil controller by pinging their network addresses (assuming they have been configured already) i.e.
ping 192.168.1.201for controller 1ping 192.168.1.202for controller 2- etc.
- If any of the controllers are not responding, look at the cabling again to diagnose any issues with the physical connection (e.g. cable is damaged or not plugged in properly, switch not powered on, etc.) and repeat. You can plug a laptop into intermediate ports and try pinging from there to help narrow down the source of the issue.
GALIL macros
For each GALIL IOC that you need to use, you need to set the GALILADDR and MTRCTRL macros. The MTRCTRL macro will set where the motor appears in the table of motors and the GALILADDR sets the IP.
e.g. if you are setting up GALIL_02, the GALILADDR macro should be set to 192.168.1.202 and MTRCTRL will probably be set to 2.
GALIL configuration file
In the configurations/galil directory, you need to create galilxx.cmd files. These files define the behaviour of a galil controller in terms of the homing modes and other settings.
For example, if you were setting up galil 2 on POLARIS, you would create \\Ndxpolaris\c$\Instrument\Settings\config\NDXPOLARIS\configurations\galil\galil02.cmd
The contents of this file looks like the following:
## configure galil crate 2

## passed parameters
##   GCID - galil crate software index. Numbering starts at 0 - will always be 0 if there is one to one galil crate <-> galil IOC mapping
##   GALILADDR - address of this galil

## see README_galil_cmd.txt for usage of commands below

#G21X3Config($(GCID),"$(GALILADDR)",8,2100,2000)
GalilCreateController("Galil", "$(GALILADDR)", 20)

#G21X3NameConfig($(GCID),"A",0,0,0,0,0,1,"",0,0,"",1,0)
#G21X3NameConfig($(GCID),"B",0,0,0,0,0,1,"",0,0,"",1,0)
#G21X3NameConfig($(GCID),"C",0,0,0,0,0,1,"",0,0,"",1,0)
#G21X3NameConfig($(GCID),"D",0,0,0,0,0,1,"",0,0,"",1,0)
#G21X3NameConfig($(GCID),"E",0,0,0,0,0,1,"",0,0,"",1,0)
#G21X3NameConfig($(GCID),"F",0,0,0,0,0,1,"",0,0,"",1,0)
#G21X3NameConfig($(GCID),"G",0,0,0,0,0,1,"",0,0,"",1,0)
#G21X3NameConfig($(GCID),"H",0,0,0,0,0,1,"",0,0,"",1,0)
GalilCreateAxis("Galil","A",1,"",1)
GalilCreateAxis("Galil","B",1,"",1)
GalilCreateAxis("Galil","C",1,"",1)
GalilCreateAxis("Galil","D",1,"",1)
GalilCreateAxis("Galil","E",1,"",1)
GalilCreateAxis("Galil","F",1,"",1)
GalilCreateAxis("Galil","G",1,"",1)
GalilCreateAxis("Galil","H",1,"",1)

epicsEnvSet "HOME_HEADER" "$(GALIL)/gmc/galil_Default_Header.gmc"
epicsEnvSet "HOME_MODE_1" "$(GALIL)/gmc/galil_Home_RevLimit.gmc"
epicsEnvSet "HOME_MODE_2" "$(GALIL)/gmc/galil_Home_RevLimit.gmc"
epicsEnvSet "HOME_MODE_3" "$(GALIL)/gmc/galil_Home_ForwLimit.gmc"
epicsEnvSet "HOME_MODE_4" "$(GALIL)/gmc/galil_Home_RevLimit.gmc"
epicsEnvSet "HOME_MODE_5" "$(GALIL)/gmc/galil_Home_Dummy_Do_Nothing.gmc"
epicsEnvSet "HOME_MODE_6" "$(GALIL)/gmc/galil_Home_Dummy_Do_Nothing.gmc"
epicsEnvSet "HOME_MODE_7" "$(GALIL)/gmc/galil_Home_Dummy_Do_Nothing.gmc"
epicsEnvSet "HOME_MODE_8" "$(GALIL)/gmc/galil_Home_Dummy_Do_Nothing.gmc"
epicsEnvSet "HOME_FOOTER" "$(GALIL)/gmc/galil_Default_Footer.gmc"

GalilStartController("Galil","$(HOME_HEADER);$(HOME_MODE_1)!$(HOME_MODE_2)!$(HOME_MODE_3)!$(HOME_MODE_4)!$(HOME_MODE_5)!$(HOME_MODE_6)!$(HOME_MODE_7)!$(HOME_MODE_8);$(HOME_FOOTER)",0,0,3)

# Ensure there is a newline at the end of the file!
Typically the only line you will need to pay careful attention to is the last (non-commented) line. This defines the homing modes of the various galils. The structure of this line is that it has a standard header ($(GALIL)/db/galil_Default_Header.gmc;), followed by 8 homing modes regardless of the number of physical axes present (use galil_Home_Dummy_Do_Nothing.gmc for non-existent axes), followed by a standard footer ($(GALIL)/gmc/galil_Default_Footer.gmc). Pay close attention to the positions of the ! and ; characters.
This last line can be made clearer by setting each of the homing modes as an environment variable, and referencing these in the call to GalilStartController. An example of this can be found in the galil01.cmd file of LOQ:
epicsEnvSet "HOME_HEADER" "$(GALIL)/gmc/galil_Default_Header.gmc"
epicsEnvSet "HOME_MODE_1" "$(GALIL)/gmc/galil_Home_RevLimit.gmc"
epicsEnvSet "HOME_MODE_2" "$(GALIL)/gmc/galil_Home_RevLimit.gmc"
epicsEnvSet "HOME_MODE_3" "$(GALIL)/gmc/galil_Home_ForwLimit.gmc"
epicsEnvSet "HOME_MODE_4" "$(GALIL)/gmc/galil_Home_RevLimit.gmc"
epicsEnvSet "HOME_MODE_5" "$(GALIL)/gmc/galil_Home_Dummy_Do_Nothing.gmc"
epicsEnvSet "HOME_MODE_6" "$(GALIL)/gmc/galil_Home_Dummy_Do_Nothing.gmc"
epicsEnvSet "HOME_MODE_7" "$(GALIL)/gmc/galil_Home_Dummy_Do_Nothing.gmc"
epicsEnvSet "HOME_MODE_8" "$(GALIL)/gmc/galil_Home_Dummy_Do_Nothing.gmc"
epicsEnvSet "HOME_FOOTER" "$(GALIL)/gmc/galil_Default_Footer.gmc"

GalilStartController("Galil","$(HOME_HEADER);$(HOME_MODE_1)!$(HOME_MODE_2)!$(HOME_MODE_3)!$(HOME_MODE_4)!$(HOME_MODE_5)!$(HOME_MODE_6)!$(HOME_MODE_7)!$(HOME_MODE_8);$(HOME_FOOTER)",0,0,3)
The homing modes available under IBEX can be seen in C:\Instrument\Apps\EPICS\support\galil\master\gmc and explanations of each are in the file readme.md in the same directory. You should select the homing mode under IBEX which corresponds to the homing mode under SECI, which can be found using the VI in \\ndxINSTRUMENT\C$\LABVIEW MODULES\Drivers\Galil DMC2280\Galil - System Functions.llb. Open up the Galil - Setup Dialog.vi and run the VI. You should now be able to see the "Home method" for all the various Galils/Axes.
If you're still unsure which homing method to use, check with the instrument scientists what the expected behaviour is.
Copy across the motor setup
There is a LabVIEW VI in C:\LABVIEW MODULES\Drivers\Galil DMC2280\Galil - EPICS.llb that will generate a series of caput commands to copy the Labview configuration into EPICS. This will need to be updated before it runs; to do this either
- a) If you are confident using source safe on an instrument then update as normal.
- b) Otherwise:
-
- Remote desktop to DEMO
-
- Open Microsoft Visual SourceSafe from start by right-clicking, selecting run-as, and using the domain account which is detailed on the passwords page. The correct account has a comment
Archive writing account, ...in the comment field of the passwords page.
- If the main interface doesn't appear (looks a bit like an old file browser) make sure that the share can be opened in file explorer.
- Open Microsoft Visual SourceSafe from start by right-clicking, selecting run-as, and using the domain account which is detailed on the passwords page. The correct account has a comment
-
- Find in the interface the file
Galil - EPICS.llbunderRay Of Light LabVIEW Modules\Drivers\Galil DMC2280\
- Find in the interface the file
-
- Right click and then select
Get Latest version
- Right click and then select
-
- Click OK on get dialogue
-
- Copy only the file
Galil - EPICS.llbto the instrument you are migrating
- Copy only the file
-
Open this VI, put the computer name as IN and the username as (INSTNAME):MOT, replacing (INSTNAME) with the name of your instrument, for example WISH:MOT for WISH. This should generate a load of caput commands that look like caput IN:(INSTNAME):MOT:MTR0101.(FIELD) (value). If the VI complains about problems with the wiring names in a bundle it probably because the Galil driver is out of date. You can fix this by copying the settings to a more modern version of the galil driver directory and then running it.
Copy these caput commands into a batch file. Look through the file for the extra checks you need to do.
- Check ticket #5654 to make sure fixes have been made otherwise do the fixes manually.
- At the top set a echo to make sure that it is run intentionally and a pause and wait for the user to press a key.
- For initialisation commands (i.e. in the Initialisation box on the SECI motor setup) these can be added to a
.PREMfield note that they should be specific to the axis so they may need to be moved, e.g.KSAshould be on axis01.
Make sure the motors can be homed or are at zero or are not connected then open an EPICS terminal and run that batch file. They need to be at 0/disconnected/can be homed because setting a motor/encoder resolution will change the positions set in the galil. This will apply the settings to the Galil under IBEX. These settings should then be autosaved but you must wait at least 30s after applying the value before restarting the IOC if you need to restart the IOC. You can also run the script on simulated motors but be aware you must run the use encoder setting again once talking to real motors. This means positions will not be reapplied when resolution is changed.
Now test both the homing and positions to make sure they are the same as in Labview. This appears not to work correctly with absolute encoders so double check these axes see ticket 2985.
- If the home offset was set in Labview you need to home if you switch from Labview to IBEX. If you think this is going to be an issue for the scientists then you should consider leaving the HOMEVAL set to the value and set the offset to zero for a cycle while they get used to IBEX. Be aware though this will mean that on home this causes the bench to drift.
- If a backlash is set then you need to test that the axis goes to a correct place in both directions. The backlash works differently in SECI and so the setting can hide an error. You should see that the axis get to the final place within 2 retries (ideally no retries).
Do be sure to check this spreadsheet to see if there are any odd behaviours, such as programs to run. This is also an opportunity to check that differences won't be highlighted by the homing routines. There is more information available on the SECI homing routines
Finally also check for dual position stage axes
Dual position stage Axis
Some Galil axes under SECI have the dual position stage box ticked this means that instead of executing a move they execute a jog in the desired direction. To configure these in IBEX you should create a motion setpoint and then set the motion set point to the two extreme ends of the axes. If possible put the two ends of travel just inside the limits, we should avoid triggering the limit switches when possible. You may need to perform a jog to find out what these positions are. You should set up a home routine at one end of the axis or the other. After this tell the scientists:
- They will no longer see limit lights at both ends of the travel
- They may need to occasionally home the axis (as they should do with other axes)
Set up any axes / jaws / barndoors files.
These files are instrument specific. If you're unsure how to set these files up, ask the developer who originally wrote that part of the system to clarify how they should be setup. Also get them to add this information to the wiki and release notes!