Main Panels - GeorgeGiannopoulos/StimuliXpert GitHub Wiki

Table of contents
| Main Panels | Emotiv Status | Stimuli Files | Stimuli Control | Record Options | Hidden Menu |
|---|
Main Panels
| Panel | Action |
|---|---|
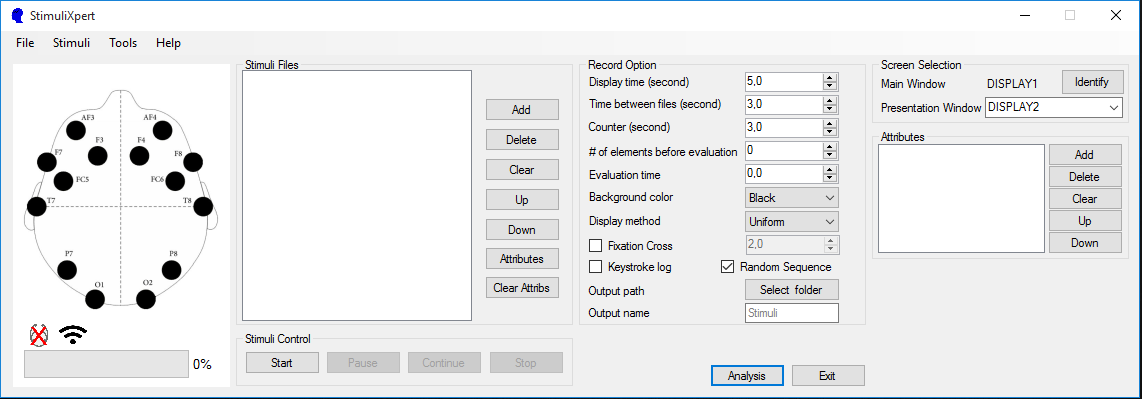
| Emotiv Status | Displays Connectivity/Battery/Signal status |
| Stimuli Files | Select/Reorder the Stimuli Files or Control the experiment |
| Record Options | Select the recording option of the experiment |
| Hidden Menu | Select between Different Screens, Set Attributes to audiovisual files |
Emotiv Status
| Icons | Action |
|---|---|
| Emotiv Channel Status | Displays the status of each of the 14 channels |
| Emotiv Connectivity | Displays Connectivity Status |
| Emotiv Battery Percentage | Displays Battery Percentage |
| Emotiv Signal Strength | Displays Signal Strength |
Stimuli Files
| Button | Action |
|---|---|
| Add | Add media files in the list for presentation |
| Delete | Delete selected media files from the list |
| Clear | Clear media files from the list |
| Up | Move one row to the top the selected files |
| Down | Move one row to the bottom the selected files |
| Attribute | Assign attribute values to the audiovisual files |
| Clear Attribs | Clear all attribute values |
Stimuli Control
| Button | Action |
|---|---|
| Start | Start media presentation and emotiv recording |
| Pause | Pause media presentation and emotiv recording |
| Continue | Continue media presentation and emotiv recording |
| Stop | Stop media presentation and emotiv recording |
Warning: It is not recommended to pause the experiment because the program continues to record the EEG data and append them to the final file
Note: The user can use the mouse or keyboard to change the audiovisual file list (e.g. Drag n Drop, Delete Button) Also, the user can pause or continue the experiment using the space bar or the Esc key respectively
Record Options
| Variables | Action |
|---|---|
| Display time | Set presentation time for images* |
| Time between files | Set the waiting time between the audiovisual files |
| Counter | Set the counter down time (plus 1 second for loading) |
| # of elements before evaluation | Set the # of files between evaluation images* |
| Evaluation time | Set the duration of every evaluation image |
| Background color | Set the color of the presentation’s background |
| Fixation Cross | Displays a "fixation cross" before each stimulus |
| Display method | Select aspect radio |
| Keystroke log | Logs keystrokes in a csv file* |
| Random sequence | Displays the audiovisual files with a random order |
| Output path | Output path for recorded EEG and keystrokes' csv files |
| Output name | Set the name of the output files* |
Notes:
- The Duration of videos and sounds equals to the original duration of each file
- The evaluation images reside under .\Resources\Images\Evaluation_Images
- The subject can use Keystrokes to describe the emotional arousal & valence in real time (A mouse or a digitizer can be used too)
- Date and time of the experiment are appended to the output file
Hidden Menu:
The main window contains the necessary elements and options that help the user to conduct an experiment. However, there are some hidden options that the user can select in order prior to running the experiment. The user can navigate to tools -> different screen or tools -> attributes, which respectively display two new element in the main window:

| Panel | Action |
|---|---|
| Screen Selection | Select between Different Screens |
| Attributes | Set Attributes to audiovisual files |
Screen Selection
This option is only available on multi-monitor systems and helps the user to improve the experience of the experiments. The user can select the screen in which the StimuliXpert main window is located and then from the hidden menu Screen Selection to select the secondary screen in which the audiovisual files will be presented. This option is useful in cases where the user wants to control the experiment so he/she can Start, Stop, Pause or Continue the audiovisual Stimulus or check the status of the Emotic headset
| Button | Action |
|---|---|
| Identify | Displays a unique number on each monitor |
| Drop-Down menu | Select the secondary screen |
Attributes
This element is related to the attributes that the user can assign to the audiovisual files.
| Button | Action |
|---|---|
| Add | Add a new attribute by name and values (comma separated list) |
| Delete | Delete an attribute |
| Clear | Clear all attributes |
| Up | Move one row to the top the selected attribute |
| Down | Move one row to the bottom the selected attribute |
Note: For more information about attributes go here